上文我们介绍如何配置用objection detection API实现实时目标检测的环境(原文链接),在这里,我们将给大家介绍如何如何自己动手做一个目标检测系统来实现对图像的识别。
一、准备图片
在这里博主想要实现的是使用API来对手机进行检测,因此我们首先需要从网上下载一定数量的手机图片,将其保存在文件夹中(这里需要注意的是,我们下载的图片都需要为.jpg格式,原因我们会在下文讲到)。
二、数据集生成
因为我们之前下载的图片并没有标签,所以我们需要手工对图片进行标注,即手工对图片中的手机进行定位并对其标注。在这里,博主使用的标注工具是labelImg_windows_v1.5.1,这个工具使用较为方便且无需安装(下载地址,下载需要积分,如果不想用积分的可以在文章末尾进行评论我私发给你~ )。当然,除此以外也可以自己安装图片的标准工具,这个方法比较麻烦,但也可以实现目标,感兴趣的可以看一下这篇文章《图像标注工具labelImg安装方法》,博主说的非常详细,在这里我就不再赘述了。
将我们下载得到的labelImg_windows_v1.5.1文件进行解压,然后直接打开其中的可执行文件即可。我们在窗口的左半部分设置图片的打开保存路径,然后选用矩形框将手机进行框选并标注即可。
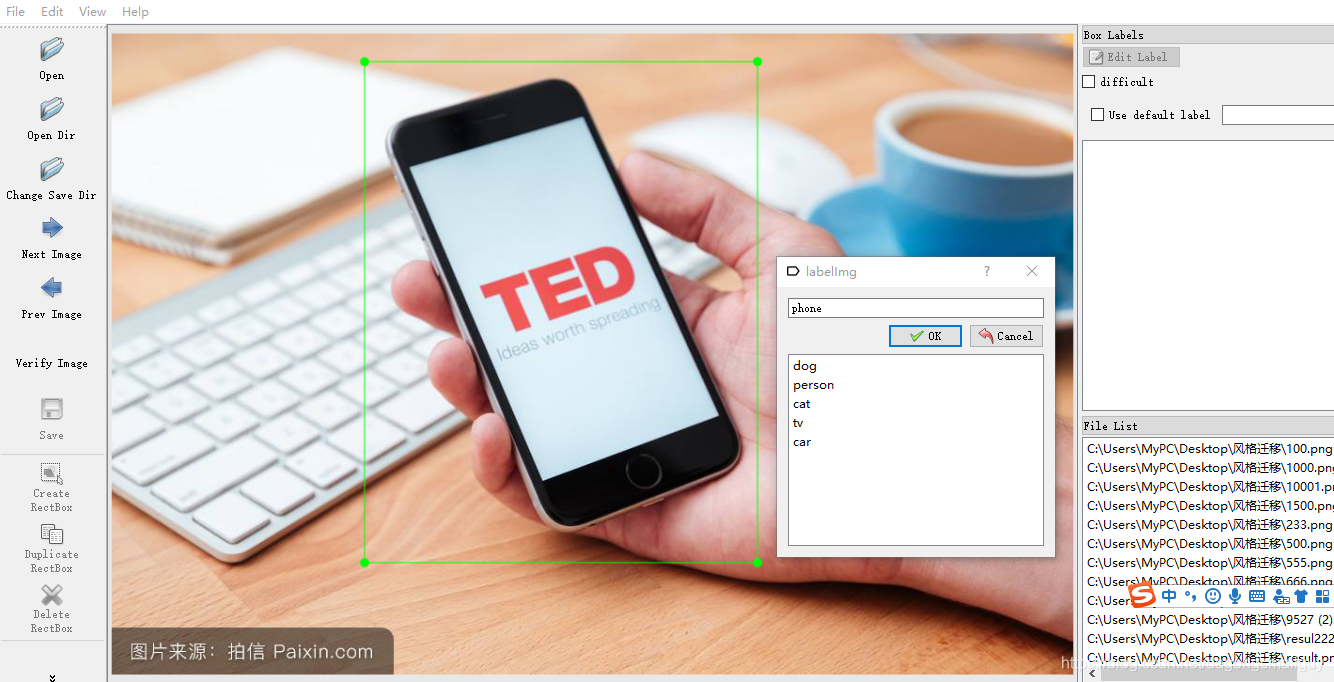
依次对之前我们下载的所有的图片进行标注,我们发现经过处理之后生成了后缀名为xml的文件,这个文件就是我们所用到的数据。
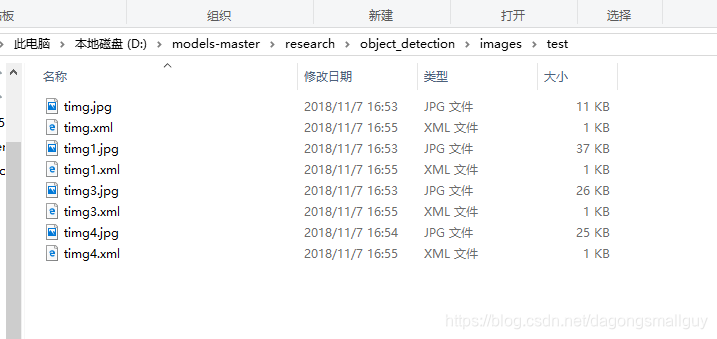
对于得到的数据,我们将其分成测试集和训练集两个部分,保存在文件夹image中。至此,我们已经完成了数据集的准备工作。
三、修改文件参数
在这里我,我们选择使用ssd进行目标检测,需要对ssd_mobilenet_v1_pets.config中的相关参数进行修改。因此在这里我们只检测了一个类别(手机),所以我们将第九行类别的数目设置为1,修改后的代码如下:
# SSD with Mobilenet v1, configured for Oxford-IIIT Pets Dataset.
# Users should configure the fine_tune_checkpoint field in the train config as
# well as the label_map_path and input_path fields in the train_input_reader and
# eval_input_reader. Search for "PATH_TO_BE_CONFIGURED" to find the fields that
# should be configured.

model {
  ssd {
    num_classes: 1
    box_coder {
      faster_rcnn_box_coder {
        y_scale: 10.0
        x_scale: 10.0
        height_scale: 5.0
        width_scale: 5.0
      }
    }
    matcher {
      argmax_matcher {
        matched_threshold: 0.5
        unmatched_threshold: 0.5
        ignore_thresholds: false
        negatives_lower_than_unmatched: true
        force_match_for_each_row: true
      }
    }
    similarity_calculator {
      iou_similarity {
      }
    }
    anchor_generator {
      ssd_anchor_generator {
        num_layers: 6
        min_scale: 0.2
        max_scale: 0.95
        aspect_ratios: 1.0
        aspect_ratios: 2.0
        aspect_ratios: 0.5
        aspect_ratios: 3.0
        aspect_ratios: 0.3333
      }
    }
    image_resizer {
      fixed_shape_resizer {
        height: 300
        width: 300
      }
    }
    box_predictor {
      convolutional_box_predictor {
        min_depth: 0
        max_depth: 0
        num_layers_before_predictor: 0
        use_dropout: false
        dropout_keep_probability: 0.8
        kernel_size: 1
        box_code_size: 4
        apply_sigmoid_to_scores: false
        conv_hyperparams {
          activation: RELU_6,
          regularizer {
            l2_regularizer {
              weight: 0.00004
            }
          }
          initializer {
            truncated_normal_initializer {
              stddev: 0.03
              mean: 0.0
            }
          }
          batch_norm {
            train: true,
            scale: true,
            center: true,
            decay: 0.9997,
            epsilon: 0.001,
          }
        }
      }
    }
    feature_extractor {
      type: 'ssd_mobilenet_v1'
      min_depth: 16
      depth_multiplier: 1.0
      conv_hyperparams {
        activation: RELU_6,
        regularizer {
          l2_regularizer {
            weight: 0.00004
          }
        }
        initializer {
          truncated_normal_initializer {
            stddev: 0.03
            mean: 0.0
          }
        }
        batch_norm {
          train: true,
          scale: true,
          center: true,
          decay: 0.9997,
          epsilon: 0.001,
        }
      }
    }
    loss {
      classification_loss {
        weighted_sigmoid {
          anchorwise_output: true
        }
      }
      localization_loss {
        weighted_smooth_l1 {
          anchorwise_output: true
        }
      }
      hard_example_miner {
        num_hard_examples: 3000
        iou_threshold: 0.99
        loss_type: CLASSIFICATION
        max_negatives_per_positive: 3
        min_negatives_per_image: 0
      }
      classification_weight: 1.0
      localization_weight: 1.0
    }
    normalize_loss_by_num_matches: true
    post_processing {
      batch_non_max_suppression {
        score_threshold: 1e-8
        iou_threshold: 0.6
        max_detections_per_class: 100
        max_total_detections: 100
      }
      score_converter: SIGMOID
    }
  }
}

train_config: {
  batch_size: 8
  optimizer {
    rms_prop_optimizer: {
      learning_rate: {
        exponential_decay_learning_rate {
          initial_learning_rate: 0.004
          decay_steps: 800720
          decay_factor: 0.95
        }
      }
      momentum_optimizer_value: 0.9
      decay: 0.9
      epsilon: 1.0
    }
  }
  fine_tune_checkpoint: "ssd_mobilenet_v1_coco_11_06_2017/model.ckpt"
  from_detection_checkpoint: true
  # Note: The below line limits the training process to 200K steps, which we
  # empirically found to be sufficient enough to train the pets dataset. This
  # effectively bypasses the learning rate schedule (the learning rate will
  # never decay). Remove the below line to train indefinitely.
  num_steps: 1000
  data_augmentation_options {
    random_horizontal_flip {
    }
  }
  data_augmentation_options {
    ssd_random_crop {
    }
  }
}

train_input_reader: {
  tf_record_input_reader {
    input_path: "data/train.record"
  }
  label_map_path: "training/object-detection.pbtxt"
}

eval_config: {
  num_examples: 40
  # Note: The below line limits the evaluation process to 10 evaluations.
  # Remove the below line to evaluate indefinitely.
  # max_evals: 10
}

eval_input_reader: {
  tf_record_input_reader {
    input_path: "data/test.record"
  }
  label_map_path: "training/object-detection.pbtxt"
  shuffle: false
  num_readers: 1
}
同样的,我们需要设置一下object-detection.pbtxt中的相关参数,只保留一个标签,且将其改为phone。修改后代码如下:
item {
          id: 1
          name: 'phone'
        }
接下来,我们对train_generate_tfrecord.py和test_generate_tfrecord.py中的也进行修改,只保留一个标签即可。修改后的train_generate_tfrecord.py文件代码如下:
"""
Usage:
  # From tensorflow/models/
  # Create train data:
  python generate_tfrecord.py --csv_input=data/train_labels.csv  --output_path=data/train.record

  # Create test data:
  python generate_tfrecord.py --csv_input=data/test_labels.csv  --output_path=data/test.record
"""
from __future__ import division
from __future__ import print_function
from __future__ import absolute_import

import os
import io
import pandas as pd
import tensorflow as tf

from PIL import Image
from object_detection.utils import dataset_util
from collections import namedtuple, OrderedDict

flags = tf.app.flags
flags.DEFINE_string('csv_input', 'data/train_labels.csv', 'Path to the CSV input')
flags.DEFINE_string('output_path', 'data/train.record', 'Path to output TFRecord')
FLAGS = flags.FLAGS


# TO-DO replace this with label map
def class_text_to_int(row_label):
    if row_label == 'phone':
        return 1
    else:
        0


def split(df, group):
    data = namedtuple('data', ['filename', 'object'])
    gb = df.groupby(group)
    return [data(filename, gb.get_group(x)) for filename, x in zip(gb.groups.keys(), gb.groups)]


def create_tf_example(group, path):
    with tf.gfile.GFile(os.path.join(path, '{}'.format(group.filename)), 'rb') as fid:
        encoded_jpg = fid.read()
    encoded_jpg_io = io.BytesIO(encoded_jpg)
    image = Image.open(encoded_jpg_io)
    width, height = image.size

    filename = group.filename.encode('utf8')
    image_format = b'jpg'
    xmins = []
    xmaxs = []
    ymins = []
    ymaxs = []
    classes_text = []
    classes = []

    for index, row in group.object.iterrows():
        xmins.append(row['xmin'] / width)
        xmaxs.append(row['xmax'] / width)
        ymins.append(row['ymin'] / height)
        ymaxs.append(row['ymax'] / height)
        classes_text.append(row['class'].encode('utf8'))
        classes.append(class_text_to_int(row['class']))

    tf_example = tf.train.Example(features=tf.train.Features(feature={
        'image/height': dataset_util.int64_feature(height),
        'image/width': dataset_util.int64_feature(width),
        'image/filename': dataset_util.bytes_feature(filename),
        'image/source_id': dataset_util.bytes_feature(filename),
        'image/encoded': dataset_util.bytes_feature(encoded_jpg),
        'image/format': dataset_util.bytes_feature(image_format),
        'image/object/bbox/xmin': dataset_util.float_list_feature(xmins),
        'image/object/bbox/xmax': dataset_util.float_list_feature(xmaxs),
        'image/object/bbox/ymin': dataset_util.float_list_feature(ymins),
        'image/object/bbox/ymax': dataset_util.float_list_feature(ymaxs),
        'image/object/class/text': dataset_util.bytes_list_feature(classes_text),
        'image/object/class/label': dataset_util.int64_list_feature(classes),
    }))
    return tf_example


def main(_):
    writer = tf.python_io.TFRecordWriter(FLAGS.output_path)
    path = os.path.join(os.getcwd(), 'images/train')
    examples = pd.read_csv(FLAGS.csv_input)
    grouped = split(examples, 'filename')
    for group in grouped:
        tf_example = create_tf_example(group, path)
        writer.write(tf_example.SerializeToString())

    writer.close()
    output_path = os.path.join(os.getcwd(), FLAGS.output_path)
    print('Successfully created the TFRecords: {}'.format(output_path))


if __name__ == '__main__':
    tf.app.run()
test_generate_tfrecord.py文件的修改方法和train_generate_tfrecord.py类似,博主就不重复粘贴代码了,读者可以自己进行修改。
四、数据制作
上文已经对必要的环境进行设置,同时修改原有模型的相关参数,我们已经做好了相关的训练准备,接下来,我们就可以通过运行批处理文件开进行数据制作。
首先我们通过运行xml_to_csv.py文件把.xml后缀的文件转化为.csv后缀的文件,然后运行后两个文件完成数据的制作,这一部分的代码如下所示。
python xml_to_csv.py
python train_generate_tfrecord.py
python test_generate_tfrecord.py
pause
五、训练
在得到我们需要的数据之后,我们就可以根据这个数据进行训练。这里我们直接调用之前已经修改好的文件即可
python train.py --logtostderr --train_dir=training/ --pipeline_config_path=training/ssd_mobilenet_v1_pets.config
pause
六、测试图片
当四和五都已经结束后,我们就可以利用训练到的模型进行图片识别了。我们把要测试的图片放在test_image下,打开在jupyter notebook中打开object_detection_tutorial.ipynb。
{
 "cells": [
  {
   "cell_type": "markdown",
   "metadata": {},
   "source": [
    "# Object Detection Demo\n",
    "Welcome to the object detection inference walkthrough!  This notebook will walk you step by step through the process of using a pre-trained model to detect objects in an image. Make sure to follow the [installation instructions](https://github.com/tensorflow/models/blob/master/research/object_detection/g3doc/installation.md) before you start."
   ]
  },
  {
   "cell_type": "markdown",
   "metadata": {},
   "source": [
    "# Imports"
   ]
  },
  {
   "cell_type": "code",
   "execution_count": 1,
   "metadata": {
    "collapsed": true,
    "scrolled": true
   },
   "outputs": [],
   "source": [
    "import numpy as np\n",
    "import os\n",
    "import six.moves.urllib as urllib\n",
    "import sys\n",
    "import tarfile\n",
    "import tensorflow as tf\n",
    "import zipfile\n",
    "\n",
    "from collections import defaultdict\n",
    "from io import StringIO\n",
    "from matplotlib import pyplot as plt\n",
    "from PIL import Image\n",
    "\n",
    "if tf.__version__ < '1.4.0':\n",
    "  raise ImportError('Please upgrade your tensorflow installation to v1.4.* or later!')\n"
   ]
  },
  {
   "cell_type": "markdown",
   "metadata": {},
   "source": [
    "## Env setup"
   ]
  },
  {
   "cell_type": "code",
   "execution_count": 2,
   "metadata": {
    "collapsed": true
   },
   "outputs": [],
   "source": [
    "# This is needed to display the images.\n",
    "%matplotlib inline\n",
    "\n",
    "# This is needed since the notebook is stored in the object_detection folder.\n",
    "sys.path.append(\"..\")"
   ]
  },
  {
   "cell_type": "markdown",
   "metadata": {},
   "source": [
    "## Object detection imports\n",
    "Here are the imports from the object detection module."
   ]
  },
  {
   "cell_type": "code",
   "execution_count": 3,
   "metadata": {
    "collapsed": true
   },
   "outputs": [],
   "source": [
    "from utils import label_map_util\n",
    "\n",
    "from utils import visualization_utils as vis_util"
   ]
  },
  {
   "cell_type": "markdown",
   "metadata": {},
   "source": [
    "# Model preparation "
   ]
  },
  {
   "cell_type": "markdown",
   "metadata": {},
   "source": [
    "## Variables\n",
    "\n",
    "Any model exported using the `export_inference_graph.py` tool can be loaded here simply by changing `PATH_TO_CKPT` to point to a new .pb file.  \n",
    "\n",
    "By default we use an \"SSD with Mobilenet\" model here. See the [detection model zoo](https://github.com/tensorflow/models/blob/master/research/object_detection/g3doc/detection_model_zoo.md) for a list of other models that can be run out-of-the-box with varying speeds and accuracies."
   ]
  },
  {
   "cell_type": "code",
   "execution_count": 4,
   "metadata": {
    "collapsed": true
   },
   "outputs": [],
   "source": [
    "# What model to download.\n",
    "MODEL_NAME = 'myFinalModelPB'\n",
    "\n",
    "\n",
    "# Path to frozen detection graph. This is the actual model that is used for the object detection.\n",
    "PATH_TO_CKPT = MODEL_NAME + '/frozen_inference_graph.pb'\n",
    "\n",
    "# List of the strings that is used to add correct label for each box.\n",
    "PATH_TO_LABELS = os.path.join('training', 'object-detection.pbtxt')\n",
    "\n",
    "NUM_CLASSES = 1"
   ]
  },
  {
   "cell_type": "markdown",
   "metadata": {},
   "source": [
    "## Download Model"
   ]
  },
  {
   "cell_type": "code",
   "execution_count": null,
   "metadata": {
    "collapsed": true
   },
   "outputs": [],
   "source": []
  },
  {
   "cell_type": "markdown",
   "metadata": {},
   "source": [
    "## Load a (frozen) Tensorflow model into memory."
   ]
  },
  {
   "cell_type": "code",
   "execution_count": 5,
   "metadata": {
    "collapsed": true
   },
   "outputs": [],
   "source": [
    "detection_graph = tf.Graph()\n",
    "with detection_graph.as_default():\n",
    "  od_graph_def = tf.GraphDef()\n",
    "  with tf.gfile.GFile(PATH_TO_CKPT, 'rb') as fid:\n",
    "    serialized_graph = fid.read()\n",
    "    od_graph_def.ParseFromString(serialized_graph)\n",
    "    tf.import_graph_def(od_graph_def, name='')"
   ]
  },
  {
   "cell_type": "markdown",
   "metadata": {},
   "source": [
    "## Loading label map\n",
    "Label maps map indices to category names, so that when our convolution network predicts `5`, we know that this corresponds to `airplane`.  Here we use internal utility functions, but anything that returns a dictionary mapping integers to appropriate string labels would be fine"
   ]
  },
  {
   "cell_type": "code",
   "execution_count": 6,
   "metadata": {
    "collapsed": false
   },
   "outputs": [],
   "source": [
    "label_map = label_map_util.load_labelmap(PATH_TO_LABELS)\n",
    "categories = label_map_util.convert_label_map_to_categories(label_map, max_num_classes=NUM_CLASSES, use_display_name=True)\n",
    "category_index = label_map_util.create_category_index(categories)"
   ]
  },
  {
   "cell_type": "markdown",
   "metadata": {},
   "source": [
    "## Helper code"
   ]
  },
  {
   "cell_type": "code",
   "execution_count": 7,
   "metadata": {
    "collapsed": true
   },
   "outputs": [],
   "source": [
    "def load_image_into_numpy_array(image):\n",
    "  (im_width, im_height) = image.size\n",
    "  return np.array(image.getdata()).reshape(\n",
    "      (im_height, im_width, 3)).astype(np.uint8)"
   ]
  },
  {
   "cell_type": "markdown",
   "metadata": {},
   "source": [
    "# Detection"
   ]
  },
  {
   "cell_type": "code",
   "execution_count": 8,
   "metadata": {
    "collapsed": false
   },
   "outputs": [],
   "source": [
    "TEST_IMAGE_PATHS=[]\n",
    "for filename in os.listdir(r\"./test_images\"):\n",
    "    if filename.split('.')[-1]=='jpg':\n",
    "        TEST_IMAGE_PATHS.append(os.path.join(os.path.join('test_images',filename)))  \n",
    "# Size, in inches, of the output images.\n",
    "IMAGE_SIZE = (12, 8)"
   ]
  },
  {
   "cell_type": "code",
   "execution_count": 9,
   "metadata": {
    "collapsed": false,
    "scrolled": true
   },
   "outputs": [
    {
     "data": {
      "image/png": "/wW\nQOZ2dM4h1pcjD1BRF”
运行代码之后我们可以得到输出的结果,博主它运行结果如下:
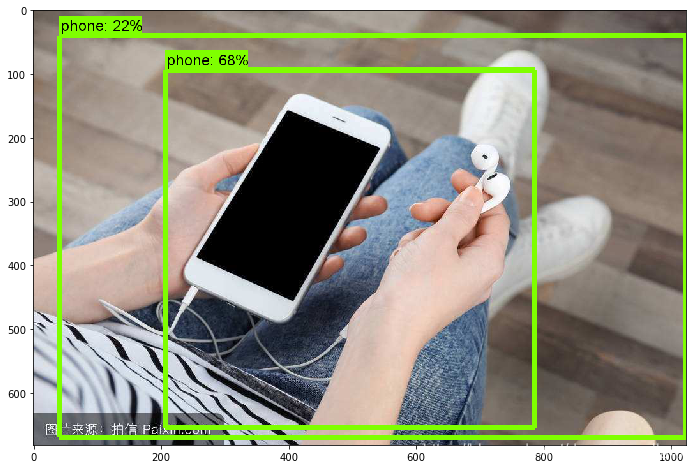
这个结果还是不错的反应了训练结果,如果增加训练的次数,模型的准确度应该可以大幅提高(为节约时间我只训练了1000次)。
好了,上文就是对图像进行目标检测的全文了,希望大家可以从中有所收获,如果在看的时候有什么疑问可以评论问我哦。博主是一个刚接触这个方向的小白,这篇文章的描述肯定存在不少不合理不确切之处,也希望能和大家进行讨论学习