版权声明:本文为博主原创文章,转载请附上博文链接! https://blog.csdn.net/qq_42920045/article/details/85111623
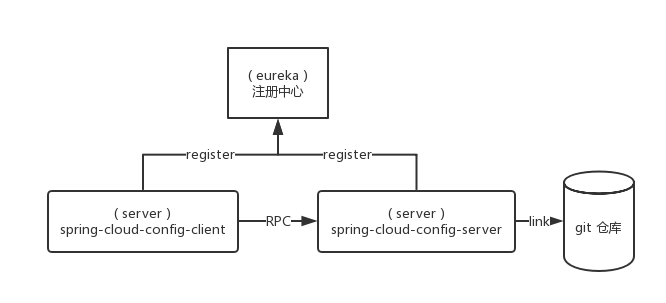
SpringCloud config git
- 在
gitHub中创建项目并存放配置文件 - 搭建一个
注册中心 - 搭建一个
服务与git仓库进行连接 - 搭建一个
服务通过仓库连接服务调用配置文件
架构图
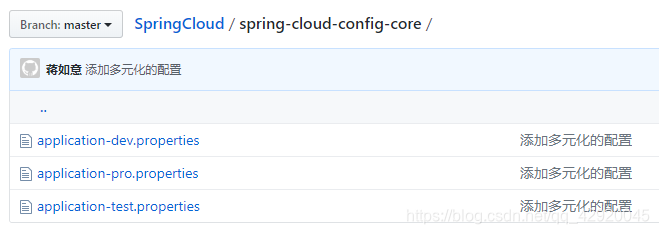
在
gitHub中创建项目并存放配置文件
搭建一个
注册中心:: 服务注册中的地址
eureka.client.serviceUrl.defaultZone=http://localhost:7070/eureka/
搭建一个
服务与git仓库进行连接
在
pom文件中添加依赖
<dependency>
    <groupId>org.springframework.cloud</groupId>
    <artifactId>spring-cloud-config-server</artifactId>
</dependency>
添加
application.yaml配置文件
server:
  port: 8000

spring:
  application:
    name: spring-cloud-config-server
  cloud:
    config:
      server:
        git:
          uri: https://github.com/jiangruyi/SpringCloud.git
          search-paths: spring-cloud-config-core
          username: [email protected]
          password: xxx

eureka:
  client:
    service-url:
      defaultZone: http://localhost:7070/eureka/
编写SpringBoot启动类
@EnableConfigServer
@EnableDiscoveryClient
@SpringBootApplication
public class Application {

	public static void main(String[] args) {
		new SpringApplicationBuilder(Application.class).web(true).run(args);
	}

}
搭建一个
服务通过仓库连接服务调用配置文件
添加
pom依赖
<dependency>
    <groupId>org.springframework.cloud</groupId>
    <artifactId>spring-cloud-starter-config</artifactId>
</dependency>
编写 bootstrap.yaml 配置文件
spring:
  cloud:
    config:
      name: application
      profile: dev
      uri: http://localhost:8000/
      label: master

server:
  port: 9000
spring.cloud.config.uri:: 与git连接的服务地址
编写基本配置文件
application.yaml
spring:
  application:
    name: config-client-git

server:
  port: 9000

eureka:
  client:
    service-url:
      defaultZone: http://localhost:7070/eureka/
编写 SpringBoot 启动类读取git上的配置文件
@EnableDiscoveryClient
@SpringBootApplication
@RestController
public class Application {

	@Value("${com.znsd.config}")
	private String gitValue;

	public void setGitValue(String gitValue) {
		this.gitValue = gitValue;
	}

	@GetMapping("hello")
	public String hello () {
		return gitValue;
	}

	public static void main(String[] args) {
		new SpringApplicationBuilder(Application.class).web(true).run(args);
	}

}
配置热部署
在调用配置服务端 pom 文件中添加依赖
<dependency>
    <groupId>org.springframework.boot</groupId>
    <artifactId>spring-boot-starter-actuator</artifactId>
</dependency>
在要动态热部署的配置类中添加:
@RefreshScope注解
以
POST方式访问URLhttp://localhost:9000/refresh刷新配置注意:
- 返回消息中包含:
Full authentication is required to access this resource.
- 解决方案:
- 将安全认证关掉:
management.security.enabled=false- 配置一个安全认证