个人博客导航页(点击右侧链接即可打开个人博客):大牛带你入门技术栈
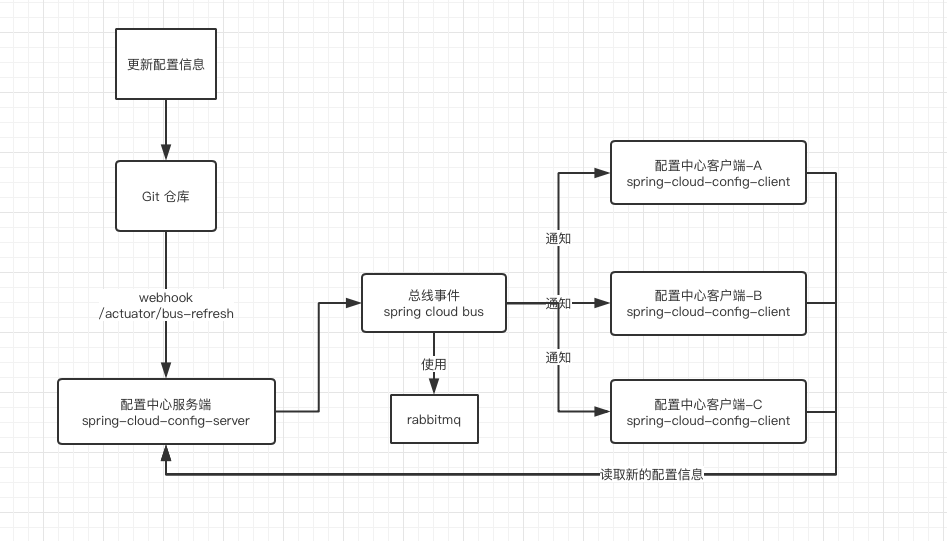
本文主要实现,基于Spring Cloud Config和git databus实现配置中心以及配置的动态刷新,以及用户认证,加密,解密的功能(代码地址点这里),本文没有原理性的讲解,就是直接讲述怎么使用,原理请自行阅读官方文档
Spring Cloud Config 是 Spring Cloud 团队创建的一个全新项目,用来为分布式系统中的基础设施和微服务应用提供集中化的外部配置支持,
它分为服务端与客户端两个部分。其中服务端也称为分布式配置中心,它是一个独立的微服务应用,用来连接配置仓库并为客户端提供获取配置信息、加密 / 解密信息等访问接口;
而客户端则是微服务架构中的各个微服务应用或基础设施,它们通过指定的配置中心来管理应用资源与业务相关的配置内容,并在启动的时候从配置中心获取和加载配置信息。
Spring Cloud Config 实现了对服务端和客户端中环境变量和属性配置的抽象映射,所以它除了适用于 Spring 构建的应用程序之外,也可以在任何其他语言运行的应用程序中使用。由于 Spring Cloud Config 实现的配置中心默认采用 Git 来存储配置信息,所以使用 Spring Cloud Config 构建的配置服务器,天然就支持对微服务应用配置信息的版本管理,并且可以通过 Git 客户端工具来方便的管理和访问配置内容。当然它也提供了对其他存储方式的支持,比如:SVN 仓库、本地化文件系统。
实现结果图

准备工作
准备一个 Git 仓库,在 Github 上面创建了一个文件夹 config-repo 用来存放配置文件,为了模拟生产环境,我们创建以下三个配置文件:
1 2 3 4 5 6 |
// 开发环境 config-client-dev.yml // 测试环境 config-client-inte.yml |
Server 端
创建一个基础的 Spring Boot 工程
添加依赖
只需要在 pom.xml 中 加入 spring-cloud-config-server 即可
| |
<dependency>
    <groupId>org.springframework.cloud</groupId>
    <artifactId>spring-cloud-config-server</artifactId>
</dependency>
<dependency>
<groupId>org.springframework.cloud</groupId>
    <artifactId>spring-cloud-bus</artifactId>
</dependency>
<dependency>
    <groupId>org.springframework.cloud</groupId>
    <artifactId>spring-cloud-stream-binder-rabbit</artifactId>
</dependency>
<dependency>
    <groupId>org.springframework.cloud</groupId>
    <artifactId>spring-cloud-starter-consul-discovery</artifactId>
</dependency>
<dependency>
    <groupId>org.springframework.cloud</groupId>
    <artifactId>spring-cloud-starter-consul-config</artifactId>
</dependency> |
配置文件:
spring:
  application:
    name: config-server
  cloud:
    config:
      server:
        git:
          uri: https://github.com/niuxuwu/config-repo  # 配置git仓库的地址
          search-paths: /blob/master                  # git仓库地址下的相对地址,可以配置多个,用,分割。
          username: niuxuwu                                             # git仓库的账号
          password: '{cipher}dfdfdsfsdf'
    bus:
      trace:
        enabled: true       #开启bus开启消息跟踪
      refresh:
        enabled: true       #开启bus刷薪
    consul:
      # consul服务器地址
      host: http://127.0.0.1
      # consul服务端口
      port: 8500
      config:
        # enabled为true表示启用配置管理功能
        enabled: true
        # watch选项为配置监视功能,主要监视配置的改变
        watch:
          enabled: true
          delay: 10000
          wait-time: 30
        # 表示如果没有发现配置,是否抛出异常,true为是,false为否,当为false时,consul会打印warn级别的日志信息
        fail-fast: false
        # 表示使用的配置格式
        format: YAML
        # 配置所在的应用目录名称
        prefix: config
        name: ${spring.application.name}
      # 服务发现配置
      discovery:
        # 启用服务发现
        enabled: true
        # 启用服务注册
        register: true
        # 服务停止时取消注册
        deregister: true
        # 表示注册时使用IP而不是hostname
        prefer-ip-address: true
        # 执行监控检查的频率
        health-check-interval: 30s
        # 设置健康检查失败多长时间后,取消注册
        health-check-critical-timeout: 30s
        # 健康检查的路径
        health-check-path: /actuator/info
        # 服务注册标识,格式为:应用名称+服务器IP+端口
        instance-id: ${spring.application.name}:${spring.cloud.client.ip-address}:${server.port}
  rabbitmq:         #mq配置
    username: root
    password: root
    host: 127.0.0.1
    port: 5672
  security:         #访问认证
    user:
      name: admin
      password: 123456
server:
  port: 8089
#yml格式
management: # 暴露触发消息总线的地址
  endpoints:
    web:
      exposure:
        include: "bus-refresh"
启动类:
@SpringBootApplication
@EnableConfigServer
@EnableDiscoveryClient
public class ServiceconfigApplication {

    public static void main(String[] args) {
        SpringApplication.run(ServiceconfigApplication.class, args);
    }

}
到此 Server 端相关配置已经基本完成
测试
首先我们先要测试 Server 端是否可以读取到 github 上面的配置信息,直接访问 http://localhost:8089/config-client/dev 返回信息如下:
{
  "name": "config-client",
  "profiles": [
    "dev"
  ],
  "label": null,
  "version": "0c5cb4522d15ae471400c480d7b52d7afb271d1f",
  "state": null,
  "propertySources": [
    {
      "name": "https://github.com/niuxuwu/config-repo/config-client-dev.yml",
      "source": {
        "info.profile": "dev bus"
      }
    }
  ]
}
上述的返回的信息包含了配置文件的位置、版本、配置文件的名称以及配置文件中的具体内容,说明 Server 端已经成功获取了 Git 仓库的配置信息。
仓库中的配置文件会被转换成 Web 接口,访问可以参照以下的规则:
- /{application}/{profile}[/{label}]
- /{application}-{profile}.yml
- /{label}/{application}-{profile}.yml
- /{application}-{profile}.properties
- /{label}/{application}-{profile}.properties
上面的 URL 会映射 {application}-{profile}.yml 对应的配置文件,其中 {label} 对应 Git 上不同的分支,默认为 master。以 config-client-dev.yml 为例子,它的 application 是 config-client,profile 是 dev。
配置中心的安全认证
通过上面测试可以看到,直接访问url就可以拿到所有的配置信息,这样是很不安全的,需要给配置中心添加安全认证,在这里使用spring-boot提供的security组件来使用HTTP Bastic用户安全认证。在spring-cloud-config-server中增加新的依赖security
<dependency>
    <groupId>org.springframework.boot</groupId>
    <artifactId>spring-boot-starter-security</artifactId>
</dependency>
在配置文件中添加用户信息
spring:
security:
user:
name: admin
password: 123456
Client 端
在完成了上述验证之后,确定配置服务中心已经正常运作,下面我们尝试如何在微服务应用中获取上述的配置信息。
再创建一个基础的 Spring Boot 应用,命名为 config-client。
添加依赖
在 pom.xml 中添加下述依赖:
| |
<dependency>
    <groupId>org.springframework.cloud</groupId>
    <artifactId>spring-cloud-starter-consul-discovery</artifactId>
</dependency>
<dependency>
    <groupId>org.springframework.cloud</groupId>
    <artifactId>spring-cloud-starter-consul-config</artifactId>
</dependency>
<dependency>
    <groupId>org.springframework.cloud</groupId>
    <artifactId>spring-cloud-starter-config</artifactId>
</dependency>
<dependency>
    <groupId>org.springframework.cloud</groupId>
    <artifactId>spring-cloud-bus</artifactId>
</dependency>
<dependency>
    <groupId>org.springframework.cloud</groupId>
    <artifactId>spring-cloud-stream-binder-rabbit</artifactId>
</dependency>
<dependency>
    <groupId>org.springframework.boot</groupId>
    <artifactId>spring-boot-starter-actuator</artifactId>
</dependency> |
配置文件
server:
  port: 8081
spring:
  application:
    name: config_client
  cloud:
    bus:
      refresh:
        enabled: true  #必须打开,否则刷新不会生效
      trace:
        enabled: true
    config:
      username: admin    #访问服务端用户密码
      password: 123456
      name: client-config
      profile: inte        #读取哪个配置文件     # 配置中心的地址
      label: master
      discovery:
        enabled: true
        service-id: config-server  #配置中心服务id
      fail-fast: true
    #debug: true
    consul:
      # consul服务器地址
      host: http://localhost
      # consul服务端口
      port: 8500
      config:
        # enabled为true表示启用配置管理功能
        enabled: true
        # watch选项为配置监视功能,主要监视配置的改变
        watch:
          enabled: true
          delay: 10000
          wait-time: 30
        # 表示如果没有发现配置,是否抛出异常,true为是,false为否,当为false时,consul会打印warn级别的日志信息
        fail-fast: false
        # 表示使用的配置格式
        format: YAML
        # 配置所在的应用目录名称
        prefix: config
        name: ${spring.application.name}
      # 服务发现配置
      discovery:
        # 启用服务发现
        enabled: true
        # 启用服务注册
        register: true
        # 服务停止时取消注册
        deregister: true
        # 表示注册时使用IP而不是hostname
        prefer-ip-address: true
        # 执行监控检查的频率
        health-check-interval: 30s
        # 设置健康检查失败多长时间后,取消注册
        health-check-critical-timeout: 30s
        # 健康检查的路径
        health-check-path: /actuator/info
        # 服务注册标识,格式为:应用名称+服务器IP+端口
        instance-id: ${spring.application.name}:${spring.cloud.client.ip-address}:${server.port}

  rabbitmq:
    username: root
    password: root
    host: 127.0.0.1
    port: 5672

management:
  endpoints:
    web:
      exposure:
        include: "*"
注意:上面这些与 Spring Cloud Config 相关的属性必须配置在 bootstrap.yml 中,config 部分内容才能被正确加载。因为 config 的相关配置会先于 application.yml,而 bootstrap.yml 的加载也是先于 application.yml。
安全认证
由于配置中心添加了安全认证,所以客户端需要配置账号,密码才可以获取到配置信息
在配置文件中添加
spring:
cloud:
config:
username: admin
password: 123456
在 Controller 中使用 @Value 注解来获取 Server 端参数的值
@RestController
@RequestMapping("/test")
@RefreshScope
public class PartnerController {

     @Value("${info.profile:error}")
    private String profile;

    @GetMapping("/info")
    public String hello() {
        return profile;
    }

} |
测试
启动项目后访问http://localhost:8081/test/info 返回 数据说明已经正确的从 Server 端获取到了参数。到此一个完整的服务端提供配置服务,客户端获取配置参数的例子就完成了。
实现配置通过bus刷新(server)
修改配置文件 config-client-inte.yml,然后访问服务端暴露出来的刷新接口,只支持post刷新
返回204,状态码为执行成功,此处需要注意,在server中需要添加自定义的一个配置,否则开启用户认证之后,会返回403,401,本人在此处真实浪费了很多时间
验证
访问http://localhost:8081/test/info,发现结果已经改变,到此实现了基于consul为注册中心,bus为消息总线,配置中心的动态刷新,本代码在真实项目中使用,在使用时候配合git webhook,更新配置文件之后直接自动发出请求,省去人工刷新这一步骤,在本文的代码中,没有这一块的体现,本文中没有说配置加密的事,只是在代码中给出了配置,下一篇文章将会详细讲解配置的加解密
局部刷新
某些场景下(例如灰度发布),我们可能只想刷新部分微服务的配置,此时可通过 /actuator/bus-refresh/{destination} 端点的 destination 参数来定位要刷新的应用程序。
例如:/actuator/bus-refresh/customers:8000,这样消息总线上的微服务实例就会根据 destination 参数的值来判断是否需要要刷新。其中,customers:8000 指的是各个微服务的 ApplicationContext ID。
destination 参数也可以用来定位特定的微服务。例如:/actuator/bus-refresh/customers:**,这样就可以触发 customers 微服务所有实例的配置刷新。
附: 实现之后的mq和consul的截图
代码地址:https://gitee.com/niuxuw/cloud-config-consul
参考资料:https://windmt.com/2018/04/19/spring-cloud-7-config-sample/
附Java/C/C++/机器学习/算法与数据结构/前端/安卓/Python/程序员必读/书籍书单大全:
(点击右侧 即可打开个人博客内有干货):技术干货小栈
=====>>①【Java大牛带你入门到进阶之路】<<====
=====>>②【算法数据结构+acm大牛带你入门到进阶之路】<<===
=====>>③【数据库大牛带你入门到进阶之路】<<=====
=====>>④【Web前端大牛带你入门到进阶之路】<<====
=====>>⑤【机器学习和python大牛带你入门到进阶之路】<<====
=====>>⑥【架构师大牛带你入门到进阶之路】<<=====
=====>>⑦【C++大牛带你入门到进阶之路】<<====
=====>>⑧【ios大牛带你入门到进阶之路】<<====
=====>>⑨【Web安全大牛带你入门到进阶之路】<<=====
=====>>⑩【Linux和操作系统大牛带你入门到进阶之路】<<=====天下没有不劳而获的果实,望各位年轻的朋友,想学技术的朋友,在决心扎入技术道路的路上披荆斩棘,把书弄懂了,再去敲代码,把原理弄懂了,再去实践,将会带给你的人生,你的工作,你的未来一个美梦。
