前言:本文是一个完整的大数据项目实战,实时|离线统计分析用户的搜索话题,并用JavaEE工程前端界面展示出来。这些指标对网站的精准营销、运营都有极大帮助。架构大致是按照企业标准来的,从日志的采集、转化处理、实时计算、JAVA后台开发、WEB前端展示,一条完整流程线下来,甚至每个节点都用的高可用架构,都考虑了故障转移和容错性。所用到的框架包括 :Hadoop(HDFS+MapReduce+Yarn)+Flume+KafKa+Hbase+Hive+Spark(SQL、Streaming )+Hive+Mysql+SpringMVC+Mybatis+Websocket+AugularJs+Echarts。所涉及到的语言包括:JAVA、Scala、Shell。
项目部署地址:http://120.79.35.74:443/Hot_News_Web/
项目源代码联系邮箱:[email protected]
项目架构图:

一:数据源处理(搜狗实验室获取新闻资源 XML——>TXT:java解析大批量xml文件 代码后贴)
处理思路:利用SAXReader获取xml文件内容,并构建News实体类以便写入txt文件,然后编写ReadWebLog类并编写脚本运行在Liunx上模拟新闻搜索日志产生
Liunx运行jar命令:java -jar 你的上传jar包所在目录 args0 args1
或Shell脚本命令:
#/bin/bash
echo "start log"
java -jar 你的上传jar包所在目录 args0 args1
代码:
处理搜狗实验室元数据.xml----->txt
package cn.yusys.hotnews.datasource;
import org.dom4j.Document;
import org.dom4j.Element;
import org.dom4j.io.SAXReader;
import java.io.BufferedWriter;
import java.io.File;
import java.io.FileWriter;
import java.io.IOException;
import java.text.SimpleDateFormat;
import java.util.ArrayList;
import java.util.Date;
import java.util.Iterator;
import java.util.List;
/**
* 解析搜狗实验室新闻xml文件为txt文件---->项目数据源
* @author Tangzhi mail:[email protected]
* Created on 2018年11月12日
*/
public class MyXMLReader2JDOM {
public static void main(String[] args) {
// 获取xml文件读取流
SAXReader reader = new SAXReader();
// 设置字符集编码方式
reader.setEncoding("utf-8");
Document document;
Element rootElement;
List<Element> docList;
Iterator<Element> iterator;
// 用于存放节点数据以便后面的写入之news.log
ArrayList<News> list = new ArrayList<News>();
// 开始进行读取
try {
document = reader.read(new File("D:\\Downloads\\大数据数据源\\news_tensite_xml.smarty.dat"));
// 得到根节点元素 <docs>...</docs>
rootElement = document.getRootElement();
//<doc>...<doc>
docList = rootElement.elements("doc");
/*
* 得到xml具体配置文件信息
*/
iterator = docList.iterator();
for (Element e : docList) {
News news = new News();
/**
* 遍历子节点将具体新闻信息写入txt文件
*/
if (e.element("url") != null && !" ".equals(e.element("url"))) {
news.setUrl(e.element("url").getStringValue().trim());
}
if (e.element("docno") != null && !" ".equals(e.element("docno"))) {
news.setDocno(e.element("docno").getStringValue().trim());
}
if (e.element("contenttitle") != null && !" ".equals(e.element("contenttitle"))) {
news.setContenttitle(e.element("contenttitle").getStringValue().trim());
}
if (e.element("content") != null && !" ".equals(e.element("content"))) {
news.setContent(e.element("content").getStringValue().trim());
}
list.add(news);
}
/**
* 进行写入txt文件
*/
writwToFile(list);
} catch (Exception e) {
e.printStackTrace();
}
}
/**
* 写入txt文件(后期当源数据文件过大时进行分片处理)
* @throws IOException
*/
public static void writwToFile(List<News> list) throws IOException {
File file = new File("D:\\Downloads\\大数据数据源\\news2.log");
BufferedWriter bw = new BufferedWriter(new FileWriter(file));
if (!file.exists()) {
try {
file.createNewFile();
} catch (IOException e) {
e.printStackTrace();
}
} else {
for (News news : list) {
Date date = new Date();
SimpleDateFormat sdf = new SimpleDateFormat("yyyy-MM-dd HH:mm:ss");
String dateStr = sdf.format(date);
bw.write("datetime"+"="+dateStr+"|");
bw.write("url"+"="+news.getUrl()+"|");
bw.write("docno"+"="+news.getDocno()+"|");
bw.write("contenttitle"+"="+news.getContenttitle()+"|");
bw.write("content"+"="+news.getContent());
bw.write("\n");
bw.flush();
}
}
}
}
----------------------------------------------------------------------------------------------------------------
----------------------------------------------------------------------------------------------------------------
package cn.yusys.hotnews.datasource;
/**
*xml解析时新闻实体类
*/
public class News implements Serializable{
// 实现序列化接口以便多台机器同时解析
public News () {
}
public News(String url, String docno, String contenttitle, String content) {
super();
this.url = url;
this.docno = docno;
this.contenttitle = contenttitle;
this.content = content;
}
String url;
String docno;
String contenttitle;
String content;
public String getUrl() {
return url;
}
public void setUrl(String url) {
this.url = url;
}
public String getDocno() {
return docno;
}
public void setDocno(String docno) {
this.docno = docno;
}
public String getContenttitle() {
return contenttitle;
}
public void setContenttitle(String contenttitle) {
this.contenttitle = contenttitle;
}
public String getContent() {
return content;
}
public void setContent(String content) {
this.content = content;
}
}
-----------------------------------------------------------------------------------------
-----------------------------------------------------------------------------------------
运行在Liunx上模拟日志产生并通过flume采集
package cn.yusys.hotnews.datasource;
import java.io.*;
/**
* 模拟日志服务器产生日(从news.log/news1.log中随机切换文件读取数据然后写入日志文件-----》然后使用进行flume采集)
* @author Tangzhi mail:[email protected]
* @date 2018年11月12日
*/
public class ReadWebLog {
public static String readFileName;
public static String writeFileName;
public static void main (String[] args) {
readFileName = args[0];
writeFileName = args[1];
readFile(readFileName);
}
/**
* 从new.log/news1.log中随机读取日志信息
*/
public static void readFile(String fileName){
try {
FileInputStream fs = new FileInputStream(fileName);
// 转换流
InputStreamReader isr = new InputStreamReader(fs,"utf-8");
BufferedReader br = new BufferedReader(isr);
int count = 0;
while (br.readLine() != null){
String line = br.readLine();
count ++;
// 自定义读取间隔毫秒
Thread.sleep(1000);
System.out.println("row:" + count + ">>>>>>>>" + line);
/**
* 写入到指定文件中(与flume配置文件对应)
*/
writeFile(writeFileName,line);
}
} catch (Exception e) {
e.printStackTrace();
}
}
/**
* 文件内容的写入
*/
public static void writeFile (String fileName,String line) {
try {
FileOutputStream fs = new FileOutputStream(fileName, true);
OutputStreamWriter osw = new OutputStreamWriter(fs);
BufferedWriter bw = new BufferedWriter(osw);
// 执行文件内容的写入
bw.write(line);
bw.write("\n");
bw.close();
} catch (Exception e) {
e.printStackTrace();
}
}
}
Q&A
Q1:
Java异常: "2 字节的 UTF-8 序列的字节 2 无效。"

A1:利用记事本打开 另行保存编码格式为UTF-8 再Notepad++(其他编辑器亦可)用打开即可
Q2 :
在Liunx系统上运行jar时出现找不到主类
A1 :使用IDEA时pom.xml加入以下依赖并在<mainClass></mainClass>部分写入你类全路径
<build>
<plugins>
<plugin>
<groupId>org.apache.maven.plugins</groupId>
<artifactId>maven-shade-plugin</artifactId>
<version>2.4.3</version>
<executions>
<execution>
<phase>package</phase>
<goals>
<goal>shade</goal>
</goals>
<configuration>
<filters>
<filter>
<artifact>*:*</artifact>
<excludes>
<exclude>META-INF/*.SF</exclude>
<exclude>META-INF/*.DSA</exclude>
<exclude>META-INF/*.RSA</exclude>
</excludes>
</filter>
</filters>
<transformers>
<transformer implementation="org.apache.maven.plugins.shade.resource.ManifestResourceTransformer">
<mainClass></mainClass>
</transformer>
</transformers>
</configuration>
</execution>
</executions>
</plugin>
</plugins>
</build>
Liunx效果图:
附 :当数据源文件很大时,可以在ReadWebLog类中进行随机读取多个log文件设置也可是模拟数据更为真实
搜狗实验室:中文信息处理以及部分数据提供 http://www.sogou.com/labs/
注:根据项目需求进行数据前期清洗
到此:数据源获取 简单清洗(uid设置 时间戳绑定 部分数据过滤)已经完成
二 :Flume与HBase、Kafka数据对接
处理思路:Flume采集数据源数据与HBase集成----->HBase与Hive对接------>Hadoop MapReduce 完成离线计算分析----->前台Echart
Flume采集数据源数据与Kafka集成----->Kafka与Spark Streaming对接----->Spark + MySql 完成实时计算分析----->前台Echart
1.Flume与HBase
Tips:此时Flume Sink 下沉目标为HBase (前提:Liunx环境安装HBase,理解HBase原理)修改hbase-site.xml 修改hbase数据目录 zookeeper地址
HBase常用Shell命令:
启动HBase: strat-hbase.sh
Shell命令交互模式:./hbase shell
创建表 : create '表名', '列族名1','列族名2','列族名N'.......
HBase配置文件下图:
##hbase-env.sh
export JAVA_HOME=/opt/jdk1.7.0_65 ----自己虚拟机jdk路径(etc/profile)
export JAVA_CLASSPATH=.:$JAVA_HOME/lib/dt.jar:$JAVA_HOME/lib/tools.jar
export HBASE_MANAGES_ZK=false ----不使用HBase自带zookeeper使用外部zookeeper集群
##hbase-site.xml
<configuration>
<property>
<name>hbase.master</name>
<value>192.168.25.136:60000</value>
</property>
<property>
<name>hbase.master.maxclockskew</name>
<value>180000</value>
</property>
<property>
<name>hbase.rootdir</name>
<value>hdfs://192.168.25.136:9000/hbase</value>
</property>
<property>
<name>hbase.cluster.distributed</name>
<value>true</value>
</property>
<property>
<name>hbase.zookeeper.quorum</name>
<value>192.168.25.136</value>
</property>
<property>
<name>hbase.zookeeper.property.dataDir</name>
<value>/tmp/hbase_data</value>
</property>
</configuration>
##regionservers
localhost ---填写集群IP地址或主机名
Q&A
Q1:创建HBase表时报错: ERROR:Can not get address from Zookeeper; znode data == null

A1:1、确保zookeeper集群可用 Hadoop集群可用 HBase服务正常启动
2、vi hbase-site.xml 查看HBase数据存放目录权限是否为可读可写 ![]()

Q2:HBase0.9.4 通过脚本启动后创建表时报错
ERROR: org.apache.hadoop.hbase.MasterNotRunningException: Retried 7 times
A2 :

1.查看hadoop集群 zookeeper集群是否可用
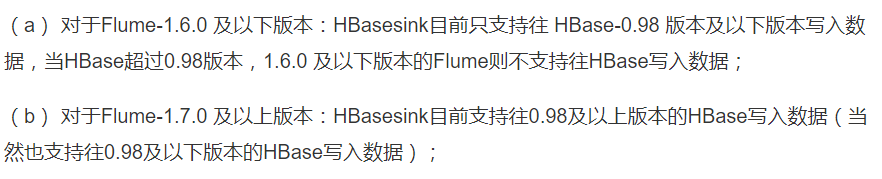
2.HBase 0.9.4 与 Hadoop 2.x 兼容性差 版本不一致 导致无法进行RPC通信 建议搭配:HBase 0.9.9.x + Hadoop 2.x但请注意此时
Flume最好选择1.7.x 原因见下图:
1.Flume与Kafka
Tips:此时Flume Sink 下沉目标为Kafka(前提:Liunx环境安装Kafka,理解Kafka原理)
Kafka常用Shell命令:
启动kafka: bin/kafka-servers-start ../config/server.properties (指定特定文件启动)
创建主题:bin/kafka-topics.sh --create --zookeeper 192.168.25.136:2181 --replication-factor 1 --partitions 1 --topic weblogs
删除主题:bin/kafka-topics.sh --delete --zookeeper 192.168.25.136:2181 --topic weblogs
控制台消费topic的数据:bin/kafka-console-consumer.sh --zookeeper 192.168.25.136:2181 --topic weblogs --from-beginning
控制台生产数据:bin/kafka-console-producer.sh --broker-list 192.168.25.136:9092 --topic weblogs
查看主题具体信息:bin/kafka-topics.sh --zookeeper 192.168.25.136:2181 --describe --topic weblogs
Kafka配置文件 (kafka在大数据项目中大多作为数据缓冲区 生产者-消费者模式)
#broker的全局唯一编号,不能重复
#用来监听链接的端口,producer或consumer将在此端口建立连接
port=9092
#处理网络请求的线程数量
num.network.threads=3
#用来处理磁盘IO的线程数量
num.io.threads=8
#发送套接字的缓冲区大小
socket.send.buffer.bytes=102400
#接受套接字的缓冲区大小
socket.receive.buffer.bytes=102400
#请求套接字的缓冲区大小
socket.request.max.bytes=104857600
#kafka运行日志存放的路径
log.dirs=/export/logs/kafka
#topic在当前broker上的分片个数
num.partitions=2
#用来恢复和清理data下数据的线程数量
num.recovery.threads.per.data.dir=1
#segment文件保留的最长时间,超时将被删除
log.retention.hours=168
#滚动生成新的segment文件的最大时间
log.roll.hours=168
#日志文件中每个segment的大小,默认为1G
log.segment.bytes=1073741824
#周期性检查文件大小的时间
log.retention.check.interval.ms=300000
#日志清理是否打开
log.cleaner.enable=true
#broker需要使用zookeeper保存meta数据
zookeeper.connect=192.168.25.136:2181,192.168.25.136:2182,192.168.25.136:2183
#zookeeper链接超时时间
zookeeper.connection.timeout.ms=6000
#partion buffer中,消息的条数达到阈值,将触发flush到磁盘
log.flush.interval.messages=10000
#消息buffer的时间,达到阈值,将触发flush到磁盘
log.flush.interval.ms=3000
#删除topic需要server.properties中设置delete.topic.enable=true否则只是标记删除
delete.topic.enable=true
#此处的host.name为本机IP(重要),如果不改,则客户端会抛出:Producer connection to localhost:9092 unsuccessful 错误!
host.name=192.168.25.136
当kafka消费的数据与HBase的weblogs表记录总数相等时说明已完成Flume与HBase、Kafka数据对接
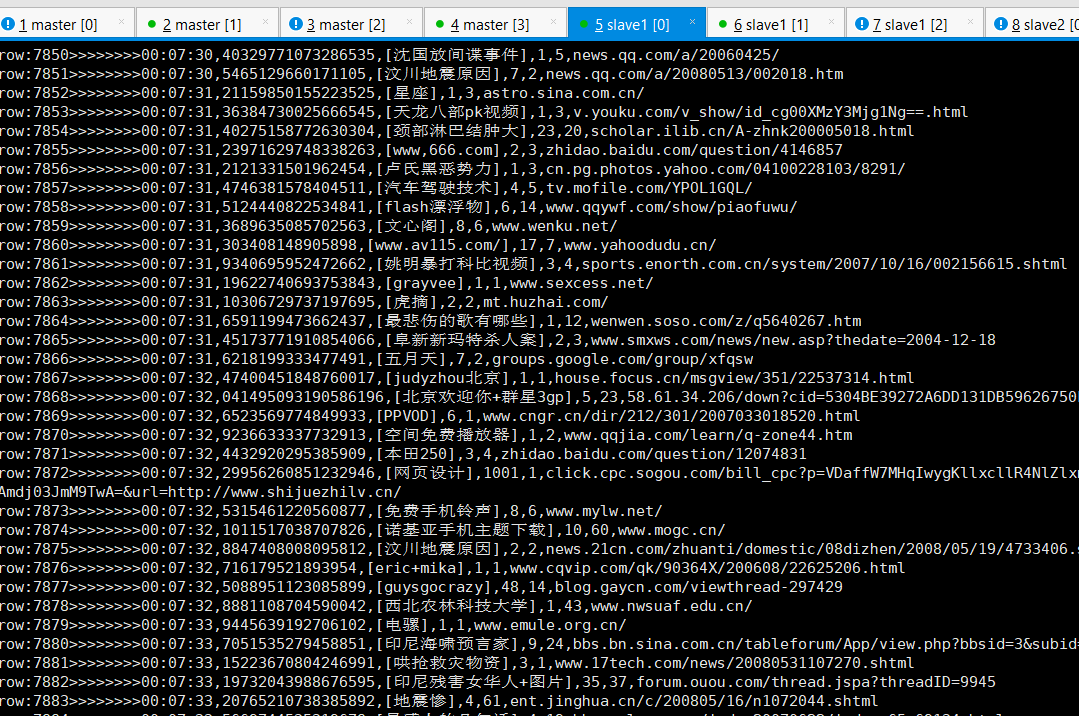
Flume启动日志图:


HBase count表中数据:

Kafka消费数据:
![]()
附:Flume采集数据按特定列下沉至Hbase、Kafka配置文件(重点)
a1.sources = r1
a1.channels = kafkaC hbaseC
a1.sinks = kafkaS hbaseS
a1.sources.r1.type = exec
a1.sources.r1.command = tail -F /home/hotnews/weblogs.log
a1.sources.r1.channels = kafkaC hbaseC
# flume + hbase
# sink 配置为HBaseSink 和 SimpleHbaseEventSerializer
a1.channels.hbaseC.type = memory
a1.channels.hbaseC.capacity = 10000
a1.channels.hbaseC.transactionCapacity = 10000
#HBase表名
a1.sinks.hbaseS.type = org.apache.flume.sink.hbase.HBaseSink
a1.sinks.hbaseS.table = weblogs
#HBase表的列族名称
a1.sinks.hbaseS.columnFamily = info
a1.sinks.hbaseS.serializer = org.apache.flume.sink.hbase.RegexHbaseEventSerializer
#正则匹配新闻数据去到对应的列族下的对应列(xxxx|xxxx|xxxx|xxxx|xxxx)
a1.sinks.hbaseS.serializer.regex = ^(.*)\\|(.*)\\|(.*)\\|(.*)\\|(.*)
a1.sinks.hbaseS.serializer.colNames =datatime,url,docno,contenttitle,content
#a1.sinks.hbaseS.serializer.rowKeyIndex = 0
# 组合sink和channel
a1.sinks.hbaseS.channel = hbaseC
# flume + kafka
a1.channels.kafkaC.type = memory
a1.channels.kafkaC.capacity = 10000
a1.channels.kafkaC.transactionCapacity = 10000
a1.sinks.kafkaS.channel = kafkaC
a1.sinks.kafkaS.type = org.apache.flume.sink.kafka.KafkaSink
a1.sinks.kafkaS.topic = weblogs
a1.sinks.kafkaS.brokerList = 192.168.25.136:9092
a1.sinks.kafkaS.zookeeperConnect = 192.168.25.136:2181
a1.sinks.kafkaS.requiredAcks = 1
a1.sinks.kafkaS.batchSize = 20
a1.sinks.kafkaS.serializer.class = kafka.serializer.StringEncoder
三 :Kafka+Spark Streaming +MySql 实时计算分析
1、数据库连接池编写(Java原生版 + Scala c3p0版)
附:MySql部署在Liunx,连接信息配置在db.properties
Java原生版:
package cn.yuysy.hotnews.realtime.db;
import java.io.File;
import java.io.FileInputStream;
import java.sql.Connection;
import java.sql.DriverManager;
import java.sql.SQLException;
import java.util.LinkedList;
import java.util.Properties;
/**
* 数据库连接池
* Created on 2018-11-15
* @author @author tangzhi mail:[email protected]
*/
public class ConnectionPool {
private static LinkedList<Connection> connectionQueue;
private static Properties prop ;
/**
* 驱动类
*/
static {
try {
prop = new Properties();
prop.load(new FileInputStream(new File("C:\\Users\\Administrator\\Hot_News\\src\\main\\scala\\cn\\yuysy\\hotnews\\realtime\\db\\db.properties")));
Class.forName(prop.getProperty("driverName").toString());
} catch (Exception e) {
e.printStackTrace();
}
}
/**
* 获取连接对象
*/
public synchronized Connection getConnection () {
if (connectionQueue == null || connectionQueue.size() == 0) {
connectionQueue = new LinkedList<Connection>();
for (int i = 0;i < 5;i ++) {
try {
Connection connection = DriverManager.getConnection(prop.getProperty("url").toString(), prop.getProperty("username").toString(), prop.getProperty("password").toString());
connectionQueue.add(connection);
} catch (SQLException e) {
e.printStackTrace();
}
}
}
return connectionQueue.poll();
}
/**
* 归还连接至连接池
*/
public void returnConnection(Connection connection) {
connectionQueue.add(connection);
}
}
Scala c3p0版:
package cn.yuysy.hotnews.realtime.db
import java.io.{File, FileInputStream, InputStream}
import java.sql.Connection
import java.util.Properties
import com.mchange.v2.c3p0.ComboPooledDataSource
import org.apache.spark.SparkFiles
/**
* C3P0数据库连接池
* Created on 2018-11-15
* @author tangzhi mail:[email protected]
*/
class c3p0ConnectionPool(isLocal: Boolean) extends Serializable {
private val cpds: ComboPooledDataSource = new ComboPooledDataSource(true)
private val prop = new Properties()
private var in: InputStream = _
isLocal match {
case true => in = getClass.getResourceAsStream("db.properties") //本地IDEA模式
case false => in = new FileInputStream(new File(SparkFiles.get("db.properties"))) //Liunx spark集群模式
}
/**
* 注册连接
* @return
*/
try {
prop.load(in);
cpds.setJdbcUrl(prop.getProperty("url").toString())
cpds.setDriverClass(prop.getProperty("driverName").toString())
cpds.setUser(prop.getProperty("username").toString())
cpds.setPassword(prop.getProperty("password").toString())
cpds.setMaxPoolSize(Integer.valueOf(prop.getProperty("maxPoolSize").toString()));
cpds.setMinPoolSize(Integer.valueOf(prop.getProperty("minPoolSize").toString()));
cpds.setAcquireIncrement(Integer.valueOf(prop.getProperty("acquireIncrement").toString()))
} catch {
case ex: Exception => ex.printStackTrace()
}
def getConnection: Connection={
try {
cpds.getConnection()
} catch {
case ex: Exception => ex.printStackTrace()
null
}
}
object c3p0ConnectionPool{
var connectionPool: c3p0ConnectionPool = _
def getc3p0ConnectionPool(isLocal: Boolean): c3p0ConnectionPool = {
synchronized {
if (connectionPool == null) {
connectionPool = new c3p0ConnectionPool(isLocal)
}
}
connectionPool
}
}
}
Q&A
Q1:本地运行spark streaming 程序读取kafka数据报错:
Exception in thread "main" java.lang.AssertionError: assertion failed: No output streams registered, so nothing to execute at scala
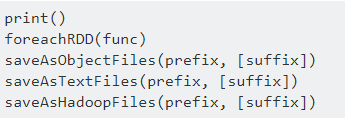
A1:spark streaming 算子运行没有触发Action 以下为常见action
Q2:spark streamign 实时计算处理后的数据写入MySqL乱码
A2:在数据库连接配置文件的URL后添加: ?useUnicode=true&characterEncoding=utf8即可
2、实时分析思路 + 部分代码
实时分析思路:
从kafka读取数据后(_._2)----->新闻数据------>先将value映射为Map[String,String]----->切割、根据key分组、聚合----->根据key值写sql------>写入MySql成功
部分代码:
package cn.yuysy.hotnews.realtime
import java.io.{File, FileInputStream}
import java.sql.{Connection, Statement}
import java.util.Properties
import cn.yuysy.hotnews.realtime.db.c3p0ConnectionPool
import org.apache.spark.{HashPartitioner, SparkConf}
import org.apache.spark.storage.StorageLevel
import org.apache.spark.streaming.kafka.KafkaUtils
import org.apache.spark.streaming.{Seconds, StreamingContext}
/**
* spark streaming从kafka获取数据进行实时计算然后下沉至MySql
* Created on 2018-11-15
* @author tangzhi mail:[email protected]
*/
object HotnewsRealTimeStreaming {
val updateFunc = (iter: Iterator[(String, Seq[Int], Option[Int])]) => {
//iter.flatMap(it=>Some(it._2.sum + it._3.getOrElse(0)).map(x=>(it._1,x)))
iter.flatMap { case (x, y, z) => Some(y.sum + z.getOrElse(0)).map(i => (x, i)) }
}
def main(args: Array[String]): Unit = {
// 设置日志打印级别
LoggerLevels.setStreamingLogLevels()
val prop = new Properties()
prop.load(new FileInputStream(new File("C:\\Users\\Administrator\\Hot_News\\src\\main\\scala\\cn\\yuysy\\hotnews\\realtime\\sparkstreaming-kafka.properties")))
val sparkConf = new SparkConf().setAppName("HotnewsRealTimeStreaming").setMaster("local[2]")
val ssc = new StreamingContext(sparkConf,Seconds(3))
//检查点文件存放地址
ssc.checkpoint("d://ck")
// 获取kafka主题(多个kafka主题)
val topicMap = prop.getProperty("topics").split(",").map((_, prop.getProperty("numThreads").toInt)).toMap
// 从kafka定时批量获取新闻数据
val line = KafkaUtils.createStream(ssc,prop.getProperty("zkQuorum"),prop.getProperty("group"),topicMap,StorageLevel.MEMORY_AND_DISK_SER).map(_._2)
/**
* spark 实时从kafka上拉取数据存入MySql数据库
*/
// 构造连接、结果集
var conn: Connection = null
var smt: Statement = null
// 1.将kafka value即新闻数据存入Map[String,String] ---> ["datetime","2018-11-18"]
def valueSplit(value: String): Map[String,String] = {
val x = value.split("\\|")
var valueMap: Map[String,String] = Map()
x.foreach(kvs => {
val kv = kvs.split("=")
if (kv != null && kv.length == 2) {
valueMap += (kv(0) -> kv(1))
}
})
valueMap
}
/**
* spark streaming 实时计算分析 写入MySql数据库
*/
line.flatMap(_.split("\\|")).map(valueSplit).map(x => {
(x.getOrElse("contenttitle",null),1)
}).updateStateByKey(updateFunc, new HashPartitioner(ssc.sparkContext.defaultParallelism), true).map(data => {
if (data._1 != null) {
try {
conn = c3p0ConnectionPool.getc3p0ConnectionPool(true).getConnection
conn.setAutoCommit(false)
smt = conn.createStatement()
val updateSql = "UPDATE testweblogs SET count = '"+data._2+"' where contenttitle = '" + data._1 + "'"
// val insertSql = "INSERT INTO testweblogs(contenttitle,count) VALUES ('" + data._1 + "','" + data._2 + "')"
smt.execute(updateSql)
conn.commit()
} catch {
case ex => ex.printStackTrace()
} finally {
if (smt != null) {
smt.close()
}
if (conn != null) {
conn.close()
}
}
}
}).print()
ssc.start()
ssc.awaitTermination()
}
}
object c3p0ConnectionPool{
var connectionPool: c3p0ConnectionPool = _
def getc3p0ConnectionPool(isLocal: Boolean): c3p0ConnectionPool = {
synchronized {
if (connectionPool == null) {
connectionPool = new c3p0ConnectionPool(isLocal)
}
}
connectionPool
}
}
四 :Kafka+HBase+Hive(Hadoop) 离线计算分析
1、Kafka对接Hbase已经完成
2、HBase对接Hive
处理思路:在Hive创建外部表weblogs连接HBase对应表weblogs
CREATE EXTERNAL TABLE weblogs(`id` string , `datatime` string , `url` string, `docno` string, `contenttitle` string,`content` string)
STORED BY 'org.apache.hadoop.hive.hbase.HBaseStorageHandler' //指定存储处理器
WITH SERDEPROPERTIES ("hbase.columns.mapping" = ":key,info:datatime,info:url,info:docno,info:contenttitle,info:content") //声明列族,列名
TBLPROPERTIES ("hbase.table.name" = "weblogs", "hbase.mapred.output.outputtable" = "weblogs");
//hbase.table.name声明HBase表名,为可选属性默认与Hive的表名相同,hbase.mapred.output.outputtable指定插入数据时写入的表,如果以后需要往表插入数据就需要指定该值


离线分析思路:
数据高速存入HBase---->通过外部表同步至Hive------>书写SQL完成数据离线统计---->选择时间间隔存入MySql----->前台展示
部分代码:
附:IDE远程访问Hive必须开启hiveserver2服务不然会出现连接拒绝错误
启动命令:./hive --service hiveserver2
package cn.yusys.hotnews.offline;
import cn.yusys.hotnews.dataconnection.ConnectionPool;
import java.io.File;
import java.io.FileInputStream;
import java.io.IOException;
import java.sql.*;
import java.util.Properties;
/**
* @ClassName HotnewsOfflineStreaming
* @Description 从Hive读取数据存入MySql
* @Author tangzhi mail:[email protected]
* * Created on 2018-11-20
**/
public class HotnewsOfflineStreaming {
public static void main (String[] args) throws IOException {
Connection connection = null ,connection1 = null;
Statement statement = null ,statement1 = null;
Properties prop = new Properties();
prop.load(new FileInputStream(new File("C:\\Users\\Administrator\\Hot_News\\src\\main\\java\\cn\\yusys\\hotnews\\offline\\db.properties")));
/**
* 1.从Hive读取数据
*/
try {
Class.forName(prop.getProperty("driverName").toString());
connection = DriverManager.getConnection(prop.getProperty("url").toString(), prop.getProperty("user").toString(), prop.getProperty("password").toString());
connection.setAutoCommit(false);
statement = connection.createStatement();
String hiveSql = "select count(1) from weblogs";
ResultSet resultSet = statement.executeQuery(hiveSql);
while (resultSet.next()) {
// 根据项目需求书写Sql
int count = resultSet.getInt(1);
/**
* 统计后的数据
*/
ConnectionPool connPool = new ConnectionPool();
connection1 = connPool.getConnection();
connection1.setAutoCommit(false);
statement1 = connection1.createStatement();
String sql = "INSERT INTO testweblogs2(count) VALUE('"+count+"')";
boolean execute = statement1.execute(sql);
connection1.commit();
if (!execute) {
// excute:false ....>插入或更新成功 true:查询成功
System.out.println("离线分析数据库更新成功");
}else {
System.out.println("离线分析数据库更新失败");
}
}
} catch (Exception e) {
e.printStackTrace();
} finally {
// 释放资源
if (connection != null && connection1 != null && statement != null && statement1 != null) {
try {
statement.close();
statement1.close();
connection.close();
connection1.close();
} catch (SQLException e) {
e.printStackTrace();
}
}
}
}
}
至此大数据分析处理部分已经结束接下来即是构建JavaEE工程进行前端WEB展示
五 :JavaEE工程前端展示(SSM)
1、SSM工程搭建(略)
2、采用WebSocket全双工通信方式使前段与后端实现实时交换
Q&A
Q1:测试SSM框架搭建时出现数据无法加载问题
A1:1.当配置文件中没有指定mapper.xml具体路径时应把Mapper类与Mapper.xml文件放在同一包下
2.也有可能spring无法加载到mapper.xml文件可在项目pom.xml中添加
<resources>
<resource>
<directory>src/main/java</directory>
<includes>
<include>**/*.xml</include>
</includes>
</resource>
<resource>
<directory>src/main/resources</directory>
</resource>
</resources>
Q1:通过WebSocke通信时报错:
A1:1.若是在MVC模式下确认类上是否有@ServerEndpoint(value = "/websocket", configurator = SpringConfigurator.class)注解
2.服务器版本要求:

3.配置文件xml应当是如下配置
其中 <scope>provided</scope>没写则会造成runtime 冲突 也会引起404 not found
<dependency>
<groupId>javax.websocket</groupId>
<artifactId>javax.websocket-api</artifactId>
<version>1.0</version>
<scope>provided</scope>
</dependency>
#部分主要代码
package service.impl;
import com.alibaba.fastjson.JSON;
import entity.Weblog;
import org.springframework.beans.factory.annotation.Autowired;
import org.springframework.web.socket.server.standard.SpringConfigurator;
import service.WeblogService;
import javax.websocket.OnClose;
import javax.websocket.OnMessage;
import javax.websocket.OnOpen;
import javax.websocket.Session;
import javax.websocket.server.ServerEndpoint;
import java.io.IOException;
import java.util.HashMap;
import java.util.List;
import java.util.Map;
/**
* @ClassName WebSocket
* @Description 实现前端与数据库全双工通信
* @Author Administrator
* @Version 1.0
**/
@ServerEndpoint(value = "/websocket", configurator = SpringConfigurator.class)
public class WebSocket {
@Autowired
private WeblogService weblogService;
@OnMessage
public void onMessage(String message, Session session) throws IOException, InterruptedException {
String[] titleNames = new String[10];
Long[] titleCounts = new Long[10];
Long[] titleSum = new Long[1];
while (true) {
Map<String,Object> map = new HashMap<String, Object>();
List<Weblog> weblogList = weblogService.webcount();
System.out.println(weblogList);
for (int i = 0;i<weblogList.size();i++) {
titleNames[i] = weblogList.get(i).getContenttitle();
titleCounts[i] = weblogList.get(i).getCount();
}
titleSum[0] = weblogService.websum();
map.put("titleName", titleNames);
map.put("titleCount", titleCounts);
map.put("titleSum", titleSum);
System.out.print(map);
session.getBasicRemote().sendText(JSON.toJSONString(map));
Thread.sleep(1000);
map.clear();
}
}
@OnOpen
public void onOpen() {
System.out.println("Client connected");
}
@OnClose
public void onClose() {
System.out.println("Connection closed");
}
}
至此前端展示工程也已经完成,也就意味着项目一期完成
注:原项目贡献者阿里云云栖社区地址:https://yq.aliyun.com/articles/557454