版权声明:本文为博主原创文章,未经博主允许不得转载。 https://blog.csdn.net/liuphahaha/article/details/50719275
- 什么是Homography
在图1中有两张书的平面图,两张图分别有四个相对位置相同的点,Homography就是一个变换(3*3矩阵),将一张图中的点映射到另一张图中对应的点
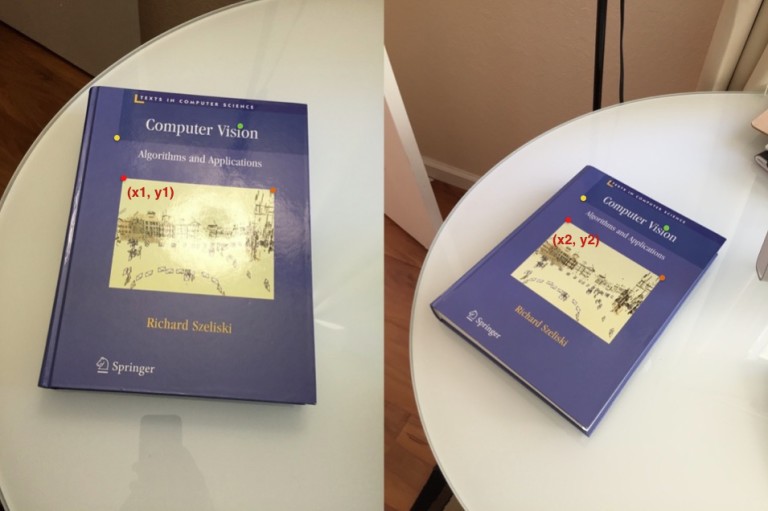
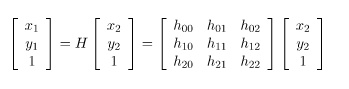
因为Homography是一个3*3矩阵,所以可以写成
H=⎡⎣⎢h00h10h20h01h11h21h02h12h22⎤⎦⎥H=[h00h01h02h10h11h12h20h21h22]
两张图间的H映射关系就可以表示成
Homography应用:图像对齐
上面公式得出的H ,对于图一中的所有点都是正确的,换句话说,可以用H将第一个图中的点映射到第二张图。
如何得到一个Homography
要得到两张图片的H,就必须至少知道4个相同对应位置的点,opencv中可以利用findHomography正确得到
// pts_src and pts_dst are vectors of points in source
// and destination images. They are of type vector<Point2f>.
// We need at least 4 corresponding points.

Mat h = findHomography(pts_src, pts_dst);

// The calculated homography can be used to warp
// the source image to destination. im_src and im_dst are
// of type Mat. Size is the size (width,height) of im_dst.
warpPerspective(im_src, im_dst, h, size);
- 1
- 2
- 3
- 4
- 5
- 6
- 7
- 8
- 9
- 10
OpenCV C++ Homography的一个简单例子:
#include "opencv2/opencv.hpp"

using namespace cv;
using namespace std;

int main( int argc, char** argv)
{
    // Read source image.
    Mat im_src = imread("book2.jpg");
    // Four corners of the book in source image
    vector<Point2f> pts_src;
    pts_src.push_back(Point2f(141, 131));
    pts_src.push_back(Point2f(480, 159));
    pts_src.push_back(Point2f(493, 630));
    pts_src.push_back(Point2f(64, 601));


    // Read destination image.
    Mat im_dst = imread("book1.jpg");
    // Four corners of the book in destination image.
    vector<Point2f> pts_dst;
    pts_dst.push_back(Point2f(318, 256));
    pts_dst.push_back(Point2f(534, 372));
    pts_dst.push_back(Point2f(316, 670));
    pts_dst.push_back(Point2f(73, 473));

    // Calculate Homography
    Mat h = findHomography(pts_src, pts_dst);

    // Output image
    Mat im_out;
    // Warp source image to destination based on homography
    warpPerspective(im_src, im_out, h, im_dst.size());

    // Display images
    imshow("Source Image", im_src);
    imshow("Destination Image", im_dst);
    imshow("Warped Source Image", im_out);

    waitKey(0);
}
- 1
- 2
- 3
- 4
- 5
- 6
- 7
- 8
- 9
- 10
- 11
- 12
- 13
- 14
- 15
- 16
- 17
- 18
- 19
- 20
- 21
- 22
- 23
- 24
- 25
- 26
- 27
- 28
- 29
- 30
- 31
- 32
- 33
- 34
- 35
- 36
- 37
- 38
- 39
- 40
- 41
Homography应用:图像矫正
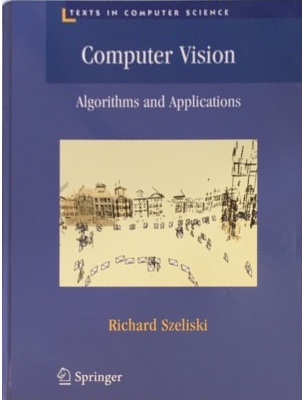
假设你有一张如下所示的图片
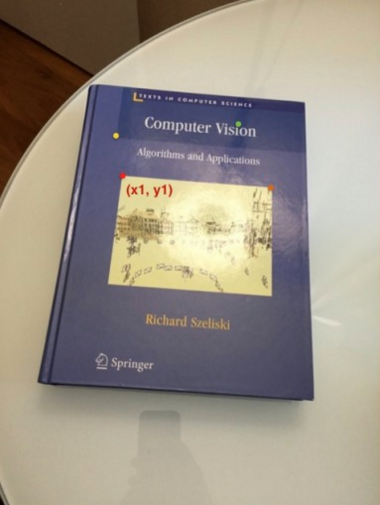
你想点击图中书的四个顶点,然后得到正放的书:
该如何做?
利用Homography可以做到这点。
1.首先获取书本四个顶点的坐标 pts_src
2.然后我们需要知道书本的宽高比,此书的宽高比是3/4,所以可使输出图像的size 为300*400,就可设其四个点的坐标为(0,0),(299,0),(299,399),(0,399)保存在pts_dst中
3.通过pts_src和pts_dst 获取homography
4.对原图应用homography 得到输出
#include <opencv2/opencv.hpp>

using namespace cv;
using namespace std;

struct userdata{
    Mat im;
    vector<Point2f> points;
};


void mouseHandler(int event, int x, int y, int flags, void* data_ptr)
{
    if  ( event == EVENT_LBUTTONDOWN )
    {
        userdata *data = ((userdata *) data_ptr);
        circle(data->im, Point(x,y),3,Scalar(0,0,255), 5, CV_AA);
        imshow("Image", data->im);
        if (data->points.size() < 4)
        {
            data->points.push_back(Point2f(x,y));
        }
    }

}


void main()
{

    // Read source image.
    Mat im_src = imread("book1.jpg");

    // Destination image. The aspect ratio of the book is 3/4
    Size size(300,400);
    Mat im_dst = Mat::zeros(size,CV_8UC3);


    // Create a vector of destination points.
    vector<Point2f> pts_dst;

    pts_dst.push_back(Point2f(0,0));
    pts_dst.push_back(Point2f(size.width - 1, 0));
    pts_dst.push_back(Point2f(size.width - 1, size.height -1));
    pts_dst.push_back(Point2f(0, size.height - 1 ));

    // Set data for mouse event
    Mat im_temp = im_src.clone();
    userdata data;
    data.im = im_temp;

    cout << "Click on the four corners of the book -- top left first and" << endl
        << "bottom left last -- and then hit ENTER" << endl;

    // Show image and wait for 4 clicks.
    imshow("Image", im_temp);
    // Set the callback function for any mouse event
    setMouseCallback("Image", mouseHandler, &data);
    waitKey(0);

    // Calculate the homography
    Mat h = findHomography(data.points, pts_dst);

    // Warp source image to destination
    warpPerspective(im_src, im_dst, h, size);

    // Show image
    imshow("Image", im_dst);
    waitKey(0);


}
- 1
- 2
- 3
- 4
- 5
- 6
- 7
- 8
- 9
- 10
- 11
- 12
- 13
- 14
- 15
- 16
- 17
- 18
- 19
- 20
- 21
- 22
- 23
- 24
- 25
- 26
- 27
- 28
- 29
- 30
- 31
- 32
- 33
- 34
- 35
- 36
- 37
- 38
- 39
- 40
- 41
- 42
- 43
- 44
- 45
- 46
- 47
- 48
- 49
- 50
- 51
- 52
- 53
- 54
- 55
- 56
- 57
- 58
- 59
- 60
- 61
- 62
- 63
- 64
- 65
- 66
- 67
- 68
- 69
- 70
- 71
- 72
- 73
- 74
Homography应用:虚拟广告牌
在足球或者棒球体育直播中,经常可以看到球场旁边有虚拟广告,并且还会根据地区,国家的不同播放不同的广告,这是如何做到的?
看完此篇博客,你应该就能知道如何实现了。原理跟前一个差不多,这里直接上代码
#include <opencv2/opencv.hpp>

using namespace cv;
using namespace std;

struct userdata{
    Mat im;
    vector<Point2f> points;
};


void mouseHandler(int event, int x, int y, int flags, void* data_ptr)
{
    if  ( event == EVENT_LBUTTONDOWN )
    {
        userdata *data = ((userdata *) data_ptr);
        circle(data->im, Point(x,y),3,Scalar(0,255,255), 5, CV_AA);
        imshow("Image", data->im);
        if (data->points.size() < 4)
        {
            data->points.push_back(Point2f(x,y));
        }
    }

}


int main( int argc, char** argv)
{

    // Read in the image.
    Mat im_src = imread("first-image.jpg");
    Size size = im_src.size();

    // Create a vector of points.
    vector<Point2f> pts_src;
    pts_src.push_back(Point2f(0,0));
    pts_src.push_back(Point2f(size.width - 1, 0));
    pts_src.push_back(Point2f(size.width - 1, size.height -1));
    pts_src.push_back(Point2f(0, size.height - 1 ));


    // Destination image
    Mat im_dst = imread("times-square.jpg");


    // Set data for mouse handler
    Mat im_temp = im_dst.clone();
    userdata data;
    data.im = im_temp;


    //show the image
    imshow("Image", im_temp);

    cout << "Click on four corners of a billboard and then press ENTER" << endl;
    //set the callback function for any mouse event
    setMouseCallback("Image", mouseHandler, &data);
    waitKey(0);

    // Calculate Homography between source and destination points
    Mat h = findHomography(pts_src, data.points);

    // Warp source image
    warpPerspective(im_src, im_temp, h, im_temp.size());

    // Extract four points from mouse data
    Point pts_dst[4];
    for( int i = 0; i < 4; i++)
    {
        pts_dst[i] = data.points[i];
    }

    // Black out polygonal area in destination image.
    fillConvexPoly(im_dst, pts_dst, 4, Scalar(0), CV_AA);

    // Add warped source image to destination image.
    im_dst = im_dst + im_temp;

    // Display image.
    imshow("Image", im_dst);
    waitKey(0);

    return 0;
}
- 1
- 2
- 3
- 4
- 5
- 6
- 7
- 8
- 9
- 10
- 11
- 12
- 13
- 14
- 15
- 16
- 17
- 18
- 19
- 20
- 21
- 22
- 23
- 24
- 25
- 26
- 27
- 28
- 29
- 30
- 31
- 32
- 33
- 34
- 35
- 36
- 37
- 38
- 39
- 40
- 41
- 42
- 43
- 44
- 45
- 46
- 47
- 48
- 49
- 50
- 51
- 52
- 53
- 54
- 55
- 56
- 57
- 58
- 59
- 60
- 61
- 62
- 63
- 64
- 65
- 66
- 67
- 68
- 69
- 70
- 71
- 72
- 73
- 74
- 75
- 76
- 77
- 78
- 79
- 80
- 81
- 82
- 83
- 84
- 85
- 86
- 87
- 88


结果:

版权声明:本文为博主原创文章,未经博主允许不得转载。 https://blog.csdn.net/liuphahaha/article/details/50719275
- 什么是Homography
在图1中有两张书的平面图,两张图分别有四个相对位置相同的点,Homography就是一个变换(3*3矩阵),将一张图中的点映射到另一张图中对应的点