目录
《圣经》记载,当时人类联合起来兴建希望能通往天堂的高塔;为了阻止人类的计划,上帝让人类说不同的语言,使人类相互之间不能沟通,计划因此失败。
像“Homography”这样的术语经常提醒我,我们仍然在与沟通斗争。Homography(单应性)是一个简单的概念,却有一个奇怪的名字!
1 介绍
1.1 什么是Homography
考虑图1所示的同一个平面(比如书皮)的两幅图像。红点表示两幅图像中相同的物理坐标点。在计算机视觉术语中,我们称之为对应点。

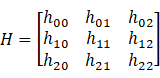
Homography就是将一张图像上的点映射到另一张图像上对应点的3x3变换矩阵。因此该矩阵我们可以表示为:
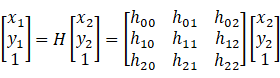
让我们考虑一组对应点,![]() 位于第一张图像和
位于第一张图像和![]() 位于第二张图像中。然后,Homography以下列方式映射它们:
位于第二张图像中。然后,Homography以下列方式映射它们:
1.2 使用Homography进行图像对齐
只要它们位于现实世界中的同一平面上,上述等式对于所有对应点都是正确的。换句话说,您可以将单应性应用于第一张图像,第一张图像中的书籍将与第二张图像中的书籍对齐!见下图。那么对于不在此平面上的点呢?这时再应用 Homography 就无法再对齐到对应点了。比如下图的桌子,地板。对于这种图像中有多个平面的情况,我们就需要针对每一个平面使用单独的Homography进行对齐。

1.3 Homography的应用-全景拼接
在上一节中,我们了解到如果已知两个图像之间的Homography,我们可以将一个图像映射到另一个图像上。但是,有一个很大的问题。图像必须位于同一个平面(书的顶部),并且只有该平面部分才会正确对齐。事实证明,如果您拍摄任何不包括一个平面的场景,然后通过旋转相机拍摄第二张照片,这两张图片就可以通过Homography相关联!您刚刚拍摄的完全随意的3D场景的两个图像可以用Homography相关联。这两个图像将共享一些可以对齐和拼接的公共区域,并且可以获得两个图像的全景图。然而这只是很粗糙的全景拼接,但基本原则是使用Homography和智能拼接。
2 Homography的计算
要计算两个图像之间的单应性,您需要知道两个图像之间至少有4个点对应关系。如果你有超过4个对应点,那就更好了。原因在于对于 H 矩阵,一般设 H22 为 1, 所以 H 有 8 个未知参数。至少需要8 个等式才能求解。而一组对应点可以提供 2 个等式,所以,至少需要 4 组对应点(任意三点不共线)来求得 H。OpenCV将稳健地估计最适合所有对应点的单应性。通常,这些点对应是通过匹配图像之间的SIFT或SURF等特征自动找到的,但在这篇文章中我们只是提前设定特征点。代码如下:
C++代码:
// OpenCV_Homography.cpp : 此文件包含 "main" 函数。程序执行将在此处开始并结束。
//

#include "pch.h"
#include <iostream>
#include <opencv2/opencv.hpp>

using namespace cv;
using namespace std;


int main(int argc, char** argv)
{
	// Read source image 原图
	Mat im_src = imread("./image/book2.jpg");
	// Four corners of the book in source image 4个角点
	vector<Point2f> pts_src;
	pts_src.push_back(Point2f(141, 131));
	pts_src.push_back(Point2f(480, 159));
	pts_src.push_back(Point2f(493, 630));
	pts_src.push_back(Point2f(64, 601));


	// Read destination image.目标图
	Mat im_dst = imread("./image/book1.jpg");

	// Four corners of the book in destination image. 4个对应点
	vector<Point2f> pts_dst;
	pts_dst.push_back(Point2f(318, 256));
	pts_dst.push_back(Point2f(534, 372));
	pts_dst.push_back(Point2f(316, 670));
	pts_dst.push_back(Point2f(73, 473));

	// Calculate Homography 计算Homography需要至少4组对应点.
	// pts_src : 源图像点坐标,pts_dst : 结果图像坐标
	Mat h = findHomography(pts_src, pts_dst);

	// Output image
	Mat im_out;
	// Warp source image to destination based on homography 仿射变换
	warpPerspective(im_src, im_out, h, im_dst.size());

	// Display images
	imshow("Source Image", im_src);
	imshow("Destination Image", im_dst);
	imshow("Warped Source Image", im_out);

	waitKey(0);
	return 0;
}
python代码:
#!/usr/bin/env python

import cv2
import numpy as np

if __name__ == '__main__' :

    # Read source image.
    im_src = cv2.imread('./image/book2.jpg')
    # Four corners of the book in source image
    pts_src = np.array([[141, 131], [480, 159], [493, 630],[64, 601]])


    # Read destination image.
    im_dst = cv2.imread('./image/book1.jpg')
    # Four corners of the book in destination image.
    pts_dst = np.array([[318, 256],[534, 372],[316, 670],[73, 473]])

    # Calculate Homography
    h, status = cv2.findHomography(pts_src, pts_dst)

    # Warp source image to destination based on homography
    im_out = cv2.warpPerspective(im_src, h, (im_dst.shape[1],im_dst.shape[0]))

    # Display images
    cv2.imshow("Source Image", im_src)
    cv2.imshow("Destination Image", im_dst)
    cv2.imshow("Warped Source Image", im_out)

    cv2.waitKey(0)
3 总结
举个例子,例如虚拟广告牌,把下图1替换下图2的广告,得到下图3


实际步骤很简单
1 用选择上图2时代广场上广告屏的 4 个顶点,作为 pts_dst;
2 选取欲嵌入的图像的 4 个顶点,假设图像尺寸 W x H, 那么 四个顶点就是 (0,0), (0, W-1), (H - 1, 0), (H - 1, W - 1)。作为pts_src 类似下面代码,这样pts_src 和pts_dst就是一组对应点;
    // Create a vector of points.
    vector<Point2f> pts_src;
    pts_src.push_back(Point2f(0,0));
    pts_src.push_back(Point2f(size.width - 1, 0));
    pts_src.push_back(Point2f(size.width - 1, size.height -1));
    pts_src.push_back(Point2f(0, size.height - 1 ));
3 使用 pts_dst 和 pts_src 计算 Homography;运用opencv中的findHomography就行了
	// Calculate Homography 计算Homography需要至少4组对应点.
	// pts_src : 源图像点坐标,pts_dst : 结果图像坐标
	Mat h = findHomography(pts_src, pts_dst);
4 对 源图像应用计算得到的 Homography 从而 混合到 目标图像上;然后计算仿射变化。
    // Warp source image
    warpPerspective(im_src, im_temp, h, im_temp.size());
由于这个例子代码简单,具体代码就不贴出来了。所有代码见:
https://github.com/luohenyueji/OpenCV-Practical-Exercise
4 参考
https://www.learnopencv.com/homography-examples-using-opencv-python-c/