最近在计算机视觉界流行一个算法,神经风格迁移(neural style transfer),出自论文《 A Neural Algorithm of Artistic Style》,今天来让我们看看这究竟是怎么一回事。
我们有一个内容图片(拿学校大门献丑了):

一个风格图片:

最终生成图片:

是不是还是相当有意思的,我先介绍原理,一会给代码。
首先,在介绍原理之前,确保你明白卷积神经网络(CNN)原理,CNN不是本篇的重点就不再做多余介绍。

如上图所示,将内容图片简写为C,风格图片简写为S,生成图片简写为G。
那么我们内容损失函数定义为J(C,G),风格损失函数定义为J(S,G),总的损失函数为J(G)=αJ(C,G)+βJ(S,G)
其中α、β为可调的超参数,分别掌控内容图片与风格图片的权重大小。
使用梯度下降来训练出生成图片:

请注意,此时梯度下降是要训练出生成图像,而不是weights和bias。
那么内容损失函数J(C,G)和风格损失函数J(S,G)具体是什么公式呢?我们先说J(C,G):

这里给的tips:1、用CNN的隐藏层来计算内容损失函数 2、用VGG等预训练好的模型来进行训练,否则你会发现,以你电脑的计算能力要训练一次得等个两三年。 3、a[l](C)的意思为对于内容图片C,a[l](C)为在CNN的第l层经过激活函数后的值。a[l](G)的意思为对于生成图片G,a[l](G)为在CNN的第l层经过激活函数后的值。 4、所以当a[l](C)与a[l](G)越相似的时候,这俩图片的内容越相似 5、那么如何定义这俩图片相似?给出内容损失函数 J(C,G)=||a[l](C)-a[l](G)||^2/2
C代表提供Content的图像, G表示生成的图像,Pl和Fl分别代表它们对于l层的响应,因此l层的Content Loss:
J(C,G)=∑i,j(Flij-Plij)^2/2
再来看风格损失函数J(S,G):

假设在CNN某个隐藏层,高为nh,宽为nw,通道数为nc。假设其有五个通道,如上图所示用不同颜色标识。我们现在就看红色的通道和黄色的通道。可视化它们,如左下角的图所示,红色的通道找到了竖条纹的特征,黄色的通道找到了橙色背景的特征。那么现在问题来了,这两个通道的相关性是多大呢?
先定义相关性:如果竖条纹出现时呈现橙色背景很多,那就说明相关性很大。如果竖条纹出现时基本不是橙色背景,说明相关性很小。
OK,我们来看下一张图:

定义i,j,k。 i为此隐藏层的高,j为宽,k为通道。G (kk') [l]的意思是在第l层k通道和k'通道的相关性,公式右上角的(s)代表风格图片,(G)代表生成图片。
那么计算k通道和k'通道相关性的公式如上图所示,遍历所有i和j(即每个通道中的所有点),将两个通道此点的值相乘,累积之和。
此矩阵在此称为风格矩阵,但因为在线性代数里叫做gram矩阵,因此在此被写为G。
我扩展一下线性代数吧,因为这里确实容易乱。gram矩阵:
多用于衡量向量相关度,在这里因为每一个通道都是一个矩阵,所以衡量两个不同通道相关度就用到了gram矩阵。
G=两个通道的内积。内积定义(下方公式i和j是从1累加到n,因为排版问题可能显示会有错误):
为矩阵 A,B 的内积。其中, Trace(A) 为矩阵 A 的迹,简记为 Tr(A) 。
好了如果有不懂的自行百度吧,实在不懂评论问我。线性代数内容不要求掌握。
顺便提一句,本文用的“通道”一词,在某些文献中可能会被称为"channel"或者"features map".
因此我们得到了风格损失函数,就是计算生成图片的gram矩阵(对于任意k,k'都要进行计算),同时计算风格图片的gram矩阵,然后相减:

前面加的归一化常数项可加可不加,因为都可以用β来调节。若是你把所有隐藏层都求一遍风格损失,然后全加起来效果会更好,因此λ用于定义每层权重。
总的损失函数为J(G)=αJ(C,G)+βJ(S,G)
接下来给出代码:
首先声明版权,本代码改编自 github:https://github.com/anishathalye/neural-style,感谢作者开源。
但如果你不想看繁琐的英文,以及期望有更易读的中文注释与可直接运行调试的程序,新的代码已上传至github:https://github.com/wenqiwenqi1/neural-style
同时请下载VGG19预训练模型放于代码根目录中:http://www.vlfeat.org/matconvnet/models/beta16/imagenet-vgg-verydeep-19.mat
环境介绍
- Python3.5
- TensorFlow 1.3
- VGG19
VGG19 网络结构
每一层神经网络都会利用上一层的输出来进一步提取更加复杂的特征,直到复杂到能被用来识别物体为止,所以每一层都可以被看做很多个局部特征的提取器。VGG19 在物体识别方面的精度甩了之前的算法一大截,之后的物体识别系统也基本都改用深度学习了。VGG19结构如下:
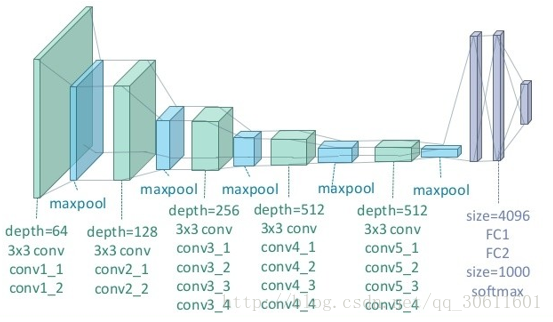
(图片来自https://zhuanlan.zhihu.com/p/26746283)
代码详解:
源码主要包含了四个文件:neural_style.py、stylize.py、vgg.py以及begin.py
neural_style.py:外部接口函数,定义了函数的主要参数以及部分参数的默认值,包含对图像的读取和存贮,对输入图像进行resize,权值分配等操作,并将参数以及resize的图片传入stylize.py中。需在命令行中使用。
stylize.py:核心代码,包含了训练、优化等过程。
vgg.py:定义了网络模型以及相关的运算。
begin.py:可直接在ide中使用,方便调试运行程序。
我们可以使用下面的代码vgg.py读取VGG-19神经网络,用于构造Neural Style模型。
import tensorflow as tf
import numpy as np
import scipy.io

VGG19_LAYERS = (
    'conv1_1', 'relu1_1', 'conv1_2', 'relu1_2', 'pool1',

    'conv2_1', 'relu2_1', 'conv2_2', 'relu2_2', 'pool2',

    'conv3_1', 'relu3_1', 'conv3_2', 'relu3_2', 'conv3_3',
    'relu3_3', 'conv3_4', 'relu3_4', 'pool3',

    'conv4_1', 'relu4_1', 'conv4_2', 'relu4_2', 'conv4_3',
    'relu4_3', 'conv4_4', 'relu4_4', 'pool4',

    'conv5_1', 'relu5_1', 'conv5_2', 'relu5_2', 'conv5_3',
    'relu5_3', 'conv5_4', 'relu5_4'
)

##我们需要的信息是每层神经网络的kernels和bias
def load_net(data_path):
    data = scipy.io.loadmat(data_path)
    if not all(i in data for i in ('layers', 'classes', 'normalization')):   #判断这几个变量名是否在字典里
        raise ValueError("You're using the wrong VGG19 data. Please follow the instructions in the README to download the correct data.")
    mean = data['normalization'][0][0][0]
    mean_pixel = np.mean(mean, axis=(0, 1))  #先按0轴求均值,再按1轴求均值。0轴为行,1轴为列
    weights = data['layers'][0]
    return weights, mean_pixel

def net_preloaded(weights, input_image, pooling):
    net = {}
    current = input_image
    for i, name in enumerate(VGG19_LAYERS):
        kind = name[:4]
        if kind == 'conv':
            kernels, bias = weights[i][0][0][0][0]
            # matconvnet: weights are [width, height, in_channels, out_channels]
            # tensorflow: weights are [height, width, in_channels, out_channels]
            kernels = np.transpose(kernels, (1, 0, 2, 3))   #因为tf和mat的weights位置不一样,所以要进行转置
            bias = bias.reshape(-1)
            current = _conv_layer(current, kernels, bias)
        elif kind == 'relu':
            current = tf.nn.relu(current)
        elif kind == 'pool':
            current = _pool_layer(current, pooling)
        net[name] = current

    assert len(net) == len(VGG19_LAYERS)
    return net

def _conv_layer(input, weights, bias):
    conv = tf.nn.conv2d(input, tf.constant(weights), strides=(1, 1, 1, 1),
            padding='SAME')
    return tf.nn.bias_add(conv, bias)


def _pool_layer(input, pooling):
    if pooling == 'avg':
        return tf.nn.avg_pool(input, ksize=(1, 2, 2, 1), strides=(1, 2, 2, 1),
                padding='SAME')
    else:
        return tf.nn.max_pool(input, ksize=(1, 2, 2, 1), strides=(1, 2, 2, 1),
                padding='SAME')

def preprocess(image, mean_pixel):
    return image - mean_pixel


def unprocess(image, mean_pixel):
    return image + mean_pixel
# Copyright (c) 2015-2017 Anish Athalye. Released under GPLv3.

import os

import numpy as np
import scipy.misc

from stylize import stylize

import math
from argparse import ArgumentParser

from PIL import Image

# default arguments
CONTENT_WEIGHT = 5e0
CONTENT_WEIGHT_BLEND = 1
STYLE_WEIGHT = 5e2
TV_WEIGHT = 1e2
STYLE_LAYER_WEIGHT_EXP = 1
LEARNING_RATE = 1e1
BETA1 = 0.9
BETA2 = 0.999
EPSILON = 1e-08
STYLE_SCALE = 1.0
ITERATIONS = 1000
VGG_PATH = 'imagenet-vgg-verydeep-19.mat'
POOLING = 'max'

def build_parser():
    parser = ArgumentParser()
    #ArgumentParser为python接收命令行信息工具
    #required - 该命令行选项是否可以省略(只针对可选参数)。
    #help - 参数的简短描述。
    #metavar - 参数在帮助信息中的名字。
    #dest - 给parse_args()返回的对象要添加的属性名称。
    parser.add_argument('--content',
            dest='content', help='content image',
            metavar='CONTENT', required=True)
    parser.add_argument('--styles',
            dest='styles',
            nargs='+', help='one or more style images',
            metavar='STYLE', required=True)
    parser.add_argument('--output',
            dest='output', help='output path',
            metavar='OUTPUT', required=True)
    parser.add_argument('--iterations', type=int,
            dest='iterations', help='iterations (default %(default)s)',
            metavar='ITERATIONS', default=ITERATIONS)
    parser.add_argument('--print-iterations', type=int,
            dest='print_iterations', help='statistics printing frequency',
            metavar='PRINT_ITERATIONS')
    parser.add_argument('--checkpoint-output',
            dest='checkpoint_output', help='checkpoint output format, e.g. output%%s.jpg',
            metavar='OUTPUT')
    parser.add_argument('--checkpoint-iterations', type=int,
            dest='checkpoint_iterations', help='checkpoint frequency',
            metavar='CHECKPOINT_ITERATIONS')
    parser.add_argument('--width', type=int,
            dest='width', help='output width',
            metavar='WIDTH')
    parser.add_argument('--style-scales', type=float,
            dest='style_scales',
            nargs='+', help='one or more style scales',
            metavar='STYLE_SCALE')
    parser.add_argument('--network',
            dest='network', help='path to network parameters (default %(default)s)',
            metavar='VGG_PATH', default=VGG_PATH)
    parser.add_argument('--content-weight-blend', type=float,
            dest='content_weight_blend', help='content weight blend, conv4_2 * blend + conv5_2 * (1-blend) (default %(default)s)',
            metavar='CONTENT_WEIGHT_BLEND', default=CONTENT_WEIGHT_BLEND)
    parser.add_argument('--content-weight', type=float,
            dest='content_weight', help='content weight (default %(default)s)',
            metavar='CONTENT_WEIGHT', default=CONTENT_WEIGHT)
    parser.add_argument('--style-weight', type=float,
            dest='style_weight', help='style weight (default %(default)s)',
            metavar='STYLE_WEIGHT', default=STYLE_WEIGHT)
    parser.add_argument('--style-layer-weight-exp', type=float,
            dest='style_layer_weight_exp', help='style layer weight exponentional increase - weight(layer<n+1>) = weight_exp*weight(layer<n>) (default %(default)s)',
            metavar='STYLE_LAYER_WEIGHT_EXP', default=STYLE_LAYER_WEIGHT_EXP)
    parser.add_argument('--style-blend-weights', type=float,
            dest='style_blend_weights', help='style blending weights',
            nargs='+', metavar='STYLE_BLEND_WEIGHT')
    parser.add_argument('--tv-weight', type=float,
            dest='tv_weight', help='total variation regularization weight (default %(default)s)',
            metavar='TV_WEIGHT', default=TV_WEIGHT)
    parser.add_argument('--learning-rate', type=float,
            dest='learning_rate', help='learning rate (default %(default)s)',
            metavar='LEARNING_RATE', default=LEARNING_RATE)
    parser.add_argument('--beta1', type=float,
            dest='beta1', help='Adam: beta1 parameter (default %(default)s)',
            metavar='BETA1', default=BETA1)
    parser.add_argument('--beta2', type=float,
            dest='beta2', help='Adam: beta2 parameter (default %(default)s)',
            metavar='BETA2', default=BETA2)
    parser.add_argument('--eps', type=float,
            dest='epsilon', help='Adam: epsilon parameter (default %(default)s)',
            metavar='EPSILON', default=EPSILON)
    parser.add_argument('--initial',
            dest='initial', help='initial image',
            metavar='INITIAL')
    parser.add_argument('--initial-noiseblend', type=float,
            dest='initial_noiseblend', help='ratio of blending initial image with normalized noise (if no initial image specified, content image is used) (default %(default)s)',
            metavar='INITIAL_NOISEBLEND')
    parser.add_argument('--preserve-colors', action='store_true',
            dest='preserve_colors', help='style-only transfer (preserving colors) - if color transfer is not needed')
    parser.add_argument('--pooling',
            dest='pooling', help='pooling layer configuration: max or avg (default %(default)s)',
            metavar='POOLING', default=POOLING)
    return parser


def main():
    parser = build_parser()  #创建剖析器
    options = parser.parse_args()  #拿到数据

    if not os.path.isfile(options.network):  #若预训练模型不存在
        parser.error("Network %s does not exist. (Did you forget to download it?)" % options.network)

    content_image = imread(options.content)  #读取content图片
    style_images = [imread(style) for style in options.styles]   #读取style图片,可以有多个

    width = options.width
    if width is not None:      #若有输入内容图片的宽度,则需重新调整内容图片shape
        new_shape = (int(math.floor(float(content_image.shape[0]) /
                content_image.shape[1] * width)), width)
        content_image = scipy.misc.imresize(content_image, new_shape)
    target_shape = content_image.shape   #此为内容图片调整后的shape
    for i in range(len(style_images)):   #调整style图片规模
        style_scale = STYLE_SCALE
        if options.style_scales is not None:
            style_scale = options.style_scales[i]
        style_images[i] = scipy.misc.imresize(style_images[i], style_scale *
                target_shape[1] / style_images[i].shape[1])

    style_blend_weights = options.style_blend_weights   #获取风格图片集的权重,即分配是否更看重某张风格图
    if style_blend_weights is None:
        # default is equal weights
        style_blend_weights = [1.0/len(style_images) for _ in style_images] #若用户未输入,则平均分配
    else:
        total_blend_weight = sum(style_blend_weights)
        style_blend_weights = [weight/total_blend_weight
                               for weight in style_blend_weights]

    initial = options.initial           #获取初始图像
    if initial is not None:
        initial = scipy.misc.imresize(imread(initial), content_image.shape[:2])
        # Initial guess is specified, but not noiseblend - no noise should be blended
        if options.initial_noiseblend is None:
            options.initial_noiseblend = 0.0
    else:
        # Neither inital, nor noiseblend is provided, falling back to random generated initial guess
        if options.initial_noiseblend is None:
            options.initial_noiseblend = 1.0
        if options.initial_noiseblend < 1.0:
            initial = content_image

    if options.checkpoint_output and "%s" not in options.checkpoint_output:  #若需保存中间图片且输入中没有%s
        parser.error("To save intermediate images, the checkpoint output "
                     "parameter must contain `%s` (e.g. `foo%s.jpg`)")

    for iteration, image in stylize(
        network=options.network,
        initial=initial,
        initial_noiseblend=options.initial_noiseblend,
        content=content_image,
        styles=style_images,
        preserve_colors=options.preserve_colors,
        iterations=options.iterations,
        content_weight=options.content_weight,
        content_weight_blend=options.content_weight_blend,
        style_weight=options.style_weight,
        style_layer_weight_exp=options.style_layer_weight_exp,
        style_blend_weights=style_blend_weights,
        tv_weight=options.tv_weight,
        learning_rate=options.learning_rate,
        beta1=options.beta1,
        beta2=options.beta2,
        epsilon=options.epsilon,
        pooling=options.pooling,
        print_iterations=options.print_iterations,
        checkpoint_iterations=options.checkpoint_iterations
    ):
        output_file = None
        combined_rgb = image
        if iteration is not None:
            if options.checkpoint_output:
                output_file = options.checkpoint_output % iteration   #在此迭代中保存一次图片
        else:
            output_file = options.output
        if output_file:
            imsave(output_file, combined_rgb)


def imread(path):   #读取图片
    img = scipy.misc.imread(path).astype(np.float)
    if len(img.shape) == 2:
        # grayscale
        img = np.dstack((img,img,img))
    elif img.shape[2] == 4:
        # PNG with alpha channel
        img = img[:,:,:3]
    return img


def imsave(path, img):   #保存图片
    img = np.clip(img, 0, 255).astype(np.uint8)
    Image.fromarray(img).save(path, quality=95)

if __name__ == '__main__':
main()import vgg
import tensorflow as tf
import numpy as np
from sys import stderr
from PIL import Image
CONTENT_LAYERS = ('relu4_2', 'relu5_2')
STYLE_LAYERS = ('relu1_1', 'relu2_1', 'relu3_1', 'relu4_1', 'relu5_1')
try:
reduce
except NameError:
from functools import reduce
def stylize(network, initial, initial_noiseblend, content, styles, preserve_colors, iterations,
content_weight, content_weight_blend, style_weight, style_layer_weight_exp, style_blend_weights, tv_weight,
learning_rate, beta1, beta2, epsilon, pooling,
print_iterations=None, checkpoint_iterations=None):
"""
Stylize images.
This function yields tuples (iteration, image); `iteration` is None
if this is the final image (the last iteration). Other tuples are yielded
every `checkpoint_iterations` iterations.
:rtype: iterator[tuple[int|None,image]]
"""
shape = (1,) + content.shape #若content.shape=(356, 600, 3) shape=(356, 600, 3, 1)
style_shapes = [(1,) + style.shape for style in styles]
content_features = {} #创建内容features map
style_features = [{} for _ in styles] #创建风格features map
vgg_weights, vgg_mean_pixel = vgg.load_net(network) #加载预训练模型,得到weights和mean_pixel
layer_weight = 1.0
style_layers_weights = {}
for style_layer in STYLE_LAYERS:
style_layers_weights[style_layer] = layer_weight
layer_weight *= style_layer_weight_exp #若有设置style_layer_weight_exp,则style_layers_weights指数增长,
# style_layer_weight_exp默认为1不增长
# normalize style layer weights
layer_weights_sum = 0
for style_layer in STYLE_LAYERS:
layer_weights_sum += style_layers_weights[style_layer]
for style_layer in STYLE_LAYERS:
style_layers_weights[style_layer] /= layer_weights_sum #更新style_layers_weights,使其总和为1
# 首先创建一个image的占位符,然后通过eval()的feed_dict将content_pre传给image,
# 启动net的运算过程,得到了content的feature maps
# compute content features in feedforward mode
g = tf.Graph()
with g.as_default(), g.device('/cpu:0'), tf.Session() as sess: #计算content features
image = tf.placeholder('float', shape=shape)
net = vgg.net_preloaded(vgg_weights, image, pooling) #所有网络在此构建,net为content的features maps
content_pre = np.array([vgg.preprocess(content, vgg_mean_pixel)]) #content - vgg_mean_pixel
for layer in CONTENT_LAYERS:
content_features[layer] = net[layer].eval(feed_dict={image: content_pre}) #content_features取值
# print(layer,content_features[layer].shape)
# compute style features in feedforward mode
for i in range(len(styles)): #计算style features
g = tf.Graph()
with g.as_default(), g.device('/cpu:0'), tf.Session() as sess:
image = tf.placeholder('float', shape=style_shapes[i])
net = vgg.net_preloaded(vgg_weights, image, pooling) #pooling 默认为MAX
style_pre = np.array([vgg.preprocess(styles[i], vgg_mean_pixel)]) #styles[i]-vgg_mean_pixel
for layer in STYLE_LAYERS:
features = net[layer].eval(feed_dict={image: style_pre})
features = np.reshape(features, (-1, features.shape[3])) #根据通道数目reshape
gram = np.matmul(features.T, features) / features.size #gram矩阵
style_features[i][layer] = gram
initial_content_noise_coeff = 1.0 - initial_noiseblend
# make stylized image using backpropogation
with tf.Graph().as_default():
if initial is None:
noise = np.random.normal(size=shape, scale=np.std(content) * 0.1)
initial = tf.random_normal(shape) * 0.256 #初始化图片
else:
initial = np.array([vgg.preprocess(initial, vgg_mean_pixel)])
initial = initial.astype('float32')
noise = np.random.normal(size=shape, scale=np.std(content) * 0.1)
initial = (initial) * initial_content_noise_coeff + (tf.random_normal(shape) * 0.256) * (1.0 - initial_content_noise_coeff)
image = tf.Variable(initial)
'''
image = tf.Variable(initial)初始化了一个TensorFlow的变量,即为我们需要训练的对象。
注意这里我们训练的对象是一张图像,而不是weight和bias。
'''
net = vgg.net_preloaded(vgg_weights, image, pooling) #此处的net为生成图片的features map
# content loss
content_layers_weights = {}
content_layers_weights['relu4_2'] = content_weight_blend #内容图片 content weight blend, conv4_2 * blend + conv5_2 * (1-blend)
content_layers_weights['relu5_2'] = 1.0 - content_weight_blend #content weight blend默认为1,即只用conv4_2层
content_loss = 0
content_losses = []
for content_layer in CONTENT_LAYERS:
content_losses.append(content_layers_weights[content_layer] * content_weight * (2 * tf.nn.l2_loss(
net[content_layer] - content_features[content_layer]) / #生成图片-内容图片
content_features[content_layer].size)) # tf.nn.l2_loss:output = sum(t ** 2) / 2
content_loss += reduce(tf.add, content_losses)
# style loss
style_loss = 0
'''
由于style图像可以输入多幅,这里使用for循环。同样的,将style_pre传给image占位符,
启动net运算,得到了style的feature maps,由于style为不同filter响应的内积,
因此在这里增加了一步:gram = np.matmul(features.T, features) / features.size,即为style的feature。
'''
for i in range(len(styles)):
style_losses = []
for style_layer in STYLE_LAYERS:
layer = net[style_layer]
_, height, width, number = map(lambda i: i.value, layer.get_shape())
size = height * width * number
feats = tf.reshape(layer, (-1, number))
gram = tf.matmul(tf.transpose(feats), feats) / size #求得生成图片的gram矩阵
style_gram = style_features[i][style_layer]
style_losses.append(style_layers_weights[style_layer] * 2 * tf.nn.l2_loss(gram - style_gram) / style_gram.size)
style_loss += style_weight * style_blend_weights[i] * reduce(tf.add, style_losses)
# total variation denoising
tv_y_size = _tensor_size(image[:,1:,:,:])
tv_x_size = _tensor_size(image[:,:,1:,:])
tv_loss = tv_weight * 2 * (
(tf.nn.l2_loss(image[:,1:,:,:] - image[:,:shape[1]-1,:,:]) /
tv_y_size) +
(tf.nn.l2_loss(image[:,:,1:,:] - image[:,:,:shape[2]-1,:]) /
tv_x_size))
# overall loss
'''
接下来定义了Content Loss和Style Loss,结合文中的公式很容易看懂,在代码中,
还增加了total variation denoising,因此总的loss = content_loss + style_loss + tv_loss
'''
loss = content_loss + style_loss + tv_loss #总loss为三个loss之和
# optimizer setup
# optimizer setup
# 创建train_step,使用Adam优化器,优化对象是上面的loss
# 优化过程,通过迭代使用train_step来最小化loss,最终得到一个best,即为训练优化的结果
train_step = tf.train.AdamOptimizer(learning_rate, beta1, beta2, epsilon).minimize(loss)
def print_progress():
stderr.write(' content loss: %g\n' % content_loss.eval())
stderr.write(' style loss: %g\n' % style_loss.eval())
stderr.write(' tv loss: %g\n' % tv_loss.eval())
stderr.write(' total loss: %g\n' % loss.eval())
# optimization
best_loss = float('inf')
best = None
with tf.Session() as sess:
sess.run(tf.global_variables_initializer())
stderr.write('Optimization started...\n')
if (print_iterations and print_iterations != 0):
print_progress()
for i in range(iterations):
stderr.write('Iteration %4d/%4d\n' % (i + 1, iterations))
train_step.run()
last_step = (i == iterations - 1)
if last_step or (print_iterations and i % print_iterations == 0):
print_progress()
if (checkpoint_iterations and i % checkpoint_iterations == 0) or last_step:
this_loss = loss.eval()
if this_loss < best_loss:
best_loss = this_loss
best = image.eval()
img_out = vgg.unprocess(best.reshape(shape[1:]), vgg_mean_pixel) #还原图片
if preserve_colors and preserve_colors == True:
original_image = np.clip(content, 0, 255)
styled_image = np.clip(img_out, 0, 255)
# Luminosity transfer steps:
# 1. Convert stylized RGB->grayscale accoriding to Rec.601 luma (0.299, 0.587, 0.114)
# 2. Convert stylized grayscale into YUV (YCbCr)
# 3. Convert original image into YUV (YCbCr)
# 4. Recombine (stylizedYUV.Y, originalYUV.U, originalYUV.V)
# 5. Convert recombined image from YUV back to RGB
# 1
styled_grayscale = rgb2gray(styled_image)
styled_grayscale_rgb = gray2rgb(styled_grayscale)
# 2
styled_grayscale_yuv = np.array(Image.fromarray(styled_grayscale_rgb.astype(np.uint8)).convert('YCbCr'))
# 3
original_yuv = np.array(Image.fromarray(original_image.astype(np.uint8)).convert('YCbCr'))
# 4
w, h, _ = original_image.shape
combined_yuv = np.empty((w, h, 3), dtype=np.uint8)
combined_yuv[..., 0] = styled_grayscale_yuv[..., 0]
combined_yuv[..., 1] = original_yuv[..., 1]
combined_yuv[..., 2] = original_yuv[..., 2]
# 5
img_out = np.array(Image.fromarray(combined_yuv, 'YCbCr').convert('RGB'))
yield ( #相当于return,但用于迭代
(None if last_step else i),
img_out
)
def _tensor_size(tensor):
from operator import mul
return reduce(mul, (d.value for d in tensor.get_shape()), 1)
def rgb2gray(rgb):
return np.dot(rgb[...,:3], [0.299, 0.587, 0.114])
def gray2rgb(gray):
w, h = gray.shape
rgb = np.empty((w, h, 3), dtype=np.float32)
rgb[:, :, 2] = rgb[:, :, 1] = rgb[:, :, 0] = gray
return rgb
import os

import numpy as np
import scipy.misc

from stylize import stylize

import math
from argparse import ArgumentParser

from PIL import Image
# default arguments
CONTENT_WEIGHT = 5e0
CONTENT_WEIGHT_BLEND = 1
STYLE_WEIGHT = 5e2
TV_WEIGHT = 1e2
STYLE_LAYER_WEIGHT_EXP = 1
LEARNING_RATE = 1e1
BETA1 = 0.9
BETA2 = 0.999
EPSILON = 1e-08
STYLE_SCALE = 1.0
ITERATIONS = 1000
VGG_PATH = 'imagenet-vgg-verydeep-19.mat'
POOLING = 'max'

def imread(path):   #读取图片
    img = scipy.misc.imread(path).astype(np.float)
    if len(img.shape) == 2:
        # grayscale
        img = np.dstack((img,img,img))
    elif img.shape[2] == 4:
        # PNG with alpha channel
        img = img[:,:,:3]
    return img

content='examples/beili.jpg'    #此处为内容图片路径,可修改
styles=['examples/1-style.jpg']    #此处为风格图片路径,可修改

content_image = imread(content)  #读取content图片
style_images = [imread(style) for style in styles]   #读取style图片,可以有多个
initial_noiseblend = 1.0
initial = content_image
style_blend_weights = [1.0/len(style_images) for _ in style_images]
for iteration, image in stylize(
    network=VGG_PATH,
    initial=initial,
    initial_noiseblend=initial_noiseblend,
    content=content_image,
    styles=style_images,
    preserve_colors=None,
    iterations=ITERATIONS,
    content_weight=CONTENT_WEIGHT,
    content_weight_blend=CONTENT_WEIGHT_BLEND,
    style_weight=STYLE_WEIGHT,
    style_layer_weight_exp=STYLE_LAYER_WEIGHT_EXP,
    style_blend_weights=style_blend_weights,
    tv_weight=TV_WEIGHT,
    learning_rate=LEARNING_RATE,
    beta1=BETA1,
    beta2=BETA2,
    epsilon=EPSILON,
    pooling=POOLING,
    print_iterations=None,
    checkpoint_iterations=None
):
    print(iteration)
python neural_style.py --content examples/beili.jpg --styles ./examples/1-style.jpg --output ./examples/beili-output.jpg