Image-style-transfer
参考来源:
https://github.com/ckmarkoh/neuralart_tensorflow
https://github.com/log0/neural-style-painting/blob/master/TensorFlow%20Implementation%20of%20A%20Neural%20Algorithm%20of%20Artistic%20Style.ipynb
主要参考第一篇中content_loss_func、style_loss_fun的写法,和第二篇中网络模型的搭建。实测第二篇中的content_loss_func、style_loss_fun跑不出结果,每一次运行都是0,不知道什么原因。
本文不讲这个算法的具体原理,这个网上有很多帖子,数学过程讲解的也很详细,这里只写博主实现的过程以及遇到的问题和解决方法。
一、简单点说,图像的风格转移的过程就是生成一副新的图像X使得它到两幅图像,内容图像(CONTENT_IMAGE, STYLE_IMAGE)之间的距离最小,然后利用tensorflow提供的最优化方法求解这个最小值,从而实现图像的风格转移。本质上,这是一个最优化问题,不牵扯到神经网络的训练问题而且也没有必要自己写一个提取图像特征的CNN网络(重点是你自己写的通常都不好用)。所以,我们可以利用现有的网络结构完成我们的任务。比如:VGG-MODEL、GOOGLE--NET等现有的已经训练好的模型。
二、博主用的是“imagenet-vgg-verydeep-19.mat”模型,然后分别把CONTENT_IMAGE, STYLE_IMAGE作为模型的input输入,但是由于这个模型多大19层,而且我们也用不到它的全链接层和分类层,所以我们只需要挑选能够代表CONTENT_IMAGE特征的特征图像和能够代表STYLE_IMAGE的特征的特征图像即可。在这里,我选择了模型的model['conv4_2']卷积层的输出作为内容图像特征的代表,model['conv1_1']['conv2_1']['conv3_1']['conv4_1']['conv5_1']作为风格图像特征的代表,至于为什么要这么选择,可以从原理中找到答案,这里不再详细赘述。
三、需要注意的问题。如果你和博主一样,运行了nvidia-docker 容器,并且tensorflow运行的是docker 镜像。那么一定要切记:在jupyter下要把所有用到的图片、数据上传,因为docker镜像是不能读取本机文件的。如果你的tensorflow是安装在本机上的则没有这个问题。笔者刚开始忘记了自己的tensorflow是运行在docker中的,导致无论怎么改变路径都无法读取图像等数据,很是崩溃。
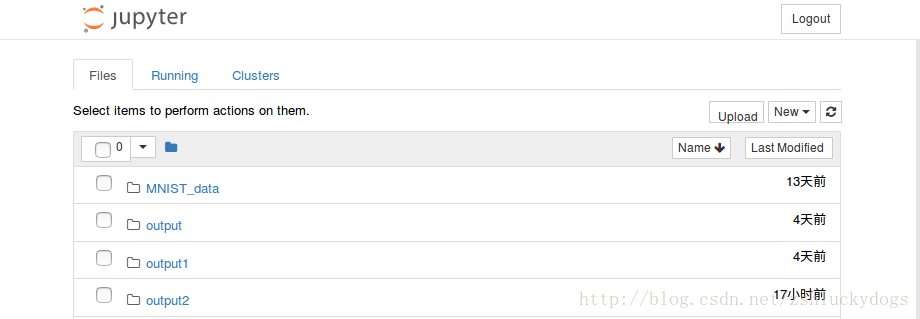
点击upload,选择要上传的数据,然后上传完成后,在jupyter的Home下可以看到刚上传的数据,之后在使用的时候不用加路径,直接是'filename.jpg'即可,就是你的文件名加文件的格式。当然如果你是在jupyter下通过python命令下载的文件则不需要上传。
四、代码展示,主要的函数都有说明。
import os
import sys
import numpy as np
import scipy.io
import scipy.misc
import tensorflow as tf
import matplotlib.pyplot as plt ###########matlab中的绘图函数
from matplotlib.pyplot import imshow
from PIL import Image###############mark,暂时不知道什么意思#################
#################################################
#################################################
##########定义风格图像、内容图像、图像的长、宽、以及通道数
########################################################
OUTPUT_DIR='output2/'
########路径的格式可能会报错,随时准备修改
STYLE_IMAGE='StarryNight.jpg'
CONTENT_IMAGE='Taipei101.jpg'
IMAGE_WIDTH=800
IMAGE_HEIGHT=600
COLOR_CHANNELS=3
STYLE_LAYERS=[
('conv1_1',0.5),
('conv2_1',1.0),
('conv3_1',1.5),
('conv4_1',3.0),
('conv5_1',4.0),
]
CONTENT_LAYERS=[('conv4_2',1.)]
#####################设置随机噪声和内容图像的比率##############
NOISE_RATIO=0.6
####################设置迭代次数###############################
ITERATIONS=1000
##########设置内容图像与风格图像的权重#########################
alpha=1
beta=500
################加载model设定均值,输入图像要减去这个均值,均值的微小改变对模型的影响很大############
VGG_MODEL='imagenet-vgg-verydeep-19.mat'
MEAN_VALUES = np.array([123.68, 116.779, 103.939]).reshape((1,1,1,3))
#################################################################
###################################################################
######开始使用VGG模型,返回一个用于生成目标风格图像的模型,只使用卷积层的权值
######外加tensorflow的conv2d函数,RELU和AVERAGEPooling层,不使用最后的全链接层
######函数的参数是vgg-model在计算机中的路径
def load_vgg_model(path):
vgg_rawnet=scipy.io.loadmat(path)#########读取.mat文件,有一大堆数据,然后提取其中的‘layers’数据
vgg_layers=vgg_rawnet['layers'][0]
#########################################################
#########################################################
#####返回VGG模型中特定层的权值和偏置层的值###################
def _weights(layer,expected_layer_name):
w=vgg_layers[layer][0][0][2][0][0]
bias=vgg_layers[layer][0][0][2][0][1]
#layer_name=vgg_layers[layer][0][0][-2]
#w=vgg_layers[layer][0][0][0][0][0]
#bias=vgg_layers[layer][0][0][0][0][1]
#print(w)
#print(bias)
###################################数组下标的选择##################
#assert layer_name==expected_layer_name
return w,bias
##########################################################
#####返回tensorflow类型的conv2d卷积的Relu的值
def _relu(conv2d_layer):
return tf.nn.relu(conv2d_layer)
##########################################################
#####使用vgg模型中layer'的weights,biases生成conv2d层
def _conv2d(prev_layer,layer,layer_name):
w,bias=_weights(layer,layer_name)
#print(w[0])
#print("#############################")
#print(bias)
#print("###############################")
w=tf.constant(w)
bias=tf.constant(np.reshape(bias,(bias.size)))
return tf.nn.conv2d(prev_layer,filter=w,strides=[1,1,1,1],padding='SAME')+bias
def _conv2d_relu(prev_layer,layer,layer_name):
return _relu(_conv2d(prev_layer,layer,layer_name))
#####################################################################
#############平均池化#############################################
def _avgpool(prev_layer):
return tf.nn.avg_pool(prev_layer,ksize=[1,2,2,1],strides=[1,2,2,1],padding='SAME')
###################################################################
###################################################################
########################构造运算流程图##############################
graph={}
graph['input']=tf.Variable(np.zeros((1,IMAGE_HEIGHT,IMAGE_WIDTH,COLOR_CHANNELS)),dtype='float32')
graph['conv1_1']=_conv2d_relu(graph['input'],0,'conv1_1')
graph['conv1_2']=_conv2d_relu(graph['conv1_1'],2,'conv1_2')
graph['avgpool1']=_avgpool(graph['conv1_2'])
graph['conv2_1']=_conv2d_relu(graph['avgpool1'],5,'conv2_1')
graph['conv2_2']=_conv2d_relu(graph['conv2_1'],7,'conv2_2')
graph['avgpool2']=_avgpool(graph['conv2_2'])
graph['conv3_1']=_conv2d_relu(graph['avgpool2'],10,'conv3_1')
graph['conv3_2']=_conv2d_relu(graph['conv3_1'],12,'conv3_2')
graph['conv3_3']=_conv2d_relu(graph['conv3_2'],14,'conv3_3')
graph['conv3_4']=_conv2d_relu(graph['conv3_3'],16,'conv3_4')
graph['avgpool3']=_avgpool(graph['conv3_4'])
graph['conv4_1']=_conv2d_relu(graph['avgpool3'],19,'conv4_1')
graph['conv4_2']=_conv2d_relu(graph['conv4_1'],21,'conv4_2')
graph['conv4_3']=_conv2d_relu(graph['conv4_2'],23,'conv4_3')
graph['conv4_4']=_conv2d_relu(graph['conv4_3'],25,'conv4_4')
graph['avgpool4']=_avgpool(graph['conv4_4'])
graph['conv5_1']=_conv2d_relu(graph['avgpool4'],28,'conv5_1')
graph['conv5_2']=_conv2d_relu(graph['conv5_1'],30,'conv5_2')
graph['conv5_3']=_conv2d_relu(graph['conv5_2'],32,'conv5_3')
graph['conv5_4']=_conv2d_relu(graph['conv5_3'],34,'conv5_4')
graph['avgpool5']=_avgpool(graph['conv5_4'])
return graph
####重写loss函数,contentloss,style_loss
def gram_matrix(x, area, depth):
x1 = tf.reshape(x, (area, depth))
g = tf.matmul(tf.transpose(x1), x1)
return g
#####################################x表示生成图像,p表上内容图像,a表示风格图像。
def content_layer_loss(p,x):
M=p.shape[1]*p.shape[2]
N=p.shape[3]
loss=(1./(4*N*M))*tf.reduce_sum(tf.pow((x-p),2))
return loss
def content_loss_func(sess,model):
layers=CONTENT_LAYERS
total_content_loss=0.0
for layer_name,weight in layers:
p=sess.run(model[layer_name])
x=model[layer_name]
total_content_loss+=content_layer_loss(p,x)*weight
total_content_loss/=float(len(layers))
return total_content_loss
def style_layer_loss(a,x):
M=a.shape[1]*a.shape[2]
N=a.shape[3]
A=gram_matrix(a,M,N)
G=gram_matrix(x,M,N)
loss=(1./(4 * N ** 2 * M ** 2))* tf.reduce_sum(tf.pow((G-A),2))
return loss
def style_loss_func(sess,model):
layers=STYLE_LAYERS
total_style_loss=0.0
for layer_name,weight in layers:
a=sess.run(model[layer_name])
x=model[layer_name]
total_style_loss+=style_layer_loss(a,x)*weight
total_style_loss/=float(len(layers))
return total_style_loss
############产生噪声图,读入图像,保存图像,返回混合了高斯白噪声的content_image
def generate_noise_image(content_image,noise_ratio=NOISE_RATIO):
noise_image=np.random.uniform(
-20,20,
(1,IMAGE_HEIGHT,IMAGE_WIDTH,COLOR_CHANNELS)).astype('float32')
input_image=noise_image*noise_ratio+content_image*(1-noise_ratio)
return input_image
##################################################################
def load_image(path):
image=scipy.misc.imread(path)
image=np.reshape(image,((1,)+image.shape))
image=image-MEAN_VALUES
return image
###################################################################
def save_image(path,image):
image=image+MEAN_VALUES
image=image[0]
image=np.clip(image,0,255).astype('uint8')
scipy.misc.imsave(path,image)
########################################################################
#########################################################################
with tf.Session() as sess:
model=load_vgg_model(VGG_MODEL)
sess.run(tf.initialize_all_variables())
#print(model)
###########生成输入图像,高斯噪声和内容图像的特征图相混合
content_image=load_image(CONTENT_IMAGE)
style_image=load_image(STYLE_IMAGE)
#print(style_image[0])
#print(input_image[0])
sess.run([model['input'].assign(content_image)])
content_loss=content_loss_func(sess,model)
####################################################################
sess.run([model['input'].assign(style_image)])
style_loss=style_loss_func(sess,model)########
###################################################################
#######总的损失函数total-loss#######################################
total_loss=alpha*content_loss+beta*style_loss
#####################################################################
##################最优化total_loss###################################
optimizer=tf.train.AdamOptimizer(2.0)
input_image=generate_noise_image(content_image)
train_step=optimizer.minimize(total_loss)
sess.run(tf.initialize_all_variables())
sess.run(model['input'].assign(input_image))
for it in range(ITERATIONS):
sess.run(train_step)
if it%100==0:
mixed_image=sess.run(model['input'])
print('Iteration %d'%(it))
print('sum:',sess.run(tf.reduce_sum(mixed_image)))
print('cost',sess.run(total_loss))
if not os.path.exists(OUTPUT_DIR):
os.mkdir(OUTPUT_DIR)
filename='output2/%d.png'%(it)
save_image(filename,mixed_image)
运行结果:
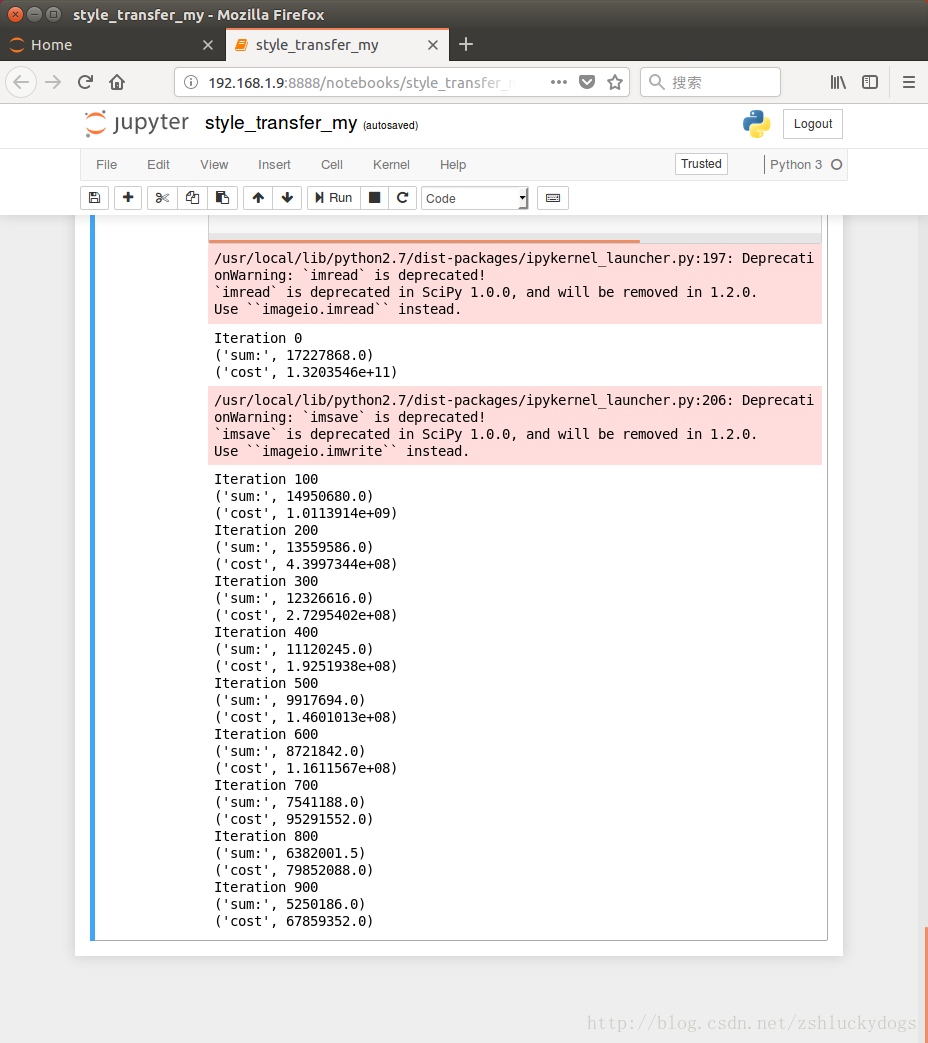
如果要跑上5000次,大概要一个小时。
CONTENT_IMAGE

STYLE_IMAGE

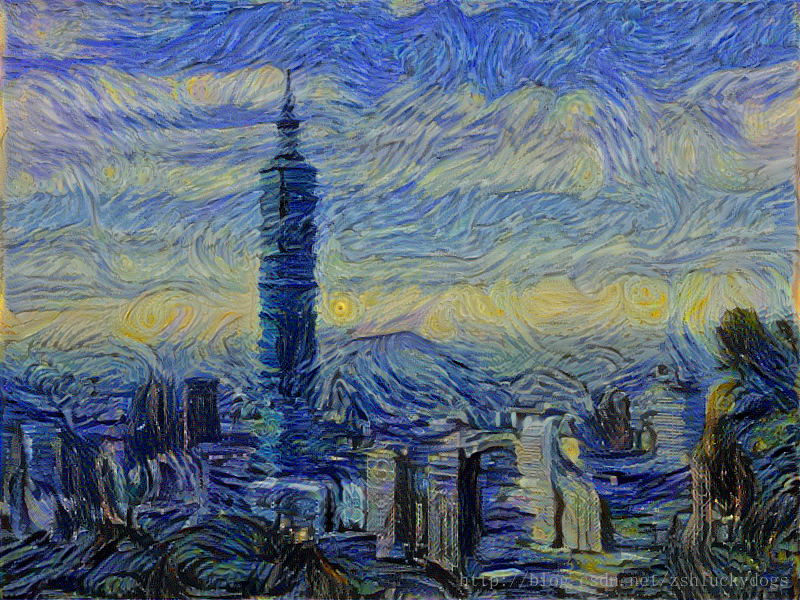
风格转移后的图像: