前面我们说了CNN的一般层次结构, 每个层的作用及其参数的优缺点等内容. 这一节将在前一节的内容的基础上, 讨论CNN中的参数初始化, CNN过拟合的处理方法, 参数学习的方法, CNN的优缺点等内容.
一 CNN参数初始化及参数学习方法
和机器学习很多算法一样, CNN在进行训练之前也要进行参数的初始化操作. 我们知道, 在机器学习中的参数值一般都是随机给定的. 但是, 这CNN的参数初始化又和机器学习中有所不同.
1.1 W的初始化
由于CNN 中的参数更新的过程一般是通过BP算法实现的,再由前面我们在深度学习之BP算法一文中得到的BP算法参数更新公式可以发现, 参数更新过程中卷积核(权重值W)参与了连乘运算,因此一定不能初始化W = 0, 否则参数W无法更新. 另外考虑到太大(小)的W值可能导致梯度下降太快(慢), 一般选择很小的随机数, 且要求w为服从均值为0, 方差未知(建议选择2/n, n为权重的个数)的正态分布的随机序列.
1.2 b的初始化
一般直接设置为0,在存在ReLU激活函数的网络中,也可以考虑设置为一个很小的数字.
1.3 CNN模型参数学习方法
CNN中的参数学习方法主要是BP算法.
前面我们知道, BP算法的关键在于反向传播时的链式求导求得误差值 . 然后使用梯度下降的方法进行参数W和b的更新.
二 CNN过拟合
CNN是通过卷积核对样本进行特征提取的, 当特征提取过多(即学习到了不重要的特征)就回造成过拟合现象的发生, 这里主要介绍两种解决过拟合的方法, 分别为正则化和Dropout.
2.1 正则化
和机器学习一样, 通过在损失函数加上L1,L2正则项可以有效地防止过拟合的问题.
2.2 Dropout
一般情况下,对于同一组训练数据,利用不同的神经网络训练之后,求其输出的平均值可以减少overfitting。Dropout就是利用这个原理,每次丢掉一半左右的隐藏层神经元,相当于在不同的神经网络上进行训练,这样就减少了神经元之间的依赖性,即每个神经元不能依赖于某几个其它的神经元(指层与层之间相连接的神经元),使神经网络更加能学习到与其它神经元之间的更加健壮robust(鲁棒性)的特征。另外Dropout不仅减少overfitting,还能提高准确率。
Dropout通过随机删除神经网络中的神经元来解决overfitting问题,在每次迭代的时候,只使用部分神经元训练模型获取W和d的值. 具体的可以参见PDF文档.
2.3 方案选择一般选择L2 或者Dropout 防止过拟合.
三 经典的CNN模型简述
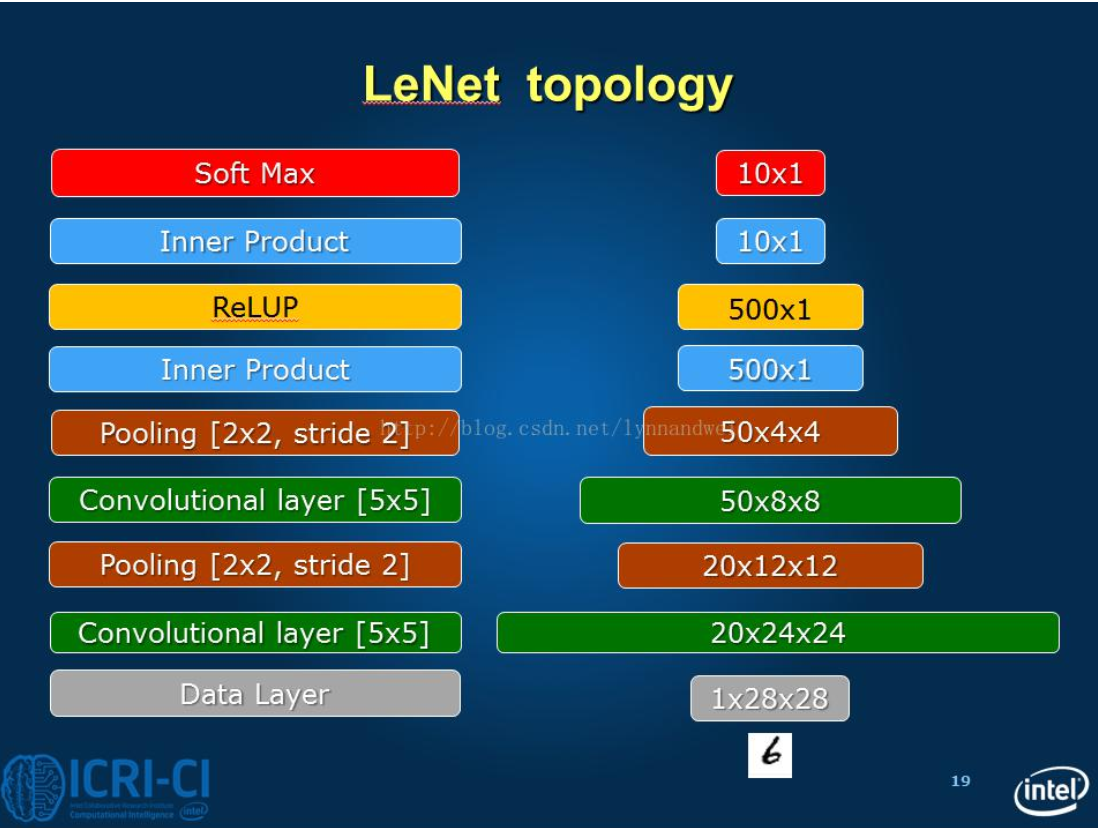
1) LeNet(经典的CNN,最早用于数字识别的CNN算法)---具体的网络结构如图所示

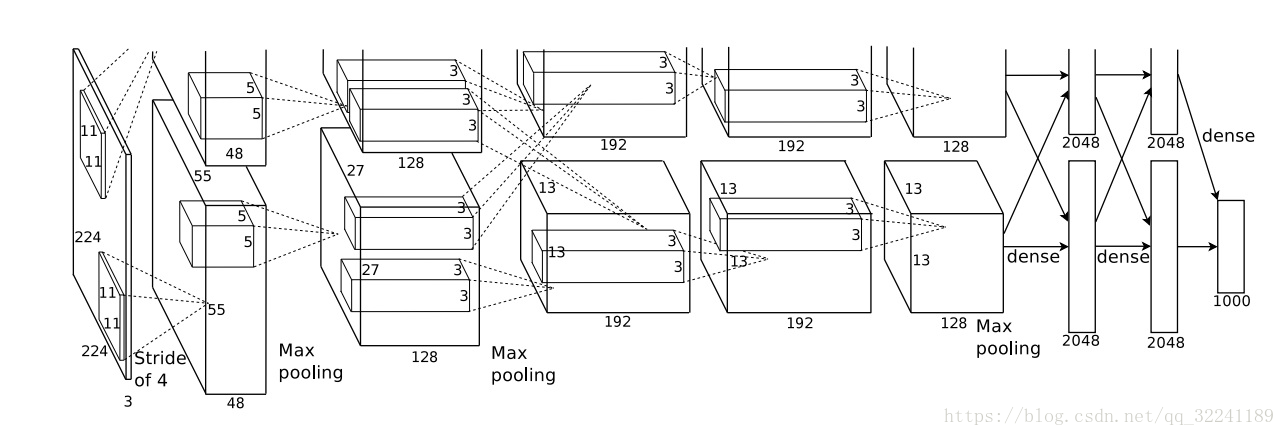
2) AlexNet(2012年ILSVRC比赛冠军,远超第二名的CNN,比LeNet更深,用多层小卷积叠加来替换单个的大卷积 )
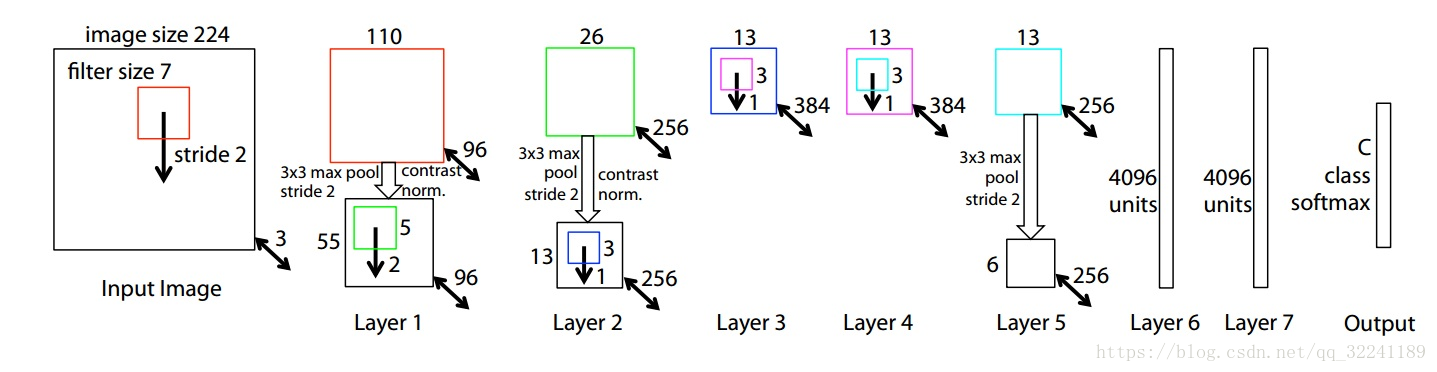
3) ZFNet(2013年ILSVRC比赛冠军)
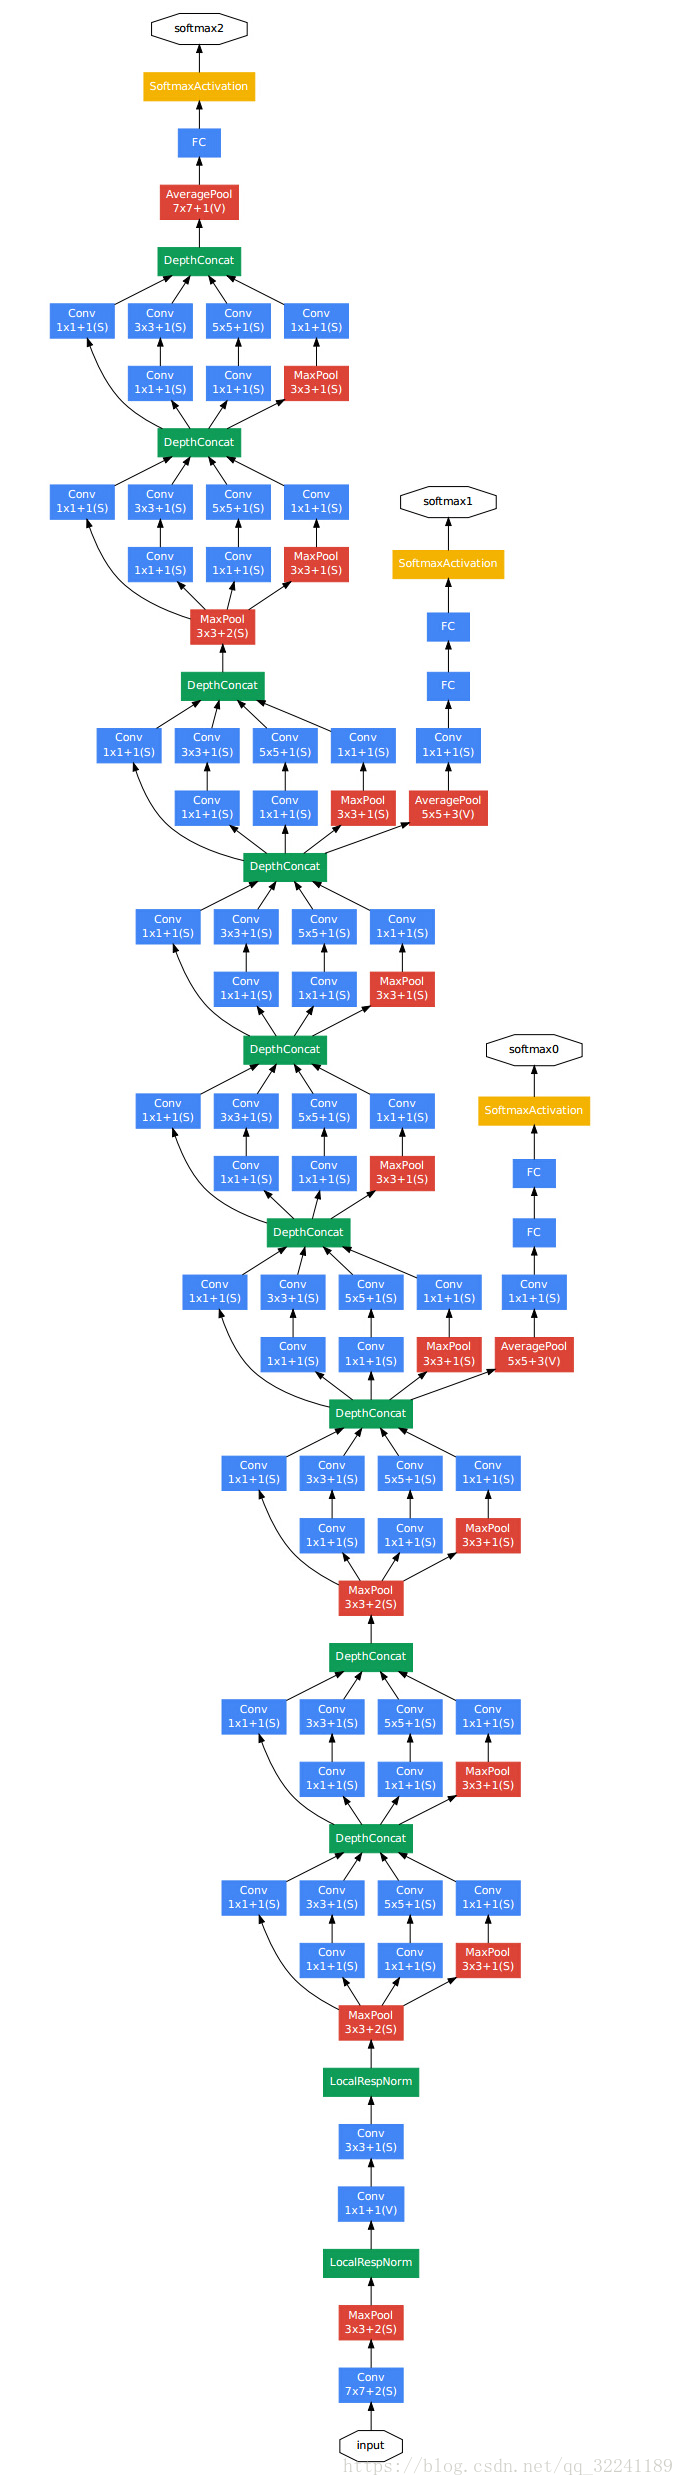
4) GoogleNet(2014年比赛冠军,层数较深, 运行时间较长)
5) VGGNet(2014年比赛模型, 效果比GooleNet略差, 但是实际运用较多)

6) ResNet(2015ILSVRC冠军,结构修正以适应更深层次的CNN训练)

四 数据增强
一 数据增强的方法介绍
增加训练数据, 则能够提升算法的准确率, 因为这样可以避免过拟合, 而避免了过拟合你就可以增大你的网络结构了。 当训练数据有限的时候, 可以通过一些变换来从已有的训练数据集中生成一些新的数据, 来扩大训练数据。
数据增强的方法有很多,这里主要介绍几种常见的数据增强的方法.
1) 图片的水平翻转(主要包括对称处理, 度数旋转等)
2) 随机裁剪(可以裁剪成不同大小的数据)
3) fancy PCA (就是从像素的角度变化, 形成新的图片)
4) 样本不均衡( 解决方案: 增加小众类别的图像数据)
样本数据的不均衡的问题是日常中较多遇到的问题, 在机器学习中我们对于数据不平衡有上采样和下采样等处理方法, 在这里我们一般使用的是小众类别增强的方法处理.
一般根据数据集中的图像最多的种类的数量进行随机采样, 使得每个样本的数量均相等.然后将这些样本图片混合打乱形成新的数据集.
5)其它方法(如平移变换;旋转/仿射变换;高斯噪声、 模糊处理、 对颜色的数据增强: 图像亮度、 饱和度、 对比度变化.)
二 数据增强的TensorFlow实现
这里就直接看代码(基于python,TensorFlow).
# _*_coding:utf-8_*_
'''
    图像处理的Python库:OpenCV, PIL, matplotlib, tensorflow
'''
import numpy as np
import matplotlib.pyplot as plt
import tensorflow as tf


def show_image_tensor(image_tensor):
    image = image_tensor.eval()
    print('图像的大小为:{}'.format(image.shape))
    if len(image.shape) == 3 and image.shape[2] == 1:
        # 黑白图片
        plt.imshow(image[:, :, 0], cmap='Greys_r')
        plt.show()
    elif len(image.shape) == 3:
        # 彩色图片
        plt.imshow(image)
        plt.show()


# 1 交互式会话启动
sess = tf.InteractiveSession()

# 图片路径
image_path0 = './datas/black_white.jpg'
image_path1 = './datas/gray.png'
image_path2 = './datas/xiaoren.png'

# 2 图像的预处理
# 一. 图像格式的转换
file_content = tf.read_file(image_path2)
# 图片解码,输出tensor对象
# 一般图像输出为[height, width, num_channels],
# gif格式(动态图像)输出为[num_frames, height, width, 3], num_frames表示动态图像中有几个静态图像
# 参数channel可取值0,1,3,4
# 其中0表示自动选择,1表示gray图片通道数,3表示RGB(红.绿,蓝)彩色图片,4表示RGBA四个通道(A表示透明度alpha)
image_tensor = tf.image.decode_png(file_content, channels=3)
# 调用show_image_tensor 函数,显示图片
# show_image_tensor(image_tensor)


# 二. 图像的大小重置
resize_image = tf.image.resize_images(images=image_tensor, size=[1200, 1200],
                                      method=tf.image.ResizeMethod.NEAREST_NEIGHBOR)
# show_image_tensor(resize_image)

# 三. 图像的剪切或者填充
# 中间剪切或者填充
crop_or_pad_image_tensor = tf.image.resize_image_with_crop_or_pad(image=image_tensor, target_height=1200,
                                                                  target_width=500)
# show_image_tensor(crop_or_pad_image_tensor)

# 中间等比例剪切
center_image_tensor = tf.image.central_crop(image=image_tensor, central_fraction=0.8)
# show_image_tensor(center_image_tensor)

# 填充数据(给定位置填充)
pad_image_tensor = tf.image.pad_to_bounding_box(image_tensor, offset_height=400, offset_width=490, target_width=1000,
                                                target_height=1000)
# show_image_tensor(pad_image_tensor)

# 剪切数据(给定位置剪切)
crop_image_tensor = tf.image.crop_to_bounding_box(image_tensor, offset_width=20, offset_height=26, target_height=70,
                                                  target_width=225)
# show_image_tensor(crop_image_tensor)

# 四.图片旋转
# 上下旋转
flip_up_down_image_tensor = tf.image.flip_up_down(image_tensor)
# show_image_tensor(flip_up_down_image_tensor)

# 左右旋转
flip_left_right_image_tensor = tf.image.flip_left_right(image_tensor)
# show_image_tensor(flip_left_right_image_tensor)

# 转置
transpose_image_tensor = tf.image.transpose_image(image_tensor)
# show_image_tensor(transpose_image_tensor)

# 旋转90,180,270(逆时针旋转)
rot90_image_tensor = tf.image.rot90(image_tensor, k=2)
# show_image_tensor(rot90_image_tensor)

# 五 颜色空间的转换(必须将类型转换为float32类型)
convert_type_image_tensor = tf.image.convert_image_dtype(image_tensor, dtype=tf.float32)
# show_image_tensor(convert_type_image_tensor)

# 1 RGB 转换为 HSV 格式(hsv表示图像的色度,饱和度,亮度)
rgb_to_hsv_image_tensor = tf.image.rgb_to_hsv(convert_type_image_tensor)
# show_image_tensor(rgb_to_hsv_image_tensor)

# 2 hsv 转换为 rgb
hsv_to_rgb_image_tensor = tf.image.hsv_to_rgb(rgb_to_hsv_image_tensor)
# show_image_tensor(hsv_to_rgb_image_tensor)

# 3 rgb_to_gray
gray_image_tensor = tf.image.rgb_to_grayscale(hsv_to_rgb_image_tensor)
# show_image_tensor(gray_image_tensor)

# 4 gray to rgb
rgb_image_tensor = tf.image.grayscale_to_rgb(gray_image_tensor)
# show_image_tensor(rgb_image_tensor)
# show_image_tensor(convert_type_image_tensor)

# 从颜色空间中提取图像轮廓信息(非常有用!!!)
# 0是黑, 1是白
a = gray_image_tensor
b = tf.less_equal(a, 0.8)
c = tf.where(b, x=a, y=a - a)
# show_image_tensor(c)

# 六 图像的调整
# 亮度调整
# delta取值(-1,1),底层是将rgb==>hsv ==> v*delta ==> rgb
adjust_brightness_image_tensor = tf.image.adjust_brightness(image_tensor, delta=0.5)
# show_image_tensor(adjust_brightness_image_tensor)

# 色调调整
adjust_hue_image_tensor = tf.image.adjust_hue(image_tensor, delta=0.5)
# show_image_tensor(adjust_hue_image_tensor)

# 饱和度调整
adjust_saturation_image_tensor = tf.image.adjust_saturation(image_tensor, saturation_factor=10)
# show_image_tensor(adjust_saturation_image_tensor)

# 对比度调整
# 公式: (x-mean)*contrast_factor + mean
adjust_contrast_image_tensor = tf.image.adjust_contrast(image_tensor, contrast_factor=5)
# show_image_tensor(adjust_contrast_image_tensor)

# 图像的gamma校正
# 注意: 输入必须为float类型的数据   input* gamma
gamma_image_tensor = tf.image.adjust_gamma(convert_type_image_tensor, gamma=2)
# show_image_tensor(gamma_image_tensor)

# 图像的归一化(防止梯度消失)
image_standardize_image_tensor = tf.image.per_image_standardization(image_tensor)
# show_image_tensor(image_standardize_image_tensor)

# 六 噪音数据的加入
noisy_image_tensor = image_tensor + tf.cast(8 * tf.random_normal(shape=(600, 510, 3), mean=0, stddev=0.2),
                                            dtype=tf.uint8)
show_image_tensor(noisy_image_tensor)