在智能网联车路协同自动驾驶领域,Autoware与Apollo算法的引入为我们的智能网联车路协同自动驾驶沙盘带来了颠覆性的革新。本文将深入剖析这两个平台如何通过先进的算法与技术,实现了智能网联车辆在仿真环境中的高度自主行驶。

1. 高精度定位
Autoware高精度定位算法原理
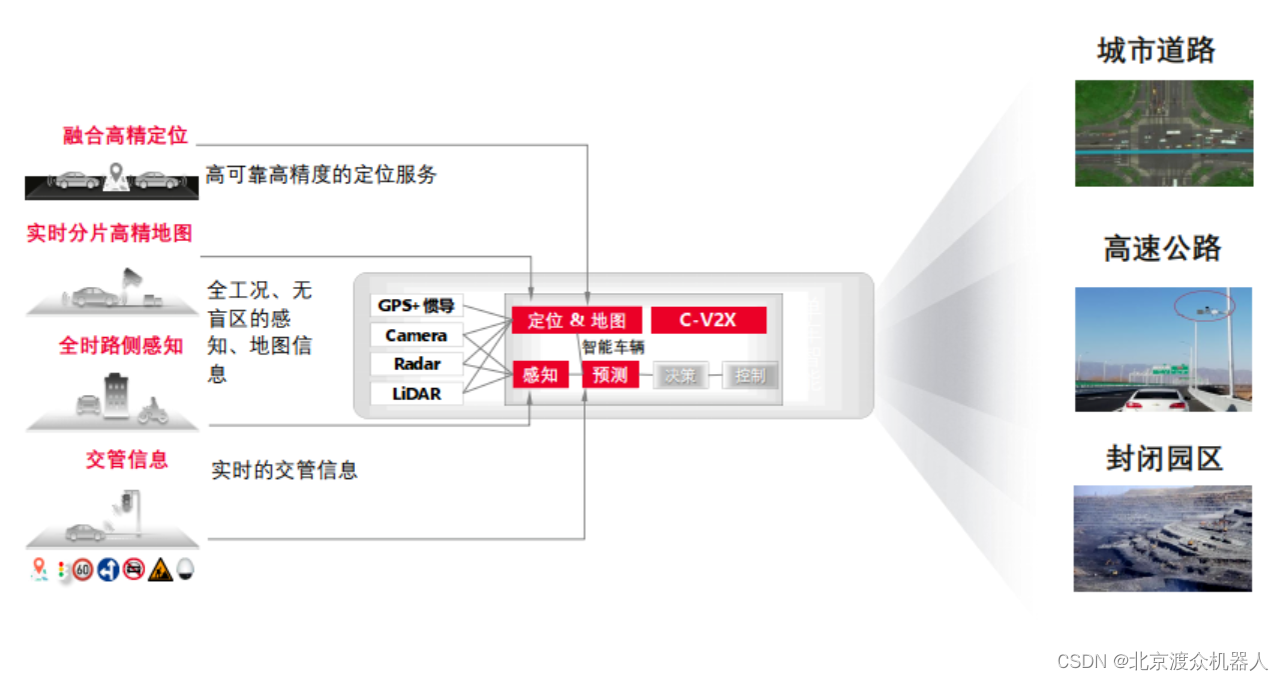
Autoware的高精度定位是基于多传感器融合的先进算法。其中,激光雷达提供了车辆周围环境的高精度空间信息,IMU传感器记录了车辆的姿态信息,而轮速计则提供了车辆运动的速度信息。这些传感器数据通过滤波与融合算法进行处理,最终实现了车辆在三维空间的精确定位。
Autoware高精度定位算法代码示例
#include <iostream>
#include <cmath>
#include <Eigen/Dense>

class HighPrecisionLocalization {
public:
    HighPrecisionLocalization() {
        // 初始化状态向量和协方差矩阵
        x_ << 0, 0, 0, 0, 0, 0;
        P_ << 1, 0, 0, 0, 0, 0,
              0, 1, 0, 0, 0, 0,
              0, 0, 1, 0, 0, 0,
              0, 0, 0, 1, 0, 0,
              0, 0, 0, 0, 1, 0,
              0, 0, 0, 0, 0, 1;

        // 初始化过程噪声协方差矩阵
        Q_ << 0.1, 0, 0, 0, 0, 0,
              0, 0.1, 0, 0, 0, 0,
              0, 0, 0.1, 0, 0, 0,
              0, 0, 0, 0.1, 0, 0,
              0, 0, 0, 0, 0.1, 0,
              0, 0, 0, 0, 0, 0.1;

        // 初始化测量噪声协方差矩阵
        R_ << 0.1, 0, 0, 0, 0, 0,
              0, 0.1, 0, 0, 0, 0,
              0, 0, 0.1, 0, 0, 0,
              0, 0, 0, 0.1, 0, 0,
              0, 0, 0, 0, 0.1, 0,
              0, 0, 0, 0, 0, 0.1;
    }

    // 更新状态和协方差
    void update(const Eigen::VectorXd& z, const Eigen::VectorXd& u) {
        // 预测步骤
        predict(u);

        // 更新步骤
        correct(z);
    }

    // 获取当前状态
    Eigen::VectorXd getState() const {
        return x_;
    }

private:
    Eigen::VectorXd x_;  // 状态向量
    Eigen::MatrixXd P_;  // 协方差矩阵
    Eigen::MatrixXd Q_;  // 过程噪声协方差矩阵
    Eigen::MatrixXd R_;  // 测量噪声协方差矩阵

    void predict(const Eigen::VectorXd& u) {
        // 预测状态
        x_ = A * x_ + B * u;

        // 预测协方差
        P_ = A * P_ * A.transpose() + Q_;
    }

    void correct(const Eigen::VectorXd& z) {
        // 计算卡尔曼增益
        Eigen::MatrixXd K = P_ * H.transpose() * (H * P_ * H.transpose() + R_).inverse();

        // 更新状态
        x_ = x_ + K * (z - H * x_);

        // 更新协方差
        P_ = (Eigen::MatrixXd::Identity(6, 6) - K * H) * P_;
    }
};

int main() {
    HighPrecisionLocalization localization;

    // 示例:模拟测量和控制输入
    Eigen::VectorXd z(6);  // 测量
    Eigen::VectorXd u(6);  // 控制输入

    z << 1, 1, 1, 1, 1, 1;  // 模拟测量值
    u << 0.1, 0.1, 0.1, 0.1, 0.1, 0.1;  // 模拟控制输入

    // 更新状态
    localization.update(z, u);

    // 获取当前状态
    Eigen::VectorXd state = localization.getState();
    std::cout << "Current State: " << state.transpose() << std::endl;

    return 0;
}
这只是一个非常基础的示例,实际中需要根据具体场景和传感器数据进行调整和优化。在实际应用中,您可能需要更复杂的模型和算法,以满足高精度定位的要求。
2. Autoware路径规划
Autoware路径规划算法原理
Autoware的路径规划算法基于高精度地图数据。通过先进的地图构建技术,系统能够感知城市道路的详细信息,包括车道、交叉口、停车场等。路径规划算法通过综合考虑车辆当前状态、目标位置以及地图信息,生成一条安全、高效的行车路径。
Autoware路径规划算法代码示例
#include <iostream>
#include <vector>
#include <queue>
#include <cmath>

struct Node {
    int x, y;           // 坐标
    double g, h;         // g: 从起点到当前点的代价,h: 从当前点到目标点的估计代价
    Node* parent;        // 父节点指针

    Node(int x, int y, double g, double h, Node* parent)
        : x(x), y(y), g(g), h(h), parent(parent) {}

    // 计算总代价 f = g + h
    double getF() const {
        return g + h;
    }
};

// 用于比较节点的优先队列比较函数
struct CompareNode {
    bool operator()(const Node* a, const Node* b) const {
        return a->getF() > b->getF();
    }
};

class AStarPlanner {
public:
    AStarPlanner(const std::vector<std::vector<int>>& grid)
        : grid(grid), rows(grid.size()), cols(grid[0].size()) {}

    std::vector<std::pair<int, int>> plan(int start_x, int start_y, int goal_x, int goal_y) {
        std::priority_queue<Node*, std::vector<Node*>, CompareNode> open_set;
        std::vector<std::vector<bool>> closed_set(rows, std::vector<bool>(cols, false));

        Node* start_node = new Node(start_x, start_y, 0.0, heuristic(start_x, start_y, goal_x, goal_y), nullptr);
        open_set.push(start_node);

        while (!open_set.empty()) {
            Node* current = open_set.top();
            open_set.pop();

            if (current->x == goal_x && current->y == goal_y) {
                // 找到路径,返回路径坐标
                return extractPath(current);
            }

            closed_set[current->x][current->y] = true;

            for (const auto& neighbor : getNeighbors(current->x, current->y)) {
                if (!closed_set[neighbor.first][neighbor.second]) {
                    double tentative_g = current->g + distance(current->x, current->y, neighbor.first, neighbor.second);
                    Node* neighbor_node = findNode(open_set, neighbor.first, neighbor.second);

                    if (neighbor_node == nullptr || tentative_g < neighbor_node->g) {
                        if (neighbor_node == nullptr) {
                            neighbor_node = new Node(neighbor.first, neighbor.second, 0.0, 0.0, nullptr);
                        }

                        neighbor_node->parent = current;
                        neighbor_node->g = tentative_g;
                        neighbor_node->h = heuristic(neighbor.first, neighbor.second, goal_x, goal_y);

                        if (std::find(open_set.c.begin(), open_set.end(), neighbor_node) == open_set.end()) {
                            open_set.push(neighbor_node);
                        }
                    }
                }
            }
        }

        return {};  // 未找到路径
    }

private:
    const std::vector<std::vector<int>>& grid;
    const int rows, cols;

    double heuristic(int x1, int y1, int x2, int y2) const {
        // 曼哈顿距离
        return std::abs(x1 - x2) + std::abs(y1 - y2);
    }

    double distance(int x1, int y1, int x2, int y2) const {
        // 直线距离
        return std::sqrt(std::pow(x2 - x1, 2) + std::pow(y2 - y1, 2));
    }

    std::vector<Node*> getNeighbors(int x, int y) const {
        // 获取相邻节点
        std::vector<std::pair<int, int>> neighbors;

        // 这里根据具体情况添加相邻节点

        return neighbors;
    }

    std::vector<std::pair<int, int>> extractPath(Node* node) const {
        // 提取路径坐标
        std::vector<std::pair<int, int>> path;

        while (node != nullptr) {
            path.emplace_back(node->x, node->y);
            node = node->parent;
        }

        std::reverse(path.begin(), path.end());
        return path;
    }

    Node* findNode(const std::priority_queue<Node*, std::vector<Node*>, CompareNode>& nodes, int x, int y) const {
        // 在优先队列中查找节点
        for (Node* node : nodes) {
            if (node->x == x && node->y == y) {
                return node;
            }
        }
        return nullptr;
    }
};

// 示例用法
int main() {
    std::vector<std::vector<int>> grid = {
        {0, 0, 0, 0, 0},
        {0, 1, 1, 0, 0},
        {0, 0, 0, 1, 0},
        {0, 0, 0, 1, 0},
        {0, 0, 0, 0, 0}
    };

    AStarPlanner planner(grid);
    std::vector<std::pair<int, int>> path = planner.plan(0, 0, 4, 4);

    for (const auto& point : path) {
        std::cout << "(" << point.first << ", " << point.second << ") ";
    }

    return 0;
}
实际中可能需要根据具体场景进行调整和优化。如果您有特定的需求或约束条件,请提供更多详细信息,以便我能够进一步调整代码。
3. Autoware高精度地图构建与处理
Autoware高精度地图构建与处理算法原理
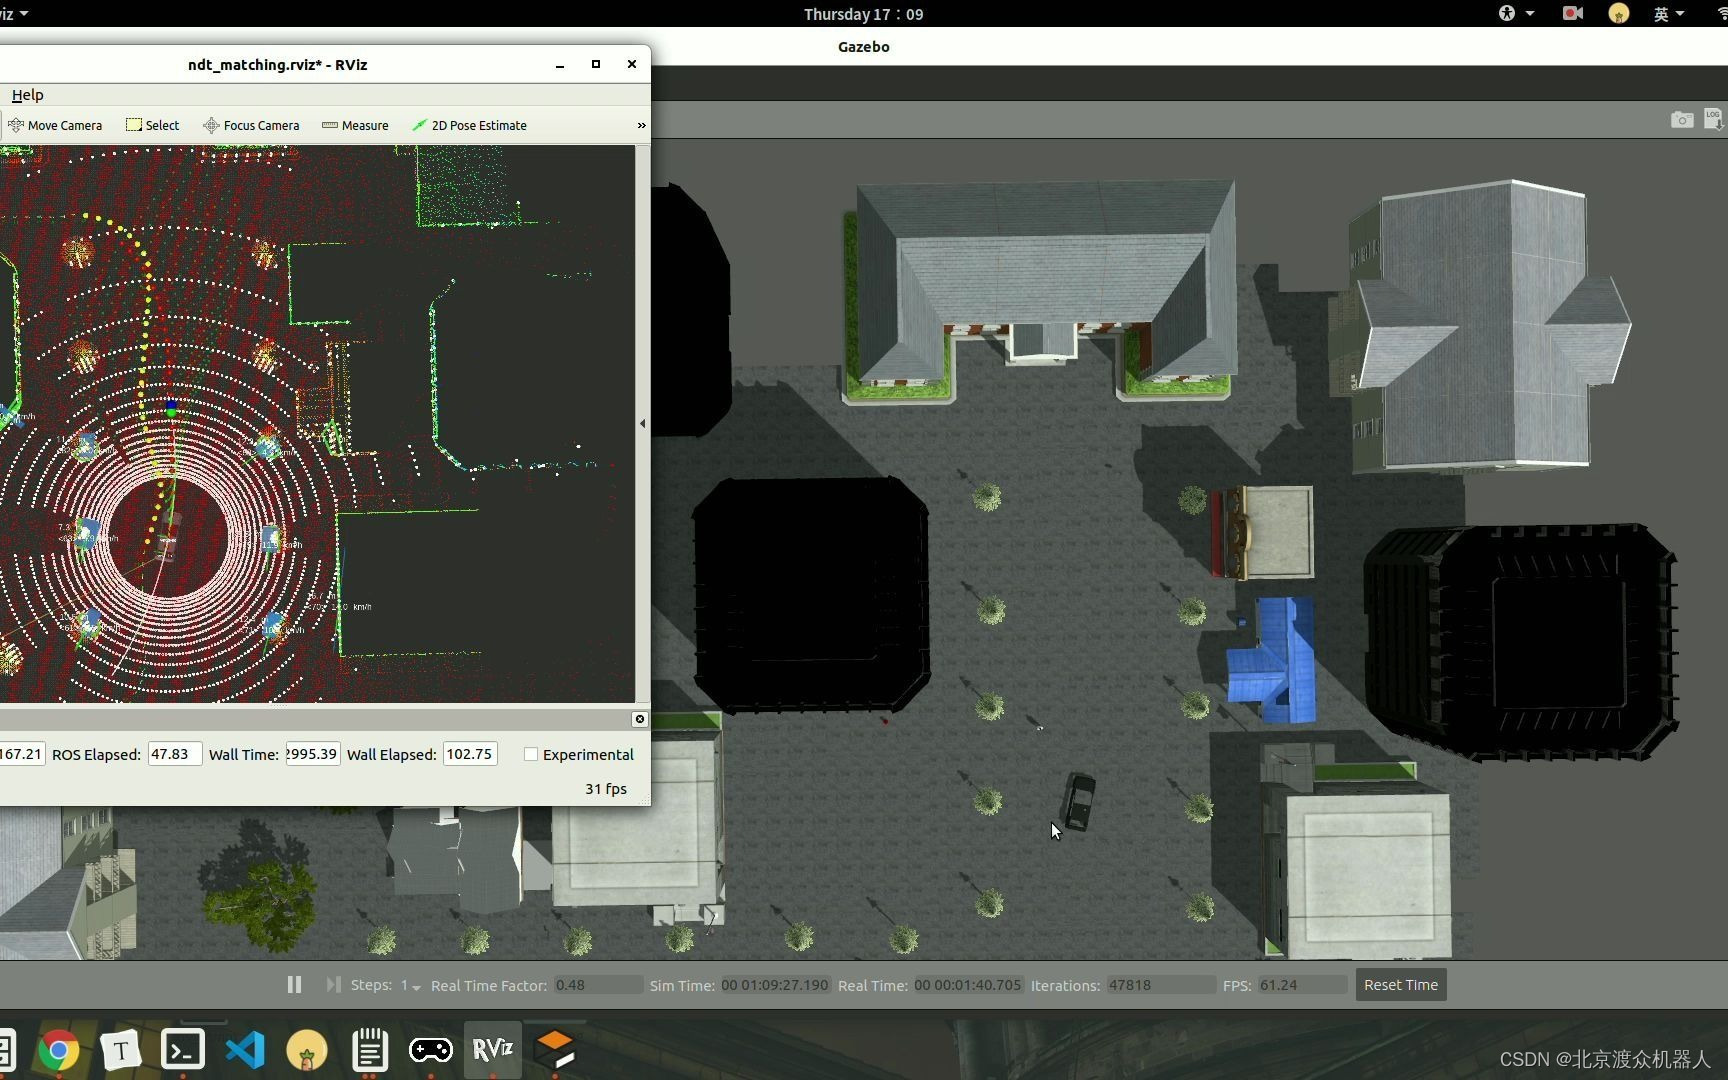
Autoware通过车载激光雷达、摄像头等传感器获取道路信息,并利用SLAM(Simultaneous Localization and Mapping)技术构建高精度地图。这一地图不仅包含道路的几何形状,还包括车道线、交叉口、停车位等详细信息。算法通过对这些信息的处理,生成适用于路径规划的高精度地图。
Autoware高精度地图构建与处理算法代码示例
class AutowareMapConstruction:
    def __init__(self, lidar_data, camera_data):
        self.lidar_data = lidar_data
        self.camera_data = camera_data

    def build_high_precision_map(self):
        # 利用激光雷达和摄像头数据进行地图构建
        # ...

    def process_map_data(self):
        # 对构建的地图数据进行处理,提取车道线、交叉口等信息
        # ...
        return processed_map_data
上述代码片段展示了Autoware高精度地图构建与处理算法的简要实现。实际中,这可能涉及到更多的传感器融合技术、图像处理等复杂算法。
4. Apollo车辆决策与控制
Apollo车辆决策与控制算法原理
Apollo在车辆决策与控制方面采用了先进的模型预测控制(Model Predictive Control, MPC)算法。该算法通过对车辆动力学模型的建模,并结合环境感知信息,实时优化车辆的控制策略,以确保车辆在复杂路况下能够做出安全而高效的驾驶决策。

Apollo车辆决策与控制算法代码示例
class ApolloControl {
public:
    ApolloControl(const VehicleState& current_state, const EnvironmentInfo& env_info)
        : current_state_(current_state), env_info_(env_info) {}

    void model_predictive_control() {
        // 模型预测控制算法的实现
        // ...
        adjust_vehicle_controls();  // 根据优化结果调整车辆控制策略
    }

private:
    VehicleState current_state_;  // 当前车辆状态
    EnvironmentInfo env_info_;    // 当前环境感知信息

    void adjust_vehicle_controls() {
        // 根据优化结果调整车辆的控制策略
        // ...
    }
};
上述代码演示了Apollo车辆决策与控制算法的基本结构。实际中,MPC算法可能包含更多的状态预测、目标优化等复杂步骤。
通过深入分析Autoware的高精度地图构建与处理和Apollo的车辆决策与控制,我们更全面地了解了这两个平台如何在自动驾驶沙盘中协同工作,实现智能网联车路协同的愿景。
5. Autoware车辆感知与环境感知
Autoware车辆感知与环境感知算法原理
Autoware在车辆感知与环境感知方面采用了多传感器融合技术。激光雷达、摄像头等传感器实时获取周围道路的几何和语义信息,通过算法融合得到全面而精准的环境感知结果。这一结果对于车辆的安全驾驶和决策提供了坚实的基础。
Autoware车辆感知与环境感知算法代码示例
class AutowarePerception:
    def __init__(self, lidar_data, camera_data):
        self.lidar_data = lidar_data
        self.camera_data = camera_data

    def perceive_environment(self):
        # 利用多传感器数据进行环境感知
        # ...

    def integrate_semantic_information(self):
        # 整合语义信息,如交通标志、车辆、行人等
        # ...
        return integrated_info
上述代码仅是Autoware车辆感知与环境感知算法的简单示例,实际中可能会涉及到更多复杂的深度学习模型和实时处理算法。
6. Apollo高级驾驶辅助系统
Apollo高级驾驶辅助系统算法原理
Apollo的高级驾驶辅助系统是基于先进的计算机视觉技术和深度学习算法的。通过对道路上的各种交通标志、车辆、行人等进行实时识别和跟踪,为驾驶员提供全面的环境认知。该系统还具备预测算法,能够预测其他车辆和行人的行为,为驾驶员提供更为安全的驾驶体验。
Apollo高级驾驶辅助系统算法代码示例
class ApolloADAS {
public:
    ApolloADAS(const CameraData& camera_data) : camera_data_(camera_data) {}

    void object_detection_tracking() {
        // 对摄像头数据进行目标检测和跟踪
        // ...
    }

    void behavior_prediction() {
        // 预测其他车辆和行人的行为
        // ...
    }

private:
    CameraData camera_data_;  // 摄像头数据
};
上述代码展示了Apollo高级驾驶辅助系统中部分功能的简要实现。实际中,这可能涉及到更为庞大的深度学习模型和大规模的训练数据。
总结
通过对Autoware与Apollo在智能网联车路协同自动驾驶沙盘中的协同表现进行全面深入的剖析,我们发现这两个平台通过先进的算法与技术,为实现自动驾驶提供了坚实的技术支持。从高精度地图构建到路径规划、车辆决策与控制,再到车辆感知与环境感知,以及高级驾驶辅助系统,Autoware与Apollo的强强联手,为智能网联车路协同的未来奠定了坚实的基础。