搭建一个好用、便宜又准确的问答机器人需要多长时间?
答案是 5 分钟。只需借助开源的 RAG 技术栈、LangChain 以及好用的向量数据库 Milvus。必须要强调的是,该问答机器人的成本很低,因为我们在召回、评估和开发迭代的过程中不需要调用大语言模型 API。只有在最后一步——生成最终问答结果的时候会调用到 1 次 API。
如有兴趣深入了解问答机器人背后的技术,可以查看 GitHub 上的源代码(https://github.com/zilliztech/akcio)。本文完整代码可通过 Bootcamp (https://github.com/milvus-io/bootcamp/blob/master/bootcamp/RAG/readthedocs_zilliz_langchain.ipynb)获取。
在正式开始前,我们先复习一下 RAG。RAG 的主要用途是为了给生成式 AI 输出的文本提供支撑。换言之,RAG 就是通过事实、自定义数据以减少 LLM 幻觉。具体而言,在 RAG 中,我们可以使用可靠可信的自定义数据文本,如产品文档,随后从向量数据库中检索相似结果。然后,将准确的文本答案作为“上下文”和“问题”一起插入到“Prompt”中,并将其输入到诸如 OpenAI 的 ChatGPT 之类的 LLM 中。最终,LLM 生成一个基于事实的聊天答案。
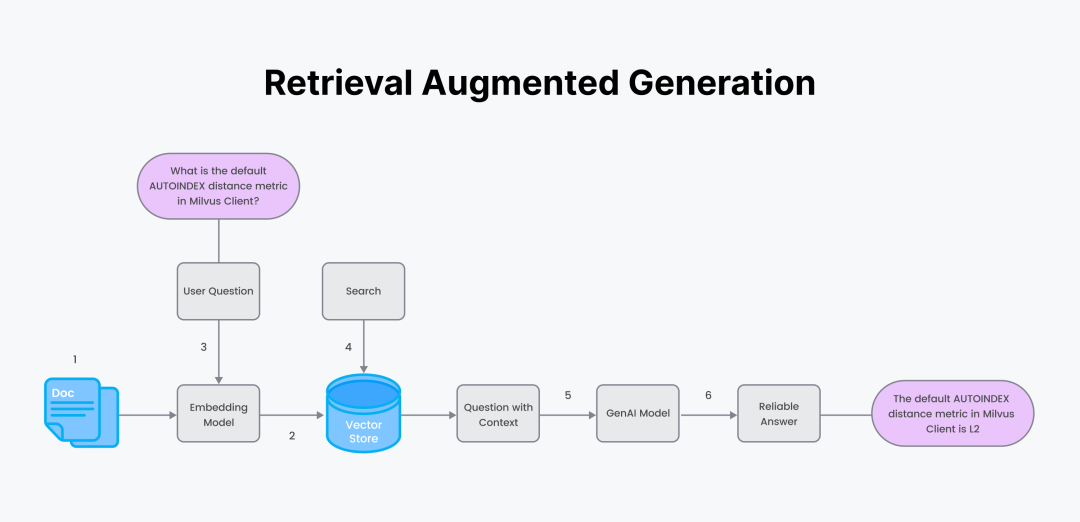
RAG 的具体流程:
-
准备可信的自定义数据和一个 Embeding 模型。
-
用 Encoder 对数据进行分块并生成 Embedding 向量,将数据和元数据保存在向量数据库中。
-
用户提出一个问题。使用第 1 步中相同的 Encoder 将问题转化为 Embedding 向量。
-
用向量数据库进行语义搜索来检索问题的答案。
-
将搜索答案文本块作为“上下文”和用户问题结果,形成 Prompt。将 Prompt 发送给 LLM。
-
LLM 生成答案。
01.获取数据
首先介绍一下本次搭建过程中会用到的工具:
Milvus 是一款开源高性能向量数据库,可简化非结构化数据搜索流程。Milvus 可存储、索引、搜索海量 Embedding 向量数据。
OpenAI 主要开发 AI 模型和工具,其最出名的产品为 GPT。
LangChain 工具和 wrapper 库能够帮助开发人员在传统软件和 LLM 中构建一座桥梁。
我们将用到产品文档页面,ReadTheDocs 是一款开源的免费文档软件,通过 Sphinx 生成文档。
Download readthedocs pages locally.
    DOCS_PAGE="https://pymilvus.readthedocs.io/en/latest/"
    wget -r -A.html -P rtdocs --header="Accept-Charset: UTF-8" $DOCS_PAGE
上述代码将文档页面下载到本地路径rtdocs中。接着,在 LangChain 中读取这些文档:
#!pip install langchain
from langchain.document_loaders import ReadTheDocsLoader
loader = ReadTheDocsLoader(
   "rtdocs/pymilvus.readthedocs.io/en/latest/",
   features="html.parser")
docs = loader.load()
02.使用 HTML 结构切分数据
需要确定分块策略、分块大小、分块重叠(chunk overlap)。本教程中,我们的配置如下所示:
-
分块策略 = 根据 Markdown 标题结构切分。
-
分块大小 = 使用 Embedding 模型参数
MAX_SEQ_LENGTH -
Overlap = 10-15%
-
函数 =
Langchain HTMLHeaderTextSplitter 切分markdown 文件标题。
Langchain RecursiveCharacterTextSplitter 将长文切分。
from langchain.text_splitter import HTMLHeaderTextSplitter, RecursiveCharacterTextSplitter
Define the headers to split on for the HTMLHeaderTextSplitter
headers_to_split_on = [
    ("h1", "Header 1"),
    ("h2", "Header 2"),]
Create an instance of the HTMLHeaderTextSplitter
html_splitter = HTMLHeaderTextSplitter(headers_to_split_on=headers_to_split_on)
Use the embedding model parameters.
chunk_size = MAX_SEQ_LENGTH - HF_EOS_TOKEN_LENGTH
chunk_overlap = np.round(chunk_size * 0.10, 0)
Create an instance of the RecursiveCharacterTextSplitter
child_splitter = RecursiveCharacterTextSplitter(
    chunk_size = chunk_size,
    chunk_overlap = chunk_overlap,
    length_function = len,)
Split the HTML text using the HTMLHeaderTextSplitter.
html_header_splits = []
for doc in docs:
    splits = html_splitter.split_text(doc.page_content)
    for split in splits:
        # Add the source URL and header values to the metadata
        metadata = {}
        new_text = split.page_content
        for header_name, metadata_header_name in headers_to_split_on:
            header_value = new_text.split("¶ ")[0].strip()
            metadata[header_name] = header_value
            try:
                new_text = new_text.split("¶ ")[1].strip()
            except:
                break
        split.metadata = {
            **metadata,
            "source": doc.metadata["source"]}
        # Add the header to the text
        split.page_content = split.page_content
    html_header_splits.extend(splits)
Split the documents further into smaller, recursive chunks.
chunks = child_splitter.split_documents(html_header_splits)
end_time = time.time()
print(f"chunking time: {end_time - start_time}")
print(f"docs: {len(docs)}, split into: {len(html_header_splits)}")
print(f"split into chunks: {len(chunks)}, type: list of {type(chunks[0])}")
Inspect a chunk.
print()
print("Looking at a sample chunk...")
print(chunks[1].page_content[:100])
print(chunks[1].metadata)

本段文本块都有文档作为支撑。此外,标题和文本块也保存在一起,标题可以后续使用。
03.生成 Embedding 向量
最新的 MTEB 性能测试结果显示,开源 Embedding/召回模型和 OpenAI Embeddings (ada-002)效果相似。下图中分数最高的小模型是bge-large-en-v1.5,本文将选择这个模型。

上图为 Embedding 模型排名表,排名最高的是voyage-lite-01-instruct(size 4.2 GB, and third rankbge-base-en-v1.5(size 1.5 GB)。OpenAIEmbeddingtext-embeddings-ada-002 排名第 22。
现在,我们来初始化模型;
#pip install torch, sentence-transformers
import torch
from sentence_transformers import SentenceTransformer
Initialize torch settings
DEVICE = torch.device('cuda:3'
   if torch.cuda.is_available()
   else 'cpu')
Load the encoder model from huggingface model hub.
model_name = "BAAI/bge-base-en-v1.5"
encoder = SentenceTransformer(model_name, device=DEVICE)
Get the model parameters and save for later.
MAX_SEQ_LENGTH = encoder.get_max_seq_length()
EMBEDDING_LENGTH = encoder.get_sentence_embedding_dimension()
接着,使用模型生成 Embedding 向量,将所有数据整合成 dictionary。
chunk_list = []
for chunk in chunks:
    # Generate embeddings using encoder from HuggingFace.
    embeddings = torch.tensor(encoder.encode([chunk.page_content]))
    embeddings = F.normalize(embeddings, p=2, dim=1)
    converted_values = list(map(np.float32, embeddings))[0]
    # Assemble embedding vector, original text chunk, metadata.
    chunk_dict = {
        'vector': converted_values,
        'text': chunk.page_content,
        'source': chunk.metadata['source'],
        'h1': chunk.metadata['h1'][:50],
        'h2': chunk.metadata['h1'][:50],}
    chunk_list.append(chunk_dict)
04.在 Milvus 中创建索引并插入数据
我们将原始文本块以 vector、text、source、h1、h2的形式存储在向量数据库中。

启动并连接 Milvus 服务器。如需使用 serverless 集群,你需要在连接时提供ZILLIZ_API_KEY。
#pip install pymilvus
from pymilvus import connections
ENDPOINT=”https://xxxx.api.region.zillizcloud.com:443”
connections.connect(
   uri=ENDPOINT,
   token=TOKEN)
创建 Milvus Collection 并命名为 MilvusDocs。Collection 类似于传统数据库中的表,其具备 Schema,定义字段和数据类型。Schema 中的向量维度应该与 Embedding 模型生成向量的维度保持一致。与此同时,创建索引:
from pymilvus import (
   FieldSchema, DataType,
   CollectionSchema, Collection)
1. Define a minimum expandable schema.
fields = [
   FieldSchema(“pk”, DataType.INT64, is_primary=True, auto_id=True),
   FieldSchema(“vector”, DataType.FLOAT_VECTOR, dim=768),]
schema = CollectionSchema(
   fields,
   enable_dynamic_field=True,)
2. Create the collection.
mc = Collection(“MilvusDocs”, schema)
3. Index the collection.
mc.create_index(
   field_name=”vector”,
   index_params={
       “index_type”: “AUTOINDEX”,
       “metric_type”: “COSINE”,}
在 Milvus/Zilliz 中插入数据的速度比 Pinecone快!
Insert data into the Milvus collection.
insert_result = mc.insert(chunk_list)
After final entity is inserted, call flush
to stop growing segments left in memory.
mc.flush()
print(mc.partitions)

05.提出问题
接下来,我们就可以用语义搜索的力量来回答有关文档的问题。语义搜索在向量空间中使用最近邻技术来找到最匹配的文档,以回答用户的问题。语义搜索的目标是理解问题和文档背后的含义,而不仅仅是匹配关键词。在检索过程中,Milvus 还可以利用元数据来增强搜索体验(在 Milvus API 选项expr=中使用布尔表达式)。
Define a sample question about your data.
QUESTION = "what is the default distance metric used in AUTOINDEX?"
QUERY = [question]
Before conducting a search, load the data into memory.
mc.load()
Embed the question using the same encoder.
embedded_question = torch.tensor(encoder.encode([QUESTION]))
Normalize embeddings to unit length.
embedded_question = F.normalize(embedded_question, p=2, dim=1)
Convert the embeddings to list of list of np.float32.
embedded_question = list(map(np.float32, embedded_question))
Return top k results with AUTOINDEX.
TOP_K = 5
Run semantic vector search using your query and the vector database.
start_time = time.time()
results = mc.search(
    data=embedded_question,
    anns_field="vector",
    # No params for AUTOINDEX
    param={},
    # Boolean expression if any
    expr="",
    output_fields=["h1", "h2", "text", "source"],
    limit=TOP_K,
    consistency_level="Eventually")
elapsed_time = time.time() - start_time
print(f"Milvus search time: {elapsed_time} sec")

下面是检索结果,我们把这些文本放入 context 字段中:
for n, hits in enumerate(results):
     print(f"{n}th query result")
     for hit in hits:
         print(hit)
Assemble the context as a stuffed string.
context = ""
for r in results[0]:
    text = r.entity.text
    context += f"{text} "
Also save the context metadata to retrieve along with the answer.
context_metadata = {
    "h1": results[0][0].entity.h1,
    "h2": results[0][0].entity.h2,
    "source": results[0][0].entity.source,}

上图显示,检索出了 5 个文本块。其中第一个文本块中包含了问题的答案。因为我们在检索时使用了output_fields=,所以检索返回的输出字段会带上引用和元数据。
id: 445766022949255988, distance: 0.708217978477478, entity: {
  'chunk': "...# Optional, default MetricType.L2 } timeout (float) –
           An optional duration of time in seconds to allow for the
           RPC. …",
  'source': 'https://pymilvus.readthedocs.io/en/latest/api.html',
  'h1': 'API reference',
  'h2': 'Client'}
06.使用 LLM 根据上下文生成用户问题的回答
这一步中,我们将使用一个小型生成式 AI 模型(LLM),该模型可通过 HuggingFace 获取。
#pip install transformers
from transformers import AutoTokenizer, pipeline
tiny_llm = "deepset/tinyroberta-squad2"
tokenizer = AutoTokenizer.from_pretrained(tiny_llm)
context cannot be empty so just put random text in it.
QA_input = {
    'question': question,
    'context': 'The quick brown fox jumped over the lazy dog'}
nlp = pipeline('question-answering',
               model=tiny_llm,
               tokenizer=tokenizer)
result = nlp(QA_input)
print(f"Question: {question}")
print(f"Answer: {result['answer']}")

答案不是很准确,我们用召回的文本提出同样的问题试试看:
QA_input = {
    'question': question,
    'context': context,}
nlp = pipeline('question-answering',
               model=tiny_llm,
               tokenizer=tokenizer)
result = nlp(QA_input)
Print the question, answer, grounding sources and citations.
Answer = assemble_grounding_sources(result[‘answer’], context_metadata)
print(f"Question: {question}")
print(answer)

答案准确多了!
接下来,我们用 OpenAI 的 GPT 试试,发现回答结果和我们自己搭建的开源机器人相同。
def prepare_response(response):
    return response["choices"][-1]["message"]["content"]
def generate_response(
    llm,
    temperature=0.0, #0 for reproducible experiments
    grounding_sources=None,
    system_content="", assistant_content="", user_content=""):
    response = openai.ChatCompletion.create(
        model=llm,
        temperature=temperature,
        api_key=openai.api_key,
        messages=[
            {"role": "system", "content": system_content},
            {"role": "assistant", "content": assistant_content},
            {"role": "user", "content": user_content}, ])
        answer = prepare_response(response=response)

        # Add the grounding sources and citations.
        answer = assemble_grounding_sources(answer, grounding_sources)
        return answer
Generate response
response = generate_response(
    llm="gpt-3.5-turbo-1106",
    temperature=0.0,
    grounding_sources=context_metadata,
    system_content="Answer the question using the context provided. Be succinct.",
    user_content=f"question: {QUESTION}, context: {context}")
Print the question, answer, grounding sources and citations.
print(f"Question: {QUESTION}")
print(response)

07.总结
本文完整展示了如何针对自定义文档搭建一个 RAG 聊天机器人。得益于 LangChain、Milvus 和开源的 LLM,我们轻而易举实现了对制定数据进行免费问答。
博通宣布终止现有 VMware 合作伙伴计划 deepin-IDE 版本更新,旧貌换新颜 WAVE SUMMIT 迎来第十届,文心一言将有最新披露! 周鸿祎:鸿蒙原生必将成功 GTA 5 完整源代码被公开泄露 Linus:圣诞夜我不看代码,明年再发布新版 Java 工具集 Hutool-5.8.24 发布,一起发发牢骚 Furion 商业化探索:轻舟已过万重山,v4.9.1.15 苹果发布开源多模态大语言模型 Ferret 养乐多公司确认 95 G 数据被泄露