本文转自:https://blog.csdn.net/AKA009/article/details/70161062
Refraction
Refraction is a screen-space UV offset for refracting the background pixels. Make sure you set the alpha to something below 1 before using, so that the refraction effect is visible.
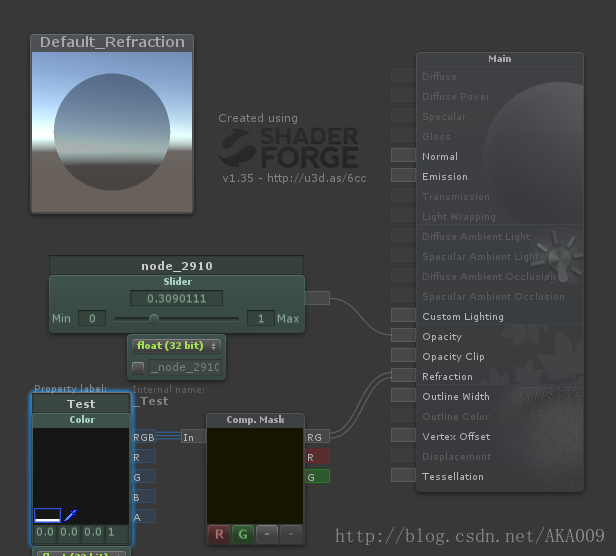
这是SF官方给出的折射节点的说明。
在生成的shader中对折射节点进行跟踪,使用的shader如下
// Shader created with Shader Forge v1.35
// Shader Forge (c) Neat Corporation / Joachim Holmer - http://www.acegikmo.com/shaderforge/

//对Shader Forge 内置折射节点的研究
//使用了一个名为Test的Color属性来确定SF如何使用节点的输入数据,此种用法并不正确

Shader "Shader Forge/Default_Refraction"
{
    Properties
    {
        _Alpha ("Alpha", Range(0, 1)) = 0.5
        _Test ("Test", Color) = (0,0,0,1)
    }
    SubShader
    {
        Tags
        {
            "IgnoreProjector"="True"
            "Queue"="Transparent"
            "RenderType"="Transparent"
        }

        GrabPass{ }//SF生成的代码使用了无参数的GrabPass来进行抓屏处理

        Pass
        {
            Name "FORWARD"
            Tags
            {
                "LightMode"="ForwardBase"
            }

            Blend SrcAlpha OneMinusSrcAlpha
            ZWrite Off

            CGPROGRAM

            #define UNITY_PASS_FORWARDBASE
            #include "UnityCG.cginc"

            #pragma vertex vert
            #pragma fragment frag
            #pragma multi_compile_fwdbase
            #pragma only_renderers d3d9 d3d11 glcore gles
            #pragma target 3.0


            uniform sampler2D _GrabTexture;//GrabPass传出的默认纹理名称为_GrabTexture,方便后续使用

            uniform float _Alpha;
            uniform float4 _Test;

            struct VertexInput
            {
                float4 vertex : POSITION;
            };

            struct VertexOutput
            {
                float4 pos : SV_POSITION;
                float4 screenPos : TEXCOORD0;
            };

            VertexOutput vert (VertexInput v)
            {
                VertexOutput o = (VertexOutput)0;
                o.pos = mul(UNITY_MATRIX_MVP, v.vertex );
                o.screenPos = o.pos;
                return o;
            }

            float4 frag(VertexOutput i) : COLOR
            {

                //从此处到sceneColor 计算结束之间的语句实现了计算屏幕坐标的过程,也可使用内置函数ComputeScreenPos()

                //屏幕坐标的计算方式参考《Unity shader 入门精要》第一版\90页\4.9.3节
                //
                //对内置变量_ProjectionParams 的 Unity官方说明如下:
                //_ProjectionParams (float4)
                //x is 1.0 (or –1.0 if currently rendering with a flipped projection matrix), y is the camera’s near plane, z is the camera’s far plane and w is 1/FarPlane.

                //消除平台差异,翻转屏幕坐标
                #if UNITY_UV_STARTS_AT_TOP
                    float grabSign = -_ProjectionParams.x;
                #else
                    float grabSign = _ProjectionParams.x;
                #endif

                i.screenPos = float4( i.screenPos.xy / i.screenPos.w, 0, 0 );
                i.screenPos.y *= _ProjectionParams.x;

                //下面的语句完成了屏幕坐标的最终偏移计算以及节点输入值的使用
                //————即输入一个float2向量,之间加在屏幕坐标上以实现偏移
                float2 sceneUVs = float2(1,grabSign)*i.screenPos.xy*0.5+0.5 + _Test.rgb.rg;

                float4 sceneColor = tex2D(_GrabTexture, sceneUVs);//利用计算好的已经偏移过的屏幕坐标对抓取纹理进行采样

                float3 finalColor = 0;
                return fixed4(lerp(sceneColor.rgb, finalColor,_Alpha),1);//使用传入Opacity节点的值作为参数,对折射的颜色和之前 计算的颜色进行线性插值混合
            }
            ENDCG
        }
    }
    FallBack "Diffuse"
    CustomEditor "ShaderForgeMaterialInspector"
}
使用的节点视图如下:
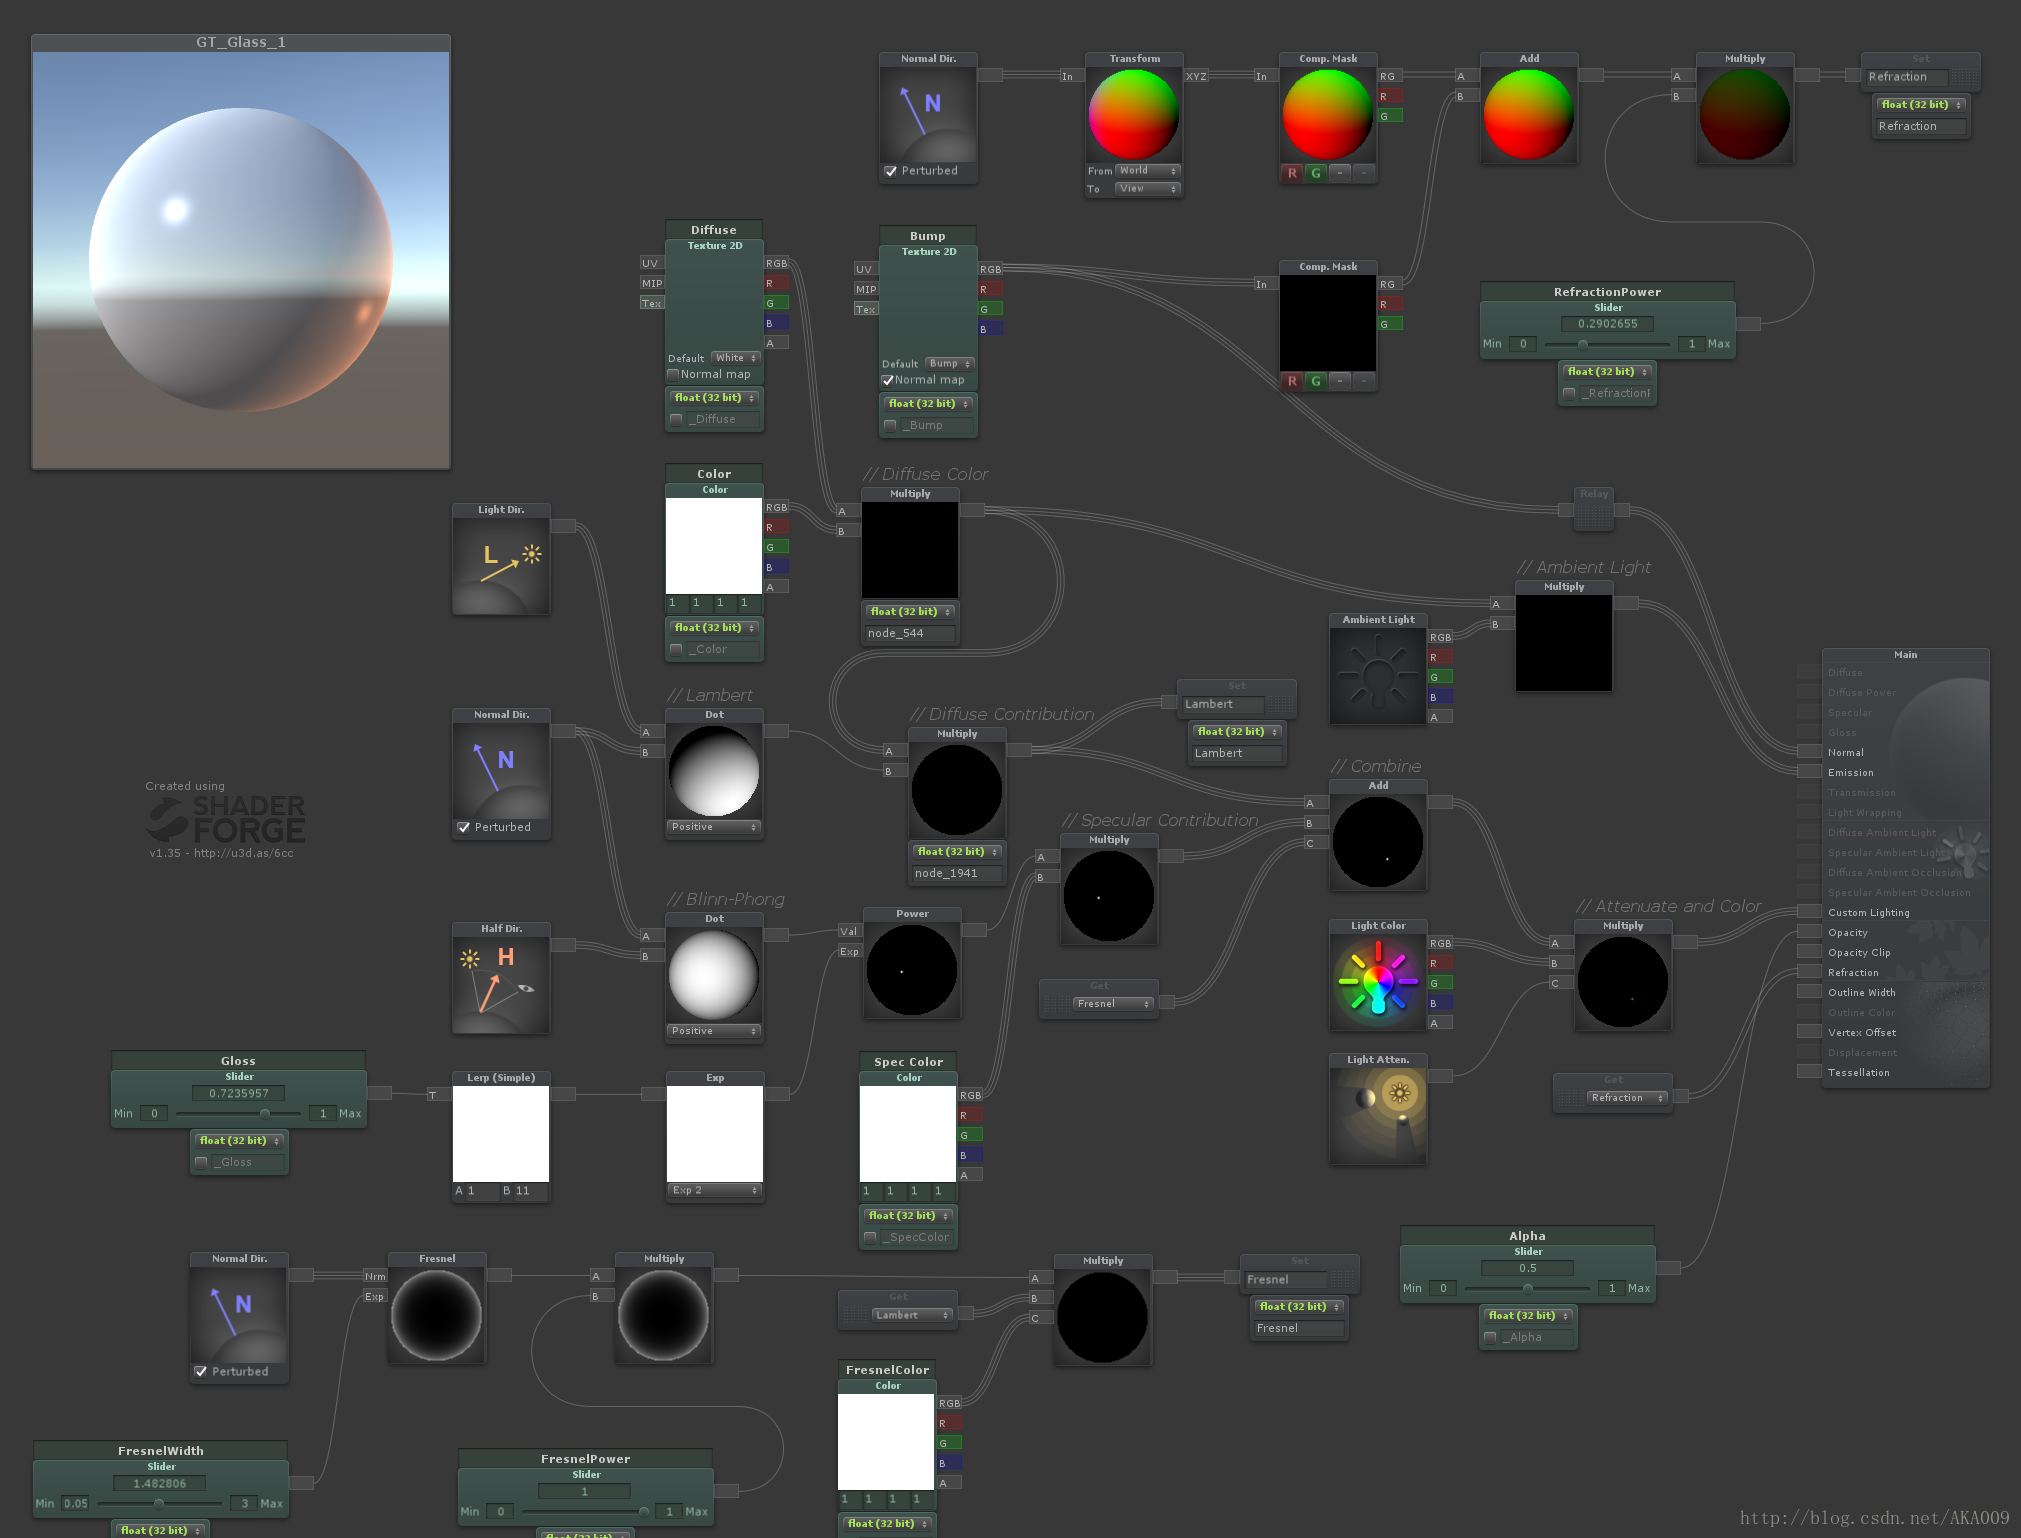
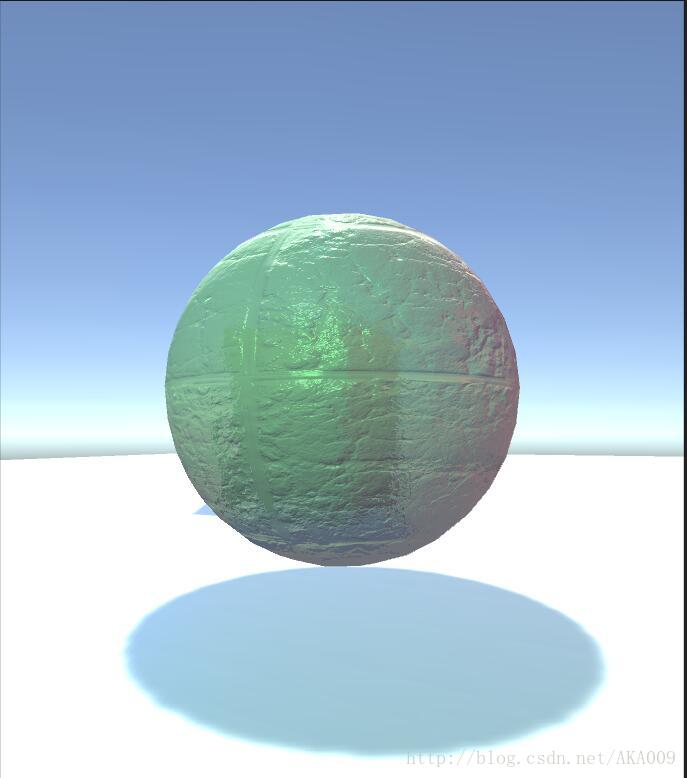
GT给出的实现方案如下:
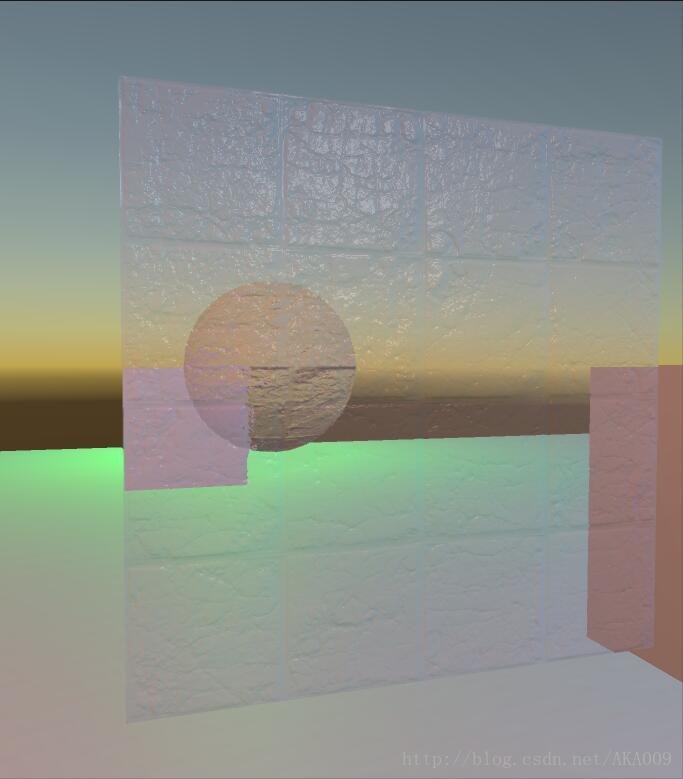
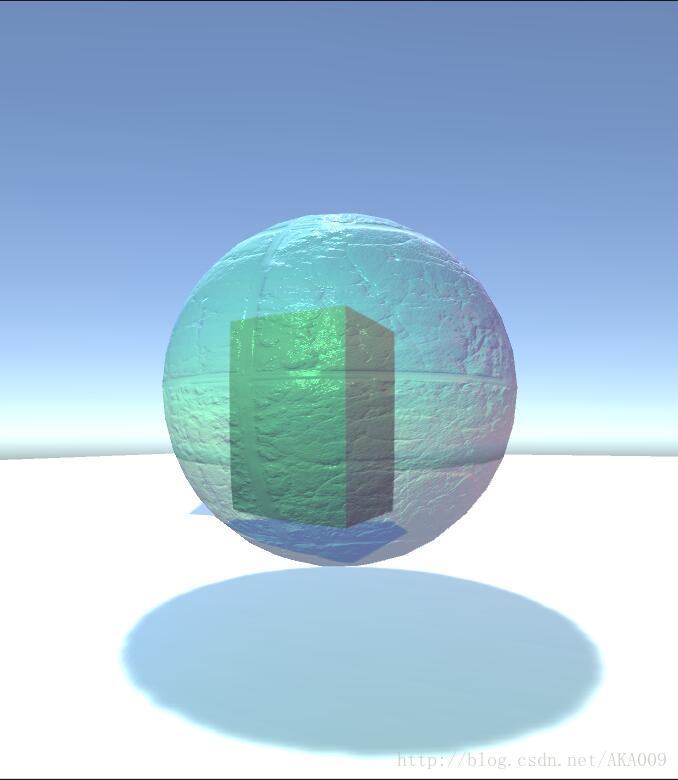
效果如下:
在不使用shadowcaster的情况下,通过指定不透明物体的fallback(legacy\Bumped Specular)来强制投射阴影
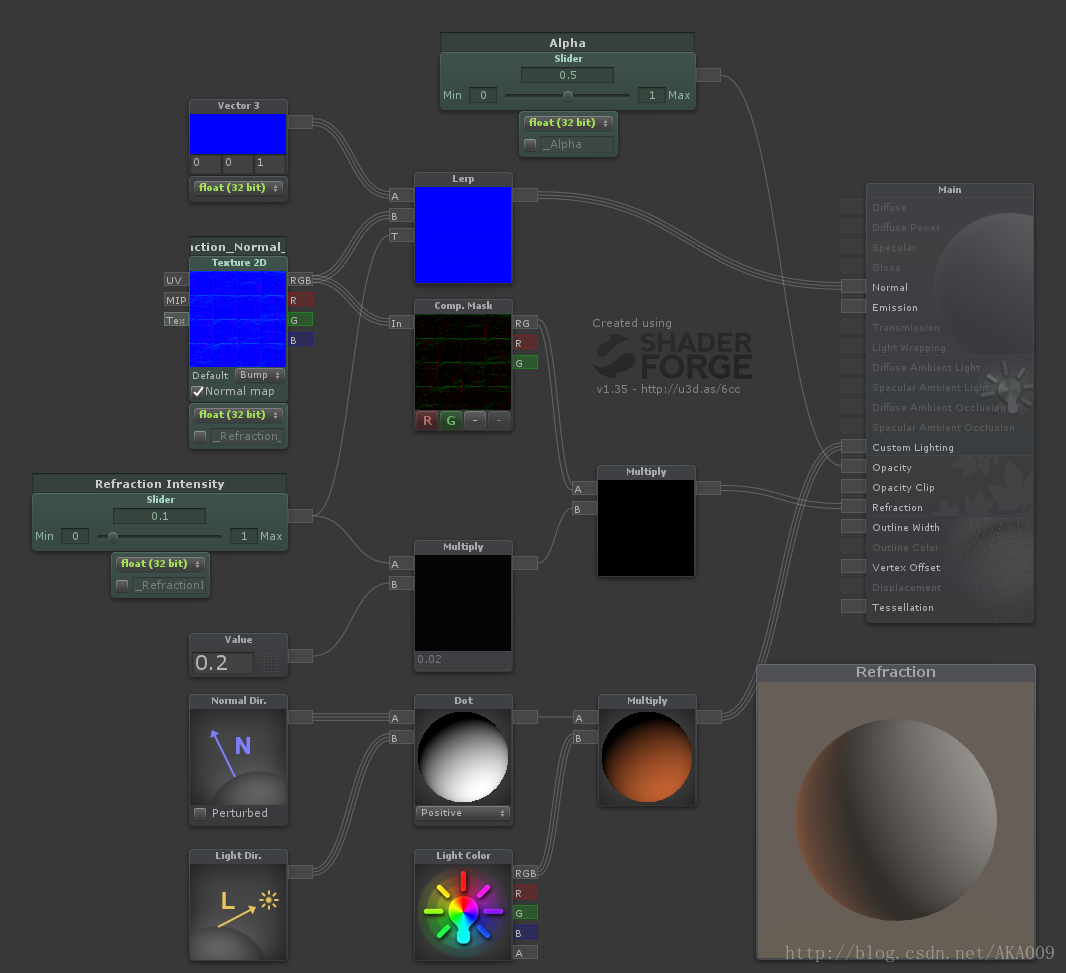
SF示例场景中的折射shader(简化版)如下
原本的shader是使用了PBL光照,双面显示;修改后为简单的Lambert光照,单面显示。
这个shader的特点在于折射强度参数可以同时控制法线贴图的强度(作为线性插值的参数)
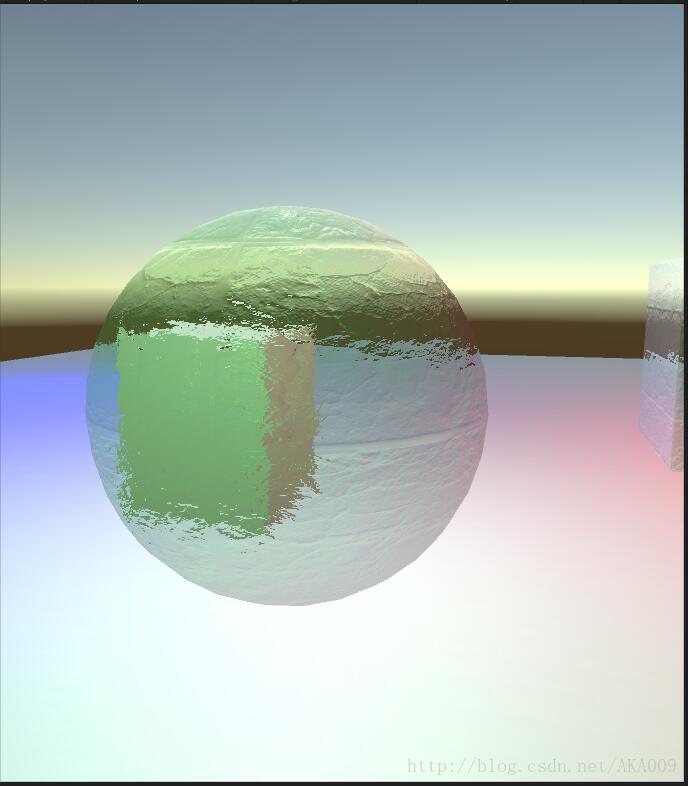
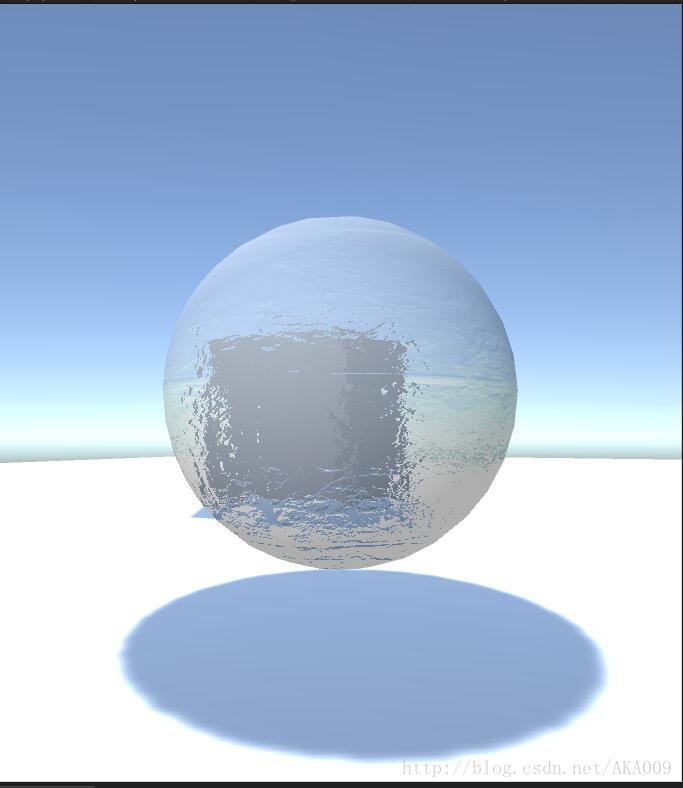
效果如下:
完整的shader编码方法可以参考《Unity Shader 入门精要》第10章节。
总结:
使用SF生成折射效果,一般使用法线节点的XY分量。折射节点只支持float二维向量输入,输入之后直接和屏幕坐标相加。
由SF生成的折射shader使用了无参数的GrabPass,有可能会对性能造成影响。
补充:
利用Scene Color节点配合uv偏移实现在不使用Alpha混合的情况下形成折射效果。
SF官方对于Scene Color节点的介绍如下:
Scene Color
A texture containing a render of the scene before this object was rendered. By default, its UVs are in screen space, making each pixel represent the color behind the object. This can be used for more advanced blending/transparency effects, or a manual way of making refraction if the UVs are altered, among other things
Scene Color (场景颜色)
包含渲染此对象前的场景渲染的纹理。默认其 UV 位于屏幕空间中,从而让每个像素都代表对象背后的颜色。这可用于更加高级的混合/透明度效果,或作为 UV 改变时形成折射的其中一种手动方法
Scene Color 的实现其实和Refraction节点一样,使用了无参数的GrabPass来进行抓屏。Refraction节点相当于对Scene Color 的封装。
GT给出的利用Parallax (视差)节点偏移uv的方案如下:
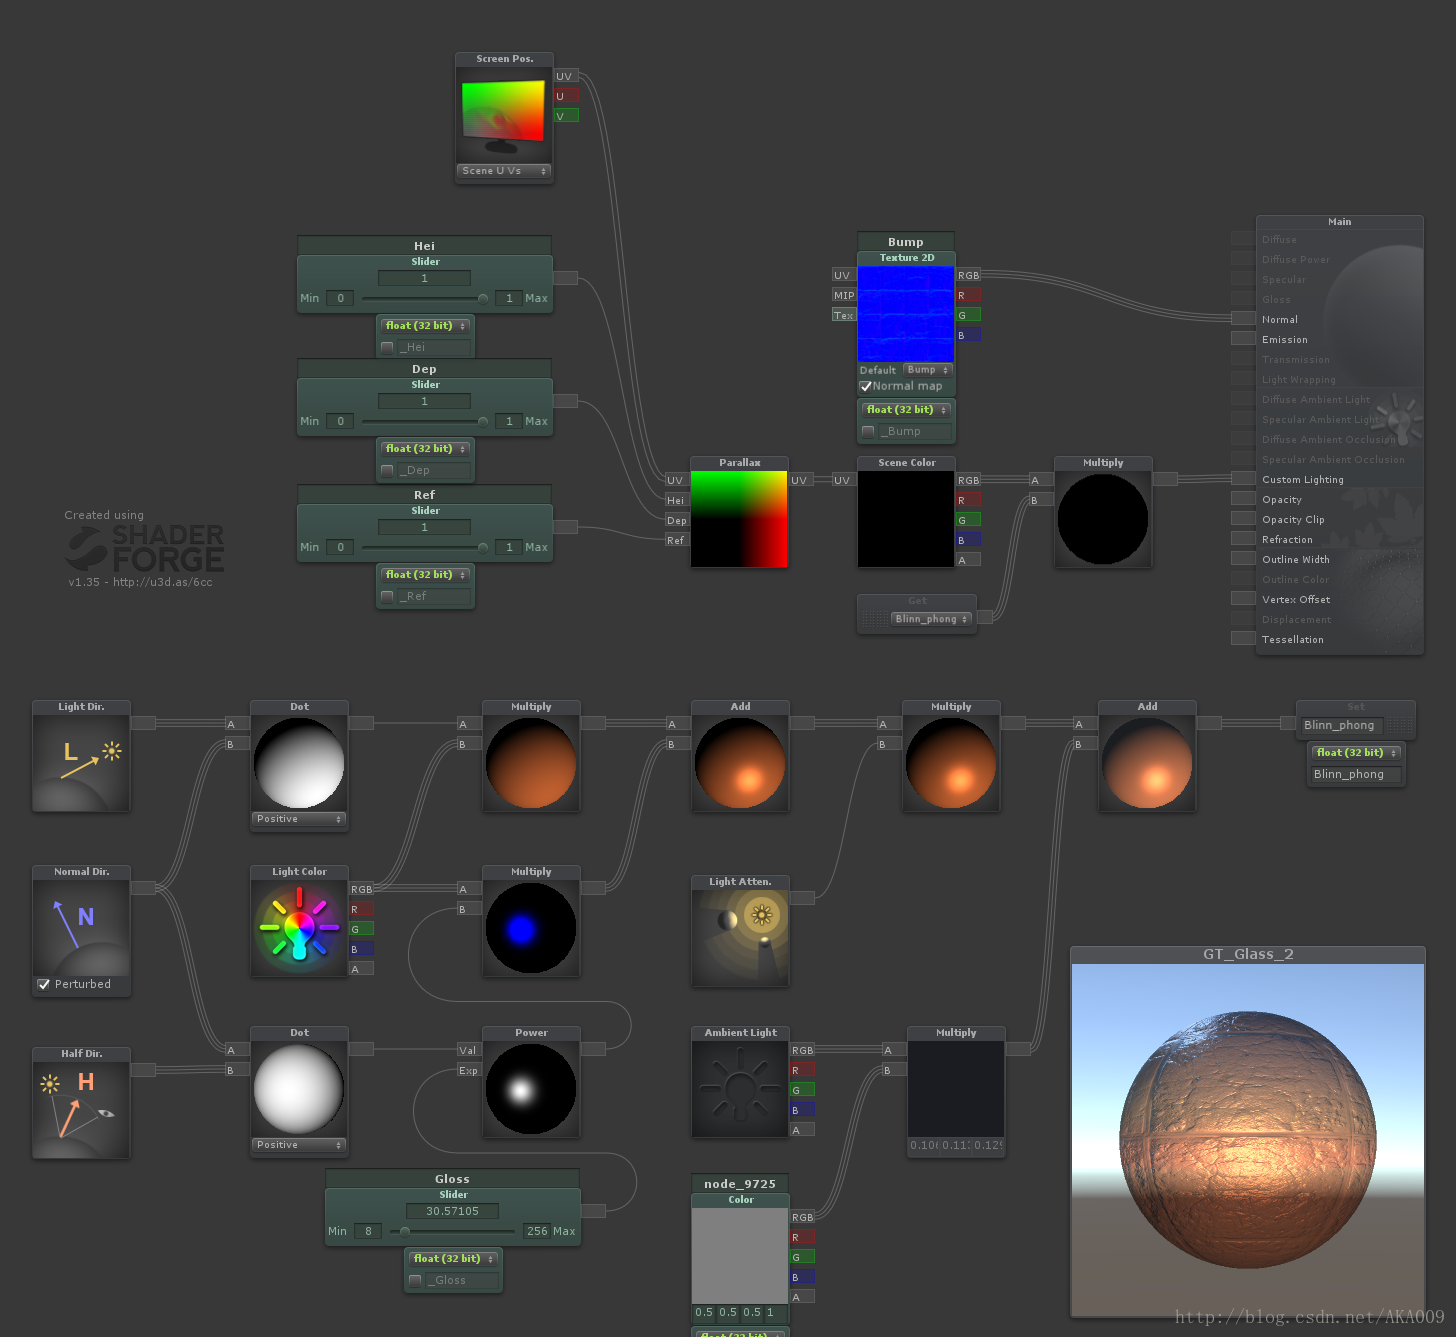
笔者在实现这种效果时没有考虑到法线扰动映射对折射效果的影响,所以缺乏真实感。
效果如下:
这是SF官方给出的折射节点的说明。
在生成的shader中对折射节点进行跟踪,使用的shader如下
// Shader created with Shader Forge v1.35
// Shader Forge (c) Neat Corporation / Joachim Holmer - http://www.acegikmo.com/shaderforge/

//对Shader Forge 内置折射节点的研究
//使用了一个名为Test的Color属性来确定SF如何使用节点的输入数据,此种用法并不正确

Shader "Shader Forge/Default_Refraction"
{
    Properties
    {
        _Alpha ("Alpha", Range(0, 1)) = 0.5
        _Test ("Test", Color) = (0,0,0,1)
    }
    SubShader
    {
        Tags
        {
            "IgnoreProjector"="True"
            "Queue"="Transparent"
            "RenderType"="Transparent"
        }

        GrabPass{ }//SF生成的代码使用了无参数的GrabPass来进行抓屏处理

        Pass
        {
            Name "FORWARD"
            Tags
            {
                "LightMode"="ForwardBase"
            }

            Blend SrcAlpha OneMinusSrcAlpha
            ZWrite Off

            CGPROGRAM

            #define UNITY_PASS_FORWARDBASE
            #include "UnityCG.cginc"

            #pragma vertex vert
            #pragma fragment frag
            #pragma multi_compile_fwdbase
            #pragma only_renderers d3d9 d3d11 glcore gles
            #pragma target 3.0


            uniform sampler2D _GrabTexture;//GrabPass传出的默认纹理名称为_GrabTexture,方便后续使用

            uniform float _Alpha;
            uniform float4 _Test;

            struct VertexInput
            {
                float4 vertex : POSITION;
            };

            struct VertexOutput
            {
                float4 pos : SV_POSITION;
                float4 screenPos : TEXCOORD0;
            };

            VertexOutput vert (VertexInput v)
            {
                VertexOutput o = (VertexOutput)0;
                o.pos = mul(UNITY_MATRIX_MVP, v.vertex );
                o.screenPos = o.pos;
                return o;
            }

            float4 frag(VertexOutput i) : COLOR
            {

                //从此处到sceneColor 计算结束之间的语句实现了计算屏幕坐标的过程,也可使用内置函数ComputeScreenPos()

                //屏幕坐标的计算方式参考《Unity shader 入门精要》第一版\90页\4.9.3节
                //
                //对内置变量_ProjectionParams 的 Unity官方说明如下:
                //_ProjectionParams (float4)
                //x is 1.0 (or –1.0 if currently rendering with a flipped projection matrix), y is the camera’s near plane, z is the camera’s far plane and w is 1/FarPlane.

                //消除平台差异,翻转屏幕坐标
                #if UNITY_UV_STARTS_AT_TOP
                    float grabSign = -_ProjectionParams.x;
                #else
                    float grabSign = _ProjectionParams.x;
                #endif

                i.screenPos = float4( i.screenPos.xy / i.screenPos.w, 0, 0 );
                i.screenPos.y *= _ProjectionParams.x;

                //下面的语句完成了屏幕坐标的最终偏移计算以及节点输入值的使用
                //————即输入一个float2向量,之间加在屏幕坐标上以实现偏移
                float2 sceneUVs = float2(1,grabSign)*i.screenPos.xy*0.5+0.5 + _Test.rgb.rg;

                float4 sceneColor = tex2D(_GrabTexture, sceneUVs);//利用计算好的已经偏移过的屏幕坐标对抓取纹理进行采样

                float3 finalColor = 0;
                return fixed4(lerp(sceneColor.rgb, finalColor,_Alpha),1);//使用传入Opacity节点的值作为参数,对折射的颜色和之前 计算的颜色进行线性插值混合
            }
            ENDCG
        }
    }
    FallBack "Diffuse"
    CustomEditor "ShaderForgeMaterialInspector"
}- 1
- 2
- 3
- 4
- 5
- 6
- 7
- 8
- 9
- 10
- 11
- 12
- 13
- 14
- 15
- 16
- 17
- 18
- 19
- 20
- 21
- 22
- 23
- 24
- 25
- 26
- 27
- 28
- 29
- 30
- 31
- 32
- 33
- 34
- 35
- 36
- 37
- 38
- 39
- 40
- 41
- 42
- 43
- 44
- 45
- 46
- 47
- 48
- 49
- 50
- 51
- 52
- 53
- 54
- 55
- 56
- 57
- 58
- 59
- 60
- 61
- 62
- 63
- 64
- 65
- 66
- 67
- 68
- 69
- 70
- 71
- 72
- 73
- 74
- 75
- 76
- 77
- 78
- 79
- 80
- 81
- 82
- 83
- 84
- 85
- 86
- 87
- 88
- 89
- 90
- 91
- 92
- 93
- 94
- 95
- 96
- 97
- 98
- 99
- 100
- 101
- 102
- 103
- 104
- 105
- 106
- 107
使用的节点视图如下:
GT给出的实现方案如下:
效果如下:
在不使用shadowcaster的情况下,通过指定不透明物体的fallback(legacy\Bumped Specular)来强制投射阴影
SF示例场景中的折射shader(简化版)如下
原本的shader是使用了PBL光照,双面显示;修改后为简单的Lambert光照,单面显示。
这个shader的特点在于折射强度参数可以同时控制法线贴图的强度(作为线性插值的参数)
效果如下:
完整的shader编码方法可以参考《Unity Shader 入门精要》第10章节。
总结:
使用SF生成折射效果,一般使用法线节点的XY分量。折射节点只支持float二维向量输入,输入之后直接和屏幕坐标相加。
由SF生成的折射shader使用了无参数的GrabPass,有可能会对性能造成影响。
补充:
利用Scene Color节点配合uv偏移实现在不使用Alpha混合的情况下形成折射效果。
SF官方对于Scene Color节点的介绍如下:
Scene Color
A texture containing a render of the scene before this object was rendered. By default, its UVs are in screen space, making each pixel represent the color behind the object. This can be used for more advanced blending/transparency effects, or a manual way of making refraction if the UVs are altered, among other things
Scene Color (场景颜色)
包含渲染此对象前的场景渲染的纹理。默认其 UV 位于屏幕空间中,从而让每个像素都代表对象背后的颜色。这可用于更加高级的混合/透明度效果,或作为 UV 改变时形成折射的其中一种手动方法
Scene Color 的实现其实和Refraction节点一样,使用了无参数的GrabPass来进行抓屏。Refraction节点相当于对Scene Color 的封装。
GT给出的利用Parallax (视差)节点偏移uv的方案如下:
笔者在实现这种效果时没有考虑到法线扰动映射对折射效果的影响,所以缺乏真实感。
效果如下: