主要目的就是根据已知的ROI区域,对点云进行裁剪。要么留下点云ROI区域,要么去除。
ROI区域一般都是一个矩形,即(x,y,width,height)。
那么封装的函数形式一般如下:
pcl::PointCloud<pcl::PointXYZ>::Ptr CloudClipper(pcl::PointCloud<pcl::PointXYZ>::Ptr& cloud,double x,double y, double width, double height)
{


	// 实现点云滤波

    // 创建滤波后点云
    pcl::PointCloud<pcl::PointXYZ>::Ptr cloud_filtered(new pcl::PointCloud<pcl::PointXYZ>());
    // 调用filter方法得到滤波后点云

	return cloud_filtered;
}
比较简单直接粗暴的方法就是使用直通滤波
#include <pcl/filters/passthrough.h>
pcl::PassThrough<pcl::PointXYZ> pass;	//创建直通滤波器对象
pass.setInputCloud(pointCloud_raw);	//设置输入的点云
pass.setFilterFieldName("z");           //设置过滤时所需要点云类型为Z字段
pass.setFilterLimits(-0.1, 10);         //设置在过滤字段的范围
pass.setFilterLimitsNegative(true);     //设置保留还是过滤掉字段范围内的点,设置为true表示过滤掉字段范围内的点
pass.filter(*cloud_filtered);		//执行滤波
PCL库中其实有条件滤波的,感觉听起来确实很像想要用的滤波器,于是就尝试了一下
#include <pcl/filters/conditional_removal.h>
pcl::PointCloud<pcl::PointXYZ>::Ptr ConditionFilter(const pcl::PointCloud<pcl::PointXYZ>::Ptr& cloud, double x, double y, double width, double height)
{
//创建条件限定下的滤波器
//pcl::ConditionBase
pcl::ConditionAnd<pcl::PointXYZ>::Ptr range_cond(new pcl::ConditionAnd<pcl::PointXYZ>());
//创建条件定义对象
//为条件定义对象添加比较算子: 使用大于0.0和小于0.8这两个条件用于建立滤波器。
range_cond->addComparison(pcl::FieldComparison<pcl::PointXYZ>::ConstPtr(new
pcl::FieldComparison<pcl::PointXYZ>("x", pcl::ComparisonOps::GT, x)));
//添加在x字段上大于0的比较算子
range_cond->addComparison(pcl::FieldComparison<pcl::PointXYZ>::ConstPtr(new
pcl::FieldComparison<pcl::PointXYZ>("x", pcl::ComparisonOps::LT, x + width)));
//添加在x字段上小于0.8的比较算子
range_cond->addComparison(pcl::FieldComparison<pcl::PointXYZ>::ConstPtr(new
pcl::FieldComparison<pcl::PointXYZ>("y", pcl::ComparisonOps::GT, y)));
range_cond->addComparison(pcl::FieldComparison<pcl::PointXYZ>::ConstPtr(new
pcl::FieldComparison<pcl::PointXYZ>("y", pcl::ComparisonOps::LT, y + height)));
//创建滤波器并用条件定义对象初始化
pcl::ConditionalRemoval<pcl::PointXYZ> condrem;
condrem.setCondition(range_cond);
condrem.setInputCloud(cloud); //设置输入点云
condrem.setKeepOrganized(false); //设置保持点云的结构:为true时被剔除的点为NAN
//condrem.setUserFilterValue(0.1f);
//condrem.getIndices
pcl::IndicesConstPtr inliers = condrem.getRemovedIndices();
if (inliers != nullptr)
{
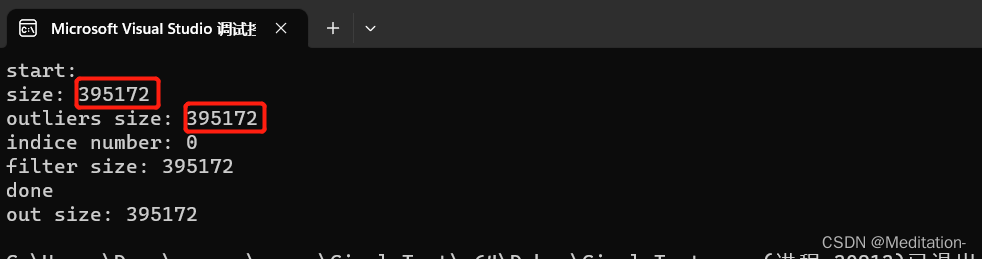
std::cout << "indice number: " << inliers->size() << std::endl;
}
pcl::PointCloud<pcl::PointXYZ>::Ptr cloud_filtered(new pcl::PointCloud<pcl::PointXYZ>());
condrem.filter(*cloud_filtered); //执行条件滤波,存储结果到cloud_filtered
std::cout << "filter size: " << cloud_filtered->points.size() << std::endl;
/* pcl::IndicesConstPtr inliers = condrem.getRemovedIndices();
pcl::copyPointCloud<pcl::PointXYZ>(*cloud, *inliers, *cloud_filtered);*/
return cloud_filtered;
}
逐行解释:
1.首先需要创建一个条件定义对象,用于设定条件。其实条件主要有两种pcl::ConditionAndpcl::PointT::Ptr和pcl::ConditionOrpcl::PointT::Ptr,前者是与条件,意思是所有条件都要满足,其实就是每个条件得到的点云求交集,后者是或条件,那么就是每个条件滤波结果求并集。可以根据需要进行使用。
2.设置字段,即range_cond->addComparison(pcl::FieldComparisonpcl::PointXYZ::ConstPtr(new
pcl::FieldComparisonpcl::PointXYZ(“x”, pcl::ComparisonOps::GT, x)));中的“x”其实是指点云的点的x坐标值,如果是“r”可以筛选出RGB中R通道的值,那么点云的数据结构必须是PointXYZRGB而不是PointXYZ,这个得注意。另外对于pcl::ComparisonOps::GT和pcl::ComparisonOps::LT,其实GT就是greater than即大于,LT就是less than即小于。
3.//创建滤波器并用条件定义对象初始化
pcl::ConditionalRemovalpcl::PointXYZ condrem;
condrem.setCondition(range_cond);
condrem.setInputCloud(cloud); //设置输入点云
以上几句无非是实例化滤波器对象后,将上述设置好了的条件和点云都输入进去
4.setKeepOrganized则是用于进行条件移除之后是否保持点云的有序性,但是一般处理的点云都是无序点云,大多数情况下这个地方设置为false,但一定要视实际情况而定。如果无序点云中的点之间不存在明确定义的拓扑关系,例如没有明确的连接关系或者边界关系,那么在移除点云中的一些点后,点云的有序属性也会被破坏。此时,即使设置 setKeepOrganized 为 true,输出点云仍然是无序的。
5.setUserFilterValue:该函数用于设置条件移除的阈值参数。对于某些条件(例如欧式距离),需要指定阈值才能进行移除。setUserFilterValue 函数可以设置这个阈值。该函数需要传递一个模板参数,表示阈值的类型,可以是 float、double、int 等。在使用 setUserFilterValue 函数时,应该根据实际情况设置合适的阈值,避免移除过多或者过少的点。
6.条件滤波器还可以得到
condrem.getIndices();
condrem.getRemovedIndices();即得到点的索引和去除点的索引。有的滤波器中有setNegative方法,设置为true时可以得到滤波器滤掉的点,设置为false时可以得到滤波器留下来的点。但是条件滤波器中没有该方法。于是想通过得到去除点的索引,然后再通过pcl::copyPointCloudpcl::PointXYZ(*cloud, *inliers, *cloud_filtered);提取得到滤波器去掉的点。结果发现滤波器得到的索引中size为0,也就是无索引。可能有以下几个原因:
在执行条件滤波操作之前,没有设置条件对象。条件滤波器必须先设置条件对象,才能根据条件对点云进行筛选。如果没有设置条件对象,则条件滤波器会将输入点云中的所有点都保留下来,因此“已移除索引”列表中就没有任何点。

设置的条件不满足任何点。如果设置的条件不满足输入点云中的任何点,则条件滤波器不会移除任何点,因此“已移除索引”列表中也就没有任何点。

使用的数据类型不正确。条件滤波器的输入点云和条件对象都必须是相同的数据类型,否则条件滤波器会出现异常,导致“已移除索引”列表为空。例如,如果输入点云是 XYZRGB 类型的,而条件对象是 XYZ 类型的,则条件滤波器会出现异常。
其实上述三个情况都没问题。可是为啥size为0呢,是点云数据结构中本身就没有索引嘛???
而使用condrem.getIndices();返回的更是一个nullptr空指针,原因如下:
1.在执行条件滤波操作之前,没有设置输入点云。条件滤波器必须设置输入点云,才能根据条件对点云进行筛选。如果没有设置输入点云,则 getIndices() 函数返回的指针是 nullptr。
2.条件滤波器没有将任何点移除。如果设置的条件不满足输入点云中的任何点,或者输入点云本身已经满足条件,条件滤波器不会移除任何点,因此 getIndices() 函数返回的指针是 nullptr。
3.没有启用索引输出。条件滤波器默认情况下不会输出被移除点的索引。如果要输出被移除点的索引,需要在条件滤波器上启用索引输出,即pcl::ConditionalRemovalpcl::PointXYZ condrem;
condrem.setKeepOrganized(true); // 启用索引输出
将setKeepOrganized设置为true后,getIndices返回的指针不为空了,但是size为输入点云的数量。而且!!!此时竟然无法滤除点云了。
后面发现其实pcl::IndicesPtr outliers = condrem.getIndices();放在condrem.filter(*cloud_filtered);后面之后,返回得指针也不为空,但是其size还是和输入的点云中点的size一致。
所以,目前通过条件滤波可以得到从点云中剪裁下来的点云,但是无法获取到除了剪裁下来的点之外的点。
使用crop_box进行剪裁
代码如下,可以直接使用
pcl::PointCloud<pcl::PointXYZ>::Ptr cropclipper3D(pcl::PointCloud<pcl::PointXYZ>::Ptr& cloud, double x, double y, double width, double height)
    {


        pcl::PointXYZ min_point(x, y, -100);
        pcl::PointXYZ max_point(x + width, y + height, 100);
        Eigen::Vector4f minpt(x, y, -100, 1);
        Eigen::Vector4f maxpt(x + width, y + height, 100, 1);
        pcl::CropBox<pcl::PointXYZ> crop_box;
        crop_box.setMin(minpt);
        crop_box.setMax(maxpt);
        // 将点云限制在 3D 盒子内部或者外部,并保存输出点云
        pcl::PointCloud<pcl::PointXYZ>::Ptr clipped_cloud(new pcl::PointCloud<pcl::PointXYZ>);
        crop_box.setInputCloud(cloud);
        crop_box.setNegative(true);
        crop_box.filter(*clipped_cloud);
        return clipped_cloud;
    }
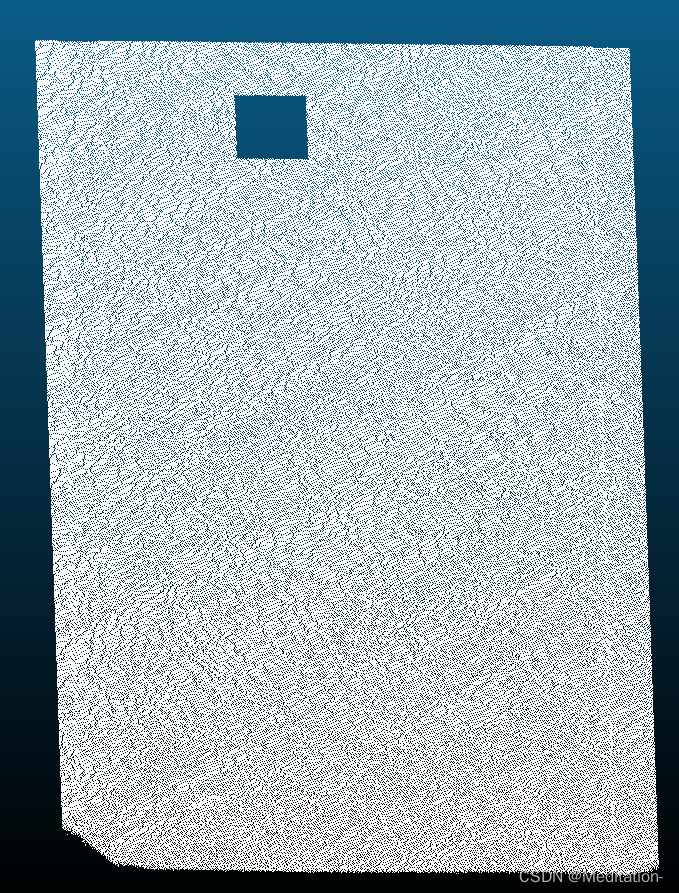
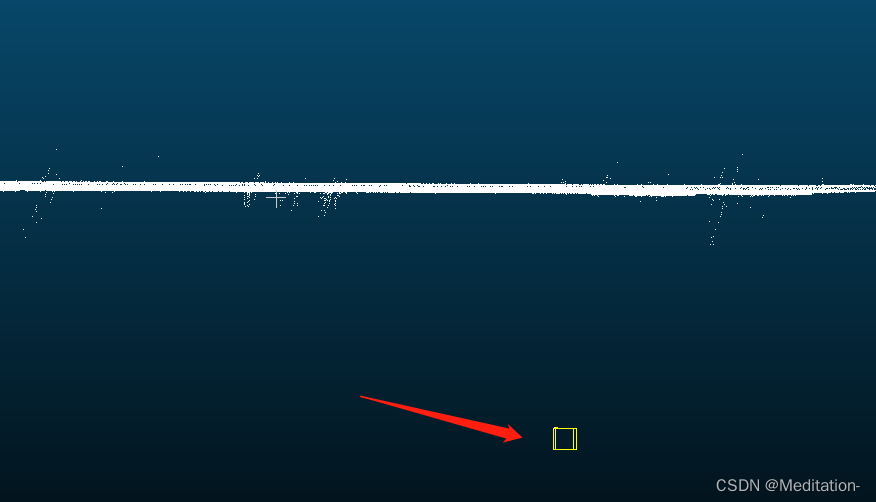
这个滤波器需要先确定box的两个坐标点,这两个点得是对角线上两个点(一个长方体距离最远的两个点)。然后这个滤波器就有我们之前提到的setNegative方法,就可以按照意愿来获取ROI内的点还是区域外的点。效果如下图所示,感觉还行
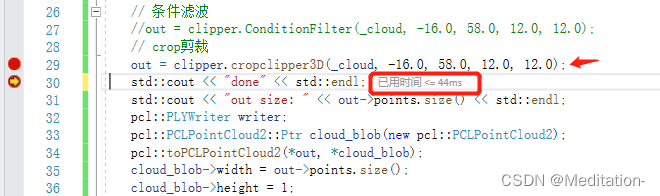
运行时间大概是44ms,这个速度感觉还好,如果能更快就好了。一块平面点云上如果有很多区域要提取或者裁剪掉,可以考虑多线程。
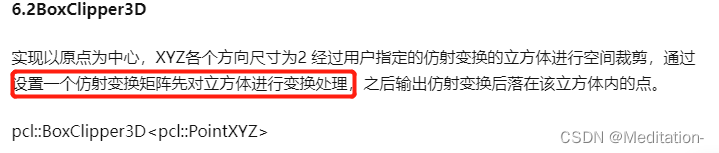
紧接着,想要研究BoxClipper3D的使用方法,但是找了好久终于在github上找到了,戳这里查看!这应该是PCL的官方测试代码。
#include <pcl/test/gtest.h>
#include <pcl/memory.h>  // for pcl::make_shared
#include <pcl/pcl_base.h>  // for pcl::Indices
#include <pcl/pcl_tests.h>
#include <pcl/point_types.h>
#include <pcl/filters/box_clipper3D.h>
#include <pcl/filters/crop_box.h>
#include <pcl/filters/extract_indices.h>

#include <pcl/common/eigen.h>

using namespace pcl;
using namespace Eigen;

//
TEST (BoxClipper3D, Filters)
{


  // PointCloud
  // -------------------------------------------------------------------------

  // Create cloud with center point and corner points
  PointCloud<PointXYZ>::Ptr input (new PointCloud<PointXYZ> ());
  input->push_back (PointXYZ (0.0f, 0.0f, 0.0f));
  input->push_back (PointXYZ (0.9f, 0.9f, 0.9f));
  input->push_back (PointXYZ (0.9f, 0.9f, -0.9f));
  input->push_back (PointXYZ (0.9f, -0.9f, 0.9f));
  input->push_back (PointXYZ (-0.9f, 0.9f, 0.9f));
  input->push_back (PointXYZ (0.9f, -0.9f, -0.9f));
  input->push_back (PointXYZ (-0.9f, -0.9f, 0.9f));
  input->push_back (PointXYZ (-0.9f, 0.9f, -0.9f));
  input->push_back (PointXYZ (-0.9f, -0.9f, -0.9f));

  ExtractIndices<PointXYZ> extract_indices;
  pcl::Indices indices;

  BoxClipper3D<PointXYZ> boxClipper3D (Affine3f::Identity ());
  boxClipper3D.clipPointCloud3D (*input, indices);

  PointCloud<PointXYZ> cloud_out;

  extract_indices.setInputCloud (input);
  extract_indices.setIndices (pcl::make_shared<pcl::Indices> (indices));
  extract_indices.filter (cloud_out);

  EXPECT_EQ (int (indices.size ()), 9);
  EXPECT_EQ (int (cloud_out.size ()), 9);
  EXPECT_EQ (int (cloud_out.width), 9);
  EXPECT_EQ (int (cloud_out.height), 1);

  // Translate points by 1 in Y-axis ...
  Affine3f t (Translation3f (0.0f, 1.0f, 0.0f));
  boxClipper3D.setTransformation (t);
  boxClipper3D.clipPointCloud3D (*input, indices);

  EXPECT_EQ (int (indices.size ()), 5);

  // ... then rotate points +45 in Y-Axis
  t.rotate (AngleAxisf (45.0f * static_cast<float>(M_PI) / 180.0f, Vector3f::UnitY ()));
  boxClipper3D.setTransformation (t);
  boxClipper3D.clipPointCloud3D (*input, indices);
  EXPECT_EQ (int (indices.size ()), 1);

  // ... then rotate points -45 in Z-axis
  t.rotate (AngleAxisf (-45.0f * static_cast<float>(M_PI) / 180.0f, Vector3f::UnitZ ()));
  boxClipper3D.setTransformation (t);
  boxClipper3D.clipPointCloud3D (*input, indices);
  EXPECT_EQ (int (indices.size ()), 3);

  // ... then scale points by 2
  t.scale (2.0f);
  boxClipper3D.setTransformation (t);
  boxClipper3D.clipPointCloud3D (*input, indices);
  EXPECT_EQ (int (indices.size ()), 1);
}
这段官方测试代码中,EXPECT_EQ
EXPECT_EQ是Google Test中的一个宏,用于比较两个值是否相等。当两个值不相等时,它会产生一个失败的测试结果。EXPECT_EQ宏的使用格式如下:
EXPECT_EQ(expected_value, actual_value);
其中,expected_value表示期望值,actual_value表示实际值。如果expected_value和actual_value的值相等,测试就会通过,否则测试就会失败,并输出expected_value和actual_value的值。
EXPECT_EQ宏适用于比较整型、浮点型、字符型、字符串等基本数据类型。如果要比较自定义类型的值,可以通过重载operator==运算符来实现。
可以按照这个功能,自定义一个宏MY_ASSERT_EQ,效果差不多。
#include <iostream>

// 自定义宏
#define MY_ASSERT_EQ(expected, actual) \
    if ((expected) != (actual)) {

       \
        std::cerr << "Assertion failed: " #expected " == " #actual \
                  << ", expected " << (expected) << ", but got " << (actual) \
                  << " at " << __FILE__ << ":" << __LINE__ << std::endl; \
    }
这个BoxClipper3D类主要是实现使用一个Box(空间中的正方体,想象成一个小盒子)去裁剪点云。落在这个盒子里的点被留下来,其余的给去掉。这个盒子不需要我们自己去添加,但是我们可以按照需求去改变它。盒子的质心在不人为去改变的情况下处于坐标系的原点,各条棱长2,那其实这八个顶点,可以写出来:
// 盒子的质心
pcl::PointXYZ(0.0f, 0.0f, 0.0f);
// 其余的八个顶点
pcl::PointXYZ(1, 1, 1);
pcl::PointXYZ(1, 1, -1);
pcl::PointXYZ(1, -1, 1);
pcl::PointXYZ(-1, 1, 1);
pcl::PointXYZ(1, -1, -1);
pcl::PointXYZ(-1, -1, 1);
pcl::PointXYZ(-1, 1, -1);
pcl::PointXYZ(-1, -1, -1);
如果想象不出来可以在纸上画一画,就出来了。
既然盒子是给定的,那我们怎么用它灵活且按照我们的想法去剪裁点云呢。首先,需要定义一个仿射变换矩阵,是3x3的,在PCL里面直接通过Eigen::Affine3f T;来声明。BoxClipper3D 类中有一个成员函数void setTransformation (const Eigen::Affine3f &transformation) 可以将我们给定的仿射变换矩阵设置进去。那么这个盒子就会经过我们设定的仿射变换矩阵变换。最后,点云落在这个盒子内的点就是保留下来。我们都知道仿射变换矩阵可以进行缩放、平移、旋转等变换,也就是说通过一个仿射变换矩阵,可以把盒子缩放、平移、旋转等操作,盒子就会被我们变换到我们想要裁剪的地方。
#include <pcl/filters/box_clipper3D.h>
BoxClipper3D (const Eigen::Affine3f &transformation)
//  利用仿射变换的矩阵transformation来构造滤波对象,最终输出点云为落在通过仿射变换矩阵变换后的立方体内的点集,立方体默认为以原点为中心.XYZ方向.尺度为2的立方体。
  BoxClipper3D (const Eigen::Vector3f &rodrigues, const Eigen::Vector3f &translation, const Eigen::Vector3f &box_size)
//  功能同上,利用三个向量构造滤波对象,其中rodrigues用来指定变换的立方体的姿态,translation用来指定变换立方体的位置,box_size用来指定变换立方体各个方向的缩放系数,最终由三个向量指定-一个完整的放射变换矩阵。
void  setTransformation (const Eigen::Affine3f &transformation)
//  设置仿射变换矩阵transformation。
void  setTransformation (const Eigen::Vector3f &rodrigues, const Eigen::Vector3f &translation, const Eigen::Vector3f &box_size)
//  通过三个向量设置仿射变换,参数同上。
virtual  ~BoxClipper3D () throw ()
//  析构函数
virtual bool  clipPoint3D (const PointT &point) const
//  裁剪掉一个单点point的接口:如果点被裁剪掉则返回true,点不在裁剪空间则返回false.
virtual bool  clipLineSegment3D (PointT &from, PointT &to) const
//  通过输入线段起始点from和终点to,裁剪掉一.条线段的接口:若线段被裁剪掉则返回true,若线段在剪贴空间外则返回false.
virtual void  clipPlanarPolygon3D (std::vector< PointT, Eigen::aligned_allocator< PointT > > &polygon) const
//  通过一个有序点列表,提供裁剪一个平面多边形的接口。其中,polygon是指定的任何方向(ccw or cw).上的多边形,注意有序点,才能保证两个相邻的点定义多边形的边界。
virtual void  clipPlanarPolygon3D (const std::vector< PointT, Eigen::aligned_allocator< PointT > > &polygon, std::vector< PointT, Eigen::aligned_allocator< PointT > > &clipped_polygon) const
//  通过一个有序点列表,提供裁剪一个平面多边形的接口:输入多边形polygon,输出裁剪后多边形clipped_ polygon。
virtual void  clipPointCloud3D (const pcl::PointCloud< PointT > &cloud_in, std::vector< int > &clipped, const std::vector< int > &indices=std::vector< int >()) const
//  裁剪点云的接口
virtual Clipper3D< PointT > *  clone () const
//  使用其参数克隆基础剪贴器的多态方法。
一般来说,我们都是使用上述的clipPointCloud3D 进行剪裁,第一个参数传入待裁剪的点云,第二个参数直接声明一个pcl::Indices indices;传入进去即可,最终这个算法会将落在盒子内的点的索引输入到indices中。
可以使用下属代码提取出点云:
pcl::ExtractIndices<pcl::PointXYZ> extract_indices;
pcl::Indices indices;
extract_indices.setInputCloud(input);
extract_indices.setIndices(pcl::make_shared<pcl::Indices>(indices));
extract_indices.filter(cloud_out);
// 下述代码应该也可以实现,效果一样
//pcl::copyPointCloud<pcl::PointXYZ>(*input, indices, cloud_out);
在使用过程中我发现这玩意很玄学,不知道是不是我个人理解问题,我尝试着将这个Box按照想要的方式进行仿射变换,我先根据我的想法创建一个仿射变换矩阵,代码如下
Eigen::Affine3f t = Eigen::Affine3f::Identity();
t.scale(Eigen::Vector3f( 0.5f, 1.0f, 1.0f));
//t.translate(Eigen::Vector3f(-x * 1.0f, -y * 1.0f, -11.7 * 1.0f));
t.translation() << -x * 1.0f, -y * 1.0f, -11.7 * 1.0f; //x = -16,y = 58
std::cout << "t : " << t.matrix() << std::endl;
得到的仿射变换矩阵也没毛病
t : 0.5 0 0 16
0 1 0 -58
0 0 1 -11.7
0 0 0 1
但是神奇的是,竟然裁剪不到任何点。于是我创建了8个点,分别代表这个盒子的8个顶点,然后对这个点云进行仿射变换,得到的结果再进行可视化,发现盒子其实在点云上的。而对于能够剪裁到的盒子,我也可视化了一下,发现这个盒子反而距离点云很远。
// 进行仿射变换
pcl::PointCloud<pcl::PointXYZ>::Ptr transformed_cloud(new pcl::PointCloud<pcl::PointXYZ>);
pcl::transformPointCloud(*Box, *transformed_cloud, t);
从下图可以看出,盒子能够框住一部分点云,但是这种情况下获取不到任何点。
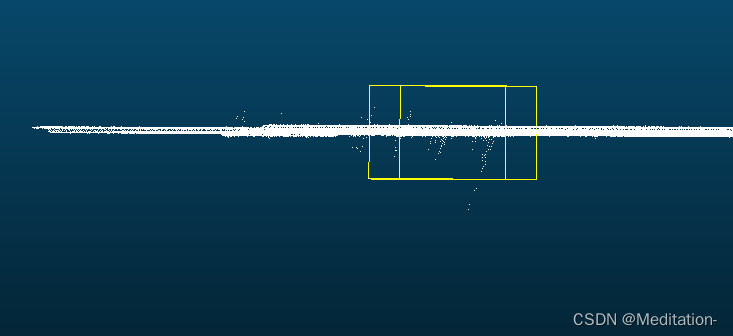
从下图可以看出,盒子没有框住任何点,但是却能够裁剪得到点。
目前很怀疑仿射变换的对象是不是box,还是点云呢。
此处所说的是对box做仿射变换