前言
Three.js是一个用于创建和呈现3D图形的JavaScript库。它提供了一组易于使用的工具和API,使得开发人员可以轻松地在Web应用程序中创建复杂的3D场景和动画。Three.js可以与其他JavaScript库和框架一起使用,如jQuery和React等。它是一个开源项目,有一个活跃的社区在支持和扩展它。
Three.js的优势主要有:
-
使Web应用程序变得更加生动和交互性:通过使用Three.js,开发人员可以轻松地为Web应用程序添加令人惊叹的3D图形和动画,从而使用户体验更加生动和交互性。
-
提供了易于使用的3D创建和呈现工具:Three.js提供了一个强大的API和工具集来创建和呈现3D场景和对象,这使得开发人员可以快速地开发出高质量的3D应用程序。
-
弥补了Web浏览器的3D图形功能不足:在过去,Web浏览器的3D图形能力非常有限。Three.js通过引入WebGL技术,使开发人员能够在Web浏览器中呈现高质量的3D图形,并且可以与其他Web技术(如HTML、CSS和JavaScript)结合使用。
-
开源、社区支持:Three.js是一个开源项目,有一个活跃的社区在支持和扩展它。这使得开发人员可以轻松地获得文档、示例、教程、库和其他工具,以及与其他开发人员进行交流和协作。
Three.js官网:https://threejs.org/

Three.js中文网:http://www.webgl3d.cn/

一、基本概念和使用
1.基本概念
Three.js的基本概念主要包括以下几个方面:
-
场景(Scene):是Three.js中的一个对象,用于组织和存储所有的3D对象、灯光和相机等元素。一个场景可以包含多个对象,并且可以应用于多个相机。
-
相机(Camera):定义了场景中可见区域的位置和方向,用于指定渲染的观察角度。Three.js支持多种不同类型的相机,包括透视相机(PerspectiveCamera)和正交相机(OrthographicCamera)等。
-
渲染器(Renderer):将场景中的3D对象和相机数据渲染到屏幕上。Three.js提供WebGLRenderer、CanvasRenderer等多种渲染器,其中WebGLRenderer使用WebGL技术进行渲染,能够提供更好的性能和视觉效果。
-
材质(Material):定义了3D对象表面的外观和特性,包括颜色、透明度、反射和纹理等。
-
几何体(Geometry):定义了3D对象的形状和大小,包括点、线、面等基本元素。
-
光源(Light):定义了场景中的光照情况,包括方向光、点光源、环境光等类型。
-
控制器(Controller):用于控制相机的移动、缩放和旋转等操作,包括OrbitControls、FlyControls等多种类型。
通过了解这些基本概念,开发人员可以更好地理解和应用Three.js的API,从而创建出更加生动和交互性的3D应用程序。
2.基本流程
Three.js是一个用于创建3D图形的JavaScript库。以下是使用Three.js的基本步骤:
- 引入Three.js库:
<script src="https://cdnjs.cloudflare.com/ajax/libs/three.js/r128/three.min.js"></script>
- 创建场景、相机、渲染器:
var scene = new THREE.Scene();  // 创建场景
var camera = new THREE.PerspectiveCamera(75, window.innerWidth/window.innerHeight, 0.1, 1000);  // 创建相机
var renderer = new THREE.WebGLRenderer();  // 创建渲染器
renderer.setSize(window.innerWidth, window.innerHeight);  // 设置渲染器大小
document.body.appendChild(renderer.domElement);  // 将渲染器添加到页面上
- 添加物体:
var geometry = new THREE.BoxGeometry();  // 创建一个立方体几何体
var material = new THREE.MeshBasicMaterial({

    color: 0x00ff00});  // 创建一个绿色的基础材质
var cube = new THREE.Mesh(geometry, material);  // 创建一个立方体物体
scene.add(cube);  // 将立方体添加到场景中
- 渲染场景:
function animate() {


    requestAnimationFrame(animate);  // 递归调用animate()函数
    cube.rotation.x += 0.01;  // 使立方体绕x轴旋转
    cube.rotation.y += 0.01;  // 使立方体绕y轴旋转
    renderer.render(scene, camera);  // 渲染场景
}
animate();  // 调用animate()函数开始渲染场景
以上是基本的Three.js使用方法,还有许多其他功能和属性可以使用,可以参考官方文档进行学习。
3.案例
<!DOCTYPE html>
<html lang="en">
<head>
<meta charset="UTF-8">
<title>Title</title>
<style>
*{
margin: 0;
padding: 0;
}
</style>
<script src="../lib/three/three.js"></script>
</head>
<body>
</body>
</html>
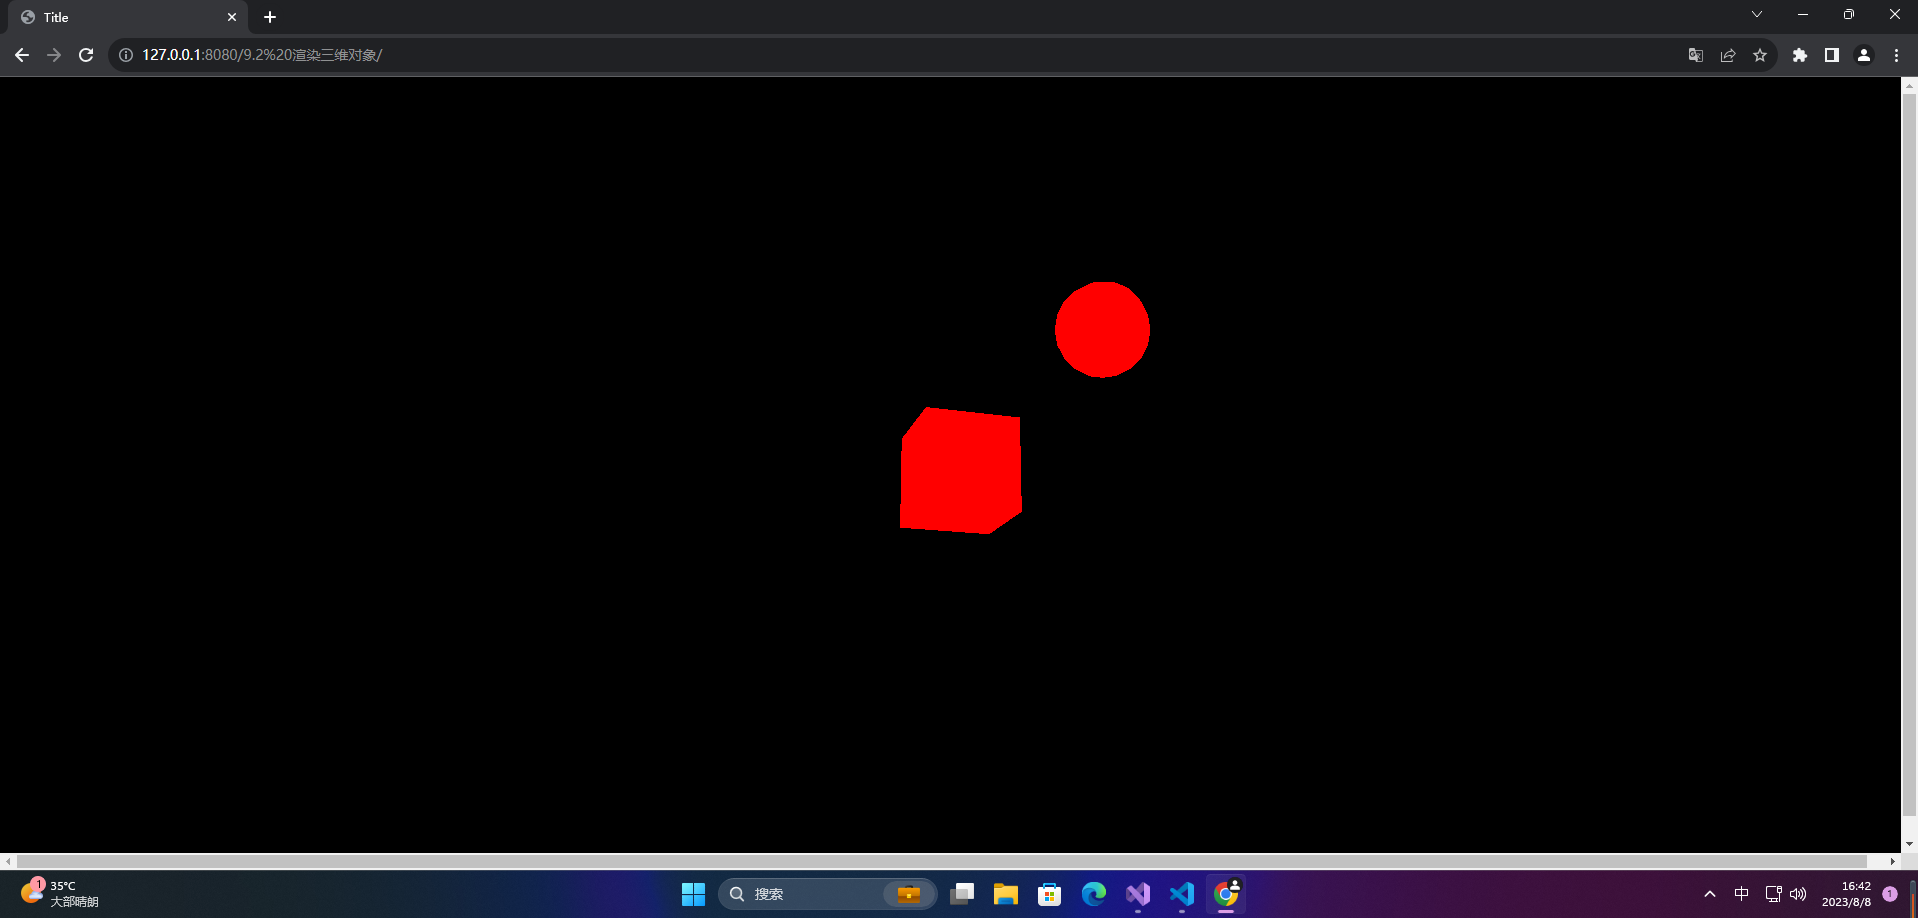
<script>
// 创建一个场景
const scene = new THREE.Scene();
// 创建一个相机 视点
const camera = new THREE.PerspectiveCamera(45, window.innerWidth / window.innerHeight, 1, 1000);
// 设置相机的位置
camera.position.set(0,0,20);
// 创建一个渲染器
const renderer = new THREE.WebGLRenderer();
// 设置渲染器尺寸
renderer.setSize(window.innerWidth, window.innerHeight);
document.body.appendChild(renderer.domElement);
// 添加一个立方体
// 定义了一个立方体的对象
const cubeGeometry = new THREE.BoxGeometry(2, 2, 2);
// 创建材质
const cubeMaterial = new THREE.MeshBasicMaterial({
color: 0xff0000, wireframe: false });
const cube = new THREE.Mesh(cubeGeometry, cubeMaterial);
// 添加到场景里
scene.add(cube);
// 添加一个球体
const sphereGeometry = new THREE.SphereGeometry(1,10,10);
const sphereMaterial = new THREE.MeshBasicMaterial({
color: 0xff0000, wireframe: false });
const sphere = new THREE.Mesh(sphereGeometry, sphereMaterial);
sphere.position.x = 3;
sphere.position.y = 3;
scene.add(sphere);
const animation = () => {
cube.rotation.x += 0.01;
cube.rotation.y += 0.01;
// 渲染
renderer.render(scene, camera);
requestAnimationFrame(animation);
}
animation()
</script>
<!DOCTYPE html>
<html lang="en">
<head>
<meta charset="UTF-8" />
<title>学习</title>
</head>
<body>
<canvas id="c2d" class="c2d" width="1000" height="500"></canvas>
<script type="module">
import * as THREE from 'https://threejs.org/build/three.module.js'
const canvas = document.querySelector('#c2d')
// 渲染器
const renderer = new THREE.WebGLRenderer({
canvas })
const fov = 40 // 视野范围
const aspect = 2 // 相机默认值 画布的宽高比
const near = 0.1 // 近平面
const far = 1000 // 远平面
// 透视投影相机
const camera = new THREE.PerspectiveCamera(fov, aspect, near, far)
camera.position.set(0, 10, 20)
camera.lookAt(0, 0, 0)
// 场景
const scene = new THREE.Scene()
scene.background = new THREE.Color('black')
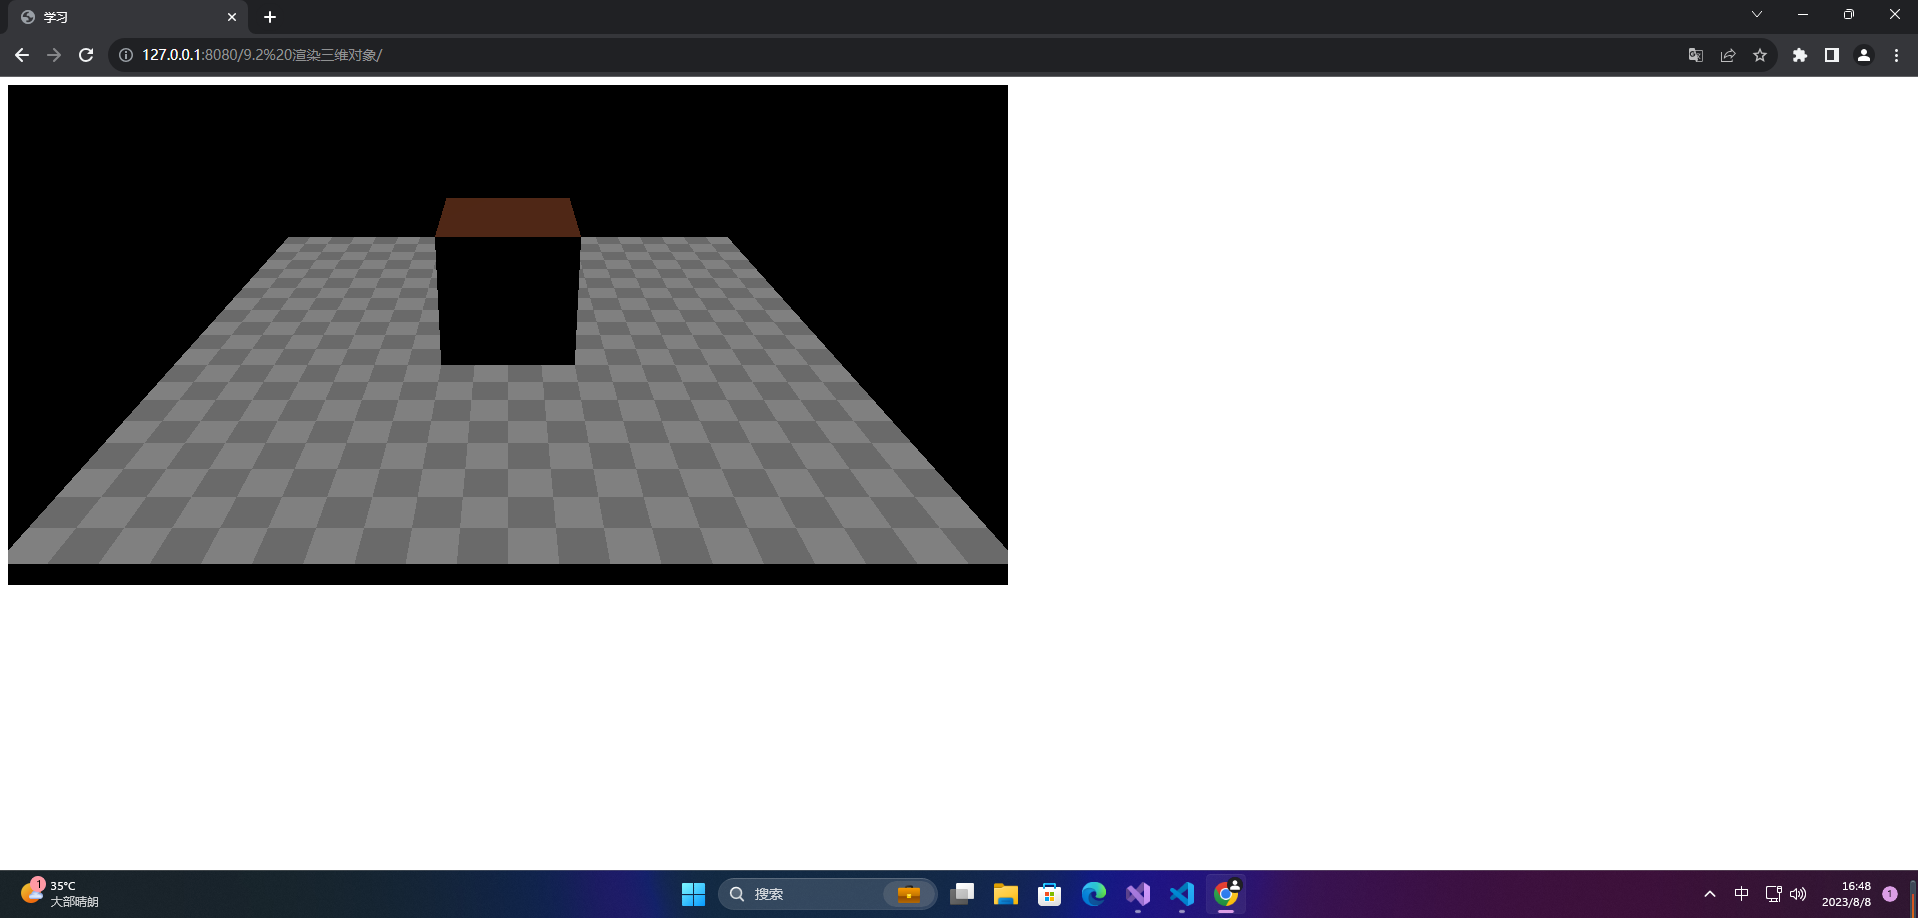
{
// 地面 平铺
const planeSize = 20
const loader = new THREE.TextureLoader()
const texture = loader.load('https://threejs.org/manual/examples/resources/images/checker.png')
texture.wrapS = THREE.RepeatWrapping
texture.wrapT = THREE.RepeatWrapping
texture.magFilter = THREE.NearestFilter
const repeats = planeSize / 2
texture.repeat.set(repeats, repeats)
const planeGeo = new THREE.PlaneGeometry(planeSize, planeSize)
const planeMat = new THREE.MeshPhongMaterial({
map: texture,
side: THREE.DoubleSide
})
const mesh = new THREE.Mesh(planeGeo, planeMat)
mesh.rotation.x = Math.PI * -0.5
scene.add(mesh)
}
{
// 方块
const cubeSize = 4
const cubeGeo = new THREE.BoxGeometry(cubeSize, cubeSize, cubeSize)
const cubeMat = new THREE.MeshPhongMaterial({
color: '#8f4b2e' })
const mesh = new THREE.Mesh(cubeGeo, cubeMat)
mesh.position.y = 2
scene.add(mesh)
}
{
// 灯光
const color = 0xffffff
const intensity = 1
// 方向光
const light = new THREE.DirectionalLight(color, intensity)
light.position.set(0, 10, 0)
light.target.position.set(-5, 0, 0)
scene.add(light)
scene.add(light.target)
}
// 渲染
function render() {
renderer.render(scene, camera)
requestAnimationFrame(render)
}
requestAnimationFrame(render)
</script>
</body>
</html>