前言
纹理是指由于物体内部或表面的微观结构、形态、组成、排列等因素所形成的外观或质感特征。它可以是线性的、非线性的、均匀的或不均匀的,可以在物体的表面或内部出现。纹理可以是自然界中的,也可以是人工制造的,是视觉艺术和设计中一个非常重要的元素。在数字图像处理中,纹理是图像分析和识别的一个重要因素。
一、纹理
1.简介
Three.js中的纹理贴图方式有以下几种:
-
基础纹理:使用纹理图像创建基本纹理,可以使用图片或视频等多种类型的纹理贴图。
-
环境贴图:创建环境贴图可以添加反射和折射效果,可以使用天空盒子或立方体纹理等。
-
光照贴图:使用光照贴图可以模拟光照效果,例如通过凹凸贴图、法线贴图、位移贴图等来模拟凹陷和凸起的效果。
-
烘培纹理:通过烘培过程将光影效果转换为纹理,可以提高性能和图形质量。
-
渲染目标纹理:使用渲染目标纹理可以将场景的渲染结果保存到纹理中,可以用于后处理、渲染效果等。
-
视频和动态纹理:可以使用视频或动态生成的图像作为纹理,动态纹理可以根据场景的变化实时更新。
2.属性
在Three.js中,贴图是指在材质表面上贴附一张图片纹理,通过纹理映射的方式来呈现出材质表面的不同效果和细节。下面是Three.js中常用的贴图属性:

-
map:基础贴图,用于显示模型的颜色、灰度值和透明度。默认值是null。
-
specularMap:高光贴图,用于显示材质的高光颜色和强度。默认值是null。
-
bumpMap:凹凸贴图,用于显示模型表面的凸出和凹陷。默认值是null。
-
normalMap:法线贴图,用于用来调整模型表面的法线,从而产生细节凹凸效果。默认值是null。
-
displacementMap:位移贴图,用于改变模型表面的位置,从而创建模型的几何细节。默认值是null。
-
alphaMap:透明贴图,用于设置材质透明度。默认值是null。
-
emissiveMap:自发光贴图,用于显示模型的自发光效果。默认值是null。
-
envMap:环境贴图,用于模拟材质被周围环境反射的效果。默认值是null。
3.案例
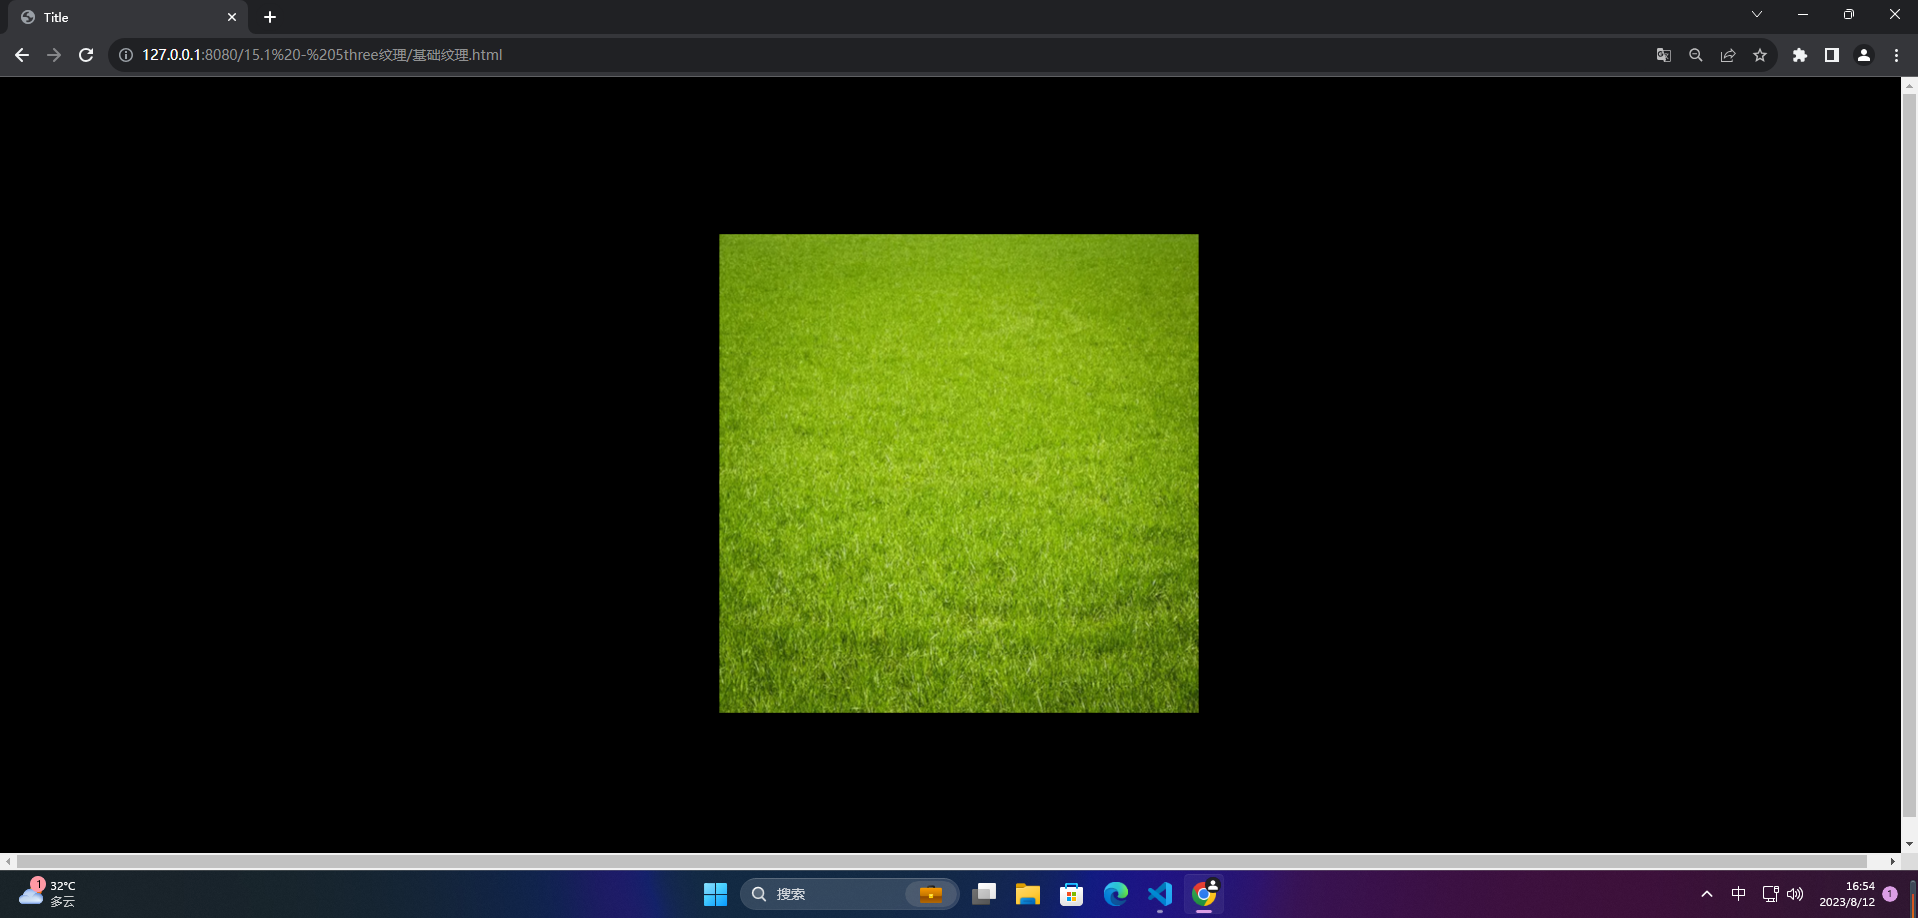
3.1 基础纹理
<!DOCTYPE html>
<html lang="en">
<head>
  <meta charset="UTF-8">
  <title>Title</title>
  <style>
    *{


      margin: 0;
      padding: 0;
    }
  </style>
  <script src="../lib/three/three.js"></script>
</head>
<body>

</body>
</html>

<script>
  // 创建一个场景
  const scene = new THREE.Scene();

  // 创建一个相机 视点
  const camera = new THREE.PerspectiveCamera(45, window.innerWidth / window.innerHeight, 1, 1000);
  // 设置相机的位置
  camera.position.set(0,0,20);

  // 创建一个渲染器
  const renderer = new THREE.WebGLRenderer();
  // 设置渲染器尺寸
  renderer.setSize(window.innerWidth, window.innerHeight);

  document.body.appendChild(renderer.domElement);

  // 添加一个立方体
  // 定义了一个立方体的对象
  const geometry = new THREE.PlaneBufferGeometry(10, 10, 2, 2);

  // 创建一个纹理加载器
  const loader = new THREE.TextureLoader()
  loader.load('../assets/grass.png', (texture) => {


    // 创建材质
    const lambert = new THREE.MeshLambertMaterial({


      map: texture
    })

    const mesh = new THREE.Mesh(geometry, lambert);

    // 添加到场景里
    scene.add(mesh);
  });

  // 添加灯光
  const spotLight = new THREE.SpotLight(0xffffff);
  spotLight.position.set(-10,10,90);
  scene.add(spotLight);

  const animation = () => {


    // 渲染
    renderer.render(scene, camera);

    requestAnimationFrame(animation);
  }
  animation()
</script>
3.2 canvas贴图
<!DOCTYPE html>
<html lang="en">
<head>
  <meta charset="UTF-8">
  <title>Title</title>
  <style>
    *{


      margin: 0;
      padding: 0;
    }
  </style>
  <script src="../lib/three/three.js"></script>

  <!-- 轨道控件 -->
  <script src="../lib/three/OrbitControls.js"></script>
</head>
<body>

</body>
</html>

<script>
  const clock = new THREE.Clock()
  // 创建一个场景
  const scene = new THREE.Scene();

  // 创建一个相机 视点
  const camera = new THREE.PerspectiveCamera(45, window.innerWidth / window.innerHeight, 1, 1000);
  // 设置相机的位置
  camera.position.set(100,100,0);
  camera.lookAt(new THREE.Vector3(0,0,0));

  const controls = new THREE.OrbitControls(camera)
  controls.minDistance = 1;
  controls.maxDistance = 50;

  // 创建一个渲染器
  const renderer = new THREE.WebGLRenderer();
  // 设置渲染器尺寸
  renderer.setSize(window.innerWidth, window.innerHeight);

  document.body.appendChild(renderer.domElement);

  renderer.setClearColor(0xffffff);
  // 添加灯光
  const spotLight = new THREE.SpotLight(0xffffff);
  spotLight.position.set(2000,8000,4000);
  scene.add(spotLight);

  function getSprite() {


    const canvas = document.createElement('canvas')
    canvas.width = 160;
    canvas.height = 160;

    const c = canvas.getContext('2d')

    c.fillStyle = 'red';
    c.arc(80, 80, 32, 0, Math.PI * 2);
    c.fill();

    const texture = new THREE.Texture(canvas);
    texture.needsUpdate = true;
    return texture;
  }

  // 创建一个球体 和一个立方体
  const cubeGeometry = new THREE.BoxGeometry(5,5,5);

  // 立方体贴图是和环境一致, 球体是跟随当前环境
  const cubeMaterial = new THREE.MeshBasicMaterial({

       map: getSprite() })

  const cube = new THREE.Mesh(cubeGeometry, cubeMaterial);

  scene.add(cube)

  const animation = () => {


    cube.rotation.x += 0.01;
    cube.rotation.y += 0.01;
    controls.update(clock.getDelta());
    // 渲染
    renderer.render(scene, camera);

    requestAnimationFrame(animation);
  }
  animation()
</script>
3.3 凹凸贴图
<!DOCTYPE html>
<html lang="en">
<head>
  <meta charset="UTF-8">
  <title>Title</title>
  <style>
    *{


      margin: 0;
      padding: 0;
    }
  </style>
  <script src="../lib/three/three.js"></script>
</head>
<body>

</body>
</html>

<script>
  // 创建一个场景
  const scene = new THREE.Scene();

  // 创建一个相机 视点
  const camera = new THREE.PerspectiveCamera(45, window.innerWidth / window.innerHeight, 1, 1000);
  // 设置相机的位置
  camera.position.set(0,0,20);

  // 创建一个渲染器
  const renderer = new THREE.WebGLRenderer();
  // 设置渲染器尺寸
  renderer.setSize(window.innerWidth, window.innerHeight);

  document.body.appendChild(renderer.domElement);

  // 添加一个立方体
  // 定义了一个立方体的对象
  const geometry = new THREE.BoxGeometry(6, 6, 3);

  // 创建一个纹理加载器
  const loader = new THREE.TextureLoader()
  loader.load('../assets/wall.jpg', (texture) => {


    // 创建材质
    const lambert = new THREE.MeshPhongMaterial({


      map: texture
    })

    const mesh = new THREE.Mesh(geometry, lambert);
    mesh.rotation.y = -0.1;
    mesh.position.x = -4;

    // 添加到场景里
    scene.add(mesh);
  });
  renderer.setClearColor(0xffffff)
  loader.load('../assets/wall.jpg', (texture) => {


    loader.load('../assets/wall-bump.jpg', (bump) => {


      // 创建材质
      const lambert = new THREE.MeshPhongMaterial({


        map: texture,
        bumpMap: bump,
        bumpScale: 0.2,
      })

      const mesh = new THREE.Mesh(geometry, lambert);
      mesh.rotation.y = -0.5;
      mesh.position.x = 4;

      // 添加到场景里
      scene.add(mesh);
    });
  });

  // 添加灯光
  const spotLight = new THREE.SpotLight(0xffffff);
  spotLight.position.set(-10,10,90);
  scene.add(spotLight);

  const animation = () => {


    // 渲染
    renderer.render(scene, camera);

    requestAnimationFrame(animation);
  }
  animation()
</script>

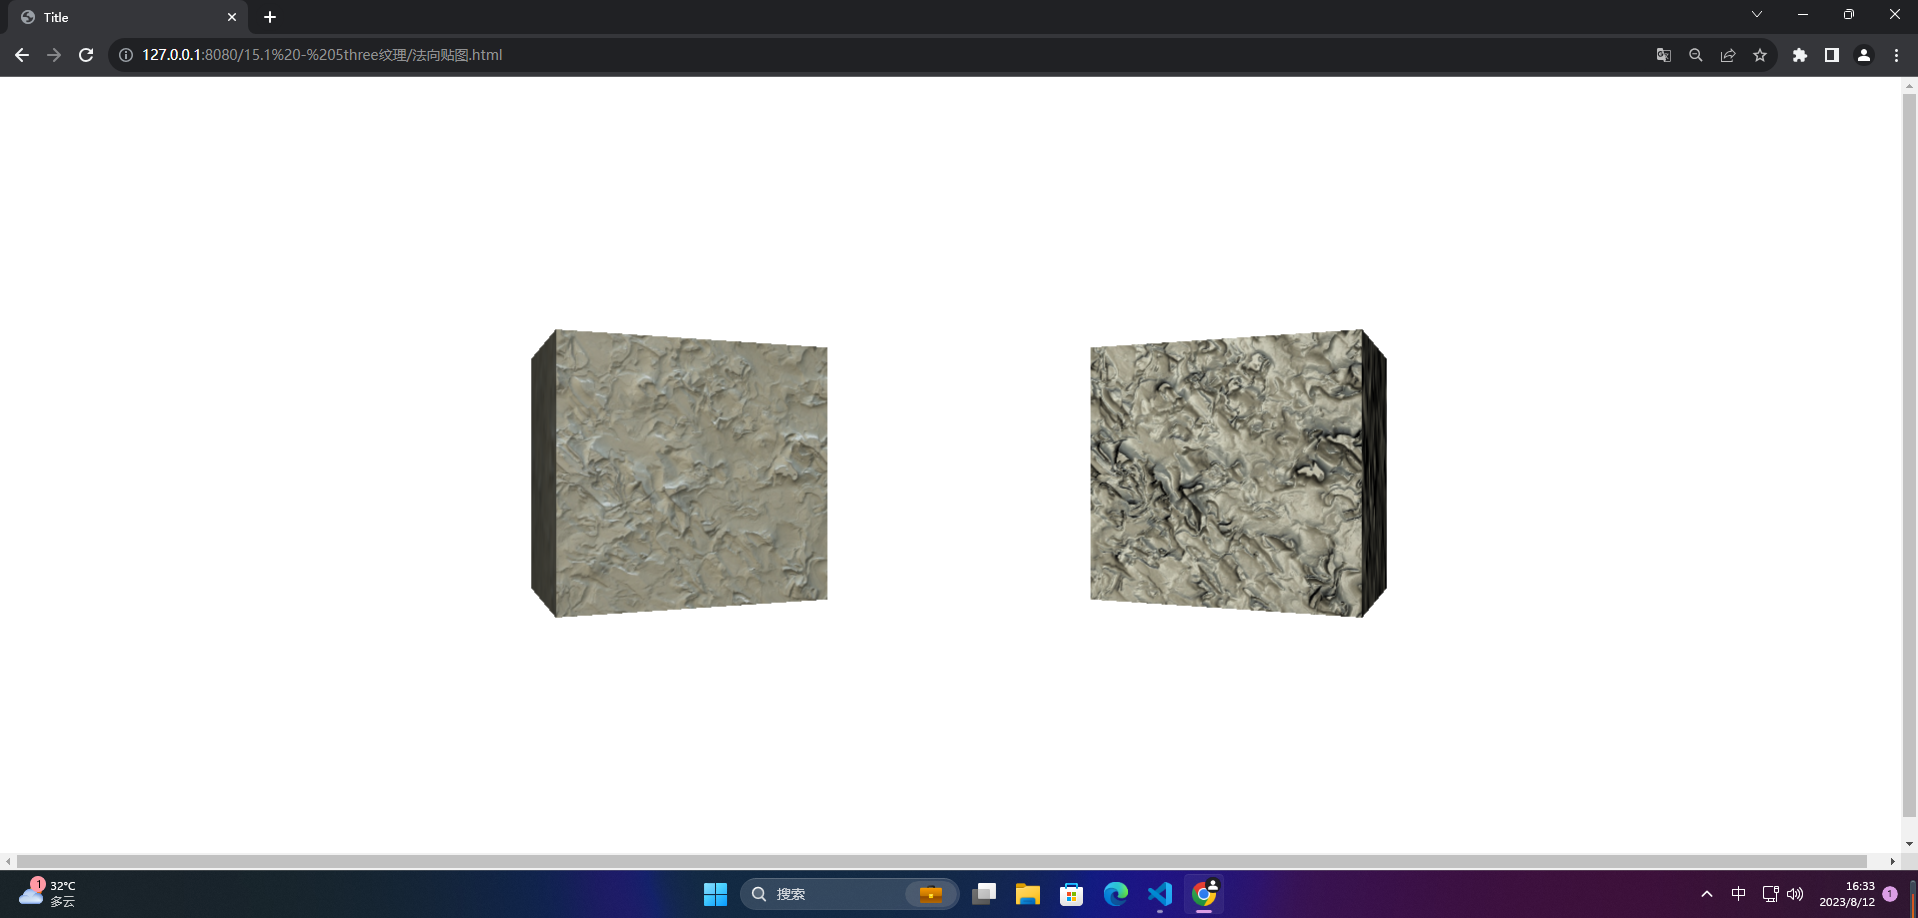
3.4 法向贴图
<!DOCTYPE html>
<html lang="en">
<head>
  <meta charset="UTF-8">
  <title>Title</title>
  <style>
    *{


      margin: 0;
      padding: 0;
    }
  </style>
  <script src="../lib/three/three.js"></script>
</head>
<body>

</body>
</html>

<script>
  // 创建一个场景
  const scene = new THREE.Scene();

  // 创建一个相机 视点
  const camera = new THREE.PerspectiveCamera(45, window.innerWidth / window.innerHeight, 1, 1000);
  // 设置相机的位置
  camera.position.set(0,0,40);

  // 创建一个渲染器
  const renderer = new THREE.WebGLRenderer();
  // 设置渲染器尺寸
  renderer.setSize(window.innerWidth, window.innerHeight);

  document.body.appendChild(renderer.domElement);

  // 添加一个立方体
  // 定义了一个立方体的对象
  const geometry = new THREE.BoxGeometry(10, 10, 10);

  // 创建一个纹理加载器
  const loader = new THREE.TextureLoader()

  // 创建材质
  const lambert = new THREE.MeshPhongMaterial({


    map: THREE.ImageUtils.loadTexture('../assets/plaster.jpg'),
  })

  const mesh = new THREE.Mesh(geometry, lambert);
  mesh.rotation.y = 0.5;
  mesh.position.x = -12;

  // 添加到场景里
  scene.add(mesh);


  renderer.setClearColor(0xffffff)

  // 创建材质
  const lambert1 = new THREE.MeshPhongMaterial({


    map: THREE.ImageUtils.loadTexture('../assets/plaster.jpg'),
    normalMap: THREE.ImageUtils.loadTexture('../assets/plaster-normal.jpg'),
  })

  const mesh2 = new THREE.Mesh(geometry, lambert1);
  mesh2.rotation.y = -0.5;
  mesh2.position.x = 12;

  // 添加到场景里
  scene.add(mesh2);

  // 添加灯光
  const spotLight = new THREE.SpotLight(0xffffff);
  spotLight.position.set(-10,10,90);
  scene.add(spotLight);

  const animation = () => {


    // 渲染
    renderer.render(scene, camera);

    requestAnimationFrame(animation);
  }
  animation()
</script>
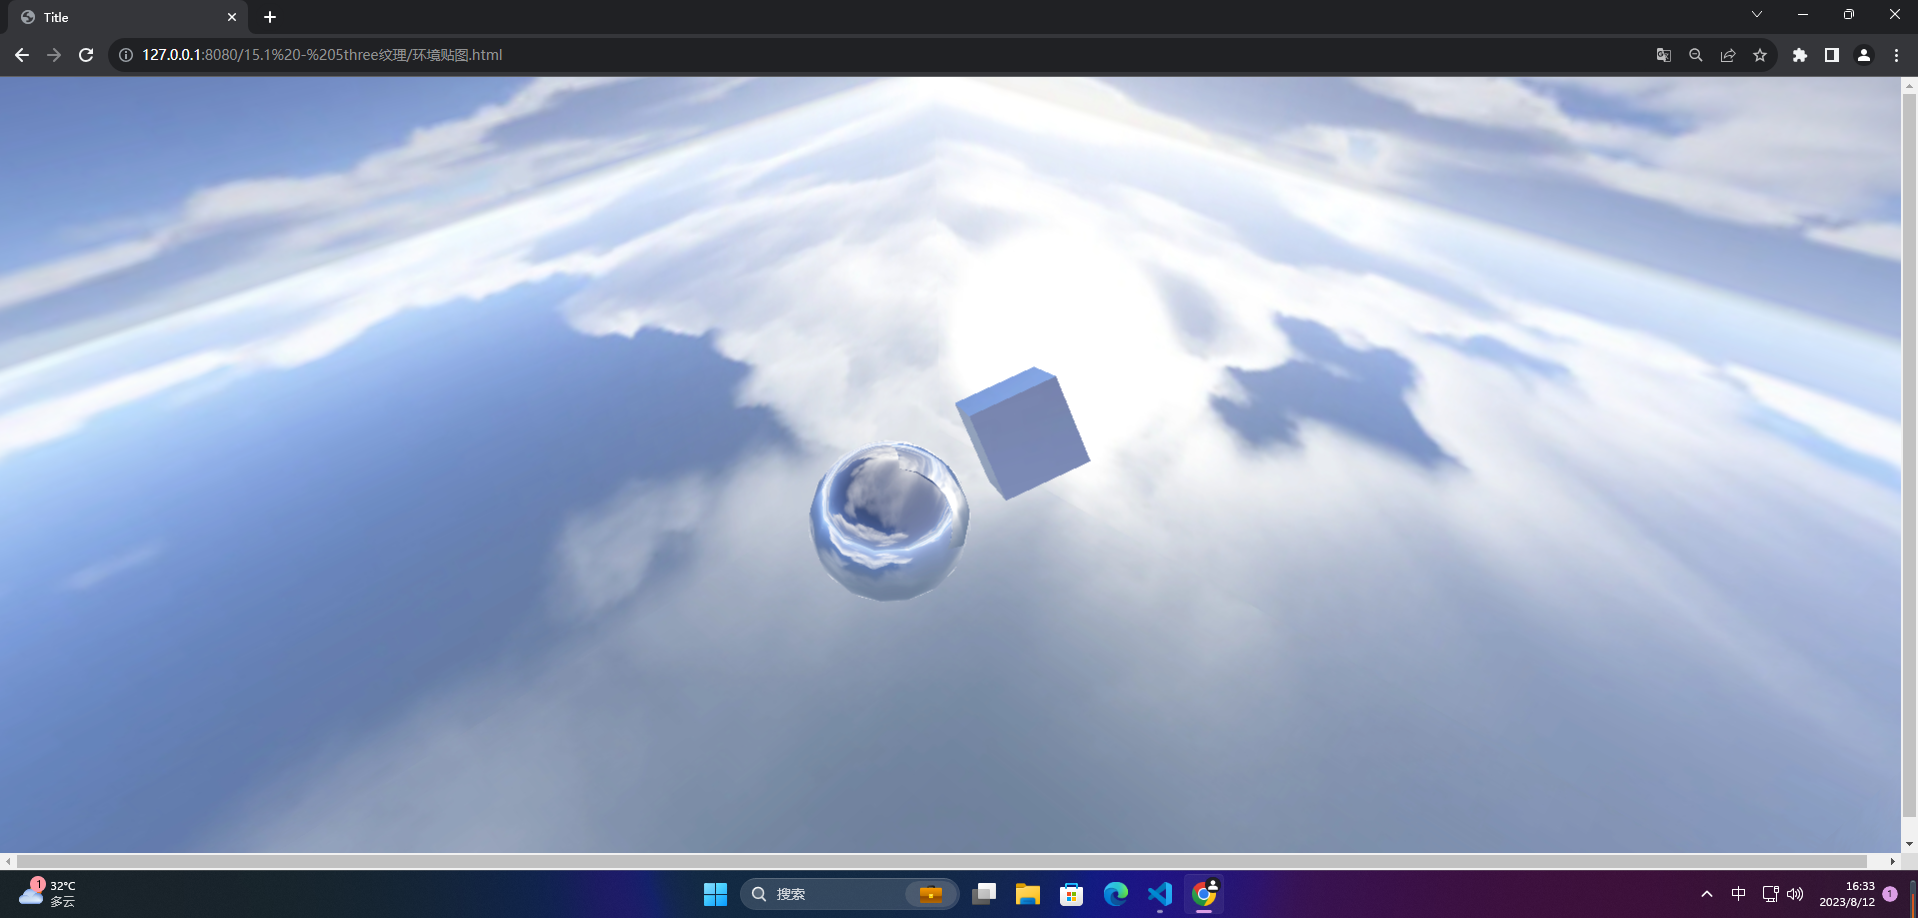
3.5 环境贴图
<!DOCTYPE html>
<html lang="en">
<head>
  <meta charset="UTF-8">
  <title>Title</title>
  <style>
    *{


      margin: 0;
      padding: 0;
    }
  </style>
  <script src="../lib/three/three.js"></script>

  <!-- 轨道控件 -->
  <script src="../lib/three/OrbitControls.js"></script>
</head>
<body>

</body>
</html>

<script>
  const clock = new THREE.Clock()
  // 创建一个场景
  const scene = new THREE.Scene();

  // 创建一个相机 视点
  const camera = new THREE.PerspectiveCamera(45, window.innerWidth / window.innerHeight, 1, 1000);
  // 设置相机的位置
  camera.position.set(100,100,0);
  camera.lookAt(new THREE.Vector3(0,0,0));

  const controls = new THREE.OrbitControls(camera)
  controls.minDistance = 1;
  controls.maxDistance = 50;

  // 创建一个渲染器
  const renderer = new THREE.WebGLRenderer();
  // 设置渲染器尺寸
  renderer.setSize(window.innerWidth, window.innerHeight);

  document.body.appendChild(renderer.domElement);

  // 添加灯光
  const spotLight = new THREE.SpotLight(0xffffff);
  spotLight.position.set(2000,8000,4000);
  scene.add(spotLight);

  // 创建虚拟的场景
  const imgs = [
    '../assets/sky/right.jpg',
    '../assets/sky/left.jpg',
    '../assets/sky/top.jpg',
    '../assets/sky/bottom.jpg',
    '../assets/sky/front.jpg',
    '../assets/sky/back.jpg',
  ]

  const mats = [];
  for (let i = 0; i < imgs.length; i++) {


    mats.push(new THREE.MeshBasicMaterial({


      map: THREE.ImageUtils.loadTexture(imgs[i]),
      side: THREE.DoubleSide,
    }))
  }

  const skybox = new THREE.Mesh(new THREE.BoxGeometry(100, 100, 100), new THREE.MeshFaceMaterial(mats))

  scene.add(skybox)

  // 创建一个球体 和一个立方体
  const sphereGeometry = new THREE.SphereGeometry(4, 15, 15);
  const cubeGeometry = new THREE.BoxGeometry(5,5,5);

  // 立方体贴图是和环境一致, 球体是跟随当前环境
  const cubeMaterial = new THREE.MeshBasicMaterial({


    envMap: THREE.ImageUtils.loadTextureCube(imgs)
  })

  // 通过立方体相机来实现
  const cubeCamera = new THREE.CubeCamera(0.1, 2000, 256);
  scene.add(cubeCamera);

  const sphereMaterial = new THREE.MeshBasicMaterial({


    envMap: cubeCamera.renderTarget,
  })

  const sphere = new THREE.Mesh(sphereGeometry, sphereMaterial);
  const cube = new THREE.Mesh(cubeGeometry, cubeMaterial);

  sphere.position.x = 5;
  cube.position.x = -5;
  scene.add(sphere)
  scene.add(cube)

  const animation = () => {


    cube.rotation.x += 0.01;
    cube.rotation.y += 0.01;
    controls.update(clock.getDelta());
    // 渲染
    renderer.render(scene, camera);

    requestAnimationFrame(animation);

    cubeCamera.updateCubeMap(renderer, scene);
  }
  animation()
</script>