文章目录
Learnability Enhancement for Low-light Raw Denoising
主要2个创新点:
1. SNA(shot noise augmentation 泊松噪声数据增强)
Our first observation is that the shot noise is only related to
the clean image and can be accurately modeled with the Poisson
distribution [15, 19]. We propose the Shot Noise Augmentation
(SNA) method to increase the data volume of paired real data. SNA
first combines the real data and the shot noise model to synthesize
new noisy-clean data pairs and then puts them into the training
process to improve the mapping precision. Benefiting from the
increased data volume, the mapping can promote the denoised
images with clear texture
通过data pairs生成新的 noisy-clean pairs.
意思就是 当clean image 增加一定量时,高斯噪声属于信号无关,泊松噪声是信号相关, noisy image 的变化量也遵循论文中的公式。
因此来合成新的 noisy-cleam pairs.
具体步骤如下:
其中增加的一定量 如何选取呢,作者通过采样的方式,生成 rgain, ggain, bgain。
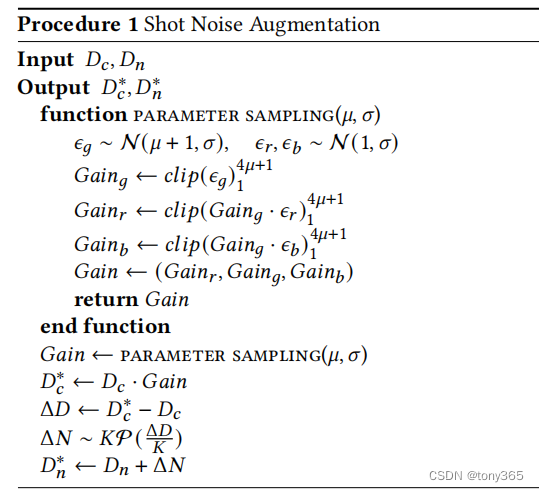
和一般的通道颜色增强还是不同的,这里clean, noisy的通道都发生变化,增强了数据的多样性同时保持噪声model。
首先 ggain,rgain,bgain是增加的ratio
ggain = G(u = 0.5, sigma = 0.5) 高斯采样, clip(0, 4*u)
rgain = (1+ggain) * (1+G(u = 0.5, sigma = 0.5)) - 1 高斯采样, clip(0, 4*u)
bgain = (1+ggain) * (1+G(u = 0.5, sigma = 0.5)) - 1 高斯采样, clip(0, 4*u)
因此图像的 rgbgain,图像增益变大为 原来的 (1 + ggain)倍
白平衡:
new_gain = [1+rgain, 1+ ggain, 1+bgain]
wb_gain = wb_gain * (new_gain) / (1+ggain)
实际应用:
从归一化 扩展到 Nbit 方便泊松, gt 除以ratio 和 noisy亮度一致
gt = gt * (p['wp'] - p['bl']) / ratio
noisy = noisy * (p['wp'] - p['bl'])

dy = gt * [rgain, ggain, bgain]
dn = np.random.poisson(dy/p['K']).astype(np.float32) * p['K']

gt = np.clip((gt + dy)*ratio, 0, (p['wp'] - p['bl']))
noisy = np.clip(noisy + dn, -p['bl'], (p['wp'] - p['bl']))
gt /= (p['wp'] - p['bl'])
noisy /= (p['wp'] - p['bl'])
通过以上步骤可知,在已知 clean-noisy(noisy可以是合成的) pair和噪声参数的情况下可以得到增强后的clean-noisy pair。
相当于 亮度增强, 白平衡增强 的情况下维持噪声模型,而不是简单的亮度增强和白平衡增强。
2. dsc dark shading corection
raw图在 black level substract 后 shading compensate之后,还存在 black level error 和 fix pattern nosie.
把这些标定出来,然后从raw图中减去,使模型更容易学习。

fix pattern上面的两个矩阵图,每个位置都不相同
black level error对于同样的iso是相同的。
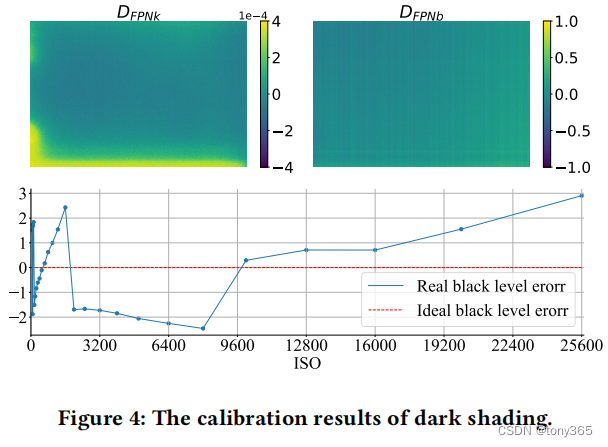
self.darkshading[iso] = ds_k * iso + ds_b + self.blc_mean[iso]
lr_raw = lr_raw - self.get_darkshading(data[‘ISO’])
hr_raw = hr_raw - self.get_darkshading(data[‘ISO’])
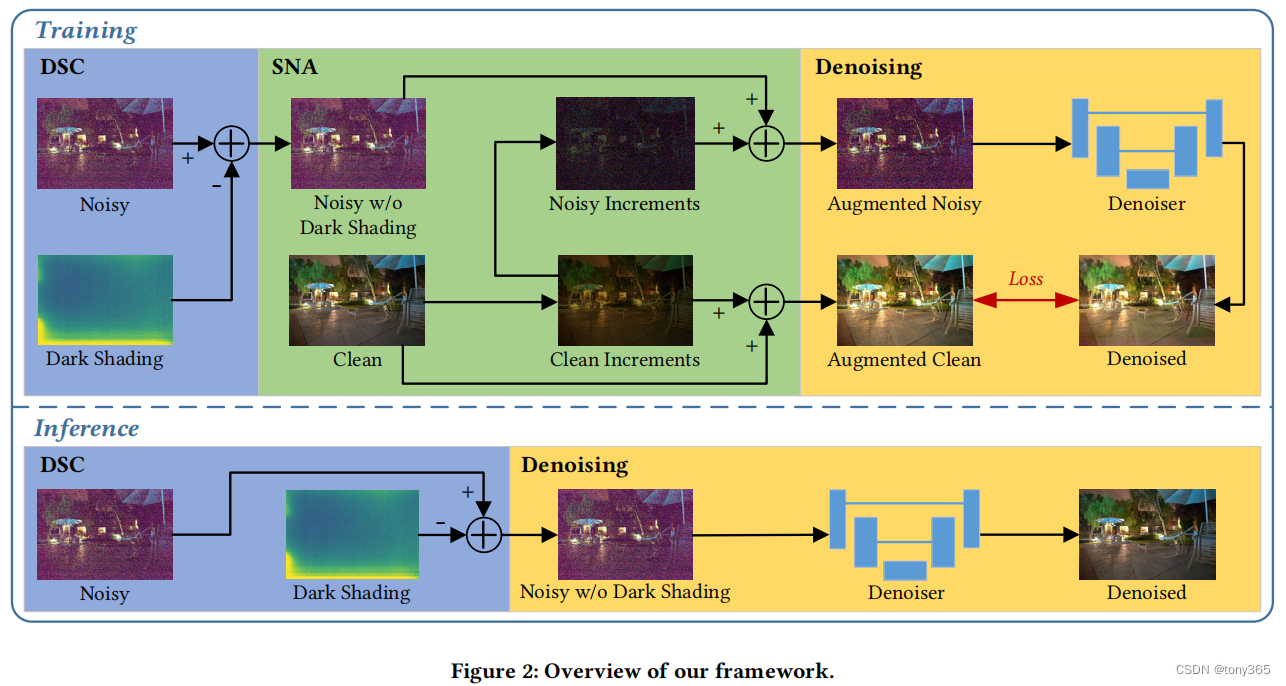
3. 完整的步骤
训练时,首先减去dark shading, 然后sna数据增强, 最后再进行训练。
ELD 噪声模型: 生成噪声图像
noisy_shot + noisy_read + noisy_row + noisy_q + noisy_bias
根据五种噪声的参数生成噪声图像。
泊松,高斯,行噪声,量化噪声,偏移噪声。
def generate_noisy_obs(y, camera_type=None, wp=16383, noise_code='p', param=None, MultiFrameMean=1, ori=False, clip=False):
    # # Burst denoising
    # sig_read = 10. ** np.random.uniform(low=-3., high=-1.5)
    # sig_shot = 10. ** np.random.uniform(low=-2., high=-1.)
    # shot = np.random.randn(*y.shape).astype(np.float32) * np.sqrt(np.maximum(y, 1e-10)) * sig_shot
    # read = np.random.randn(*y.shape).astype(np.float32) * sig_read
    # z = y + shot + read
    p = param
    y = y * (p['wp'] - p['bl'])
    # p['ratio'] = 1/p['ratio'] # 临时行为,为了快速实现MFM
    y = y / p['ratio']
    MFM = MultiFrameMean ** 0.5

    use_R = True if 'r' in noise_code.lower() else False
    use_Q = True if 'q' in noise_code.lower() else False
    use_TL = True if 'g' in noise_code.lower() else False
    use_P = True if 'p' in noise_code.lower() else False
    use_D = True if 'd' in noise_code.lower() else False
    use_black = True if 'b' in noise_code.lower() else False

    if use_P:   # 使用泊松噪声作为shot noisy
        noisy_shot = np.random.poisson(MFM*y/p['K']).astype(np.float32) * p['K'] / MFM
    else:   # 不考虑shot noisy
        noisy_shot = y + np.random.randn(*y.shape).astype(np.float32) * np.sqrt(np.maximum(y/p['K'], 1e-10)) * p['K'] / MFM
    if not use_black:
        if use_TL:   # 使用TL噪声作为read noisy
            noisy_read = stats.tukeylambda.rvs(p['lam'], scale=p['sigTL']/MFM, size=y.shape).astype(np.float32)
        else:   # 使用高斯噪声作为read noisy
            noisy_read = stats.norm.rvs(scale=p['sigGs']/MFM, size=y.shape).astype(np.float32)
        # 行噪声需要使用行的维度h,[1,c,h,w]所以-2是h
        noisy_row = np.random.randn(y.shape[-3], y.shape[-2], 1).astype(np.float32) * p['sigR']/MFM if use_R else 0
        noisy_q = np.random.uniform(low=-0.5, high=0.5, size=y.shape) if use_Q else 0
        noisy_bias = p['bias'] if use_D else 0
    else:
        noisy_read = 0
        noisy_row = 0
        noisy_q = 0
        noisy_bias = 0

    # 归一化回[0, 1]
    z = (noisy_shot + noisy_read + noisy_row + noisy_q + noisy_bias) / (p['wp'] - p['bl'])
    # 模拟实际情况
    z = np.clip(z, -p['bl']/p['wp'], 1) if clip is False else np.clip(z, 0, 1)
    if ori is False:
        z = z * p['ratio']

    return z.astype(np.float32)
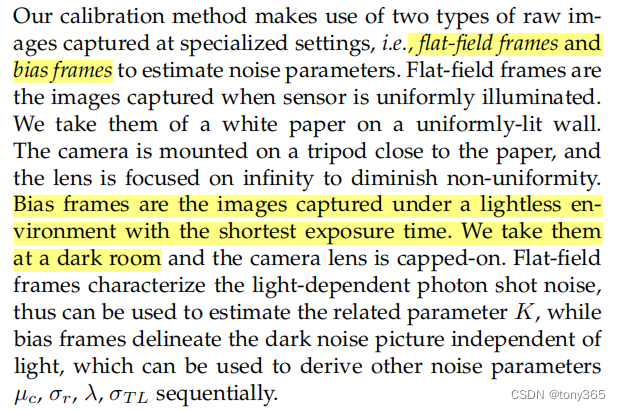
如何标定呢?不同的iso下
flat frames 标定泊松参数
bias frames 标定 信号无关的 噪声,比如read noise, row noise ,qua noise等。
Rethinking Noise Synthesis and Modeling in Raw Denoising
和ELD一样都是合成噪声图像,只不过ELD采用建模的方法,本文采用采样的方法。

泊松噪声的参数可以通过flat frame标定得到,而其他噪声作者采用采样的方式得到,从哪里采样呢?
每个iso拍摄 10 dark frames, 保存下来作为该iso下的噪声数据库。
生成的时候就是随机采样 里面的数据。
1.possion-gaussian model
标定处possion和gaissian参数后,可以得到PG噪声模型,对于不是很暗的场景表现不错。
下面是生成噪声图像的code:
import torch
from torch.distributions.poisson import Poisson

import numpy as np


def generate_poisson_(y, k=1):
    y = torch.poisson(y / k) * k
    return y


def generate_read_noise(shape, noise_type, scale, loc=0):
    noise_type = noise_type.lower()
    if noise_type == 'norm':
        read = torch.FloatTensor(shape).normal_(loc, scale)
    else:
        raise NotImplementedError('Read noise type error.')
    return read


def noise_profiles(camera):
    camera = camera.lower()
    if camera == 'ip':  # iPhone
        iso_set = [100, 200, 400, 800, 1600, 2000]
        cshot = [0.00093595, 0.00104404, 0.00116461, 0.00129911, 0.00144915, 0.00150104]
        cread = [4.697713410870357e-07, 6.904488905478659e-07, 6.739473744228789e-07,
                 6.776787431555864e-07, 6.781983208034481e-07, 6.783184262356993e-07]
    elif camera == 's6':  # Sumsung s6 edge
        iso_set = [100, 200, 400, 800, 1600, 3200]
        cshot = [0.00162521, 0.00256175, 0.00403799, 0.00636492, 0.01003277, 0.01581424]
        cread = [1.1792188420255036e-06, 1.607602896683437e-06, 2.9872611575167216e-06,
                 5.19157563906707e-06, 1.0011034196248119e-05, 2.0652668477786836e-05]
    elif camera == 'gp':  # Google Pixel
        iso_set = [100, 200, 400, 800, 1600, 3200, 6400]
        cshot = [0.00024718, 0.00048489, 0.00095121, 0.001866, 0.00366055, 0.00718092, 0.01408686]
        cread = [1.6819349659429324e-06, 2.0556981890860545e-06, 2.703070976302046e-06,
                 4.116405515789963e-06, 7.569256436438246e-06, 1.5199001098203388e-05, 5.331422827048082e-05]
    elif camera == 'sony':  # Sony a7s2
        iso_set = [800, 1600, 3200]
        cshot = [1.0028880020069384, 1.804521362114003, 3.246920234173119]
        cread = [4.053034401667052, 6.692229120425673, 4.283115294604881]
    elif camera == 'nikon':  # Nikon D850
        iso_set = [800, 1600, 3200]
        cshot = [3.355988883536526, 6.688199969242411, 13.32901281288985]
        cread = [4.4959735547955635, 8.360429952584846, 15.684213053647735]
    else:
        assert NotImplementedError
    return iso_set, cshot, cread


def pg_noise_demo(clean_tensor, camera='IP'):
    iso_set, k_set, read_scale_set = noise_profiles(camera)

    # sample randomly
    i = np.random.choice(len(k_set))
    k, read_scale = k_set[i], read_scale_set[i]

    noisy_shot = generate_poisson_(clean_tensor, k)
    read_noise = generate_read_noise(clean_tensor.shape, noise_type='norm', scale=read_scale)
    noisy = noisy_shot + read_noise
    return noisy


if __name__ == '__main__':
    clean = torch.randn(48, 48).clamp(0, 1)
    noisy = pg_noise_demo(clean, camera='ip')
    print(noisy.shape, noisy.mean())
PAP 技术 和 high-bit reconstruction技术
-
特别暗的场景 直接采样像素值效果不好,因为存在fix pattern。 pattern-aligned patch sampling 是直接采样一个patch,而且bayer format是对齐的。
-
high-bit synthetic noise。 对于场景很暗的图像,又lowbit的情况下,数据量比较少,难以通过统计信息得到 比较多有价值的信息。 通过highbit reconstruction,可以得到更准确的噪声分布和相关统计信息。
首先要知道高斯噪声的方差参数,
class HighBitRecovery:
    def __init__(self, camera_type='IMX686', noise_code='prq', param=None,
                perturb=True, factor=6, float=True):
        self.camera_type = camera_type
        self.noise_code = noise_code
        self.param = param
        self.jitter = perturb
        self.factor = factor
        self.float = float
        self.lut = {

    }

    def get_lut(self, iso_list, blc_mean=None):
        for iso in iso_list:
            if blc_mean is None:
                bias = 0
            else:
                bias = np.mean(blc_mean[iso])
            if self.jitter:
                r = 0.25
                bias += np.random.uniform(-r, r)
            self.lut[iso] = self.HB2LB_LUT(iso, bias)

    def HB2LB_LUT(self, iso, bias=0, param=None):
        # 标记LUT区间
        lut_info = {

    }
        # 获得标定的噪声参数
        p = sample_params_max(self.camera_type, iso=iso) if param is None else param
        lut_info['param'] = p
        # 选择一种分布,依照该分布映射到HighBit
        if 'g' in self.noise_code.lower():
            dist = stats.tukeylambda(p['lam'], loc=bias, scale=p['sigTL'])
            sigma = p['sigTL']
            lut_info['dist'] = dist
        else:
            dist = stats.norm(loc=bias, scale=p['sigGs'])
            sigma = p['sigGs']
            lut_info['dist'] = dist

        # 寻址范围为[-6σ,6σ],离群点不做映射恢复
        low = max(int(-sigma*self.factor + bias), -p['bl']+1)
        high = int(sigma*self.factor + bias)
        for x in range(low, high):
            lut_info[x] = {


                # 累积概率函数的起点
                'cdf': dist.cdf(x-0.5),
                # 累积概率函数的变化范围
                'range': dist.cdf(x+0.5) - dist.cdf(x-0.5),
            }
        lut_info['low'] = low
        lut_info['high'] = high
        lut_info['bias'] = bias
        lut_info['sigma'] = sigma
        return lut_info

    def map(self, data, iso=6400, norm=True):    # 将LB图像映射成HB图像
        p = self.lut[iso]['param']
        if np.max(data) <= 1: data = data * (p['wp'] - p['bl'])
        data_float = data.copy()
        data = np.round(data_float)
        if self.float:
            delta = data_float - data
        rand = np.random.uniform(0, 1, size=data.shape)
        # 寻址范围为[-6σ,6σ],离群点不做映射恢复
        for x in range(self.lut[iso]['low'], self.lut[iso]['high']):
            keys = (data==x)
            cdf = self.lut[iso][x]['cdf']
            r = self.lut[iso][x]['range']
            # 根据ppf反推分位点
            data[keys] = self.lut[iso]['dist'].ppf(cdf + rand[keys] * r)
        if self.float:
            data = data + delta
        if norm:
            data = data / (p['wp'] - p['bl'])
        else:
            data = data + p['bl']

        return data