文章目录
Practical Deep Raw Image Denoising on Mobile Devices(huber linear regression)
code:https://github.com/MegEngine/PMRID
其他相关博客:https://blog.csdn.net/zjy_snow/article/details/124385456
1.DNG 文件处理 pipeline
关于DNG文件的处理,主要查看 SIDD 的仓库 simple-camera-pipeline.
打印bayer pattern格式
pattern = “”.join([chr(short_raw.color_desc[i]) for i in short_raw.raw_pattern.flatten()])
或者
cfa_pattern_str = “”.join([“RGB”[i] for i in cfa_pattern])
下面demo_single.py输入dng raw后,可以得到各个阶段的输出结果。
# (demo_single.py)
import glob
import os
import cv2
import numpy as np

from python.pipeline import run_pipeline_v2
from python.pipeline_utils import get_visible_raw_image, get_metadata

params = {


    'input_stage': 'raw',  # options: 'raw', 'normal', 'white_balance', 'demosaic', 'xyz', 'srgb', 'gamma', 'tone'
    'output_stage': 'tone',  # options: 'normal', 'white_balance', 'demosaic', 'xyz', 'srgb', 'gamma', 'tone'
    'save_as': 'png',  # options: 'jpg', 'png', 'tif', etc.
    'demosaic_type': 'EA',
    'save_dtype': np.uint8
}

image_path = r'D:\dataset\pratical_raw\reno10x_noise\gray_scale_chart\RAW_2020_02_20_13_11_10_787\DNG_2020_02_20_13_11_10_787_1.dng'


# raw image data
raw_image = get_visible_raw_image(image_path)
print('raw data:', raw_image.shape, raw_image.dtype, raw_image.max(), raw_image.min())
# metadata
metadata = get_metadata(image_path)
print('meta info : ', metadata)
# modify WB here
#metadata['as_shot_neutral'] = [1., 1., 1.]

# render
output_image = run_pipeline_v2(image_path, params)
#
# save
output_image_path = image_path.replace('.dng', '_{}.'.format(params['output_stage']) + params['save_as'])
max_val = 2 ** 16 if params['save_dtype'] == np.uint16 else 255
output_image = (output_image[..., ::-1] * max_val).astype(params['save_dtype'])
if params['save_as'] == 'jpg':
    cv2.imwrite(output_image_path, output_image, [cv2.IMWRITE_JPEG_QUALITY, 100])
else:
    cv2.imwrite(output_image_path, output_image)
2.noise estimation
2.1noise model
原论文3.1中给出了简洁明了又清晰的噪声模型:
主要包括高斯噪声和泊松噪声。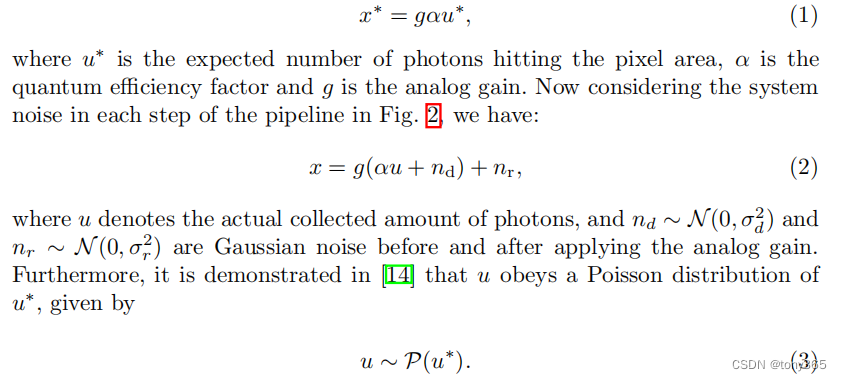
那么通过raw图的均值和方差可以得到参数k和sigma
2.2dataset
code and dataset : https://github.com/MegEngine/PMRID
- reno dataset
reno dataset 包含 [100,200,400,800,1200,1600,2400,3200,4000,4800,5600,6400]iso下的,每个iso下拍摄连续 64个raw图(注意raw图是没有经过blc的)
图像是一个会卡,光线不均匀,亮度不一

采集图像,iso变化,iso最大的时候曝光时间 设置为 固定的曝光时间。然后调节灯光亮度。
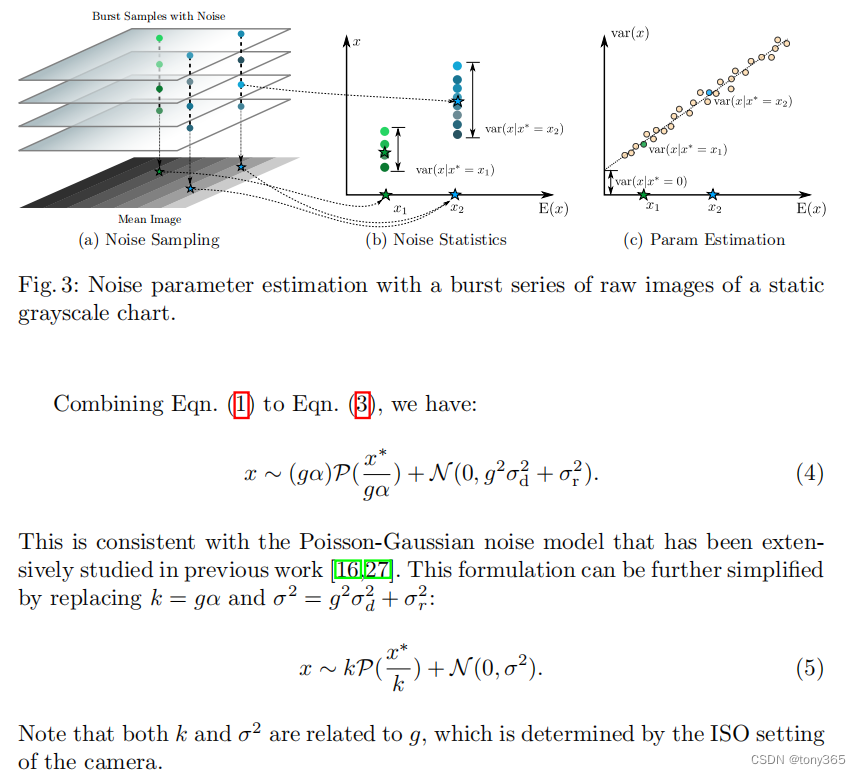
2.3noise estimation
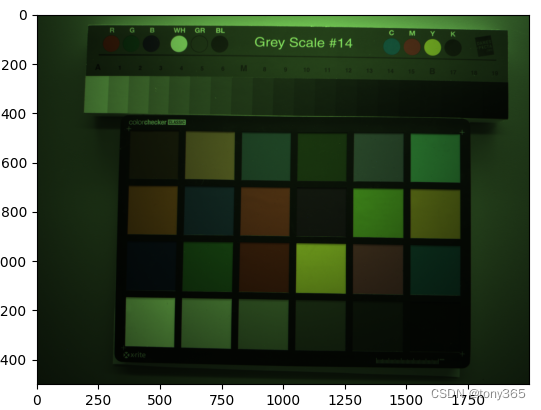
以reno10x raw图为例,复现文章fig6
1)得到 6400 iso下的 k-sigma2图像:
import glob
import os
import numpy as np
from matplotlib import pyplot as plt
from scipy import optimize

from python.pipeline_utils import get_visible_raw_image, get_metadata


def get_rggb_mean_var(raw):
    """
    :param raw: bayer raw
    :return:  4个通道的均值和方差
    """
    rggb = np.dstack((raw[0::2,0::2], raw[0::2,1::2], raw[1::2,0::2], raw[1::2,1::2]))
    average = np.mean(rggb,axis=(0, 1))
    var = np.var(rggb,axis=(0, 1))
    return np.hstack((average.reshape(1, -1), var.reshape(1, -1)))

if __name__ == "__main__":

    dir = r'D:\dataset\pratical_raw\reno10x_noise\gray_scale_chart\RAW_2020_02_20_13_11_10_787'

    files = glob.glob(os.path.join(dir, '*.dng'))

    raws = []
    noise_level = []
    rggb_mean_var = []
    for file in files:
        image_path = file # r'D:\dataset\pratical_raw\reno10x_noise\gray_scale_chart\RAW_2020_02_20_13_06_43_108\DNG_2020_02_20_13_06_43_108_1.dng'
        raw_image = get_visible_raw_image(image_path) - 64
        # metadata
        metadata = get_metadata(image_path)
        #print(' raw data:', raw_image.shape, raw_image.dtype, raw_image.max(), raw_image.min())
        raws.append(raw_image)

        noise = [tem[0] for tem in metadata['noise_profile']]
        noise_level.append(noise)
        print(get_rggb_mean_var(raw_image).reshape(-1))
        rggb_mean_var.append(get_rggb_mean_var(raw_image).reshape(-1))

    noise_level = np.dstack(noise_level)
    noise_level = np.mean(noise_level, axis=-1)
    print('noise_level:', noise_level)

    rggb_mean_var = np.dstack(rggb_mean_var)
    rggb_mean_var = np.mean(rggb_mean_var.reshape(8, -1), axis=-1)
    print('rggb_mean_var:', rggb_mean_var)

    raws = np.dstack(raws)
    print(raws.dtype, raws.shape)
    raw_mean = np.mean(raws, axis=-1).astype(np.uint16)

    mm = np.arange(metadata['white_level'][0]+1)
    uu = []
    for i in range(metadata['white_level'][0]+1):
        data = raws[raw_mean == i]
        if data is None or len(data) == 0:
            uu.append(-1)
        else:
            #print(data.shape, i, data.min(), data.max())
            uu.append((data.var())) # 这里如果筛选出 异常的数据,计算会更精确

    uu = np.array(uu)
    print(mm, uu, mm.dtype, mm.shape, uu.dtype, uu.shape)

    mask = np.logical_and(uu >= 0, mm < 350)
    mm = mm[mask]
    uu = uu[mask]
    m_u = np.hstack((mm.reshape(-1, 1), uu.reshape(-1, 1))).astype(np.float32)

    # method1
    z1 = np.polyfit(mm[uu>=0], uu[uu>=0], 1)  # 用3次多项式拟合,输出系数从高到0
    p1 = np.poly1d(z1)  # 使用系数合成多项式
    r_y = p1(mm[uu > 0])
    print('z1:',z1)
    # method2
    def huber_loss(theta, x, y,  delta=0.8):
        diff = abs(y - (theta[1] + theta[0] * x))
        return ((diff < delta) * diff ** 2 / 2 + (diff >= delta) * delta * (diff - delta / 2)).sum()
    z2 = optimize.fmin(huber_loss, x0=(0, 0), args=(mm[uu>0], uu[uu>0]), disp=False)
    print('z2', z2)
    p1 = np.poly1d(z2)  # 使用系数合成多项式
    r_y2 = p1(mm[uu >= 0])

    plt.figure()
    plt.plot(mm[uu >= 0][::3], uu[uu >= 0][::3], 'r+')
    plt.plot(mm[uu > 0], r_y, 'k-')
    plt.plot(mm[uu > 0], r_y2, 'g-')
    plt.show()
    save_dir = r'D:\dataset\pratical_raw\reno10x_noise\gray_scale_chart'
    np.savetxt(os.path.join(save_dir, dir[-27:]+'_k1_sigma2.txt'), np.round(z2, 5), fmt='%.5f')
    np.savetxt(os.path.join(save_dir, dir[-27:] + '_m_var.txt'), np.round(m_u, 2), fmt='%.2f')
    np.savetxt(os.path.join(save_dir, dir[-27:] + '_noise.txt'), np.round(noise_level.reshape(-1), 9), fmt='%.9f')
    np.savetxt(os.path.join(save_dir, dir[-27:] + '_rggb_mean_var.txt'), np.round(rggb_mean_var.reshape(-1), 2), fmt='%.2f')
    print(dir)
2)各个iso下的 k, sigma2:
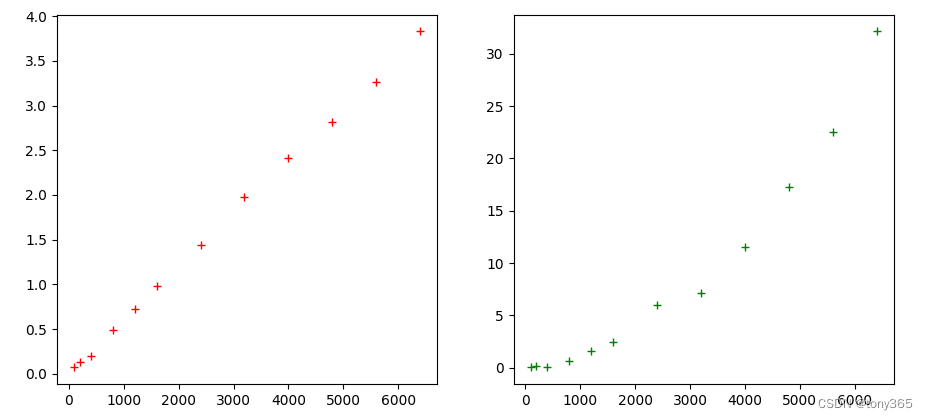
基本和文章fig6一致。
import glob
import os
import numpy as np
from matplotlib import pyplot as plt
from scipy import optimize

if __name__ == "__main__":
    iso = [100,200,400,800,1200,1600,2400,3200,4000,4800,5600,6400]

    dir = r'D:\dataset\pratical_raw\reno10x_noise\gray_scale_chart'

    k1_sigma2s = []
    files = glob.glob(os.path.join(dir, '*k1_sigma2.txt'))
    for file in files:
        k1_sigma2 = np.loadtxt(file)
        print(k1_sigma2)
        k1_sigma2s.append(k1_sigma2)
    k1_sigma2s = np.array(k1_sigma2s)
    k = k1_sigma2s[..., 0]
    sigma2 = k1_sigma2s[..., 1]
    # print('norm k:', k / k[0])

    plt.figure()
    plt.subplot(121)
    plt.plot(iso, k, 'r+')
    plt.subplot(122)
    plt.plot(iso, sigma2, 'g+')
    plt.show()


    # 各iso下图像均值变化不大,方差随着iso增大而增大。
    rggb_mean_vars = []
    files = glob.glob(os.path.join(dir, '*rggb_mean_var.txt'))
    for file in files:
        rggb_mean_var = np.loadtxt(file)
        print(rggb_mean_var)
        rggb_mean_vars.append(rggb_mean_var)
    rggb_mean_vars = np.array(rggb_mean_vars)
    print('rggb ratio:\n', rggb_mean_vars / rggb_mean_vars[0])

    # 打印DNG meta记录的 noise level
    print('\n\n noise level in meta:')
    noises = []
    files = glob.glob(os.path.join(dir, '*noise.txt'))
    for file in files:
        noise = np.loadtxt(file)
        print(noise)
        noises.append(noise[:2])
    noises = np.array(noises).reshape(-1, 2)

    plt.figure()
    plt.subplot(121)
    plt.plot(iso, noises[:,0]*(1023-64), 'r+')
    plt.subplot(122)
    plt.plot(iso, noises[:,1]*(959*959), 'g+')
    plt.show()
3.论文中的测试集
拍了五个场景,每个场景两种光源调节bright和dark.
每种光源条件又用了5中iso+expo time.
import glob
import os
import numpy as np
from matplotlib import pyplot as plt


'''
process PMRID dataset
'''

if __name__ == "__main__":
    dir_ori = r'D:\dataset\pratical_raw\PMRID\Scene4\dark'
    dirs = glob.glob(os.path.join(dir_ori, 'RAW*'))
    print(dirs)
    for dir in dirs:
        files = glob.glob(os.path.join(dir, "*.raw"))

        for file in files:
            print(file)

            data = np.fromfile(file, dtype=np.uint16)
            data = data.reshape(3000, 4000)

            rgb = np.dstack((data[1::2,1::2], data[1::2,0::2], data[0::2,0::2]))
            plt.figure()
            plt.imshow(rgb / rgb.max())
            plt.show()
4.论文总结
- 提出根据raw图泊松高斯噪声估计模型,即各种iso下的噪声参数
- 根据噪声参数可以生成泛化能力强的噪声图片
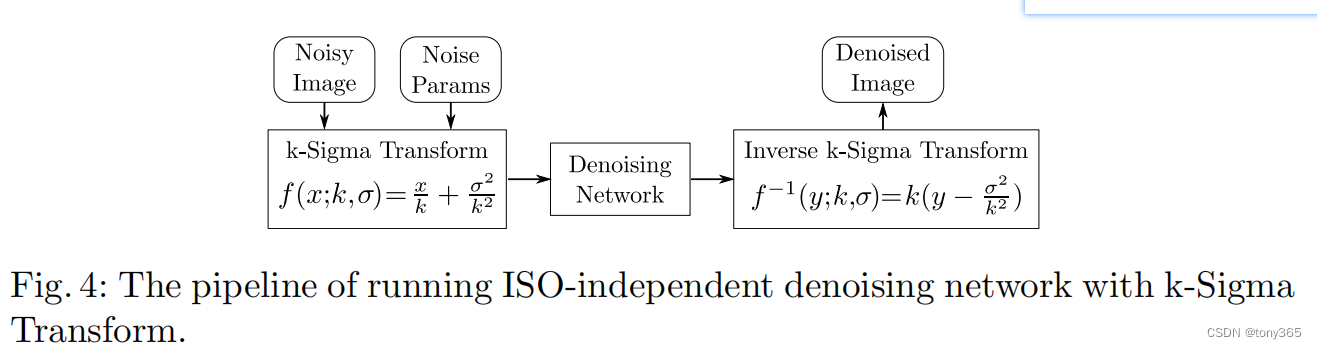
- 提出k-sigma转换处理 input 和 output, 可以使网络学习 iso-independent space, 因此不需要扩大网络模型,就可以训练一个能处理各种iso噪声的轻量化模型,且效果很好。
5.net
#!/usr/bin/env python3
import torch
import torch.nn as nn
from collections import OrderedDict

import numpy as np


def Conv2D(
        in_channels: int, out_channels: int,
        kernel_size: int, stride: int, padding: int,
        is_seperable: bool = False, has_relu: bool = False,
):
    modules = OrderedDict()

    if is_seperable:
        modules['depthwise'] = nn.Conv2d(
            in_channels, in_channels, kernel_size, stride, padding,
            groups=in_channels, bias=False,
        )
        modules['pointwise'] = nn.Conv2d(
            in_channels, out_channels,
            kernel_size=1, stride=1, padding=0, bias=True,
        )
    else:
        modules['conv'] = nn.Conv2d(
            in_channels, out_channels, kernel_size, stride, padding,
            bias=True,
        )
    if has_relu:
        modules['relu'] = nn.ReLU()

    return nn.Sequential(modules)


class EncoderBlock(nn.Module):

    def __init__(self, in_channels: int, mid_channels: int, out_channels: int, stride: int = 1):
        super().__init__()

        self.conv1 = Conv2D(in_channels, mid_channels, kernel_size=5, stride=stride, padding=2, is_seperable=True, has_relu=True)
        self.conv2 = Conv2D(mid_channels, out_channels, kernel_size=5, stride=1, padding=2, is_seperable=True, has_relu=False)

        self.proj = (
            nn.Identity()
            if stride == 1 and in_channels == out_channels else
            Conv2D(in_channels, out_channels, kernel_size=3, stride=stride, padding=1, is_seperable=True, has_relu=False)
        )
        self.relu = nn.ReLU()

    def forward(self, x):
        proj = self.proj(x)

        x = self.conv1(x)
        x = self.conv2(x)

        x = x + proj
        return self.relu(x)


def EncoderStage(in_channels: int, out_channels: int, num_blocks: int):

    blocks = [
        EncoderBlock(
            in_channels=in_channels,
            mid_channels=out_channels//4,
            out_channels=out_channels,
            stride=2,
        )
    ]
    for _ in range(num_blocks-1):
        blocks.append(
            EncoderBlock(
                in_channels=out_channels,
                mid_channels=out_channels//4,
                out_channels=out_channels,
                stride=1,
            )
        )

    return nn.Sequential(*blocks)


class DecoderBlock(nn.Module):

    def __init__(self, in_channels: int, out_channels: int, kernel_size: int = 3):
        super().__init__()

        padding = kernel_size // 2
        self.conv0 = Conv2D(
            in_channels, out_channels, kernel_size=kernel_size, padding=padding,
            stride=1, is_seperable=True, has_relu=True,
        )
        self.conv1 = Conv2D(
            out_channels, out_channels, kernel_size=kernel_size, padding=padding,
            stride=1, is_seperable=True, has_relu=False,
        )

    def forward(self, x):
        inp = x
        x = self.conv0(x)
        x = self.conv1(x)
        x = x + inp
        return x


class DecoderStage(nn.Module):

    def __init__(self, in_channels: int, skip_in_channels: int, out_channels: int):
        super().__init__()

        self.decode_conv = DecoderBlock(in_channels, in_channels, kernel_size=3)
        self.upsample = nn.ConvTranspose2d(in_channels, out_channels, kernel_size=2, stride=2, padding=0)
        self.proj_conv = Conv2D(skip_in_channels, out_channels, kernel_size=3, stride=1, padding=1, is_seperable=True, has_relu=True)
        # M.init.msra_normal_(self.upsample.weight, mode='fan_in', nonlinearity='linear')

    def forward(self, inputs):
        inp, skip = inputs

        x = self.decode_conv(inp)
        x = self.upsample(x)
        y = self.proj_conv(skip)
        return x + y


class Network(nn.Module):

    def __init__(self):
        super().__init__()

        self.conv0 = Conv2D(in_channels=4, out_channels=16, kernel_size=3, padding=1, stride=1, is_seperable=False, has_relu=True)
        self.enc1 = EncoderStage(in_channels=16, out_channels=64, num_blocks=2)
        self.enc2 = EncoderStage(in_channels=64, out_channels=128, num_blocks=2)
        self.enc3 = EncoderStage(in_channels=128, out_channels=256, num_blocks=4)
        self.enc4 = EncoderStage(in_channels=256, out_channels=512, num_blocks=4)

        self.encdec = Conv2D(in_channels=512, out_channels=64, kernel_size=3, padding=1, stride=1, is_seperable=True, has_relu=True)
        self.dec1 = DecoderStage(in_channels=64, skip_in_channels=256, out_channels=64)
        self.dec2 = DecoderStage(in_channels=64, skip_in_channels=128, out_channels=32)
        self.dec3 = DecoderStage(in_channels=32, skip_in_channels=64, out_channels=32)
        self.dec4 = DecoderStage(in_channels=32, skip_in_channels=16, out_channels=16)

        self.out0 = DecoderBlock(in_channels=16, out_channels=16, kernel_size=3)
        self.out1 = Conv2D(in_channels=16, out_channels=4, kernel_size=3, stride=1, padding=1, is_seperable=False, has_relu=False)

    def forward(self, inp):

        conv0 = self.conv0(inp)
        conv1 = self.enc1(conv0)
        conv2 = self.enc2(conv1)
        conv3 = self.enc3(conv2)
        conv4 = self.enc4(conv3)

        conv5 = self.encdec(conv4)

        up3 = self.dec1((conv5, conv3))
        up2 = self.dec2((up3, conv2))
        up1 = self.dec3((up2, conv1))
        x = self.dec4((up1, conv0))

        x = self.out0(x)
        x = self.out1(x)

        pred = inp + x
        return pred


if __name__ == "__main__":
    net = Network()
    # img = mge.tensor(np.random.randn(1, 4, 64, 64).astype(np.float32))
    img = torch.randn(1, 4, 64, 64, device=torch.device('cpu'), dtype=torch.float32)
    out = net(img)

    import IPython; IPython.embed()

# vim: ts=4 sw=4 sts=4 expandtab