YOLO模型实例化
预测之前将模型实例化:
class YOLO(object):
    _defaults = {


        #--------------------------------------------------------------------------#
        #   使用自己训练好的模型进行预测一定要修改model_path和classes_path!
        #   model_path指向logs文件夹下的权值文件,classes_path指向model_data下的txt
        #
        #   训练好后logs文件夹下存在多个权值文件,选择验证集损失较低的即可。
        #   验证集损失较低不代表mAP较高,仅代表该权值在验证集上泛化性能较好。
        #   如果出现shape不匹配,同时要注意训练时的model_path和classes_path参数的修改
        #--------------------------------------------------------------------------#
        "model_path"        : r'E:\deeplearnning-project\yolov7-pytorch-master\logs\yolov7_weights.pth',
        "classes_path"      : 'model_data/coco_classes.txt',
        #---------------------------------------------------------------------#
        #   anchors_path代表锚框对应的txt文件,一般不修改。
        #   anchors_mask用于帮助代码找到对应的锚框,一般不修改。
        #---------------------------------------------------------------------#
        "anchors_path"      : 'model_data/yolo_anchors.txt',
        "anchors_mask"      : [[6, 7, 8], [3, 4, 5], [0, 1, 2]],
        #---------------------------------------------------------------------#
        #   输入图片的大小,必须为32的倍数。
        #---------------------------------------------------------------------#
        "input_shape"       : [640, 640],
        #------------------------------------------------------#
        #   所使用到的yolov7的版本,本仓库一共提供两个:
        #   l : 对应yolov7
        #   x : 对应yolov7_x
        #------------------------------------------------------#
        "phi"               : 'l',
        #---------------------------------------------------------------------#
        #   只有得分大于置信度的预测框会被保留下来
        #---------------------------------------------------------------------#
        "confidence"        : 0.5,
        #---------------------------------------------------------------------#
        #   非极大抑制所用到的nms_iou大小
        #---------------------------------------------------------------------#
        "nms_iou"           : 0.3,
        #---------------------------------------------------------------------#
        #   该变量用于控制是否使用letterbox_image对输入图像进行不失真的resize,
        #   在多次测试后,发现关闭letterbox_image直接resize的效果更好
        #---------------------------------------------------------------------#
        "letterbox_image"   : True,
        #-------------------------------#
        #   是否使用Cuda
        #   没有GPU可以设置成False
        #-------------------------------#
        "cuda"              : True,
    }

    @classmethod
    def get_defaults(cls, n):
        if n in cls._defaults:
            return cls._defaults[n]
        else:
            return "Unrecognized attribute name '" + n + "'"

    #---------------------------------------------------#
    #   初始化YOLO
    #---------------------------------------------------#
    def __init__(self, **kwargs):
        self.__dict__.update(self._defaults)
        for name, value in kwargs.items():
            setattr(self, name, value)
            self._defaults[name] = value

        #---------------------------------------------------#
        #   获得种类和锚框的数量
        #---------------------------------------------------#
        self.class_names, self.num_classes  = get_classes(self.classes_path)
        self.anchors, self.num_anchors      = get_anchors(self.anchors_path)
        self.bbox_util                      = DecodeBox(self.anchors, self.num_classes, (self.input_shape[0], self.input_shape[1]), self.anchors_mask)
        self.generate()
        show_config(**self._defaults)

    #---------------------------------------------------#
    #   生成模型
    #---------------------------------------------------#
    def generate(self, onnx=False):
        self.net    = YoloBody(self.anchors_mask, self.num_classes, self.phi)
        device      = torch.device('cuda' if torch.cuda.is_available() else 'cpu')
        self.net.load_state_dict(torch.load(self.model_path, map_location=device))
        self.net    = self.net.fuse().eval()
        print('{} model, and classes loaded.'.format(self.model_path))
这边提一嘴self.anchors, self.num_anchors = get_anchors(self.anchors_path):
def get_anchors(anchors_path):
    '''loads the anchors from a file'''
    with open(anchors_path, encoding='utf-8') as f:
        anchors = f.readline()
    anchors = [float(x) for x in anchors.split(',')]
    anchors = np.array(anchors).reshape(-1, 2)
    return anchors, len(anchors)
anchor在anchors_path路径下,这里3个特征图,每个特征图用3个anchor,也就是用了9个anchors。
锚框设置
代码中self.anchors跟self.anchors_mask[i]是配合着使用的:self.anchors[self.anchors_mask[i]]]:
scaled_anchors = [(anchor_width / stride_w, anchor_height / stride_h) for anchor_width, anchor_height in self.anchors[self.anchors_mask[i]]]
锚框的尺寸设置是根据上文的get_anchors(),从锚框尺寸设置路径文件里获取,如下图:
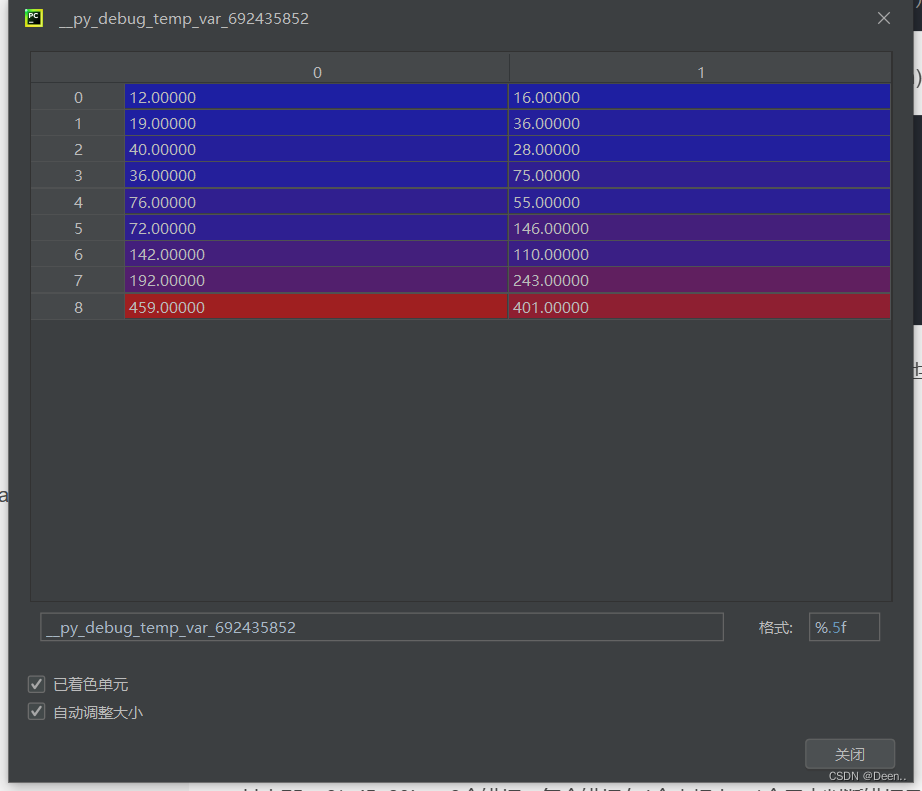
== self.anchors_mask[i] : [[6, 7, 8], [3, 4, 5], [0, 1, 2]]==是为3个不同特征层挑选锚框尺寸。如self.anchors_mask[0]意味着为特征层 P5挑选尺寸为尺寸为[142,110],[192,243],[459,401]的锚框。
预测过程
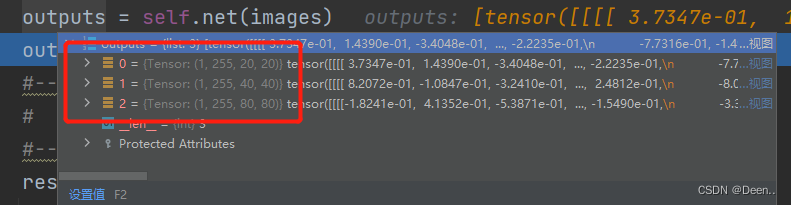
经过YOLO模型输出三个检测头,假设有80类,则检测头的尺寸分别为
P3 80, 80, 255
P4 40, 40, 255
P5 20, 20, 255
其中255 = 3*(5+80),表示3个锚框,每个锚框有4个坐标点,第5个用来判断锚框是目标的置信度,80个用来判断是种类的置信度,在后期做NMS的时候,认为一个预测框的置信度是由目标置信度*类别置信度:(detections_class[:, 4] * detections_class[:, 5])
预测代码如下:
单张图片的预测部分重点在yolo.detect_image()函数中。crop是决定是否要截取预测内容保存起来,count是觉得是否对预测结果计数。
    if mode == "predict":
        yolo = YOLO()
        while True:
            img = input('Input image filename:')
            try:
                image = Image.open(img)
            except:
                print('Open Error! Try again!')
                continue
            else:
                r_image = yolo.detect_image(image, crop = crop, count=count)
                r_image.show()
输入的图片对其做缩放处理,具体为,将图片按输入比例缩放,图片的长边等于输入图片的长边尺寸,图片的短边按图片本身的比例缩放。再将输入图片与缩放后图片多出来的灰边进行填充。代码中是先做个灰色底图的输入图片,然后把缩放后的图片copy进来。
   def detect_image(self, image, crop = False, count = False):
        #---------------------------------------------------#
        #   计算输入图片的高和宽
        #---------------------------------------------------#
        image_shape = np.array(np.shape(image)[0:2])
        #---------------------------------------------------------#
        #   在这里将图像转换成RGB图像,防止灰度图在预测时报错。
        #   代码仅仅支持RGB图像的预测,所有其它类型的图像都会转化成RGB
        #---------------------------------------------------------#
        image       = cvtColor(image)
        #---------------------------------------------------------#
        #   给图像增加灰条,实现不失真的resize
        #   也可以直接resize进行识别
        #---------------------------------------------------------#
        image_data  = resize_image(image, (self.input_shape[1], self.input_shape[0]), self.letterbox_image)
        #---------------------------------------------------------#
        #   添加上batch_size维度
        #   h, w, 3 => 3, h, w => 1, 3, h, w
        #---------------------------------------------------------#
        image_data  = np.expand_dims(np.transpose(preprocess_input(np.array(image_data, dtype='float32')), (2, 0, 1)), 0)
def resize_image(image, size, letterbox_image, mode='PIL'):
    if mode == 'PIL':
        iw, ih  = image.size
        w, h    = size

        if letterbox_image:
            scale   = min(w/iw, h/ih)
            nw      = int(iw*scale)
            nh      = int(ih*scale)

            image   = image.resize((nw,nh), Image.BICUBIC)
            new_image = Image.new('RGB', size, (128,128,128))
            new_image.paste(image, ((w-nw)//2, (h-nh)//2))
        else:
            new_image = image.resize((w, h), Image.BICUBIC)
将缩放后的图片由numpy格式转为torch格式进行转换,转换后输入模型网络得出预测结果如图:
预测结果解码:
预测结果由3个图层,以第一个特征图层的第一个锚框为例,其长度为85。前4为是坐标,但是预测框的坐标是相对锚框的偏移量,且格式是[x,y,w,h]的,将其转换为[x,y,x,y]的格式。
具体流程为:
首先获取该图层的框高,以及该图片原始的框高,计算缩放的比例:
   def decode_box(self, inputs):
        outputs = []
        for i, input in enumerate(inputs):
            #-----------------------------------------------#
            #   输入的input一共有三个,他们的shape分别是
            #   batch_size = 1
            #   batch_size, 3 * (4 + 1 + 80), 20, 20
            #   batch_size, 255, 40, 40
            #   batch_size, 255, 80, 80
            #-----------------------------------------------#
            batch_size      = input.size(0)
            input_height    = input.size(2)
            input_width     = input.size(3)

            #-----------------------------------------------#
            #   输入为640x640时
            #   stride_h = stride_w = 32、16、8
            #-----------------------------------------------#
            stride_h = self.input_shape[0] / input_height
            stride_w = self.input_shape[1] / input_width
            #-------------------------------------------------#
将该图层的格式进行调整,然后分别获取x,y,w,h,conf的值。在获取的时候用sigmoid函数对预测的结果值做对于处理。
            prediction = input.view(batch_size, len(self.anchors_mask[i]),
                                    self.bbox_attrs, input_height, input_width).permute(0, 1, 3, 4, 2).contiguous()

            #-----------------------------------------------#
            #   锚框的中心位置的调整参数
            #-----------------------------------------------#
            x = torch.sigmoid(prediction[..., 0])
            y = torch.sigmoid(prediction[..., 1])
            #-----------------------------------------------#
            #   锚框的宽高调整参数
            #-----------------------------------------------#
            w = torch.sigmoid(prediction[..., 2])
            h = torch.sigmoid(prediction[..., 3])
            #-----------------------------------------------#
            #   获得置信度,是否有物体
            #-----------------------------------------------#
            conf        = torch.sigmoid(prediction[..., 4])
            #-----------------------------------------------#
            #   种类置信度
生成锚框的网格中心,并且生成锚框的框高这(一部分只跟特征图层大小、锚框数量,边长大小有关):
            grid_x = torch.linspace(0, input_width - 1, input_width).repeat(input_height, 1).repeat(
                batch_size * len(self.anchors_mask[i]), 1, 1).view(x.shape).type(FloatTensor)
            grid_y = torch.linspace(0, input_height - 1, input_height).repeat(input_width, 1).t().repeat(
                batch_size * len(self.anchors_mask[i]), 1, 1).view(y.shape).type(FloatTensor)

            anchor_w = FloatTensor(scaled_anchors).index_select(1, LongTensor([0]))
            anchor_h = FloatTensor(scaled_anchors).index_select(1, LongTensor([1]))
            anchor_w = anchor_w.repeat(batch_size, 1).repeat(1, 1, input_height * input_width).view(w.shape)
            anchor_h = anchor_h.repeat(batch_size, 1).repeat(1, 1, input_height * input_width).view(h.shape)
锚框匹配参考文章
利用预测结果对锚框进行调整:
            #   利用预测结果对先验框进行调整
            #   首先调整先验框的中心,从先验框中心向右下角偏移
            #   再调整先验框的宽高。
            #   x 0 ~ 1 => 0 ~ 2 => -0.5, 1.5 => 负责一定范围的目标的预测
            #   y 0 ~ 1 => 0 ~ 2 => -0.5, 1.5 => 负责一定范围的目标的预测
            #   w 0 ~ 1 => 0 ~ 2 => 0 ~ 4 => 先验框的宽高调节范围为0~4倍
            #   h 0 ~ 1 => 0 ~ 2 => 0 ~ 4 => 先验框的宽高调节范围为0~4倍
            #----------------------------------------------------------#
            pred_boxes          = FloatTensor(prediction[..., :4].shape)
            pred_boxes[..., 0]  = x.data * 2. - 0.5 + grid_x
            pred_boxes[..., 1]  = y.data * 2. - 0.5 + grid_y
            pred_boxes[..., 2]  = (w.data * 2) ** 2 * anchor_w
            pred_boxes[..., 3]  = (h.data * 2) ** 2 * anchor_h
再将结果归一化后输出
            #----------------------------------------------------------#
            #   将输出结果归一化成小数的形式
            #----------------------------------------------------------#
            _scale = torch.Tensor([input_width, input_height, input_width, input_height]).type(FloatTensor)
            output = torch.cat((pred_boxes.view(batch_size, -1, 4) / _scale,
                                conf.view(batch_size, -1, 1), pred_cls.view(batch_size, -1, self.num_classes)), -1)
            outputs.append(output.data)
3个图层处理完后输出图片,完成解码。
极大值抑制
解码完完毕后进行极大值抑制:
results = self.bbox_util.non_max_suppression(torch.cat(outputs, 1), self.num_classes, self.input_shape, image_shape, self.letterbox_image, conf_thres = self.confidence, nms_thres = self.nms_iou)
 def non_max_suppression(self, prediction, num_classes, input_shape, image_shape, letterbox_image, conf_thres=0.5, nms_thres=0.4):
        #----------------------------------------------------------#
        #   将预测结果的格式转换成左上角右下角的格式。
        #   prediction  [batch_size, num_anchors, 85]
        #----------------------------------------------------------#
        box_corner          = prediction.new(prediction.shape)
        box_corner[:, :, 0] = prediction[:, :, 0] - prediction[:, :, 2] / 2
        box_corner[:, :, 1] = prediction[:, :, 1] - prediction[:, :, 3] / 2
        box_corner[:, :, 2] = prediction[:, :, 0] + prediction[:, :, 2] / 2
        box_corner[:, :, 3] = prediction[:, :, 1] + prediction[:, :, 3] / 2
        prediction[:, :, :4] = box_corner[:, :, :4]

        output = [None for _ in range(len(prediction))]
        for i, image_pred in enumerate(prediction):
            #----------------------------------------------------------#
            #   对种类预测部分取max。
            #   class_conf  [num_anchors, 1]    种类置信度
            #   class_pred  [num_anchors, 1]    种类
            #----------------------------------------------------------#
            class_conf, class_pred = torch.max(image_pred[:, 5:5 + num_classes], 1, keepdim=True)

            #----------------------------------------------------------#
            #   利用置信度进行第一轮筛选
            #----------------------------------------------------------#
            conf_mask = (image_pred[:, 4] * class_conf[:, 0] >= conf_thres).squeeze()

            #----------------------------------------------------------#
            #   根据置信度进行预测结果的筛选
            #----------------------------------------------------------#
            image_pred = image_pred[conf_mask]
            class_conf = class_conf[conf_mask]
            class_pred = class_pred[conf_mask]
            if not image_pred.size(0):
                continue
            #-------------------------------------------------------------------------#
            #   detections  [num_anchors, 7]
            #   7的内容为:x1, y1, x2, y2, obj_conf, class_conf, class_pred
            #-------------------------------------------------------------------------#
            detections = torch.cat((image_pred[:, :5], class_conf.float(), class_pred.float()), 1)

            #------------------------------------------#
            #   获得预测结果中包含的所有种类
            #------------------------------------------#
            unique_labels = detections[:, -1].cpu().unique()

            if prediction.is_cuda:
                unique_labels = unique_labels.cuda()
                detections = detections.cuda()

            for c in unique_labels:
                #------------------------------------------#
                #   获得某一类得分筛选后全部的预测结果
                #------------------------------------------#
                detections_class = detections[detections[:, -1] == c]

                #------------------------------------------#
                #   使用官方自带的非极大抑制会速度更快一些!
                #   筛选出一定区域内,属于同一种类得分最大的框
                #------------------------------------------#
                keep = nms(
                    detections_class[:, :4],
                    detections_class[:, 4] * detections_class[:, 5],
                    nms_thres
                )
                max_detections = detections_class[keep]

                # # 按照存在物体的置信度排序
                # _, conf_sort_index = torch.sort(detections_class[:, 4]*detections_class[:, 5], descending=True)
                # detections_class = detections_class[conf_sort_index]
                # # 进行非极大抑制
                # max_detections = []
                # while detections_class.size(0):
                #     # 取出这一类置信度最高的,一步一步往下判断,判断重合程度是否大于nms_thres,如果是则去除掉
                #     max_detections.append(detections_class[0].unsqueeze(0))
                #     if len(detections_class) == 1:
                #         break
                #     ious = bbox_iou(max_detections[-1], detections_class[1:])
                #     detections_class = detections_class[1:][ious < nms_thres]
                # # 堆叠
                # max_detections = torch.cat(max_detections).data

                # Add max detections to outputs
                output[i] = max_detections if output[i] is None else torch.cat((output[i], max_detections))

            if output[i] is not None:
                output[i]           = output[i].cpu().numpy()
                box_xy, box_wh      = (output[i][:, 0:2] + output[i][:, 2:4])/2, output[i][:, 2:4] - output[i][:, 0:2]
                output[i][:, :4]    = self.yolo_correct_boxes(box_xy, box_wh, input_shape, image_shape, letterbox_image)
        return output
极大值抑制后得到的图像既为最终预测结果:
            results = self.bbox_util.non_max_suppression(torch.cat(outputs, 1), self.num_classes, self.input_shape,
                        image_shape, self.letterbox_image, conf_thres = self.confidence, nms_thres = self.nms_iou)

            if results[0] is None:
                return image
将其处理后就可显示在图片中。
            top_label   = np.array(results[0][:, 6], dtype = 'int32')
            top_conf    = results[0][:, 4] * results[0][:, 5]
            top_boxes   = results[0][:, :4]