博主计划做一个目标检测跟踪项目,考虑使用YOLO系列模型来作为目标检测器,如今YOLO项目已经更新到了YOLOV7版本,因此便来学习一下相关原理,完成相关实验工作。
论文链接:https://arxiv.org/abs/2207.02696

网络结构
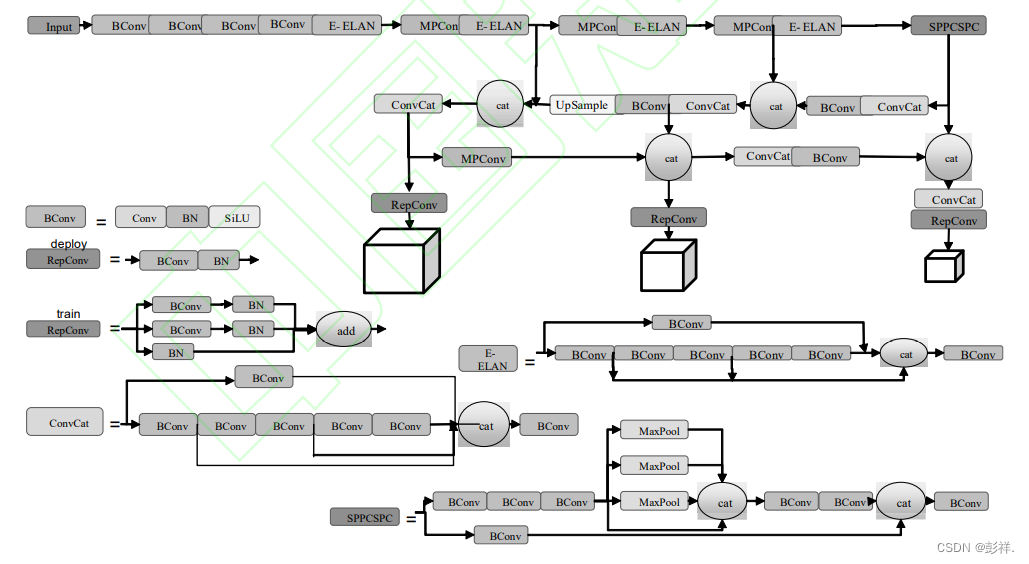
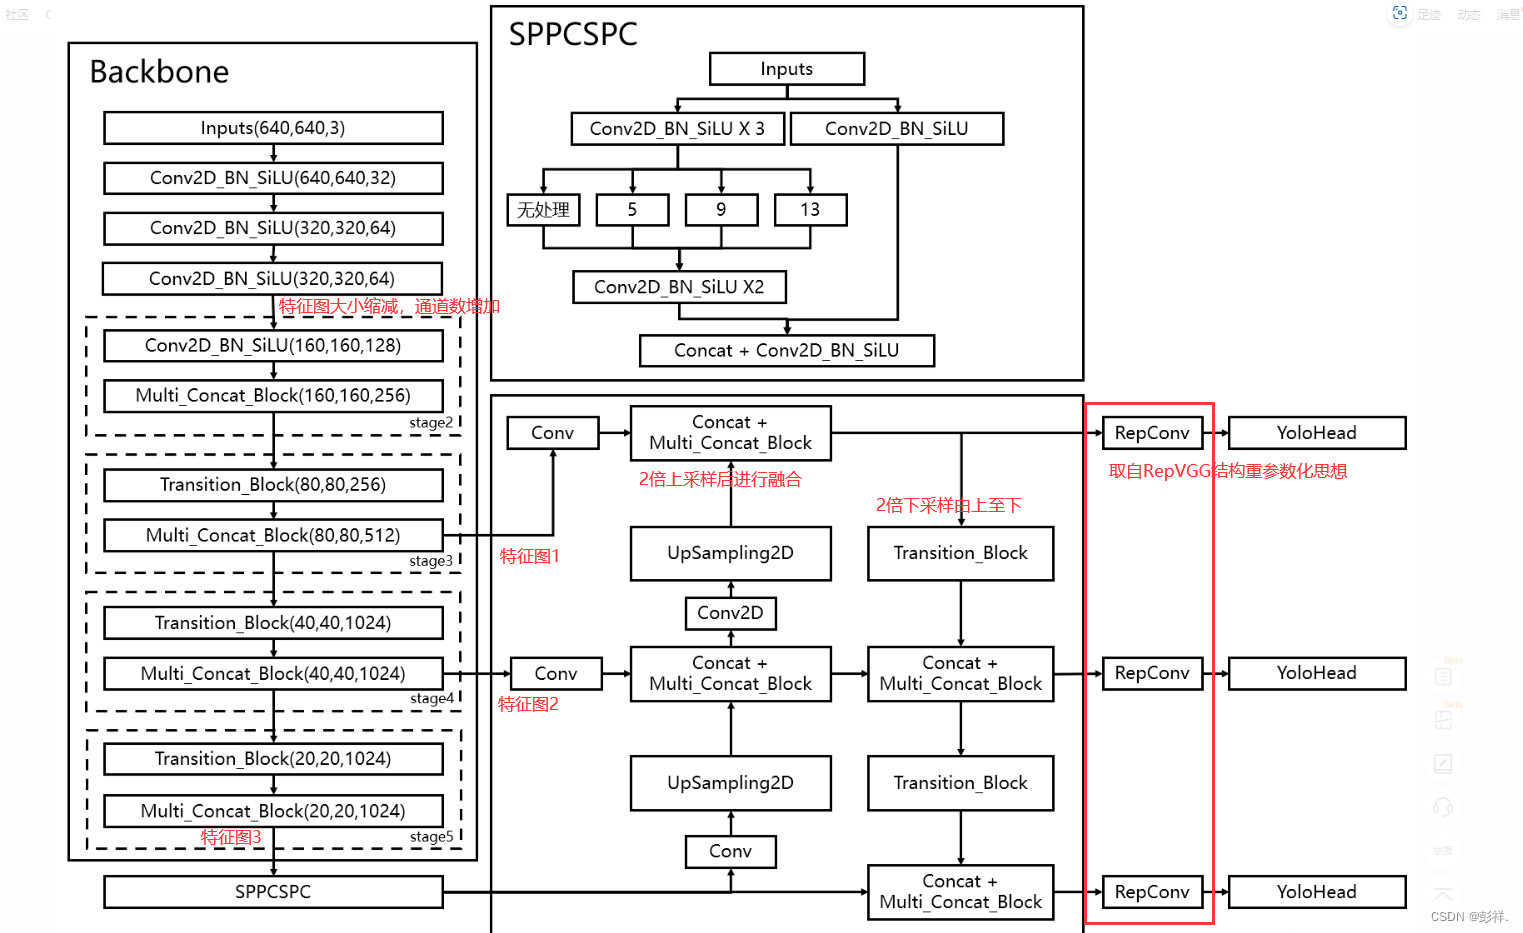
YOLOv7是 YOLO 系列最新推出的YOLO 结构,在 5 帧/秒到 160 帧/秒范围内,其速度和精度都超过了大部分已知的目标检测器,在 GPU V100 已知的 30 帧/秒以上的实时目标检测器中,YOLOv7 的准确率最高。根据代码运行环境的不同(边缘 GPU、普通 GPU 和云 GPU),YOLOv7 设置了三种基本模型,分别称为 YOLOv7-tiny、YOLOv7和 YOLOv7-W6。相比于 YOLO 系列其他网络 模 型 ,YOLOv7 的 检 测 思 路 与YOLOv4、YOLOv5相似,其网络架构如图所示。
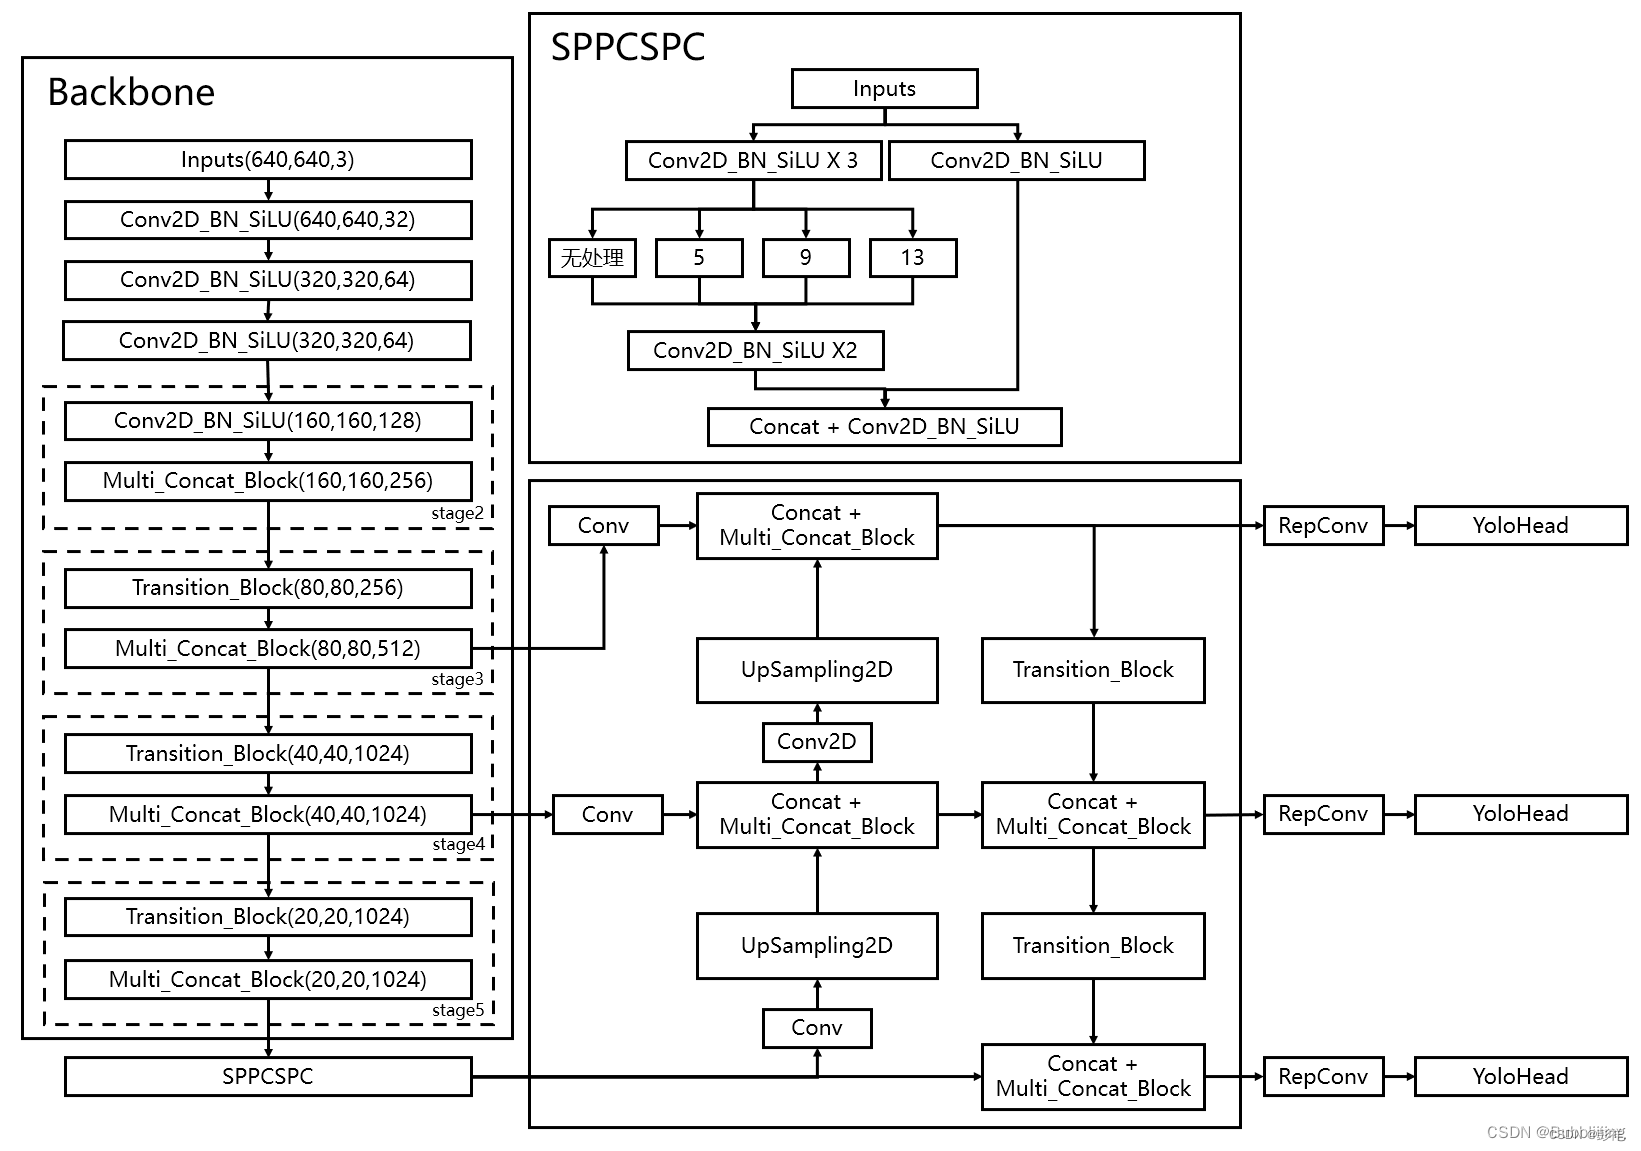
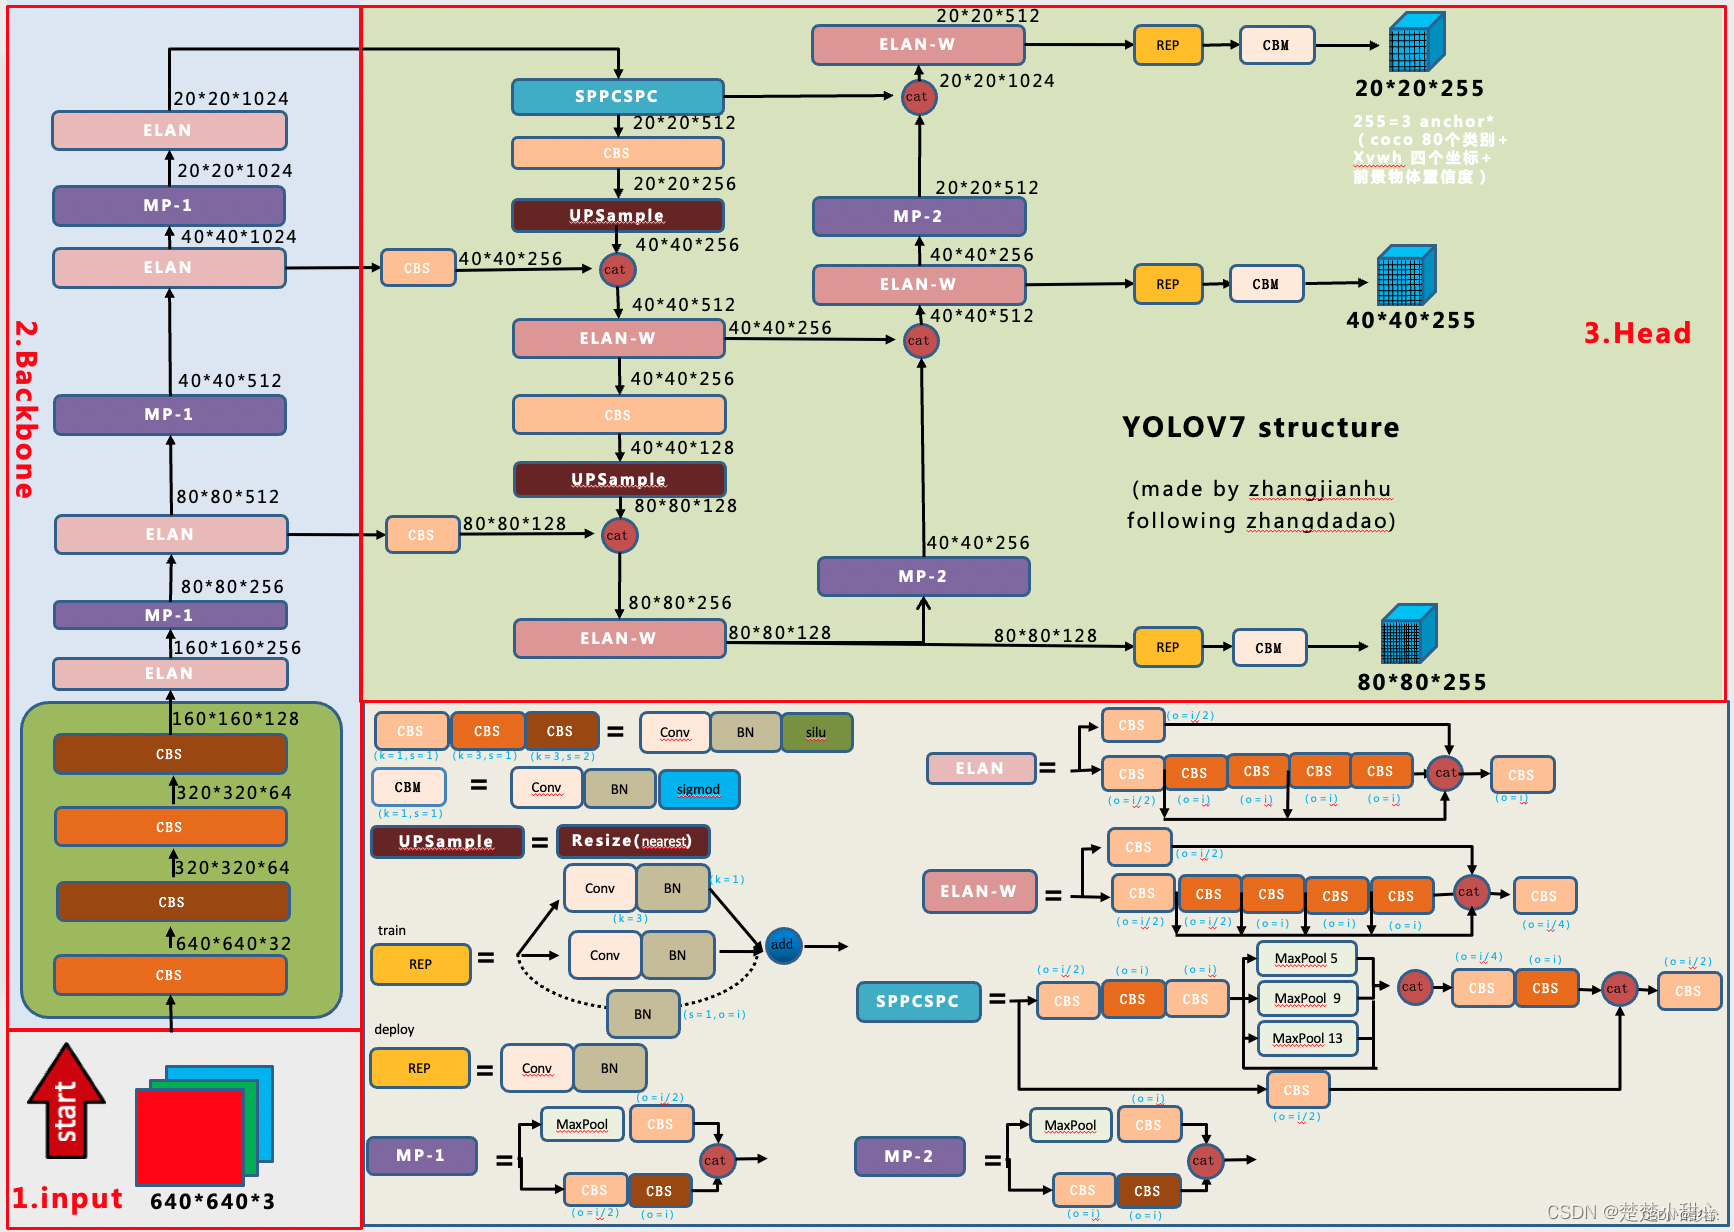
更详细的模型结构:
工作流程
YOLOv7 网络主要包含了 Input(输入)、Backbone(骨干网络)、Neck(颈部)、Head(头部)这四个部分。首先,图片经过输入部分数据增强等一系列操作进行预处理后,被送入主干网,主干网部分对处理后的图片提取特征;随后,提取到的特征经过 Neck 模块特征融合处理得到大、中、小三种尺寸的特
征;最终,融合后的特征被送入检测头,经过检测之后输出得到结果。
BackBone
YOLOv7 网络模型的主干网部分主要由卷积、E-ELAN 模块、MPConv 模块以及SPPCSPC 模 块 构 建 而 成 。其 中 ,E-ELAN(Extended-ELAN) 模块,在原始ELAN 的基础上,改变计算块的同时保持原ELAN 的过渡层构,利用 expand、shuffle、merge cardinality 的思想来实现在不破坏原有梯度路径的情况下增强网络学习的能力。SPPCSPC 模块,在一串卷积中加入并行的多次 MaxPool 操作,避免了由于图像处理操作所造成的图像失真等问题,同时解决了卷积神经网络提取到图片重复特征的难题。MPConv 模块中,MaxPool 操作将当前特征层的感受野进行扩张再与正常卷积处理后的特征信息进行融合,提高了网络的泛化性。
输入的图片首先会在主干网络里面进行特征提取,提取到的特征可以被称作特征层,是输入图片的特征集合。在主干部分,我们获取了三个特征层进行下一步网络的构建,这三个特征层我称它为有效特征层。
Neck:FPN+PAN结构
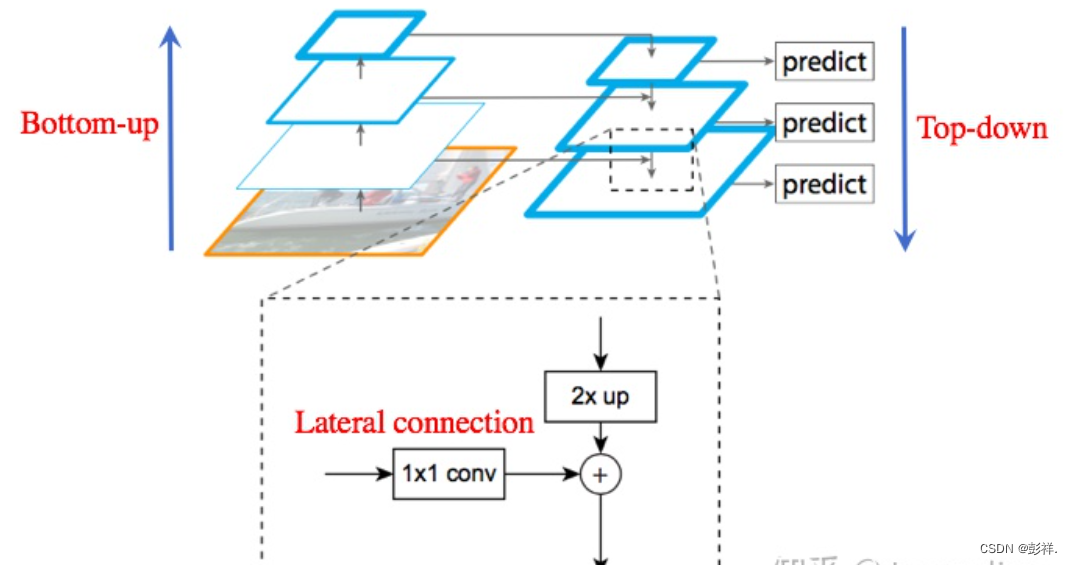
FPN 特征金字塔(Feature Pyramid Network)
PANet结构

FPN与PANet详解
在 Neck 模块,YOLOv7 与 YOLOv5 网络相同,也采用了传统的 PAFPN 结构。FPN是YoloV7的加强特征提取网络,在主干部分获得的三个有效特征层会在这一部分进行特征融合,特征融合的目的是结合不同尺度的特征信息。在FPN部分,已经获得的有效特征层被用于继续提取特征。在YoloV7里依然使用到了Panet的结构,我们不仅会对特征进行上采样实现特征融合,还会对特征再次进行下采样实现特征融合。
Head
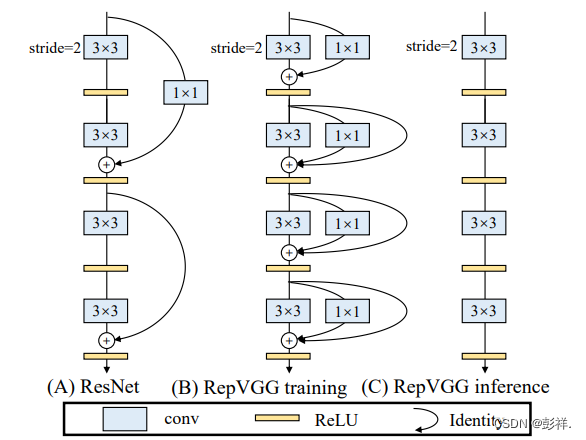
检测头部分,本文的基线 YOLOv7 选用了表示大、中、小三种目标尺寸的 IDetect 检测头,RepConv 模块在训练和推理时结构具有一定的区别。具体可以参考RepVGG中的构造,其引入了结构重参数化的思想
Yolo Head作为YoloV7的分类器与回归器,通过Backbone和FPN,可以获得三个加强过的有效特征层。每一个特征层都有宽、高和通道数,此时我们可以将特征图看作一个又一个特征点的集合,每个特征点上有三个先验框,每一个先验框都有通道数个特征。Yolo Head实际上所做的工作就是对特征点进行判断,判断特征点上的先验框是否有物体与其对应。与以前版本的Yolo一样,YoloV7所用的解耦头是一起的,也就是分类和回归在一个1X1卷积里实现。
BackBone(代码实现)
1.多分支堆叠模块(ELAN)
文中起名ELAN,博主觉得叫多分支堆叠模块更好,只是个人理解而已
其结构如下图所示:是不是型如其名
ELAN模块是一个高效的网络结构,它通过控制最短和最长的梯度路径,使网络能够学习到更多的特征,并且具有更强的鲁棒性。
ELAN有两条分支。
第一条分支是经过一个1x1的卷积做通道数的变化。
第二条分支就比较复杂了。它先首先经过一个1x1的卷积模块,做通道数的变化。然后再经过四个3x3的卷积模块,做特征提取。
如图所示,最后把四个特征叠加在一起得到最后的特征提取结果。
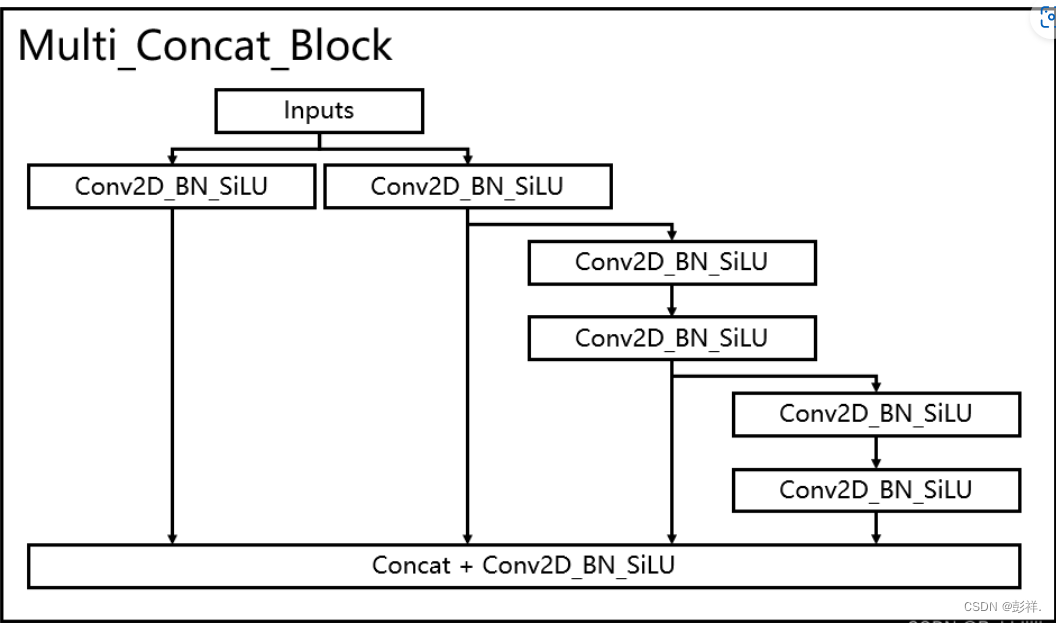
这里引入了残次结构的思想,经过多个卷积+批归一化+激活函数堆叠构成。
backbone.py
分支堆叠结合
class Multi_Concat_Block(nn.Module):
    def __init__(self, c1, c2, c3, n=4, e=1, ids=[0]):
        super(Multi_Concat_Block, self).__init__()
        c_ = int(c2 * e)
        self.ids = ids
        self.cv1 = Conv(c1, c_, 1, 1)
        self.cv2 = Conv(c1, c_, 1, 1)
        self.cv3 = nn.ModuleList(
            [Conv(c_ if i ==0 else c2, c2, 3, 1) for i in range(n)]
        )
        self.cv4 = Conv(c_ * 2 + c2 * (len(ids) - 2), c3, 1, 1)
    def forward(self, x):
        x_1 = self.cv1(x)
        x_2 = self.cv2(x)
        x_all = [x_1, x_2]
        for i in range(len(self.cv3)):
            x_2 = self.cv3[i](x_2)
            x_all.append(x_2)
        out = self.cv4(torch.cat([x_all[id] for id in self.ids], 1))
        return out
如此多的堆叠其实也对应了更密集的残差结构,残差网络的特点是容易优化,并且能够通过增加相当的深度来提高准确率。其内部的残差块使用了跳跃连接,缓解了在深度神经网络中增加深度带来的梯度消失问题。
卷积+批归一化+激活函数(CBS模块)
对于CBS模块,我们可以看从图中可以看出它是由一个Conv层,也就是卷积层,一个BN层,也就是Batch normalization层,还有一个Silu层,这是一个激活函数。
silu激活函数是swish激活函数的变体,两者的公式如下所示
silu(x)=x⋅sigmoid(x)
swish(x)=x⋅sigmoid(βx)
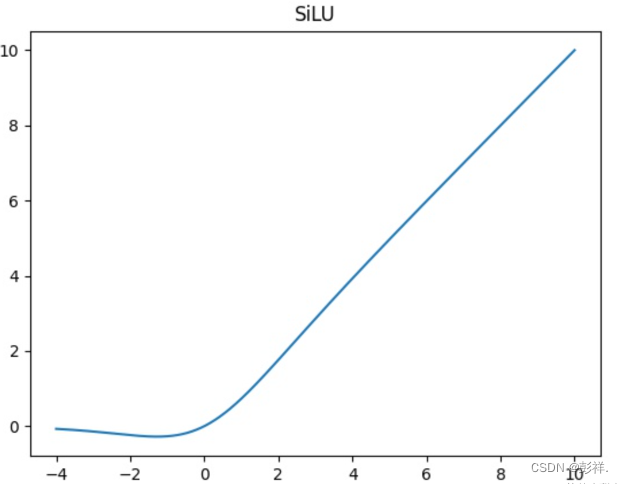

从架构图中我们可以看出,CBS模块这里有三种颜色,三种颜色代表它们的卷积核(k)和步长(s)不同。
首先最浅的颜色,也就是第一个CBS模块的颜色,它是一个1x1的卷积,stride(步长为1)。
其次稍浅的颜色,也就是第二个CBS模块的颜色,它是一个3x3的卷积,stride(步长为1)。
最后最深的颜色,也就是第三个CBS模块的颜色,它是一个3x3的卷积,stride(步长为2)。
1x1的卷积主要用来改变通道数。
3x3的卷积,步长为1,主要用来特征提取。
3x3的卷积,步长为2,主要用来下采样。
代码如下:
class Conv(nn.Module):
    def __init__(self, c1, c2, k=1, s=1, p=None, g=1, act=SiLU()):  # ch_in, ch_out, kernel, stride, padding, groups
        super(Conv, self).__init__()
        self.conv   = nn.Conv2d(c1, c2, k, s, autopad(k, p), groups=g, bias=False)
        self.bn     = nn.BatchNorm2d(c2, eps=0.001, momentum=0.03)
        self.act    = nn.LeakyReLU(0.1, inplace=True) if act is True else (act if isinstance(act, nn.Module) else nn.Identity())
    def forward(self, x):
        return self.act(self.bn(self.conv(x)))
    def fuseforward(self, x):
        return self.act(self.conv(x))

2.Transition_Block(完成下采样)
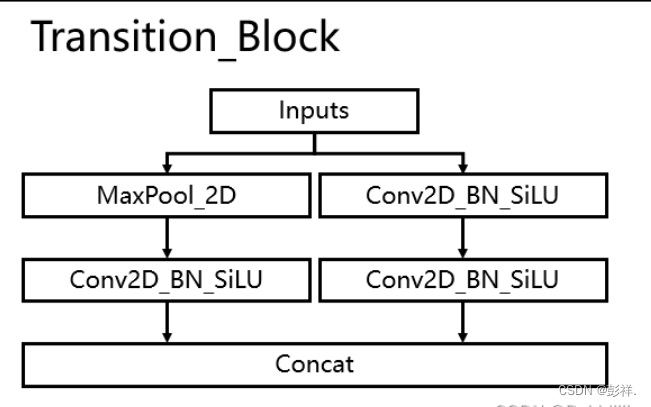
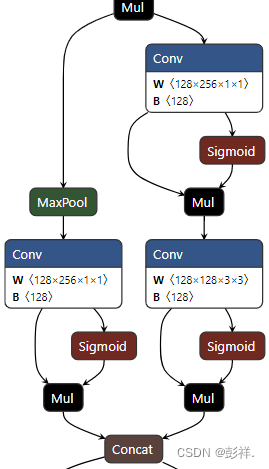
使用创新的过渡模块Transition_Block来进行下采样,在卷积神经网络中,常见的用于下采样的过渡模块是一个卷积核大小为3x3、步长为2x2的卷积或者一个步长为2x2的最大池化。在YoloV7中,作者将两种过渡模块进行了集合,一个过渡模块存在两个分支,如图所示。左分支是一个步长为2x2的最大池化+一个1x1卷积,右分支是一个1x1卷积+一个卷积核大小为3x3、步长为2x2的卷积,两个分支的结果在输出时会进行堆叠。
池化

MP模块有两个分支,作用是进行下采样。
第一条分支先经过一个maxpool,也就是最大池化。最大值化的作用就是下采样,然后再经过一个1x1的卷积进行通道数的改变。
第二条分支先经过一个1x1的卷积,做通道数的变化,然后再经过一个3x3卷积核、步长为2的卷积块,这个卷积块也是用来下采样的。
最后把第一个分支和第二分支的结果加在一起,得到了超级下采样的结果。
class MP(nn.Module):
    def __init__(self, k=2):
        super(MP, self).__init__()
        self.m = nn.MaxPool2d(kernel_size=k, stride=k)
    def forward(self, x):
        return self.m(x)
Transition结合
class Transition_Block(nn.Module):
    def __init__(self, c1, c2):
        super(Transition_Block, self).__init__()
        self.cv1 = Conv(c1, c2, 1, 1)
        self.cv2 = Conv(c1, c2, 1, 1)
        self.cv3 = Conv(c2, c2, 3, 2)
        self.mp  = MP()
    def forward(self, x):
        x_1 = self.mp(x)
        x_1 = self.cv1(x_1)
        x_2 = self.cv2(x)
        x_2 = self.cv3(x_2)
        return torch.cat([x_2, x_1], 1)
其他
激活函数
class SiLU(nn.Module):
    @staticmethod
    def forward(x):
        return x * torch.sigmoid(x)
主体代码
class Backbone(nn.Module):
    def __init__(self, transition_channels, block_channels, n, phi, pretrained=False):
        super().__init__()
        #-----------------------------------------------#
        #   输入图片是640, 640, 3
        #-----------------------------------------------#
        ids = {


            'l' : [-1, -3, -5, -6],
            'x' : [-1, -3, -5, -7, -8],
        }[phi]
        self.stem = nn.Sequential(
            Conv(3, transition_channels, 3, 1),
            Conv(transition_channels, transition_channels * 2, 3, 2),
            Conv(transition_channels * 2, transition_channels * 2, 3, 1),
        )
        self.dark2 = nn.Sequential(
            Conv(transition_channels * 2, transition_channels * 4, 3, 2),
            Multi_Concat_Block(transition_channels * 4, block_channels * 2, transition_channels * 8, n=n, ids=ids),
        )
        self.dark3 = nn.Sequential(
            Transition_Block(transition_channels * 8, transition_channels * 4),
            Multi_Concat_Block(transition_channels * 8, block_channels * 4, transition_channels * 16, n=n, ids=ids),
        )
        self.dark4 = nn.Sequential(
            Transition_Block(transition_channels * 16, transition_channels * 8),
            Multi_Concat_Block(transition_channels * 16, block_channels * 8, transition_channels * 32, n=n, ids=ids),
        )
        self.dark5 = nn.Sequential(
            Transition_Block(transition_channels * 32, transition_channels * 16),
            Multi_Concat_Block(transition_channels * 32, block_channels * 8, transition_channels * 32, n=n, ids=ids),
        )
        if pretrained:
            url = {


                "l" : 'https://github.com/bubbliiiing/yolov7-pytorch/releases/download/v1.0/yolov7_backbone_weights.pth',
                "x" : 'https://github.com/bubbliiiing/yolov7-pytorch/releases/download/v1.0/yolov7_x_backbone_weights.pth',
            }[phi]
            checkpoint = torch.hub.load_state_dict_from_url(url=url, map_location="cpu", model_dir="./model_data")
            self.load_state_dict(checkpoint, strict=False)
            print("Load weights from " + url.split('/')[-1])

    def forward(self, x):
        x = self.stem(x)
        x = self.dark2(x)
        #-----------------------------------------------#
        #   dark3的输出为80, 80, 256,是一个有效特征层
        #-----------------------------------------------#
        x = self.dark3(x)
        feat1 = x
        #-----------------------------------------------#
        #   dark4的输出为40, 40, 512,是一个有效特征层
        #-----------------------------------------------#
        x = self.dark4(x)
        feat2 = x
        #-----------------------------------------------#
        #   dark5的输出为20, 20, 1024,是一个有效特征层
        #-----------------------------------------------#
        x = self.dark5(x)
        feat3 = x
        return feat1, feat2, feat3
FPN强特征融合
在特征利用部分,YoloV7提取多特征层进行目标检测,一共提取三个特征层。
三个特征层位于主干部分的不同位置,分别位于中间层,中下层,底层,当输入为(640,640,3)的时候,三个特征层的shape分别为feat1=(80,80,512)、feat2=(40,40,1024)、feat3=(20,20,1024)
在获得三个有效特征层后,我们利用这三个有效特征层进行FPN层的构建,构建方式为(在本博文中,将SPPCSPC结构归于FPN中):
- 1.feature3=(20,20,1024)的特征层首先利用SPPCSPC进行特征提取,该结构可以提高YoloV7的感受野,获得P5。
- 2,对P5先进行1次1X1卷积调整通道,然后进行上采样UmSampling2d后与feature2=(40,40,1024)进行一次卷积后的特征层进行结合,然后使用Multi_Concat_Block进行特征提取获得P4,此时获得的特征层为(40,40,256)。
- 3.对P4先进行1次1X1卷积调整通道,然后进行上采样UmSampling2d后与feature1=(80,80,512)进行一次卷积后的特征层进行结合,然后使用Multi_Concat_Block进行特征提取获得P3_out,此时获得的特征层为(80,80,128)。
- 4.P3_out=(80,80,128)的特征层进行一次Transition_Block卷积进行下采样,下采样后与P4堆叠,然后使用Multi_Concat_Block进行特征提取P4_out,此时获得的特征层为(40,40,256)。
- 5.P4_out=(40,40,256)的特征层进行一次Transition_Block卷积进行下采样,下采样后与P5堆叠,然后使用Multi_Concat_Block进行特征提取P5_out,此时获得的特征层为(20,20,512)。
特征金字塔可以将不同shape的特征层进行特征融合,有利于提取出更好的特征。
yolo.py
SPPCSPC块

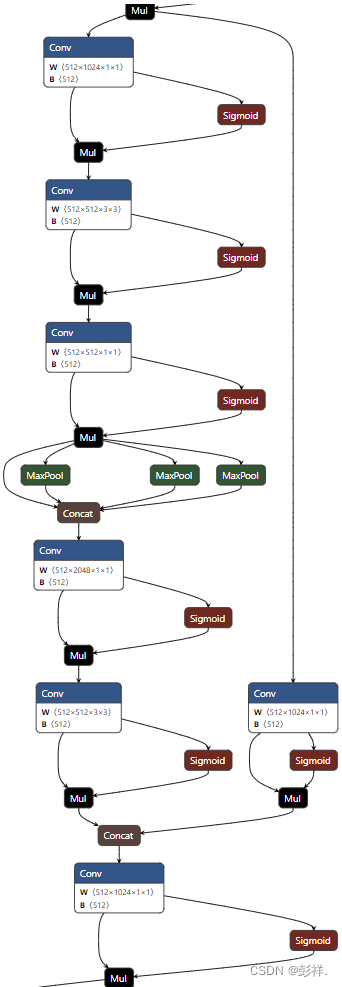
class SPPCSPC(nn.Module):
    # CSP https://github.com/WongKinYiu/CrossStagePartialNetworks
    def __init__(self, c1, c2, n=1, shortcut=False, g=1, e=0.5, k=(5, 9, 13)):
        super(SPPCSPC, self).__init__()
        c_ = int(2 * c2 * e)  # hidden channels
        self.cv1 = Conv(c1, c_, 1, 1)
        self.cv2 = Conv(c1, c_, 1, 1)
        self.cv3 = Conv(c_, c_, 3, 1)
        self.cv4 = Conv(c_, c_, 1, 1)
        self.m = nn.ModuleList([nn.MaxPool2d(kernel_size=x, stride=1, padding=x // 2) for x in k])
        self.cv5 = Conv(4 * c_, c_, 1, 1)
        self.cv6 = Conv(c_, c_, 3, 1)
        self.cv7 = Conv(2 * c_, c2, 1, 1)

    def forward(self, x):
        x1 = self.cv4(self.cv3(self.cv1(x)))
        y1 = self.cv6(self.cv5(torch.cat([x1] + [m(x1) for m in self.m], 1)))
        y2 = self.cv2(x)
        return self.cv7(torch.cat((y1, y2), dim=1))
Neck块
class YoloBody(nn.Module):
    def __init__(self, anchors_mask, num_classes, phi, pretrained=False):
        super(YoloBody, self).__init__()
        #-----------------------------------------------#
        #   定义了不同yolov7版本的参数
        #-----------------------------------------------#
        transition_channels = {

    'l' : 32, 'x' : 40}[phi]
        block_channels      = 32
        panet_channels      = {

    'l' : 32, 'x' : 64}[phi]
        e       = {

    'l' : 2, 'x' : 1}[phi]
        n       = {

    'l' : 4, 'x' : 6}[phi]
        ids     = {

    'l' : [-1, -2, -3, -4, -5, -6], 'x' : [-1, -3, -5, -7, -8]}[phi]
        conv    = {

    'l' : RepConv, 'x' : Conv}[phi]
        #-----------------------------------------------#
        #   输入图片是640, 640, 3
        #-----------------------------------------------#

        #---------------------------------------------------#
        #   生成主干模型
        #   获得三个有效特征层,他们的shape分别是:
        #   80, 80, 512
        #   40, 40, 1024
        #   20, 20, 1024
        #---------------------------------------------------#
        self.backbone   = Backbone(transition_channels, block_channels, n, phi, pretrained=pretrained)

        self.upsample   = nn.Upsample(scale_factor=2, mode="nearest")

        self.sppcspc                = SPPCSPC(transition_channels * 32, transition_channels * 16)
        self.conv_for_P5            = Conv(transition_channels * 16, transition_channels * 8)
        self.conv_for_feat2         = Conv(transition_channels * 32, transition_channels * 8)
        self.conv3_for_upsample1    = Multi_Concat_Block(transition_channels * 16, panet_channels * 4, transition_channels * 8, e=e, n=n, ids=ids)

        self.conv_for_P4            = Conv(transition_channels * 8, transition_channels * 4)
        self.conv_for_feat1         = Conv(transition_channels * 16, transition_channels * 4)
        self.conv3_for_upsample2    = Multi_Concat_Block(transition_channels * 8, panet_channels * 2, transition_channels * 4, e=e, n=n, ids=ids)

        self.down_sample1           = Transition_Block(transition_channels * 4, transition_channels * 4)
        self.conv3_for_downsample1  = Multi_Concat_Block(transition_channels * 16, panet_channels * 4, transition_channels * 8, e=e, n=n, ids=ids)

        self.down_sample2           = Transition_Block(transition_channels * 8, transition_channels * 8)
        self.conv3_for_downsample2  = Multi_Concat_Block(transition_channels * 32, panet_channels * 8, transition_channels * 16, e=e, n=n, ids=ids)

        self.rep_conv_1 = conv(transition_channels * 4, transition_channels * 8, 3, 1)
        self.rep_conv_2 = conv(transition_channels * 8, transition_channels * 16, 3, 1)
        self.rep_conv_3 = conv(transition_channels * 16, transition_channels * 32, 3, 1)

        self.yolo_head_P3 = nn.Conv2d(transition_channels * 8, len(anchors_mask[2]) * (5 + num_classes), 1)
        self.yolo_head_P4 = nn.Conv2d(transition_channels * 16, len(anchors_mask[1]) * (5 + num_classes), 1)
        self.yolo_head_P5 = nn.Conv2d(transition_channels * 32, len(anchors_mask[0]) * (5 + num_classes), 1)

    def fuse(self):
        print('Fusing layers... ')
        for m in self.modules():
            if isinstance(m, RepConv):
                m.fuse_repvgg_block()
            elif type(m) is Conv and hasattr(m, 'bn'):
                m.conv = fuse_conv_and_bn(m.conv, m.bn)
                delattr(m, 'bn')
                m.forward = m.fuseforward
        return self

    def forward(self, x):
        #  backbone
        feat1, feat2, feat3 = self.backbone.forward(x)

        P5          = self.sppcspc(feat3)
        P5_conv     = self.conv_for_P5(P5)
        P5_upsample = self.upsample(P5_conv)
        P4          = torch.cat([self.conv_for_feat2(feat2), P5_upsample], 1)
        P4          = self.conv3_for_upsample1(P4)

        P4_conv     = self.conv_for_P4(P4)
        P4_upsample = self.upsample(P4_conv)
        P3          = torch.cat([self.conv_for_feat1(feat1), P4_upsample], 1)
        P3          = self.conv3_for_upsample2(P3)

        P3_downsample = self.down_sample1(P3)
        P4 = torch.cat([P3_downsample, P4], 1)
        P4 = self.conv3_for_downsample1(P4)

        P4_downsample = self.down_sample2(P4)
        P5 = torch.cat([P4_downsample, P5], 1)
        P5 = self.conv3_for_downsample2(P5)

        P3 = self.rep_conv_1(P3)
        P4 = self.rep_conv_2(P4)
        P5 = self.rep_conv_3(P5)
        #---------------------------------------------------#
        #   第三个特征层
        #   y3=(batch_size, 75, 80, 80)
        #---------------------------------------------------#
        out2 = self.yolo_head_P3(P3)
        #---------------------------------------------------#
        #   第二个特征层
        #   y2=(batch_size, 75, 40, 40)
        #---------------------------------------------------#
        out1 = self.yolo_head_P4(P4)
        #---------------------------------------------------#
        #   第一个特征层
        #   y1=(batch_size, 75, 20, 20)
        #---------------------------------------------------#
        out0 = self.yolo_head_P5(P5)

        return [out0, out1, out2]
利用Yolo Head获得预测结果
利用FPN特征金字塔,我们可以获得三个加强特征,这三个加强特征的shape分别为(20,20,512)、(40,40,256)、(80,80,128),然后我们利用这三个shape的特征层传入Yolo Head获得预测结果。
RepConv
与之前Yolo系列不同的是,YoloV7在Yolo Head前使用了一个RepConv的结构,这个RepConv的思想取自于RepVGG,基本思想就是在训练的时候引入特殊的残差结构辅助训练,这个残差结构是经过独特设计的,在实际预测的时候,可以将复杂的残差结构等效于一个普通的3x3卷积,这个时候网络的复杂度就下降了,但网络的预测性能却没有下降。
RepVGG学习记录
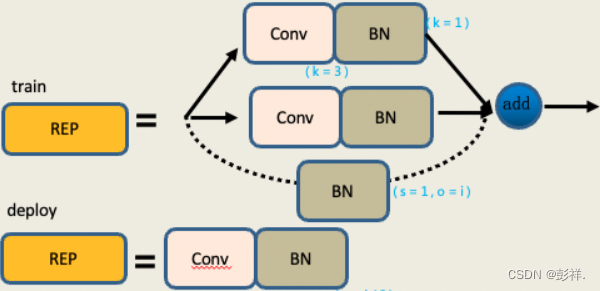
REP模块分为两个,一个是train,也就是训练,一个deploy,也就是推理。
训练模块,它有三个分支。
最上面的分支是3x3的卷积,用于特征提取。
中间的分支是1x1的卷积,用于平滑特征。
最后分支是一个Identity,不做卷积操作,直接移过来。
最后把它们相加在一起。
推理模块,包含一个3x3的卷积,stride(步长为1)。是由训练模块重参数化转换而来。
在训练模块中,因为第一层是一个3x3的卷积,第二层是一个1x1的卷积,最后层是一个Identity。
在模型从参数化的时候,需要把1x1的卷积啊,转换成3x3的卷积,把Identity也转换成3x3的卷积,然后进行一个矩阵的一个加法,也就是一个矩阵融合过程。
然后最后将它的权重进行相加,就得到了一个3x3的卷积,也就是说,这三个分支就融合成了一条线,里面只有一个3x3的卷积。
它们的权重是三个分支的叠加结果,矩阵,也是三个分支的叠加结果。
class RepConv(nn.Module):
    # Represented convolution
    # https://arxiv.org/abs/2101.03697
    def __init__(self, c1, c2, k=3, s=1, p=None, g=1, act=SiLU(), deploy=False):
        super(RepConv, self).__init__()
        self.deploy         = deploy
        self.groups         = g
        self.in_channels    = c1
        self.out_channels   = c2

        assert k == 3
        assert autopad(k, p) == 1

        padding_11  = autopad(k, p) - k // 2
        self.act    = nn.LeakyReLU(0.1, inplace=True) if act is True else (act if isinstance(act, nn.Module) else nn.Identity())

        if deploy:
            self.rbr_reparam    = nn.Conv2d(c1, c2, k, s, autopad(k, p), groups=g, bias=True)
        else:
            self.rbr_identity   = (nn.BatchNorm2d(num_features=c1, eps=0.001, momentum=0.03) if c2 == c1 and s == 1 else None)
            self.rbr_dense      = nn.Sequential(
                nn.Conv2d(c1, c2, k, s, autopad(k, p), groups=g, bias=False),
                nn.BatchNorm2d(num_features=c2, eps=0.001, momentum=0.03),
            )
            self.rbr_1x1        = nn.Sequential(
                nn.Conv2d( c1, c2, 1, s, padding_11, groups=g, bias=False),
                nn.BatchNorm2d(num_features=c2, eps=0.001, momentum=0.03),
            )

    def forward(self, inputs):
        if hasattr(self, "rbr_reparam"):
            return self.act(self.rbr_reparam(inputs))
        if self.rbr_identity is None:
            id_out = 0
        else:
            id_out = self.rbr_identity(inputs)
        return self.act(self.rbr_dense(inputs) + self.rbr_1x1(inputs) + id_out)

    def get_equivalent_kernel_bias(self):
        kernel3x3, bias3x3  = self._fuse_bn_tensor(self.rbr_dense)
        kernel1x1, bias1x1  = self._fuse_bn_tensor(self.rbr_1x1)
        kernelid, biasid    = self._fuse_bn_tensor(self.rbr_identity)
        return (
            kernel3x3 + self._pad_1x1_to_3x3_tensor(kernel1x1) + kernelid,
            bias3x3 + bias1x1 + biasid,
        )

    def _pad_1x1_to_3x3_tensor(self, kernel1x1):
        if kernel1x1 is None:
            return 0
        else:
            return nn.functional.pad(kernel1x1, [1, 1, 1, 1])

    def _fuse_bn_tensor(self, branch):
        if branch is None:
            return 0, 0
        if isinstance(branch, nn.Sequential):
            kernel      = branch[0].weight
            running_mean = branch[1].running_mean
            running_var = branch[1].running_var
            gamma       = branch[1].weight
            beta        = branch[1].bias
            eps         = branch[1].eps
        else:
            assert isinstance(branch, nn.BatchNorm2d)
            if not hasattr(self, "id_tensor"):
                input_dim = self.in_channels // self.groups
                kernel_value = np.zeros(
                    (self.in_channels, input_dim, 3, 3), dtype=np.float32
                )
                for i in range(self.in_channels):
                    kernel_value[i, i % input_dim, 1, 1] = 1
                self.id_tensor = torch.from_numpy(kernel_value).to(branch.weight.device)
            kernel      = self.id_tensor
            running_mean = branch.running_mean
            running_var = branch.running_var
            gamma       = branch.weight
            beta        = branch.bias
            eps         = branch.eps
        std = (running_var + eps).sqrt()
        t   = (gamma / std).reshape(-1, 1, 1, 1)
        return kernel * t, beta - running_mean * gamma / std

    def repvgg_convert(self):
        kernel, bias = self.get_equivalent_kernel_bias()
        return (
            kernel.detach().cpu().numpy(),
            bias.detach().cpu().numpy(),
        )

    def fuse_conv_bn(self, conv, bn):
        std     = (bn.running_var + bn.eps).sqrt()
        bias    = bn.bias - bn.running_mean * bn.weight / std

        t       = (bn.weight / std).reshape(-1, 1, 1, 1)
        weights = conv.weight * t

        bn      = nn.Identity()
        conv    = nn.Conv2d(in_channels = conv.in_channels,
                              out_channels = conv.out_channels,
                              kernel_size = conv.kernel_size,
                              stride=conv.stride,
                              padding = conv.padding,
                              dilation = conv.dilation,
                              groups = conv.groups,
                              bias = True,
                              padding_mode = conv.padding_mode)

        conv.weight = torch.nn.Parameter(weights)
        conv.bias   = torch.nn.Parameter(bias)
        return conv

    def fuse_repvgg_block(self):
        if self.deploy:
            return
        print(f"RepConv.fuse_repvgg_block")
        self.rbr_dense  = self.fuse_conv_bn(self.rbr_dense[0], self.rbr_dense[1])

        self.rbr_1x1    = self.fuse_conv_bn(self.rbr_1x1[0], self.rbr_1x1[1])
        rbr_1x1_bias    = self.rbr_1x1.bias
        weight_1x1_expanded = torch.nn.functional.pad(self.rbr_1x1.weight, [1, 1, 1, 1])

        # Fuse self.rbr_identity
        if (isinstance(self.rbr_identity, nn.BatchNorm2d) or isinstance(self.rbr_identity, nn.modules.batchnorm.SyncBatchNorm)):
            identity_conv_1x1 = nn.Conv2d(
                    in_channels=self.in_channels,
                    out_channels=self.out_channels,
                    kernel_size=1,
                    stride=1,
                    padding=0,
                    groups=self.groups,
                    bias=False)
            identity_conv_1x1.weight.data = identity_conv_1x1.weight.data.to(self.rbr_1x1.weight.data.device)
            identity_conv_1x1.weight.data = identity_conv_1x1.weight.data.squeeze().squeeze()
            identity_conv_1x1.weight.data.fill_(0.0)
            identity_conv_1x1.weight.data.fill_diagonal_(1.0)
            identity_conv_1x1.weight.data = identity_conv_1x1.weight.data.unsqueeze(2).unsqueeze(3)

            identity_conv_1x1           = self.fuse_conv_bn(identity_conv_1x1, self.rbr_identity)
            bias_identity_expanded      = identity_conv_1x1.bias
            weight_identity_expanded    = torch.nn.functional.pad(identity_conv_1x1.weight, [1, 1, 1, 1])
        else:
            bias_identity_expanded      = torch.nn.Parameter( torch.zeros_like(rbr_1x1_bias) )
            weight_identity_expanded    = torch.nn.Parameter( torch.zeros_like(weight_1x1_expanded) )

        self.rbr_dense.weight   = torch.nn.Parameter(self.rbr_dense.weight + weight_1x1_expanded + weight_identity_expanded)
        self.rbr_dense.bias     = torch.nn.Parameter(self.rbr_dense.bias + rbr_1x1_bias + bias_identity_expanded)

        self.rbr_reparam    = self.rbr_dense
        self.deploy         = True

        if self.rbr_identity is not None:
            del self.rbr_identity
            self.rbr_identity = None

        if self.rbr_1x1 is not None:
            del self.rbr_1x1
            self.rbr_1x1 = None

        if self.rbr_dense is not None:
            del self.rbr_dense
            self.rbr_dense = None
而对于每一个特征层,我们可以获得利用一个卷积调整通道数,最终的通道数和需要区分的种类个数相关,在YoloV7里,每一个特征层上每一个特征点存在3个先验框。
预测头结构
如果使用的是voc训练集,类则为20种,最后的维度应该为75 = 3x25,三个特征层的shape为(20,20,75),(40,40,75),(80,80,75)。
最后的75可以拆分成3个25,对应3个先验框的25个参数,25可以拆分成4+1+20。
前4个参数用于判断每一个特征点的回归参数,回归参数调整后可以获得预测框;
第5个参数用于判断每一个特征点是否包含物体;
最后20个参数用于判断每一个特征点所包含的物体种类。
如果使用的是coco训练集,类则为80种,最后的维度应该为255 = 3x85,三个特征层的shape为(20,20,255),(40,40,255),(80,80,255)
最后的255可以拆分成3个85,对应3个先验框的85个参数,85可以拆分成4+1+80。
前4个参数用于判断每一个特征点的回归参数,回归参数调整后可以获得预测框;
第5个参数用于判断每一个特征点是否包含物体;
最后80个参数用于判断每一个特征点所包含的物体种类。
预测结果的解码
1、获得预测框与得分
由预测头部分我们可以获得三个特征层的预测结果,以COCO为例,shape分别为(N,20,20,255),(N,40,40,255),(N,80,80,255)的数据。
但是这个预测结果并不对应着最终的预测框在图片上的位置,还需要解码才可以完成。在YoloV5里,每一个特征层上每一个特征点存在3个先验框。
每个特征层最后的255可以拆分成3个85,对应3个先验框的85个参数,我们先将其reshape一下,其结果为(N,20,20,3,85),(N,40.40,3,85),(N,80,80,3,85)。
其中的85可以拆分成4+1+80。
前4个参数用于判断每一个特征点的回归参数,回归参数调整后可以获得预测框;
第5个参数用于判断每一个特征点是否包含物体;
最后80个参数用于判断每一个特征点所包含的物体种类。
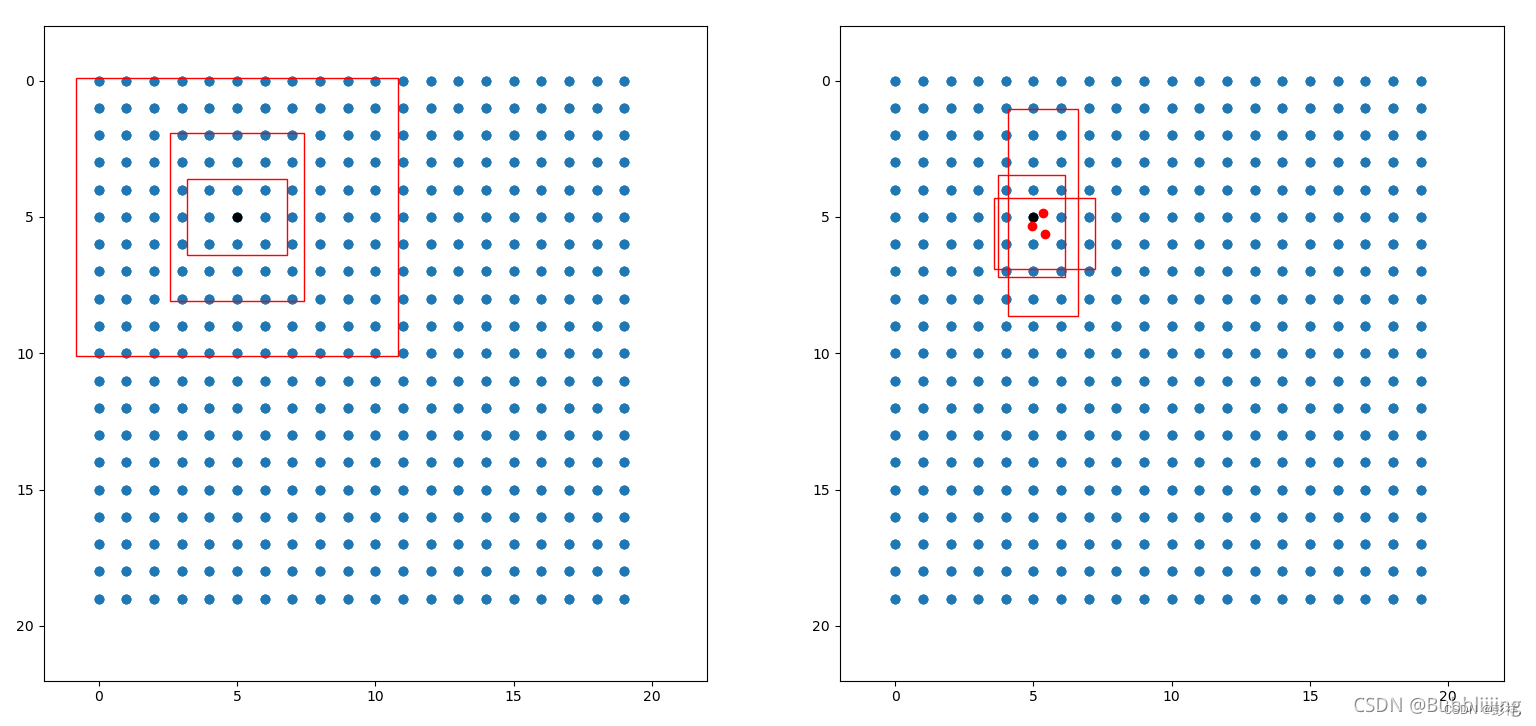
以(N,20,20,3,85)这个特征层为例,该特征层相当于将图像划分成20x20个特征点,如果某个特征点落在物体的对应框内,就用于预测该物体。
如图所示,蓝色的点为20x20的特征点,此时我们对左图黑色点的三个先验框进行解码操作演示:
- 1、进行中心预测点的计算,利用Regression预测结果前两个序号的内容对特征点的三个先验框中心坐标进行偏移,偏移后是右图红色的三个点;
- 2、进行预测框宽高的计算,利用Regression预测结果后两个序号的内容求指数后获得预测框的宽高;
- 3、此时获得的预测框就可以绘制在图片上了。
utils_bbox.py
预测框解码
class DecodeBox():
    def __init__(self, anchors, num_classes, input_shape, anchors_mask = [[6,7,8], [3,4,5], [0,1,2]]):
        super(DecodeBox, self).__init__()
        self.anchors        = anchors
        self.num_classes    = num_classes
        self.bbox_attrs     = 5 + num_classes
        self.input_shape    = input_shape
        #-----------------------------------------------------------#
        #   13x13的特征层对应的anchor是[142, 110],[192, 243],[459, 401]
        #   26x26的特征层对应的anchor是[36, 75],[76, 55],[72, 146]
        #   52x52的特征层对应的anchor是[12, 16],[19, 36],[40, 28]
        #-----------------------------------------------------------#
        self.anchors_mask   = anchors_mask

    def decode_box(self, inputs):
        outputs = []
        for i, input in enumerate(inputs):
            #-----------------------------------------------#
            #   输入的input一共有三个,他们的shape分别是
            #   batch_size = 1
            #   batch_size, 3 * (4 + 1 + 80), 20, 20
            #   batch_size, 255, 40, 40
            #   batch_size, 255, 80, 80
            #-----------------------------------------------#
            batch_size      = input.size(0)
            input_height    = input.size(2)
            input_width     = input.size(3)

            #-----------------------------------------------#
            #   输入为640x640时
            #   stride_h = stride_w = 32、16、8
            #-----------------------------------------------#
            stride_h = self.input_shape[0] / input_height
            stride_w = self.input_shape[1] / input_width
            #-------------------------------------------------#
            #   此时获得的scaled_anchors大小是相对于特征层的
            #-------------------------------------------------#
            scaled_anchors = [(anchor_width / stride_w, anchor_height / stride_h) for anchor_width, anchor_height in self.anchors[self.anchors_mask[i]]]

            #-----------------------------------------------#
            #   输入的input一共有三个,他们的shape分别是
            #   batch_size, 3, 20, 20, 85
            #   batch_size, 3, 40, 40, 85
            #   batch_size, 3, 80, 80, 85
            #-----------------------------------------------#
            prediction = input.view(batch_size, len(self.anchors_mask[i]),
                                    self.bbox_attrs, input_height, input_width).permute(0, 1, 3, 4, 2).contiguous()

            #-----------------------------------------------#
            #   先验框的中心位置的调整参数
            #-----------------------------------------------#
            x = torch.sigmoid(prediction[..., 0])
            y = torch.sigmoid(prediction[..., 1])
            #-----------------------------------------------#
            #   先验框的宽高调整参数
            #-----------------------------------------------#
            w = torch.sigmoid(prediction[..., 2])
            h = torch.sigmoid(prediction[..., 3])
            #-----------------------------------------------#
            #   获得置信度,是否有物体
            #-----------------------------------------------#
            conf        = torch.sigmoid(prediction[..., 4])
            #-----------------------------------------------#
            #   种类置信度
            #-----------------------------------------------#
            pred_cls    = torch.sigmoid(prediction[..., 5:])

            FloatTensor = torch.cuda.FloatTensor if x.is_cuda else torch.FloatTensor
            LongTensor  = torch.cuda.LongTensor if x.is_cuda else torch.LongTensor

            #----------------------------------------------------------#
            #   生成网格,先验框中心,网格左上角
            #   batch_size,3,20,20
            #----------------------------------------------------------#
            grid_x = torch.linspace(0, input_width - 1, input_width).repeat(input_height, 1).repeat(
                batch_size * len(self.anchors_mask[i]), 1, 1).view(x.shape).type(FloatTensor)
            grid_y = torch.linspace(0, input_height - 1, input_height).repeat(input_width, 1).t().repeat(
                batch_size * len(self.anchors_mask[i]), 1, 1).view(y.shape).type(FloatTensor)

            #----------------------------------------------------------#
            #   按照网格格式生成先验框的宽高
            #   batch_size,3,20,20
            #----------------------------------------------------------#
            anchor_w = FloatTensor(scaled_anchors).index_select(1, LongTensor([0]))
            anchor_h = FloatTensor(scaled_anchors).index_select(1, LongTensor([1]))
            anchor_w = anchor_w.repeat(batch_size, 1).repeat(1, 1, input_height * input_width).view(w.shape)
            anchor_h = anchor_h.repeat(batch_size, 1).repeat(1, 1, input_height * input_width).view(h.shape)

            #----------------------------------------------------------#
            #   利用预测结果对先验框进行调整
            #   首先调整先验框的中心,从先验框中心向右下角偏移
            #   再调整先验框的宽高。
            #   x 0 ~ 1 => 0 ~ 2 => -0.5, 1.5 => 负责一定范围的目标的预测
            #   y 0 ~ 1 => 0 ~ 2 => -0.5, 1.5 => 负责一定范围的目标的预测
            #   w 0 ~ 1 => 0 ~ 2 => 0 ~ 4 => 先验框的宽高调节范围为0~4倍
            #   h 0 ~ 1 => 0 ~ 2 => 0 ~ 4 => 先验框的宽高调节范围为0~4倍
            #----------------------------------------------------------#
            pred_boxes          = FloatTensor(prediction[..., :4].shape)
            pred_boxes[..., 0]  = x.data * 2. - 0.5 + grid_x
            pred_boxes[..., 1]  = y.data * 2. - 0.5 + grid_y
            pred_boxes[..., 2]  = (w.data * 2) ** 2 * anchor_w
            pred_boxes[..., 3]  = (h.data * 2) ** 2 * anchor_h

            #----------------------------------------------------------#
            #   将输出结果归一化成小数的形式
            #----------------------------------------------------------#
            _scale = torch.Tensor([input_width, input_height, input_width, input_height]).type(FloatTensor)
            output = torch.cat((pred_boxes.view(batch_size, -1, 4) / _scale,
                                conf.view(batch_size, -1, 1), pred_cls.view(batch_size, -1, self.num_classes)), -1)
            outputs.append(output.data)
        return outputs
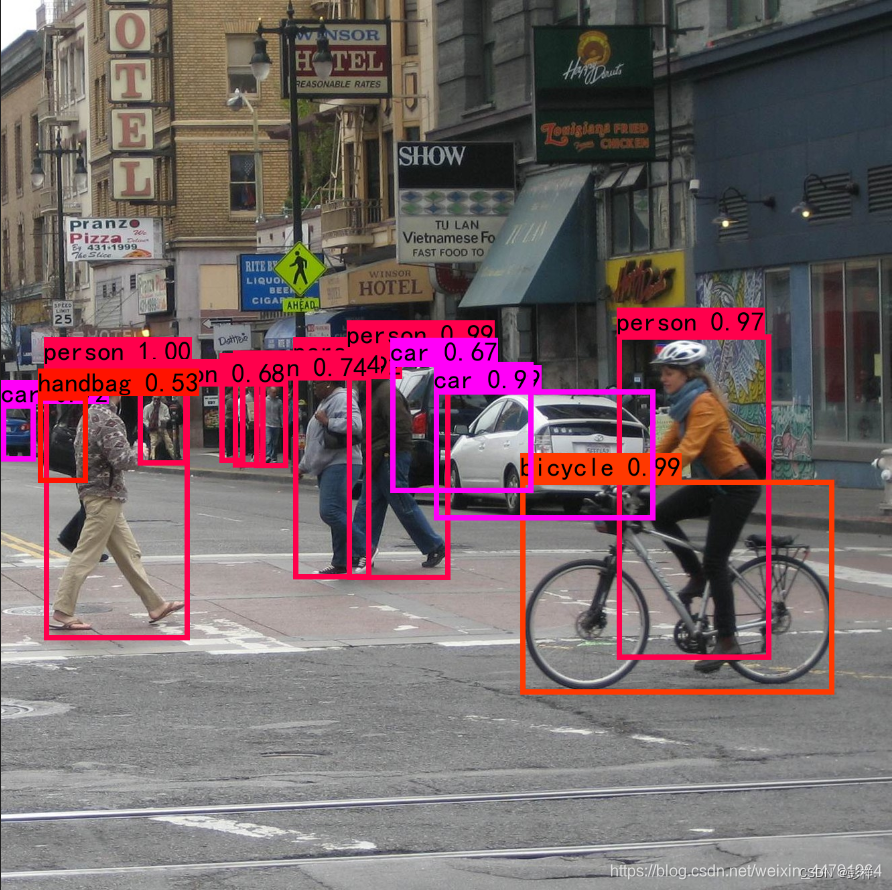
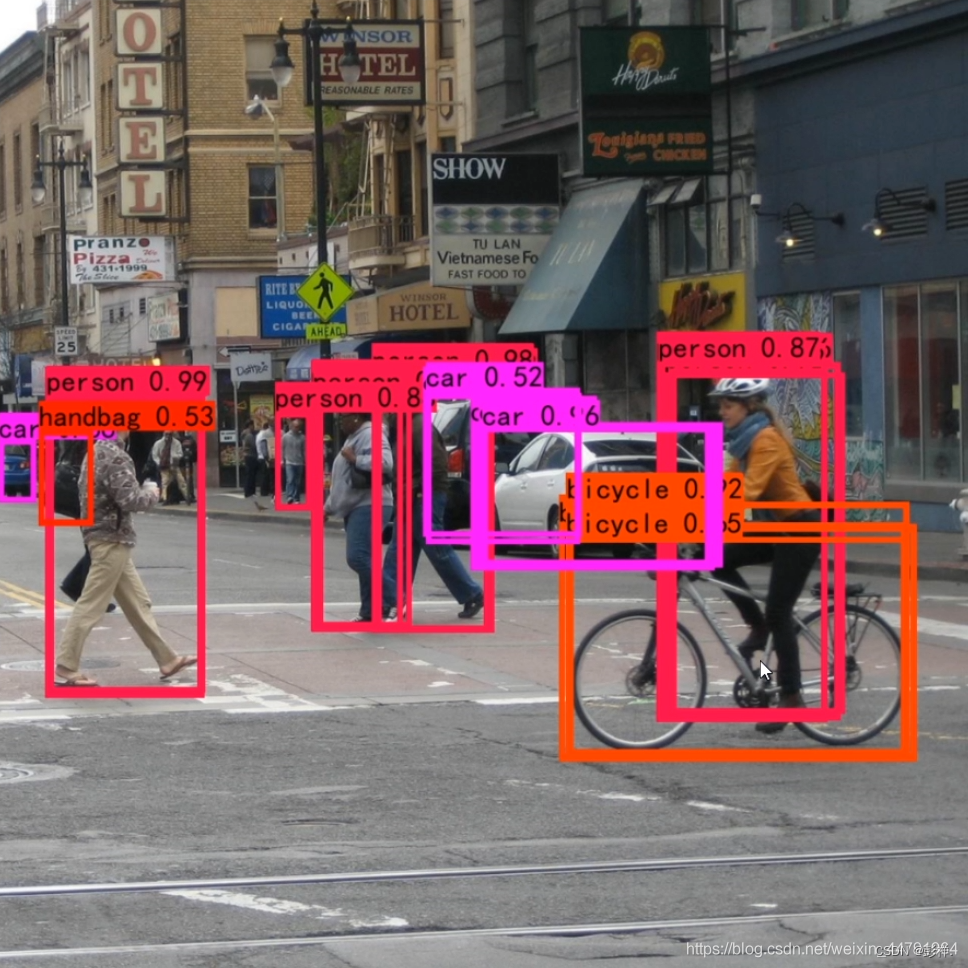
2、得分筛选与非极大抑制
得到最终的预测结果后还要进行得分排序与非极大抑制筛选。
得分筛选就是筛选出得分满足confidence置信度的预测框。
非极大抑制就是筛选出一定区域内属于同一种类得分最大的框。
得分筛选与非极大抑制的过程可以概括如下:
- 1、找出该图片中得分大于门限函数的框。在进行重合框筛选前就进行得分的筛选可以大幅度减少框的数量。
- 2、对种类进行循环,非极大抑制的作用是筛选出一定区域内属于同一种类得分最大的框,对种类进行循环可以帮助我们对每一个类分别进行非极大抑制。
- 3、根据得分对该种类进行从大到小排序。
- 4、每次取出得分最大的框,计算其与其它所有预测框的重合程度,重合程度过大的则剔除。
得分筛选与非极大抑制后的结果就可以用于绘制预测框了。
下图是经过非极大抑制的。
未经抑制的
非极大抑制代码实现
def non_max_suppression(self, prediction, num_classes, input_shape, image_shape, letterbox_image, conf_thres=0.5, nms_thres=0.4):
    #----------------------------------------------------------#
    #   将预测结果的格式转换成左上角右下角的格式。
    #   prediction  [batch_size, num_anchors, 85]
    #----------------------------------------------------------#
    box_corner          = prediction.new(prediction.shape)
    box_corner[:, :, 0] = prediction[:, :, 0] - prediction[:, :, 2] / 2
    box_corner[:, :, 1] = prediction[:, :, 1] - prediction[:, :, 3] / 2
    box_corner[:, :, 2] = prediction[:, :, 0] + prediction[:, :, 2] / 2
    box_corner[:, :, 3] = prediction[:, :, 1] + prediction[:, :, 3] / 2
    prediction[:, :, :4] = box_corner[:, :, :4]

    output = [None for _ in range(len(prediction))]
    for i, image_pred in enumerate(prediction):
        #----------------------------------------------------------#
        #   对种类预测部分取max。
        #   class_conf  [num_anchors, 1]    种类置信度
        #   class_pred  [num_anchors, 1]    种类
        #----------------------------------------------------------#
        class_conf, class_pred = torch.max(image_pred[:, 5:5 + num_classes], 1, keepdim=True)

        #----------------------------------------------------------#
        #   利用置信度进行第一轮筛选
        #----------------------------------------------------------#
        conf_mask = (image_pred[:, 4] * class_conf[:, 0] >= conf_thres).squeeze()

        #----------------------------------------------------------#
        #   根据置信度进行预测结果的筛选
        #----------------------------------------------------------#
        image_pred = image_pred[conf_mask]
        class_conf = class_conf[conf_mask]
        class_pred = class_pred[conf_mask]
        if not image_pred.size(0):
            continue
        #-------------------------------------------------------------------------#
        #   detections  [num_anchors, 7]
        #   7的内容为:x1, y1, x2, y2, obj_conf, class_conf, class_pred
        #-------------------------------------------------------------------------#
        detections = torch.cat((image_pred[:, :5], class_conf.float(), class_pred.float()), 1)

        #------------------------------------------#
        #   获得预测结果中包含的所有种类
        #------------------------------------------#
        unique_labels = detections[:, -1].cpu().unique()

        if prediction.is_cuda:
            unique_labels = unique_labels.cuda()
            detections = detections.cuda()

        for c in unique_labels:
            #------------------------------------------#
            #   获得某一类得分筛选后全部的预测结果
            #------------------------------------------#
            detections_class = detections[detections[:, -1] == c]

            #------------------------------------------#
            #   使用官方自带的非极大抑制会速度更快一些!
            #   筛选出一定区域内,属于同一种类得分最大的框
            #------------------------------------------#
            keep = nms(
                detections_class[:, :4],
                detections_class[:, 4] * detections_class[:, 5],
                nms_thres
            )
            max_detections = detections_class[keep]

            # # 按照存在物体的置信度排序
            # _, conf_sort_index = torch.sort(detections_class[:, 4]*detections_class[:, 5], descending=True)
            # detections_class = detections_class[conf_sort_index]
            # # 进行非极大抑制
            # max_detections = []
            # while detections_class.size(0):
            #     # 取出这一类置信度最高的,一步一步往下判断,判断重合程度是否大于nms_thres,如果是则去除掉
            #     max_detections.append(detections_class[0].unsqueeze(0))
            #     if len(detections_class) == 1:
            #         break
            #     ious = bbox_iou(max_detections[-1], detections_class[1:])
            #     detections_class = detections_class[1:][ious < nms_thres]
            # # 堆叠
            # max_detections = torch.cat(max_detections).data

            # Add max detections to outputs
            output[i] = max_detections if output[i] is None else torch.cat((output[i], max_detections))

        if output[i] is not None:
            output[i]           = output[i].cpu().numpy()
            box_xy, box_wh      = (output[i][:, 0:2] + output[i][:, 2:4])/2, output[i][:, 2:4] - output[i][:, 0:2]
            output[i][:, :4]    = self.yolo_correct_boxes(box_xy, box_wh, input_shape, image_shape, letterbox_image)
    return output
数据集训练
关于源码调试过程,可以参考博主这篇文章
YOLOV7调试记录
整体结构
