FBMNoise噪声算法
FBM是Fractal Brownian Motion的简写,中文翻译为分形布朗运动。
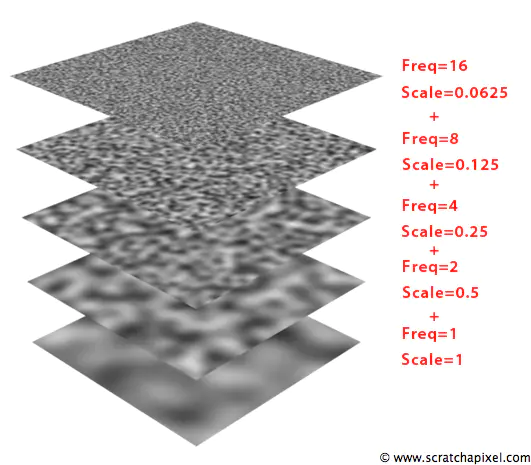
FBMNoise是将其他噪声算法用不同的参数输入叠加起来得到的噪声。其可以平滑噪声里的高频区域(即突变区域),使整个噪声变化更平滑。
下图展示了FBM的基本形式,简单来说就是将多个不同频率的噪声按照不同的振幅进行混合。
代码实现
代码非常简单,这里以perlinNoise柏林噪声为例。
只要在perlinNoise的原始文件中加入这样一个函数即可
        public static float fbmNoise(float x, float y,int layer)
        {


            float value =0;
            float frequency = 1;
            float amplitude = 0.5f;
            for(int i = 0; i < layer; i++)
            {


                value += noise(x*frequency,y*frequency) * amplitude;
                frequency *= 2;
                amplitude *= 0.5f;
            }

            return value;
        }
然后在生成时调用该函数
        void Start()
        {


            Texture2D texture = new Texture2D(512, 512);

            this.GetComponent<Renderer>().material.mainTexture = texture;

            for (int y = 0; y < texture.height; y++)
            {


                for (int x = 0; x < texture.width; x++)
                {


                    float grayscale = PerlinNoise.fbmNoise(x / (float) cellSize, y / (float) cellSize,8);
                    texture.SetPixel(x, y, new Color(grayscale, grayscale, grayscale));
                }
            }

            texture.Apply();
            saveTexture2D(texture, "tex");
        }
其他的噪声可以去我之前几期博客看。
需要注意的是层数越高,需要的计算量就越大,如果层数过高,unity可能会卡住。这种fbm噪声,一般是采用预先计算的贴图而不是实时生成的。
效果演示
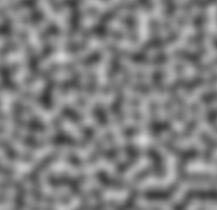
原始的perlinNoise
使用了fbm的perlinNoise
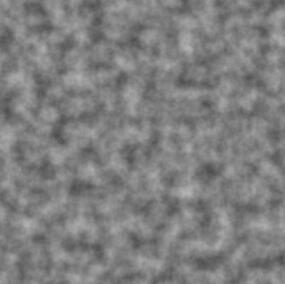
肉眼可见的平滑效果。
再试一下worlyNoise,原始效果

使用fbm之后

更多的效果大家可以自己尝试
地形生成
我们同样用perlinNoise的fbm形式来生成一个地形试试
using Algorithm;
using UnityEngine;

public class CreateTerrain : MonoBehaviour
{


    void Start()
    {


        for (int z = 0; z < 128; z++)
        {


            for (int x = 0; x < 128; x++)
            {


                float grayscale = ValueNoise.noise(x / (float) 16, z / (float) 16);
                var cube=GameObject.CreatePrimitive(PrimitiveType.Cube);
                int cubeY = (int) (grayscale * 10);
                cube.transform.position = new Vector3(x, cubeY, z);
                cube.GetComponent<Renderer>().material.color=new Color(0,grayscale,0);
            }
        }
    }
}
把这个脚本挂载到任意场景中的物体上,就可以得到如下效果。效果相当的好

完整代码
using UnityEngine;

namespace Algorithm
{


    public static class PerlinNoise
    {


        static float interpolate(float a0, float a1, float w)
        {


            //线性插值
            //return (a1 - a0) * w + a0;

            //hermite插值
            return Mathf.SmoothStep(a0, a1, w);
        }


        static Vector2 randomVector2(Vector2 p)
        {


            float random = Mathf.Sin(666 + p.x * 5678 + p.y * 1234) * 4321;
            return new Vector2(Mathf.Sin(random), Mathf.Cos(random));
        }


        static float dotGridGradient(Vector2 p1, Vector2 p2)
        {


            Vector2 gradient = randomVector2(p1);
            Vector2 offset = p2 - p1;
            return Vector2.Dot(gradient, offset) / 2 + 0.5f;
        }

        public static float fbmNoise(float x, float y,int layer)
        {


            float value =0;
            float frequency = 1;
            float amplitude = 0.5f;
            for(int i = 0; i < layer; i++)
            {


                value += noise(x*frequency,y*frequency) * amplitude;
                frequency *= 2;
                amplitude *= 0.5f;
            }

            return value;
        }

        public static float noise(float x, float y)
        {


            //声明二维坐标
            Vector2 pos = new Vector2(x, y);
            //声明该点所处的'格子'的四个顶点坐标
            Vector2 rightUp = new Vector2((int) x + 1, (int) y + 1);
            Vector2 rightDown = new Vector2((int) x + 1, (int) y);
            Vector2 leftUp = new Vector2((int) x, (int) y + 1);
            Vector2 leftDown = new Vector2((int) x, (int) y);

            //计算x上的插值
            float v1 = dotGridGradient(leftDown, pos);
            float v2 = dotGridGradient(rightDown, pos);
            float interpolation1 = interpolate(v1, v2, x - (int) x);

            //计算y上的插值
            float v3 = dotGridGradient(leftUp, pos);
            float v4 = dotGridGradient(rightUp, pos);
            float interpolation2 = interpolate(v3, v4, x - (int) x);

            float value = interpolate(interpolation1, interpolation2, y - (int) y);
            return value;
        }
    }
}
生成图片的类
using System.IO;
using UnityEditor;
using UnityEngine;

namespace Algorithm
{


    public class CreatePerlinNoiseTex : MonoBehaviour
    {


        [Range(1,512)]
        public int cellSize=16;

        void Start()
        {


            Texture2D texture = new Texture2D(512, 512);

            this.GetComponent<Renderer>().material.mainTexture = texture;

            for (int y = 0; y < texture.height; y++)
            {


                for (int x = 0; x < texture.width; x++)
                {


                    float grayscale = WorlyNoise.fbmNoise(x / (float) cellSize, y / (float) cellSize,8);
                    texture.SetPixel(x, y, new Color(grayscale, grayscale, grayscale));
                }
            }

            texture.Apply();
            saveTexture2D(texture, "tex");
        }


        void saveTexture2D(Texture2D texture, string fileName)
        {


            var bytes = texture.EncodeToPNG();
            var file = File.Create(Application.dataPath + "/01PerlinNoise/" + fileName + ".png");
            var binary = new BinaryWriter(file);
            binary.Write(bytes);
            file.Close();
            AssetDatabase.Refresh();
        }
    }
}
另外代码也传到github仓库里了,大家也可以关注一下哦~
我的github