Perlin噪声算法
perlin噪声算法是比较有名的一种噪声算法,现在很多噪声算法几乎都是对原始perlin噪声进行改进的结果,而perlin噪声在游戏开发中也有许多用处,比如地形的生成,纹理材质的生成等等…
当然。。unity内置了perlin噪声的实现,即mathf.perlinnoise函数。这个函数是一个c++写的本地函数。但是不能知其然不知其所以然,本文就讲解了perlin噪声具体的实现过程。
perlin噪声的算法过程如下,我们以2D perlin噪声为例。
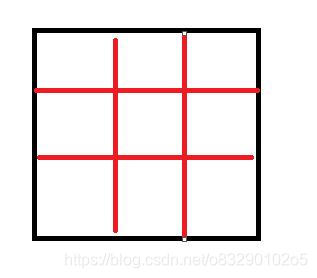
首先需要创建一个2D’网格’,‘网格’由’格子’构成,这里的’格子’并不是对应单个像素的,而是一个’格子’里包含有许多个像素。
(如图所示的一个格子,一个格子由9个像素组成,而’网格’由无数个这种’格子’组成,一个格子由多少像素组成对最后的效果有很大影响)
对每一个像素,我们需要计算它的灰度值,计算过程如下。
1.对每个’格子’的四个顶点,分别关联一个随机的单位向量(也可以不预先计算而是在用到时用一个函数得到,但是这个函数必须对每个种子返回确定的’随机值’)
2.判断该像素属于哪一个’格子’
3.计算该像素到四个顶点的偏移向量,不用单位化
4.对每个顶点,依次用到该顶点的偏移向量点积之前关联在该顶点上的随机向量,对每个顶点得到一个值
5.进行正方形插值,获得该像素的灰度值
如果用数学的语言描述,其实就是在格子的四个顶点关联一个随机的梯度,对于每个格子里的像素,计算该像素到四个顶点的向量,然后使用这个向量点积对应顶点的关联梯度(学过高数的朋友应该听出来了,其实就是算四个顶点上的方向导数)然后进行正方形插值
听起来可能有些莫名其妙的,看一下代码可能就清楚了,代码还是比较简短的。
代码实现
我们要写的函数形式是这样的,即给定一个浮点坐标值,返回一个灰度值。
当然像素坐标是没有浮点值的,这里需要用到我们用到的’格子’概念,如果一个格子包含四个像素,在传入像素坐标值的时候就要除以4。
public static float perlin(float x, float y)
    {


    }
接下来声明5个点,分明是坐标点,以及该坐标所属的格子的四个顶点。具体的计算通过向下取整来进行。
		//声明二维坐标
        Vector2 pos = new Vector2(x, y);
        //声明该点所处的'格子'的四个顶点坐标
        Vector2 rightUp = new Vector2((int) x + 1, (int) y + 1);
        Vector2 rightDown = new Vector2((int) x + 1, (int) y);
        Vector2 leftUp = new Vector2((int) x, (int) y + 1);
        Vector2 leftDown = new Vector2((int) x, (int) y);
接下来就是计算格子顶点对应的值的函数,我们这里传入两个坐标值。
首先用坐标值对应一个随机的单位向量。
接着向量相减计算出偏移向量。
最后进行点积,点积的值[-1,1]还需要映射到灰度值取值[0,1]中
    static float dotGridGradient(Vector2 p1, Vector2 p2)
    {


        Vector2 gradient = randomVector2(p1);
        Vector2 offset = p2 - p1;
        return Vector2.Dot(gradient, offset) / 2 + 0.5f;
    }
我们这里每个顶点对应的随机向量不是预先计算的,如果预先计算的话也很方便,用random类就可以了,生成之后记得保存起来。
但是直接用一种映射的方式生成随机向量的话,就可以省掉这个存储空间了。
我们使用的传入一个坐标返回一个随机单位向量的函数如下。
看不懂这个函数的话很正常。。因为并不能证明这个函数确实具有统计分布上的随机性,这里的系数也是随便取值的。
但是这个函数确实可以作为简易的随机函数来使用,而且这种基于sin函数的简易随机数函数在很多地方都有使用,只要想象一下这个函数的图像就明白了。
而且可以保证对相同的参数返回值是相同的。
    static Vector2 randomVector2(Vector2 p)
    {


        float random = Mathf.Sin(666+p.x*5678 + p.y*1234 )*4321;
        return new Vector2(Mathf.Sin(random), Mathf.Cos(random));
    }
对每个像素计算出四个值之后就可以进行正方形插值了,正方形插值就是线性插值的二维版本。首先对上面两个顶点进行插值,接着对下面两个顶点进行插值。最后对这两个值再进行插值。
  //计算x上的插值
        float v1 = dotGridGradient(leftDown, pos);
        float v2 = dotGridGradient(rightDown, pos);
        float interpolation1 = interpolate(v1, v2, x - (int) x);

        //计算y上的插值
        float v3 = dotGridGradient(leftUp, pos);
        float v4 = dotGridGradient(rightUp, pos);
        float interpolation2 = interpolate(v3, v4, x - (int) x);

        float value = interpolate(interpolation1, interpolation2, y - (int) y);
        return value;
线性插值函数
  static float interpolate(float a0, float a1, float w)
    {


        //线性插值
        return (a1 - a0) * w + a0;
    }
这样perlin噪声的代码就写完了。
接着我们再创建一个c#脚本基于这个函数来生成一张纹理。
创建一个Texture2D然后在一个二重循环里用SetPixel函数来设置对应像素点的颜色,因为我们要创建一个灰度图,所以rgb分量全都一样。
需要注意我们传入参数的时候对坐标值除以了64,这就代表一个’格子’里有64个像素。
最后还写了一个函数把创建好的纹理保存成图片。
把这个类挂载在一个物体上就可以生成一张perlin噪声图并贴在物体上,同时保存该图在Assets文件夹下。

 public class CreatePerlinNoiseTex : MonoBehaviour
    {


        void Start()
        {


            Texture2D texture = new Texture2D(1024, 1024);

            this.GetComponent<Renderer>().material.mainTexture = texture;

            for (int y = 0; y < texture.height; y++)
            {


                for (int x = 0; x < texture.width; x++)
                {


                    float grayscale = PerlinNoise.perlin(x / 64f, y / 64f);
                    texture.SetPixel(x, y, new Color(grayscale,grayscale,grayscale));
                }
            }

            texture.Apply();
            saveTexture2D(texture, "tex");
        }


        void saveTexture2D(Texture2D texture, string fileName)
        {


            var bytes = texture.EncodeToPNG();
            var file = File.Create(Application.dataPath + "/" + fileName + ".png");
            var binary = new BinaryWriter(file);
            binary.Write(bytes);
            file.Close();
            UnityEditor.AssetDatabase.Refresh();
        }
    }
效果演示
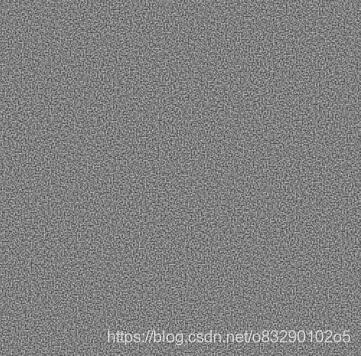
效果如下

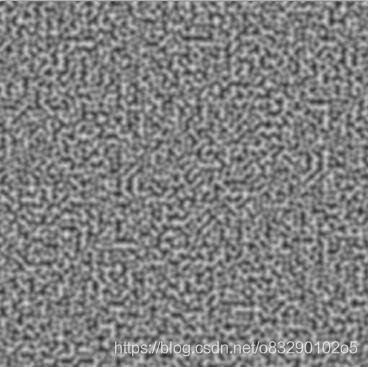
生成的图片如下。
可以看到,仔细看的话隐隐约约能注意到格子的边界。这主要是因为线性插值导致的,在格子的边界处亮度的变化率会产生突变,导致了这种效果。
我们这里更改线性插值代码为hermite曲线插值,hermite曲线插值保证在线段端点的导数为0,也就是保证了一阶参数连续性,因此在边界处的过渡会更平滑。(注:我们这里不手动实现hermite曲线插值,而是使用SmoothStep函数,该函数在内部就是使用了hermite曲线插值)
如果想知道hermite曲线插值的实现细节可以看我这篇博客
hermite曲线的绘制
    static float interpolate(float a0, float a1, float w)
    {


        //线性插值
        //return (a1 - a0) * w + a0;

        //hermite插值
        return Mathf.SmoothStep(a0, a1, w);
    }
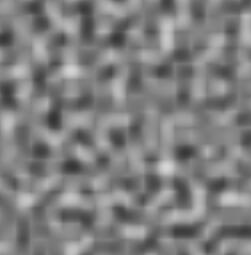
更改插值方法后输出图片如下。几乎意识不到格子的存在了。
(注意避免一个格子里只有一个像素和所有像素都在一个格子里的情况,这种情况下几乎看不出效果,另外一个格子里含有的像素大小最好是2的幂次,否则在边缘处的插值会有一些问题,计算上也会变慢)
一个格子16个像素
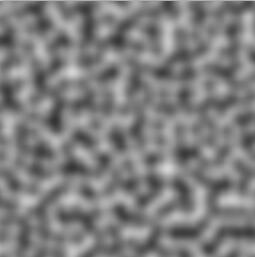
一个格子4个像素
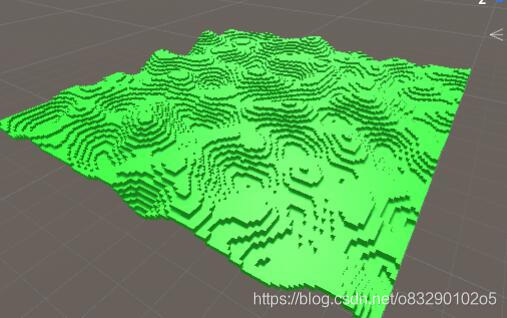
地形生成
我们这里稍微演示一下噪声图的作用,用噪声图来生成一个简单的地形。一般来说地形生成需要直接用Mesh类来生成顶点,但是为了简单起见我们就用许多cube来合成一个地形,这种地形也是类似Minecraft里的地形生成。
再写一个简单的类来调用perlin噪声函数就可以了,只是我们这里需要把perlin噪声的返回值映射到cube的坐标。
using Algorithm;
using UnityEngine;

public class CreateTerrain : MonoBehaviour
{


    void Start()
    {


        for (int z = 0; z < 128; z++)
        {


            for (int x = 0; x < 128; x++)
            {


                float grayscale = PerlinNoise.noise(x / (float) 16, z / (float) 16);
                var cube=GameObject.CreatePrimitive(PrimitiveType.Cube);
                int cubeY = (int) (grayscale * 20);
                cube.transform.position = new Vector3(x, cubeY, z);
                cube.GetComponent<Renderer>().material.color=Color.green;
            }
        }
    }
}
把这个脚本挂载到任意场景中的物体上,就可以得到如下效果。是不是能让人想到minecraft里的地形呢~
其实minecraft也是使用这种地形生成的算法,当然肯定比这里复杂的多,当然核心还是用到的是各种噪声算法。
完整代码
using UnityEngine;

public static class PerlinNoise
{


    static float interpolate(float a0, float a1, float w)
    {


        //线性插值
        //return (a1 - a0) * w + a0;

        //hermite插值
        return Mathf.SmoothStep(a0, a1, w);
    }


    static Vector2 randomVector2(Vector2 p)
    {


        float random = Mathf.Sin(666+p.x*5678 + p.y*1234 )*4321;
        return new Vector2(Mathf.Sin(random), Mathf.Cos(random));
    }


    static float dotGridGradient(Vector2 p1, Vector2 p2)
    {


        Vector2 gradient = randomVector2(p1);
        Vector2 offset = p2 - p1;
        return Vector2.Dot(gradient, offset) / 2 + 0.5f;
    }


    public static float perlin(float x, float y)
    {


        //声明二维坐标
        Vector2 pos = new Vector2(x, y);
        //声明该点所处的'格子'的四个顶点坐标
        Vector2 rightUp = new Vector2((int) x + 1, (int) y + 1);
        Vector2 rightDown = new Vector2((int) x + 1, (int) y);
        Vector2 leftUp = new Vector2((int) x, (int) y + 1);
        Vector2 leftDown = new Vector2((int) x, (int) y);

        //计算x上的插值
        float v1 = dotGridGradient(leftDown, pos);
        float v2 = dotGridGradient(rightDown, pos);
        float interpolation1 = interpolate(v1, v2, x - (int) x);

        //计算y上的插值
        float v3 = dotGridGradient(leftUp, pos);
        float v4 = dotGridGradient(rightUp, pos);
        float interpolation2 = interpolate(v3, v4, x - (int) x);

        float value = interpolate(interpolation1, interpolation2, y - (int) y);
        return value;
    }
}
生成图片的类
using System.IO;
using UnityEngine;

namespace _01PerlinNoise
{


    public class CreatePerlinNoiseTex : MonoBehaviour
    {


        void Start()
        {


            Texture2D texture = new Texture2D(1024, 1024);

            this.GetComponent<Renderer>().material.mainTexture = texture;

            for (int y = 0; y < texture.height; y++)
            {


                for (int x = 0; x < texture.width; x++)
                {


                    float grayscale = PerlinNoise.perlin(x /16f, y / 16f);
                    texture.SetPixel(x, y, new Color(grayscale,grayscale,grayscale));
                }
            }

            texture.Apply();
            saveTexture2D(texture, "tex");
        }


        void saveTexture2D(Texture2D texture, string fileName)
        {


            var bytes = texture.EncodeToPNG();
            var file = File.Create(Application.dataPath + "/" + fileName + ".png");
            var binary = new BinaryWriter(file);
            binary.Write(bytes);
            file.Close();
            UnityEditor.AssetDatabase.Refresh();
        }
    }
}
另外代码也传到github仓库里了,大家也可以关注一下哦~
我的github