最近工程做图像处理和网格处理,顺便来记几篇博客。
二值化处理
在图像处理上,一般的图像(彩图)携带信息过多,用于计算处理方面就不适合,需要将图像进行灰度化->二值化。
1.灰度化
图像编码分为RGB、YUV两种常用的编码方式,一般我们使用的是RGB编码,但是涉及到网络传输等对数据压缩有较高要求的领域,YUV则是主流,因为YUV在损失一定数据量的前提下依旧保证了较高的画质。
YUV具体压缩方式就是:
彩色图像记录的格式,常见的有RGB、YUV、CMYK等。彩色电视最早的构想是使用RGB三原色来同时传输。这种设计方式是原来黑白带宽的3倍,在当时并不是很好的设计。RGB诉求于人眼对色彩的感应,YUV则着重于视觉对于亮度的敏感程度,Y代表的是亮度,UV代表的是彩度(因此黑白电影可省略UV,相近于RGB),分别用Cr和Cb来表示,因此YUV的记录通常以Y:UV的格式呈现。
由于人眼对彩度不明感,UV彩度分量则使用了降采样(二分之一)的方式处理,则U分量(V分量)是Y分量的四分之一数据量,也就是从RGB的12x降低到了YUV(I420)的6x数据量。
百度yuv
铺垫了这么多,主要是因为我们需要将图片的RGB转成YUV(只需要Y),也就是将亮度(灰度)提取出来了,下面就是RGB和YUV转换的计算公式:
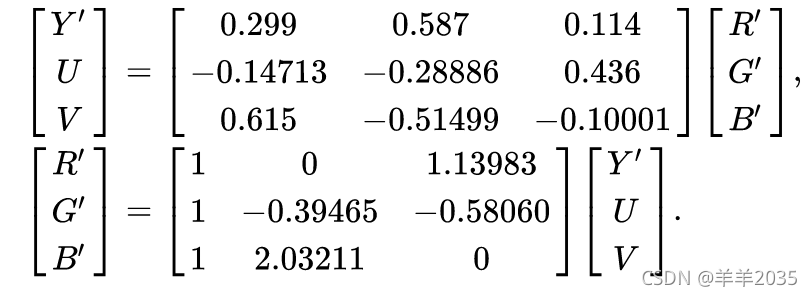 wiki yuv
接下来我们处理彩图到灰度图的转换:
#pragma kernel CSMain

RWTexture2D<float4> Source;
RWTexture2D<float4> Result;

float4 grayPixel(float4 rgba)
{


    float gray = 0.299*rgba.x+0.587*rgba.y+0.114*rgba.z;
    float4 px = float4(gray,gray,gray,1);
    return px;
}

[numthreads(8,8,1)]
void CSMain (uint3 id : SV_DispatchThreadID)
{


    Result[id.xy] = grayPixel(Source[id.xy]);
}
c#调用:
using System.Collections;
using System.Collections.Generic;
using UnityEngine;

public class TestBinarization : MonoBehaviour
{


    public Texture2D sourceTex;
    public ComputeShader grayCS;

    private int texWidth;
    private int texHeight;

    public RenderTexture sourceRT;
    public RenderTexture grayRT;

    void Start()
    {


        texWidth = sourceTex.width;
        texHeight = sourceTex.height;

        GetSourceRT();
        GetGrayRT();
    }

    public void GetSourceRT()
    {


        sourceRT = new RenderTexture(texWidth, texHeight, 0, RenderTextureFormat.ARGB32);
        sourceRT.enableRandomWrite = true;
        sourceRT.Create();
        Graphics.Blit(sourceTex, sourceRT);
    }

    public void GetGrayRT()
    {


        grayRT = new RenderTexture(texWidth, texHeight, 0, RenderTextureFormat.ARGB32);
        grayRT.enableRandomWrite = true;
        grayRT.Create();
        int kl = grayCS.FindKernel("CSMain");
        grayCS.SetTexture(kl, "Source", sourceRT);
        grayCS.SetTexture(kl, "Result", grayRT);
        grayCS.Dispatch(kl, texWidth / 8, texHeight / 8, 1);
    }
}
效果如下:
原图:
灰度图:

接下来灰度图进行二值化:
#pragma kernel CSMain

RWTexture2D<float4> Source;
RWTexture2D<float4> Result;

float4 binaryPixel(float4 rgba)
{


    float r = rgba.x;
    float4 px;
    if(r<0.7)
    {


        px = float4(0,0,0,1);
    }
    else
    {


        px = float4(1,1,1,1);
    }
    return px;
}

[numthreads(8,8,1)]
void CSMain (uint3 id : SV_DispatchThreadID)
{


    Result[id.xy] = binaryPixel(Source[id.xy]);
}
效果如下:
但是我是通过自己目测调整0.7这个threshold达到的效果,并不是自动化处理的二值化的threshold,那么我们怎么才能自动处理这个threshold呢?
这里有三种常用算法:平均值法、OTSU法、Kittler法。
平均值法:
用灰度图所有像素灰度平均值作为threshold,如下:
    public float GetAvgThreshold(RenderTexture rt)
    {


        int width = rt.width;
        int height = rt.height;
        RenderTexture.active = rt;
        Texture2D tex = new Texture2D(width, height);
        tex.ReadPixels(new Rect(0, 0, width, height), 0, 0);
        tex.Apply();
        RenderTexture.active = null;
        float threshold = 0f;
        Color[] cols = tex.GetPixels();
        for (int y = 0; y < height; y++)
        {


            for (int x = 0; x < width; x++)
            {


                threshold += cols[y * width + x].r;
            }
        }
        threshold /= (width * height);
#if UNITY_EDITOR
        Debug.LogFormat("GetAvgThreshold threshold = {0}", threshold);
#endif
        return threshold;
    }
    public void GetBinaryRT()
    {


        binaryRT = new RenderTexture(texWidth, texHeight, 0, RenderTextureFormat.ARGB32);
        binaryRT.enableRandomWrite = true;
        binaryRT.Create();
        int kl = grayCS.FindKernel("CSMain");
        float thre = BinarizationFactory.Instance.GetAvgThreshold(grayRT);
        binaryCS.SetFloat("threshold", thre);
        binaryCS.SetTexture(kl, "Source", grayRT);
        binaryCS.SetTexture(kl, "Result", binaryRT);
        binaryCS.Dispatch(kl, texWidth / 8, texHeight / 8, 1);
    }
效果如下:

可以看得出来,效果不怎么好。
OTSU法:
OTSU法也叫大津法(百度大津法),原理是假设threshold灰度值将灰度图分为前景区域(黑)和背景区域(白),求出前景和背景的最大类间方差,根据步长(0f/255f-255f/255f)进行迭代,求出threshold值,公式如下:
类间方差 = 前景像素占比比例 x (前景平均灰度值 - 全图平均灰度值) ^ 2 + 背景像素占比比例 x (背景平均灰度值 - 全图平均灰度值) ^ 2
下面是计算公式:
1.threshold阈值(t)
2.前景(黑)像素占比比例(r1)
3.前景(白)平均灰度(g1)
4.全图平均灰度(g)
5.背景像素占比比例(r2)
6.背景平均灰度(g2)
7.类间方差(v)
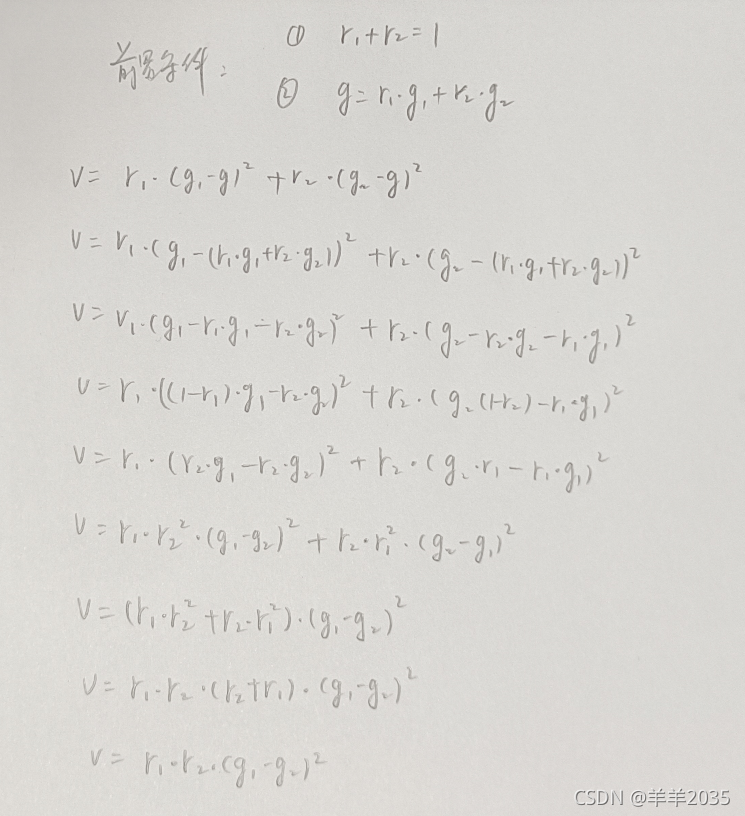
得到的结果就是v = r1r2(g1-g2)^ 2,只要根据迭代得到最大的v即可求的迭代值threshold。
接下来写代码:
    public float GetOTSUThreshold(RenderTexture rt)
    {


        int width = rt.width;
        int height = rt.height;
        int pxlen = width * height;
        RenderTexture.active = rt;
        Texture2D tex = new Texture2D(width, height);
        tex.ReadPixels(new Rect(0, 0, width, height), 0, 0);
        tex.Apply();
        RenderTexture.active = null;
        Color[] cols = tex.GetPixels();
        //以0.02f迭代
        float iter = 0.02f;
        //v = r1*r2*(g1-g2)^2
        float threshold = 0;
        float maxv = float.MinValue;
        for (float t = 0; t < 1f; t += iter)
        {


            float r1 = 0, r2 = 0, g1 = 0f, g2 = 0f;
            for (int k = 0; k < pxlen; k++)
            {


                float gray = cols[k].r;
                if (gray <= t)      //前景(黑)
                {


                    r1++;
                    g1 += gray;
                }
                else                //背景(白)
                {


                    r2++;
                    g2 += gray;
                }
            }
            g1 /= r1;
            r1 /= (float)pxlen;
            g2 /= r2;
            r2 /= (float)pxlen;
            float v = r1 * r2 * (g1 - g2) * (g1 - g2);
            if (maxv < v)
            {


                maxv = v;
                threshold = t;
            }
        }
#if UNITY_EDITOR
        Debug.LogFormat("GetOTSUThreshold threshold = {0}", threshold);
#endif
        return threshold;
    }
效果如下:

这里我没有用1f/255f迭代,而是为了加速计算用0.02f迭代,如果需要高精度的就迭代次数多一点,不过看得出来效果还算可以。
Kittler法
kittler法又称最小误差阈值法,从名称上来看很自信。核心思想是计算整幅图像得到梯度灰度的平均值,以此平均值作为threshold阈值。
具体做法就是逐行迭代像素,得到像素水平或垂直方向的最大梯度,而这个梯度的计算方法就是邻间灰度值之差的绝对值,如下图:
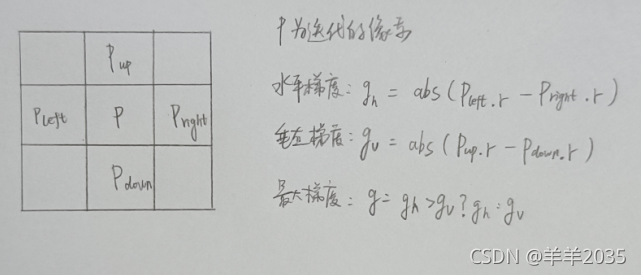
然后计算最大梯度g与像素灰度p.r的积gp,迭代完成得到∑gp和∑g,求得除数即得到了阈值threshold,如下:
    public float GetKittlerThreshold(RenderTexture rt)
    {


        int width = rt.width;
        int height = rt.height;
        int pxlen = width * height;
        RenderTexture.active = rt;
        Texture2D tex = new Texture2D(width, height);
        tex.ReadPixels(new Rect(0, 0, width, height), 0, 0);
        tex.Apply();
        RenderTexture.active = null;
        Color[] cols = tex.GetPixels();
        float gp = 0f;              //∑gp
        float gsum = 0f;            //∑g
        for (int y = 1; y < height - 1; y++)
        {


            for (int x = 1; x < width - 1; x++)
            {


                int px = y * width + x;
                int left = y * width + x - 1;
                int right = y * width + x + 1;
                int up = (y - 1) * width + x;
                int down = (y + 1) * width + x;
                float gh = Mathf.Abs(cols[left].r - cols[right].r);
                float gv = Mathf.Abs(cols[up].r - cols[down].r);
                //得到最大梯度g
                float g = gh > gv ? gh : gv;
                //累加
                gp += (g * cols[px].r);
                gsum += g;
            }
        }
        float threshold = gp / gsum;
#if UNITY_EDITOR
        Debug.LogFormat("GetKittlerThreshold threshold = {0}", threshold);
#endif
        return threshold;
    }
效果如下:

可以看得出来效果也不差。
好了,这也算是常用的几种二值化计算方法,当然百度google还有一堆一堆的二值化算法,有需要实现一下即可。后面有时间聊下工程的网格处理。