这里学习一下Compute Shader,顾名思义就是用于计算(Compute)的Shader。
一般情况下,我们写跑在GPU上的shader都是为了特定的渲染效果,而做运算则用c#CPU去处理。但是GPU的运算能力,特别是浮点数运算能力强于CPU不止十倍,CPU则在逻辑处理能力上强于GPU。那么如果我们碰到低逻辑判断高运算需求的情况下,如果能用上GPU运算,那就可以节省很多时间了。比如AI模型训练,基本都是在GPU上跑算法,我们做视频图像识别卷积运算,用CPU去干这事,基本卡冒烟,而GPU(特别是硬件支持深度学习的GPU加速)才能顶得住,而且游刃有余。
好了,言归正传,我们来学习unity的compute shader(简称CS),先上官方:
因为GPU的并行运算能力很强,所以CS能帮我们加速某些运算。
PS:其实普通的unlitshader照样可以,如下:
Shader "Compute/ComputeUnlitShader"
{
    Properties
    {
        _MainTex ("Texture", 2D) = "white" {}
        _BinaThreshold("Binaryzation Threshold",Range(0,0.01)) = 0.5
    }
    SubShader
    {
        Tags { "RenderType"="Opaque" }
        LOD 100

        Pass
        {
            CGPROGRAM
            #pragma vertex vert
            #pragma fragment frag

            #include "UnityCG.cginc"

            struct appdata
            {
                float4 vertex : POSITION;
                float2 uv : TEXCOORD0;
            };

            struct v2f
            {
                float2 uv : TEXCOORD0;
                float4 vertex : SV_POSITION;
            };

            sampler2D _MainTex;
            float4 _MainTex_ST;

            float _BinaThreshold;

            v2f vert (appdata v)
            {
                v2f o;
                o.vertex = UnityObjectToClipPos(v.vertex);
                o.uv = TRANSFORM_TEX(v.uv, _MainTex);
                return o;
            }

            //去色
            fixed4 decolor(fixed4 col)
            {
                fixed g = 0.299 * col.r + 0.587 * col.g + 0.114 * col.b;
                return fixed4(g,g,g,1);
            }

            //查边
            fixed4 edgecolor(fixed4 gcol)
            {
                fixed x = ddx(gcol.r);
                fixed y = ddy(gcol.r);
                fixed w = (x+y)/2;
                if(w>_BinaThreshold)
                {
                    return fixed4(1,1,1,1);
                }
                return fixed4(0,0,0,1);
            }

            fixed4 frag (v2f i) : SV_Target
            {
                fixed4 col = tex2D(_MainTex, i.uv);
                fixed4 gcol = decolor(col);
                fixed4 ecol = edgecolor(gcol);
                return ecol;
            }
            ENDCG
        }
    }
}
c#代码:
using System.Collections;
using System.Collections.Generic;
using UnityEngine;
using UnityEngine.UI;

public class TestComputeUnlitShader : MonoBehaviour
{
    public RawImage sourceImg;
    public RawImage destImg;

    public Material cptUnlitMat;
    public Texture2D sourceTex;
    public Texture2D destTex;

    void Start()
    {
        sourceImg.texture = sourceTex;

        RenderTexture tempRt = new RenderTexture(sourceTex.width, sourceTex.height, 0);

        Graphics.Blit(sourceTex, tempRt, cptUnlitMat);
        destTex = RT2Tex2D(tempRt);

        destImg.texture = destTex;
    }

    private Texture2D RT2Tex2D(RenderTexture rt)
    {
        Texture2D tex = new Texture2D(rt.width, rt.height, TextureFormat.RGB24, false);
        RenderTexture.active = rt;
        tex.ReadPixels(new Rect(0, 0, rt.width, rt.height), 0, 0);
        tex.Apply();
        return tex;
    }
}
我们将数据储存到texture2d,使用fragment函数处理计算,通过c#graphics.blit获取运算后的texture2d,则相当于使用了GPU完成一次数据运算。效果如下:

通过shader对图像进行了一次二值化处理的过程。
接下来我们尝试一下CS,一般情况下通过GPU shader进行运算的入参都是texture2d,出参也是texture2d,毕竟纹理即数据。
先看下默认CS代码:
// Each #kernel tells which function to compile; you can have many kernels
#pragma kernel CSMain

// Create a RenderTexture with enableRandomWrite flag and set it
// with cs.SetTexture
RWTexture2D<float4> Result;

[numthreads(8,8,1)]
void CSMain (uint3 id : SV_DispatchThreadID)
{
    // TODO: insert actual code here!

    Result[id.xy] = float4(id.x & id.y, (id.x & 15)/15.0, (id.y & 15)/15.0, 0.0);
}
还是来一个逐句解析(然而你看自带的英文注释都已经解释的比较清楚了):
#pragma kernel CSMain (定义入口函数,类似c# main函数,或者shader中#pragma vertex vert等定义函数,不过CS中kernel可以定义多个)
RWTexture2D<float4> Result; (全称read write texture2d,即入参出参纹理,前面我们也说了shader中入参出参都用texture2d纹理来承载数据)
[numthreads(8,4,1)] (1个4*8线程集合,1个8列4行的线程矩阵,用于并行的处理texture2d中的rgba数据)
Dispatch(5,3,2):分配一个5*3*2的<三维线程数组>的三维线程数组
numthreads[10,8,3]:分配一个10*8*3的<三维线程数组>

ps:其中numthreads=x*y*z要小于GPU的流处理单元数量。
uint3 id : SV_DispatchThreadID (语义,绑定当前所处线程id,该id包含3个int值xyz,xyz代表当前线程在<整个线程数组的数组中>的三维索引。因为我们是大量并行线程同时运行,有这个id保证我们可以获取到确定的线程运行的逻辑和结果)
其中三维索引SV_DispatchThreadID的计算公式:[(disptch.x,disptch.y,disptch.z)*[numthreads.x,numthreads.y,numthreads.z]]+SV_GroupThreadID
Result[id.xy] = float4(id.x & id.y, (id.x & 15)/15.0, (id.y & 15)/15.0, 0.0); (id.xy为当前线程处理的texture2d颜色二维矩阵的xy轴索引,便于我们获取准确的颜色二维坐标,但是有个前提:texture2d的width和height要分别与Dispatch(x,y)*numthreads[x,y]的处理线程单元一一对应,通熟来说就是一个线程处理一个像素)
注意:我反复用了几次<数组的数组>,就是为了突出GPU并行的能力之高,我们通过numthreads定义了<三维线程数组>(或者说x*y*z的长一维数组),而且我们还可以通过c#Dispatch(x,y,z)再次定义一个<三维线程数组>的三维线程数组,将texture2d纹理数据“平均切分开”用5*3*2=30个线程,且每个线程调用10*8*3=240个流处理单元处理数据。
我相信大家可能没有直观的感觉,下面我们就来写个demo演示一下:
#pragma kernel CSMain

RWTexture2D<float4> xResult;
RWTexture2D<float4> yResult;
RWTexture2D<float4> zResult;


[numthreads(4,8,2)]
void CSMain (uint3 id : SV_DispatchThreadID)
{
    //转为float进行计算
    float x = id.x;
    float y = id.y;
    float z = id.z;
    //根据id的xyz计算颜色值
    float xcol = x/512;
    float ycol = y/512;
    float zcol = z/2;
    //采样xyz的颜色值
    xResult[id.xy] = float4(xcol,xcol,xcol,1);
    yResult[id.xy] = float4(ycol,ycol,ycol,1);
    zResult[id.xy] = float4(zcol,zcol,zcol,1);
}
c#代码:
using UnityEngine;
using UnityEngine.UI;

public class DemoCSCall : MonoBehaviour
{
    public int texWidth = 512;
    public int texHeight = 512;
    public RawImage imgx;
    public RawImage imgy;
    public RawImage imgz;
    public ComputeShader theCS;

    private RenderTexture xTex;
    private RenderTexture yTex;
    private RenderTexture zTex;

    void Start()
    {

    }

    private void Update()
    {
        if (Input.GetKeyDown(KeyCode.R))
        {
            //创建xyz展示纹理
            xTex = new RenderTexture(texWidth, texHeight, 0, RenderTextureFormat.ARGB32);
            xTex.enableRandomWrite = true;
            xTex.Create();
            yTex = new RenderTexture(texWidth, texHeight, 0, RenderTextureFormat.ARGB32);
            yTex.enableRandomWrite = true;
            yTex.Create();
            zTex = new RenderTexture(texWidth, texHeight, 0, RenderTextureFormat.ARGB32);
            zTex.enableRandomWrite = true;
            zTex.Create();
            //获取kernel id
            int kl = theCS.FindKernel("CSMain");
            //赋值xyz纹理入参出参
            theCS.SetTexture(kl, "xResult", xTex);
            theCS.SetTexture(kl, "yResult", yTex);
            theCS.SetTexture(kl, "zResult", zTex);
            //设置数据处理单元并运行CS
            //我们使用numthreads[4,8,2]
            //则根据纹理宽/4,高/8,1设置numthreads处理的数据范围
            theCS.Dispatch(kl, texWidth / 4, texHeight / 8, 1);
            //提取xyztex进行展示
            imgx.texture = xTex;
            imgy.texture = yTex;
            imgz.texture = zTex;
        }
    }
}
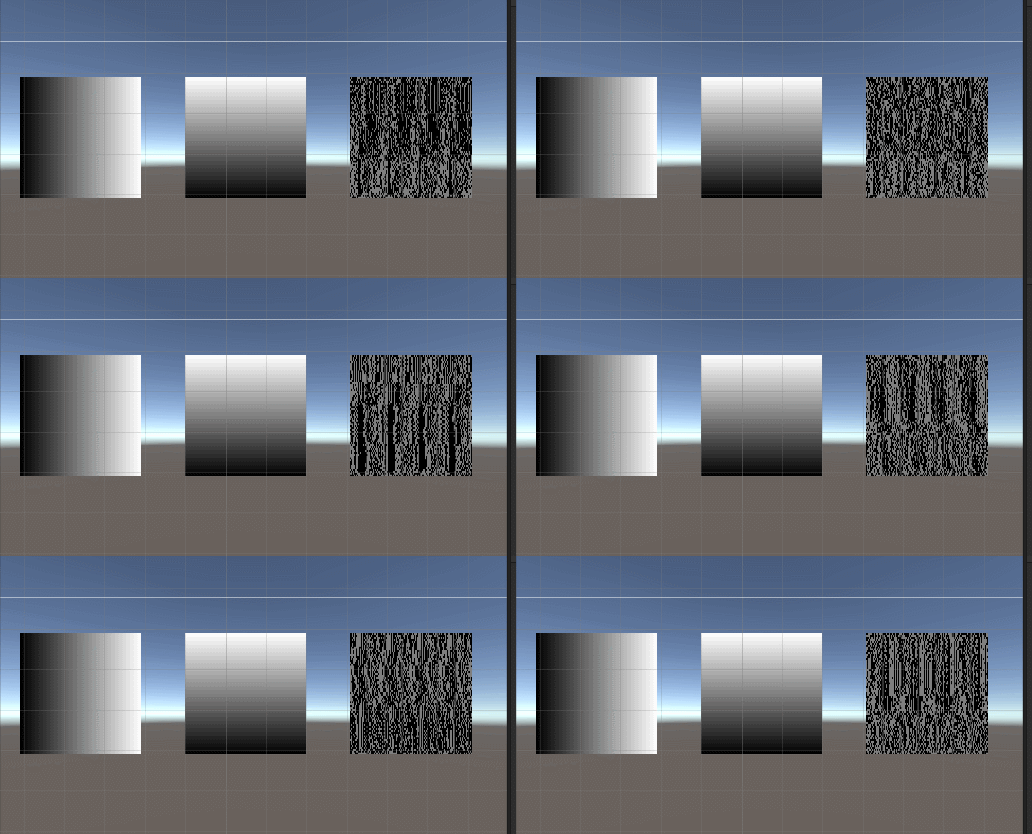
运行效果如下:

结合上面的代码和下面的运行结果来观察zTex,可以了解到CS线程SV_Group是乱序执行的,因为我们每次得到的id.z都不一样,所以zTex的黑灰色块一直变换。
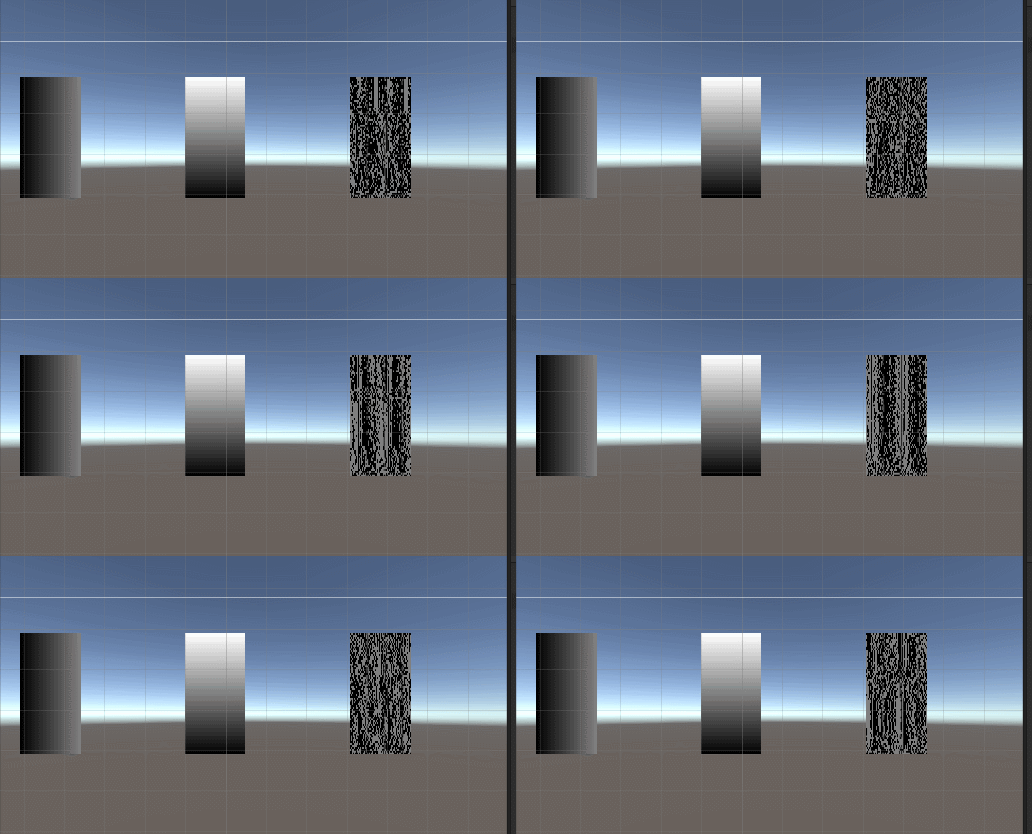
同时,如果我们修改Dispatch的入参,也会出现一些现象:
theCS.Dispatch(kl, texWidth / 8, texHeight / 8, 1);降低每个线程在纹理x轴的处理数据量,则如下:

CS只处理“一半”的纹理数据。如果我们增加每个线程的处理数据量,则没什么变化,无非就是重叠了线程之间的数据区间,浪费了一些硬件资源。
同时,CS也可以处理纯粹的数据,比如数组。其实这也很正常,CS就是专门给我们做计算的shader,如果我们必须将数据都写成图片,那光是处理入参的开销都不小,CS处理普通数据如下:
#pragma kernel CSMain

RWStructuredBuffer<float2> Float2s;
RWTexture2D<float4> Result;
int Width;
int Height;

float getDistance(float2 p,float2 c)
{
    float2 d = p-c;
    return sqrt(d.x*d.x+d.y*d.y);
}

float getMaxDistance(float2 c)
{
    return sqrt(c.x*c.x+c.y*c.y);
}

float4 getTexRGBA(float2 p)
{
    float2 center = float2(Width/2,Height/2);
    float dist = getDistance(p,center);
    float mdist = getMaxDistance(center);
    float4 col = float4(dist/mdist,dist/mdist,dist/mdist,1);
    return col;
}

[numthreads(16,32,2)]
void CSMain (uint3 id : SV_DispatchThreadID)
{
    int index = id.y*Width+id.x;
    float2 p = Float2s[index];
    Result[id.xy] = getTexRGBA(p);
}
c#调用:
using UnityEngine;
using UnityEngine.UI;

public class BufferCSCall : MonoBehaviour
{
    public int texWidth = 8192;
    public int texHeight = 8192;
    public ComputeShader theCS;
    public RawImage img;

    private ComputeBuffer csBuffer;
    private Vector2[] csFloats;
    private RenderTexture csTex;

    void Start()
    {
        //假设有这么一个二维vector2矩阵
        int bufferlen = texWidth * texHeight;
        csFloats = new Vector2[bufferlen];
        for (int x = 0; x < texWidth; x++)
        {
            for (int y = 0; y < texHeight; y++)
            {
                int index = x * texHeight + y;
                csFloats[index] = new Vector2(x, y);
            }
        }
#if UNITY_EDITOR
        Debug.LogFormat("cs start time = {0}", Time.realtimeSinceStartup);
#endif
        //初始化tex
        csTex = new RenderTexture(texWidth, texHeight, 0, RenderTextureFormat.ARGB32);
        csTex.enableRandomWrite = true;
        csTex.Create();
        //绘制图像
        //通过Set函数传递数据到GPU
        int kl = theCS.FindKernel("CSMain");
        csBuffer = new ComputeBuffer(bufferlen, 32);
        csBuffer.SetData(csFloats);
        theCS.SetBuffer(kl, "Float2s", csBuffer);
        theCS.SetTexture(kl, "Result", csTex);
        theCS.SetInt("Width", texWidth);
        theCS.SetInt("Height", texHeight);
        theCS.Dispatch(kl, texWidth / 16, texHeight / 32, 1);
        img.texture = csTex;
#if UNITY_EDITOR
        Debug.LogFormat("cs stop time = {0}", Time.realtimeSinceStartup);
#endif
    }
}
效果如下:

可以看得出来使用0.4s左右生成了一个基于像素中心距离插值的8k图像,下面用CPU试一下:
using UnityEngine;
using UnityEngine.UI;

public class K8TexGenerator : MonoBehaviour
{
    public RawImage img;

    public int texWidth = 8192;
    public int texHeight = 8192;

    void Start()
    {
#if UNITY_EDITOR
        Debug.LogFormat("cpu start time = {0}", Time.realtimeSinceStartup);
#endif
        Texture2D tex = new Texture2D(texWidth, texHeight, TextureFormat.ARGB32, false);
        for (int x = 0; x < texWidth; x++)
        {
            for (int y = 0; y < texHeight; y++)
            {
                Vector2 p = new Vector2(x, y);
                tex.SetPixel(x, y, getTexRGBA(p));
            }
        }
        tex.Apply();
        img.texture = tex;
#if UNITY_EDITOR
        Debug.LogFormat("cpu stop time = {0}", Time.realtimeSinceStartup);
#endif
    }

    float GetDistance(Vector2 p, Vector2 c)
    {
        Vector2 d = p - c;
        return Mathf.Sqrt(d.x * d.x + d.y * d.y);
    }

    float GetMaxDistance(Vector2 c)
    {
        return Mathf.Sqrt(c.x * c.x + c.y * c.y);
    }

    Color getTexRGBA(Vector2 p)
    {
        Vector2 center = new Vector2(texWidth / 2, texHeight / 2);
        float dist = GetDistance(p, center);
        float mdist = GetMaxDistance(center);
        Color col = new Color(dist / mdist, dist / mdist, dist / mdist, 1);
        return col;
    }
}
效果如下:

整整22.5s才生成一张同样算法的图,差距简直不可想象。所以说CS在数据处理方面还是很强大的。
好了,CS学习到这里,以后有机会碰到用CS的地方,再来举几个CS的用法例子。