最近想实现一系列的喷涂绘制功能,感觉挺有用的。
首先就是普通的颜色绘制,利用材质纹理进行绘制操作,如下:
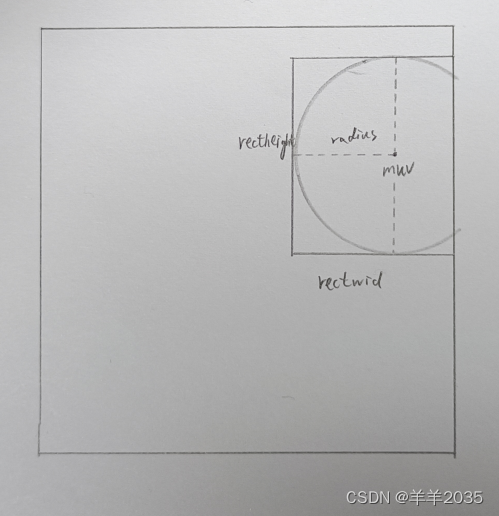
假设上面是纹理uv,我们鼠标射线击中muv,根据radius算出绘制的外接矩形rect,然后根据圆弧到圆心距离判断圆形涂色。这里唯一需要注意的就是纹理像素的边界问题了,不要越界,如下:
using System.Collections;
using System.Collections.Generic;
using UnityEngine;

public class TestColorSpray : MonoBehaviour
{


    public Color color;         //颜色
    [Range(0, 1)]
    public float alpha;         //透明度
    public int radius;          //半径像素

    private Camera cam;

    private bool isStart = false;

    private Material mat;
    private Texture2D tex;
    private int texWidth;
    private int texHeight;

    void Start()
    {


        cam = Camera.main;
    }

    void FixedUpdate()
    {


        if (Input.GetMouseButtonDown(0))
        {


            Ray ray = cam.ScreenPointToRay(Input.mousePosition);
            RaycastHit hit;
            if (Physics.Raycast(ray, out hit))
            {


                StartSpray(hit.transform);
            }
        }
        if (Input.GetMouseButton(0))
        {


            if (isStart)
            {


                Ray ray = cam.ScreenPointToRay(Input.mousePosition);
                RaycastHit hit;
                if (Physics.Raycast(ray, out hit))
                {


#if UNITY_EDITOR
                    Debug.DrawLine(cam.transform.position, hit.point, Color.black);
#endif
                    //鼠标圆心
                    Vector2 muv = new Vector2(hit.textureCoord.x * texWidth, hit.textureCoord.y * texHeight);
                    int mx = Mathf.Clamp((int)muv.x, 0, texWidth - 1);
                    int my = Mathf.Clamp((int)muv.y, 0, texHeight - 1);
                    //外接矩形(不规则)
                    int left = Mathf.Clamp(mx - radius, 0, texWidth - 1);
                    int right = Mathf.Clamp(mx + radius, 0, texWidth - 1);
                    int bottom = Mathf.Clamp(my - radius, 0, texHeight - 1);
                    int top = Mathf.Clamp(my + radius, 0, texHeight - 1);
                    int rectwid = right - left;
                    int recthei = top - bottom;
                    //绘制
                    Color[] ogcols = tex.GetPixels(left, bottom, rectwid, recthei);
                    //逐行扫描
                    for (int y = 0; y < recthei; y++)
                    {


                        for (int x = 0; x < rectwid; x++)
                        {


                            int index = y * rectwid + x;
                            int px = x + left - mx;
                            int py = y + bottom - my;
                            float alphainten;
                            if (CheckInCircle(radius, px, py, out alphainten))
                            {


                                Color ocol = ogcols[index];
                                Color scol = color;
                                float inten = alphainten * alpha;
                                ogcols[index] = BlendColor(ocol, scol, inten);
                            }
                        }
                    }
                    tex.SetPixels(left, bottom, rectwid, recthei, ogcols);
                    tex.Apply();
                }
            }
        }
        if (Input.GetMouseButtonUp(0))
        {


            StopSpray();
        }
    }

    private void StartSpray(Transform obj)
    {


        isStart = true;
        mat = obj.GetComponent<MeshRenderer>().sharedMaterial;
        tex = (Texture2D)mat.GetTexture("_MainTex");
        texWidth = tex.width;
        texHeight = tex.height;
    }

    private void StopSpray()
    {


        isStart = false;
    }

    /// <summary>
    /// 检测xy在rad圆形中
    /// 相对坐标,圆心(0,0)
    /// </summary>
    /// <param name="rad"></param>
    /// <param name="x"></param>
    /// <param name="y"></param>
    /// <param name="inten"></param>
    /// <returns></returns>
    private bool CheckInCircle(int rad, int x, int y, out float inten)
    {


        float rad2 = rad * rad;
        float len2 = x * x + y * y;
        inten = 1f - len2 / rad2;
        return len2 <= rad2;
    }
    /// <summary>
    /// 混合颜色
    /// </summary>
    /// <param name="a"></param>
    /// <param name="b"></param>
    /// <returns></returns>
    private Color BlendColor(Color a, Color b, float k)
    {


        Color c = Color.Lerp(a, b, k);
        return c;
    }
}
测试一下,material的maintex设置为readwrite/rgba32,如下:

不过有个小问题,材质图片建议复制一份,不然Apply覆盖了原始数据,如下:
using System.Collections;
using System.Collections.Generic;
using UnityEngine;

public class SprayObject : MonoBehaviour
{


    void Start()
    {


        MeshRenderer render = gameObject.GetComponent<MeshRenderer>();
        Material mat = render.material;
        Texture2D tex = (Texture2D)mat.GetTexture("_MainTex");
        Texture2D copytex = new Texture2D(tex.width, tex.height, tex.format, false);
        copytex.SetPixels(tex.GetPixels());
        copytex.Apply();
        mat.SetTexture("_MainTex", copytex);
    }
}
这样我们喷涂的物体首先就clone一份材质和贴图。
同时这种方案还存在一个最大的问题,那就是uv接缝处无法处理,如下:

因为模型网格接缝处的uv是不连续且随机(根据美术人员uvmapping)的,所以无法处理喷涂的连续性,如果较真起来,我们必须想另外一种喷涂方案。
当然当前的方案也有一定的用武之地的,比如刷地形、刷物件,我就用的这种。
同时还有刷图案纹理,如下:
using System.Collections;
using System.Collections.Generic;
using UnityEngine;

public class TestGraphSpray : MonoBehaviour
{


    public Texture2D graphTex;  //图案
    [Range(0, 1)]
    public float alpha;         //透明度

    private Camera cam;

    private bool isStart = false;

    private Material mat;
    private Texture2D tex;
    private int texWidth;
    private int texHeight;

    private int gWid;           //图案宽
    private int gHei;           //图案高
    private int ghWid;          //图案半宽
    private int ghHei;          //图案半高

    void Start()
    {


        cam = Camera.main;

        gWid = graphTex.width;
        gHei = graphTex.height;
        ghWid = (int)(gWid * 0.5f);
        ghHei = (int)(graphTex.height * 0.5f);
    }

    void Update()
    {


        if (Input.GetMouseButtonDown(0))
        {


            Ray ray = cam.ScreenPointToRay(Input.mousePosition);
            RaycastHit hit;
            if (Physics.Raycast(ray, out hit))
            {


                StartSpray(hit.transform);
            }
        }
        if (Input.GetMouseButton(0))
        {


            if (isStart)
            {


                Ray ray = cam.ScreenPointToRay(Input.mousePosition);
                RaycastHit hit;
                if (Physics.Raycast(ray, out hit))
                {


#if UNITY_EDITOR
                    Debug.DrawLine(cam.transform.position, hit.point, Color.black);
#endif
                    //鼠标圆心
                    Vector2 muv = new Vector2(hit.textureCoord.x * texWidth, hit.textureCoord.y * texHeight);
                    int mx = Mathf.Clamp((int)muv.x, 0, texWidth - 1);
                    int my = Mathf.Clamp((int)muv.y, 0, texHeight - 1);
                    //外接矩形(不规则)
                    int left = Mathf.Clamp(mx - ghWid, 0, texWidth - 1);
                    int right = Mathf.Clamp(mx + ghWid, 0, texWidth - 1);
                    int bottom = Mathf.Clamp(my - ghHei, 0, texHeight - 1);
                    int top = Mathf.Clamp(my + ghHei, 0, texHeight - 1);
                    int rectwid = right - left;
                    int recthei = top - bottom;
                    //绘制
                    Color[] ocols = tex.GetPixels(left, bottom, rectwid, recthei);
                    //根据矩形是否越界,判断graphTex采样的起始点
                    int gx = mx > ghWid ? 0 : ghWid - mx;
                    int gy = my > ghHei ? 0 : ghHei - my;
                    Color[] gcols = graphTex.GetPixels(gx, gy, rectwid, recthei);
                    //逐行扫描
                    for (int y = 0; y < recthei; y++)
                    {


                        for (int x = 0; x < rectwid; x++)
                        {


                            int index = y * rectwid + x;
                            Color ocol = ocols[index];
                            Color gcol = gcols[index];
                            float k = alpha * gcol.a;
                            ocols[index] = BlendColor(ocol, gcol, k);
                        }
                    }
                    tex.SetPixels(left, bottom, rectwid, recthei, ocols);
                    tex.Apply();
                }
            }
        }
        if (Input.GetMouseButtonUp(0))
        {


            StopSpray();
        }
    }

    private void StartSpray(Transform obj)
    {


        isStart = true;
        mat = obj.GetComponent<MeshRenderer>().sharedMaterial;
        tex = (Texture2D)mat.GetTexture("_MainTex");
        texWidth = tex.width;
        texHeight = tex.height;
    }

    private void StopSpray()
    {


        isStart = false;
    }

    private Color BlendColor(Color a, Color b, float k)
    {


        Color c = Color.Lerp(a, b, k);
        return c;
    }
}
核心就是根据绘制rect采样图案和背景颜色数组进行混合就行了,效果如下:
 特别注意一下矩形“突破”边界情况下的图案采样坐标问题。
当然目前还需要深入的问题很多,比如:
1.模型UV接缝、模型之间接缝喷涂怎么处理?
2.喷涂+网格计算共同作用,类似zbrush操作?
3.能否处理3d纹理配合模型上色?
后面有时间慢慢实现。
对了,顺便说一下,这种绘制操作不太适合使用ComputeShader,我写了个测试了一下,虽然ComputeShader在颜色矩阵的计算上比CPU快,但是在数据总线bus交换上太耗时,不适合这种喷涂操作。