两个场景渲染在一个页面
1.场景渲染
1.1创建两个场景
我们需要把两个场景渲染在同一个页面那么首先创建两个场景,具体如下:
// 创建场景
createScene () {


  // 创建一个场景
  this.scene = new THREE.Scene()
  // 创建另一个场景
  this.spriteScene = new THREE.Scene()
}
1.2创建两个相机
这一步创建两个相机第一个相机为透视相机,第二个是正投影相机,创建第二个相机时需要注意将左边界设置为0,这样渲染时就可以把第二个场景全部展示到屏幕中,具体如下
// 创建相机
createCamera () {


  const element = document.getElementById('container')
  const width = element.clientWidth // 窗口宽度
  const height = element.clientHeight // 窗口高度
  const k = width / height // 窗口宽高比

  // 创建第一个相机
  this.camera = new THREE.PerspectiveCamera(45, k, 0.1, 200)
  this.camera.position.set(0, 0, 100) // 设置相机位置

  this.camera.lookAt(new THREE.Vector3(10, 0, 0)) // 设置相机方向
  this.scene.add(this.camera)

  // 创建第二个相机
  // THREE.OrthographicCamera( left,right,top,bottom,near,far)
  // 创建时注意这个相机是正投影相机,左边界是0,这样是为了把第二个场景全部展示到屏幕中
  this.spriteCamera = new THREE.OrthographicCamera(
    0,
    width,
    height,
    -50,
    0,
    20
  )
}
1.3通过渲染器将两个场景融合
在render()函数中渲染两个场景
// 渲染第一个场景
this.renderer.render(this.scene, this.camera)
// 渲染器是否在渲染每一帧之前自动清除其输出,设置为false
this.renderer.autoClear = false
// 渲染第二个场景 即可将两个场景融合
this.renderer.render(this.spriteScene, this.spriteCamera)
2.创建左右移动的小怪兽
2.1获取贴图
// 获取贴图
getTexture () {


  const THIS = this
  const textureLoader = new THREE.TextureLoader()
  const loadTexture = textureLoader.load(
    `${

      THIS.publicPath}images/sprite-sheet.png`
  )
  return loadTexture
}
2.2 通过贴图创建点精灵材质
createSpriteMaterial () {


  const spriteMaterial = new THREE.SpriteMaterial({


    transparent: this.properties.transparent,
    opacity: this.properties.opacity.value,
    color: this.properties.color,
    map: this.getTexture()
  })

  spriteMaterial.map.offset = new THREE.Vector2(
    0.2 * this.properties.sprite.value,
    0
  )
  spriteMaterial.map.repeat = new THREE.Vector2(1 / 5, 1)
  spriteMaterial.depthTest = false

  spriteMaterial.blending = THREE.AdditiveBlending
  return spriteMaterial
}
2.3 创建精灵并添加到场景
createSprite () {


  this.sprite = new THREE.Sprite(this.createSpriteMaterial())
  this.sprite.scale.set(
    this.properties.size.value,
    this.properties.size.value,
    this.properties.size.value
  )
  this.sprite.position.set(1800, 25, 0)
  this.sprite.velocityX = 5

  this.spriteScene.add(this.sprite)
}
2.4 创建精灵动画
spriteAnimation () {


      // 球沿y轴来回运动
      this.camera.position.y = Math.sin((this.step += 0.01)) * 40

      // 小怪兽沿X轴底部来回运动
      this.sprite.position.x = this.sprite.position.x + this.sprite.velocityX
      if (this.sprite.position.x > window.innerWidth) {


        this.properties.sprite.value++
        this.sprite.velocityX = -5
        this.sprite.material.map.offset.set(
          (1 / 5) * (this.properties.sprite.value % 4),
          0
        )
      }
      if (this.sprite.position.x < 0) {


        this.sprite.velocityX = 5
      }
    }
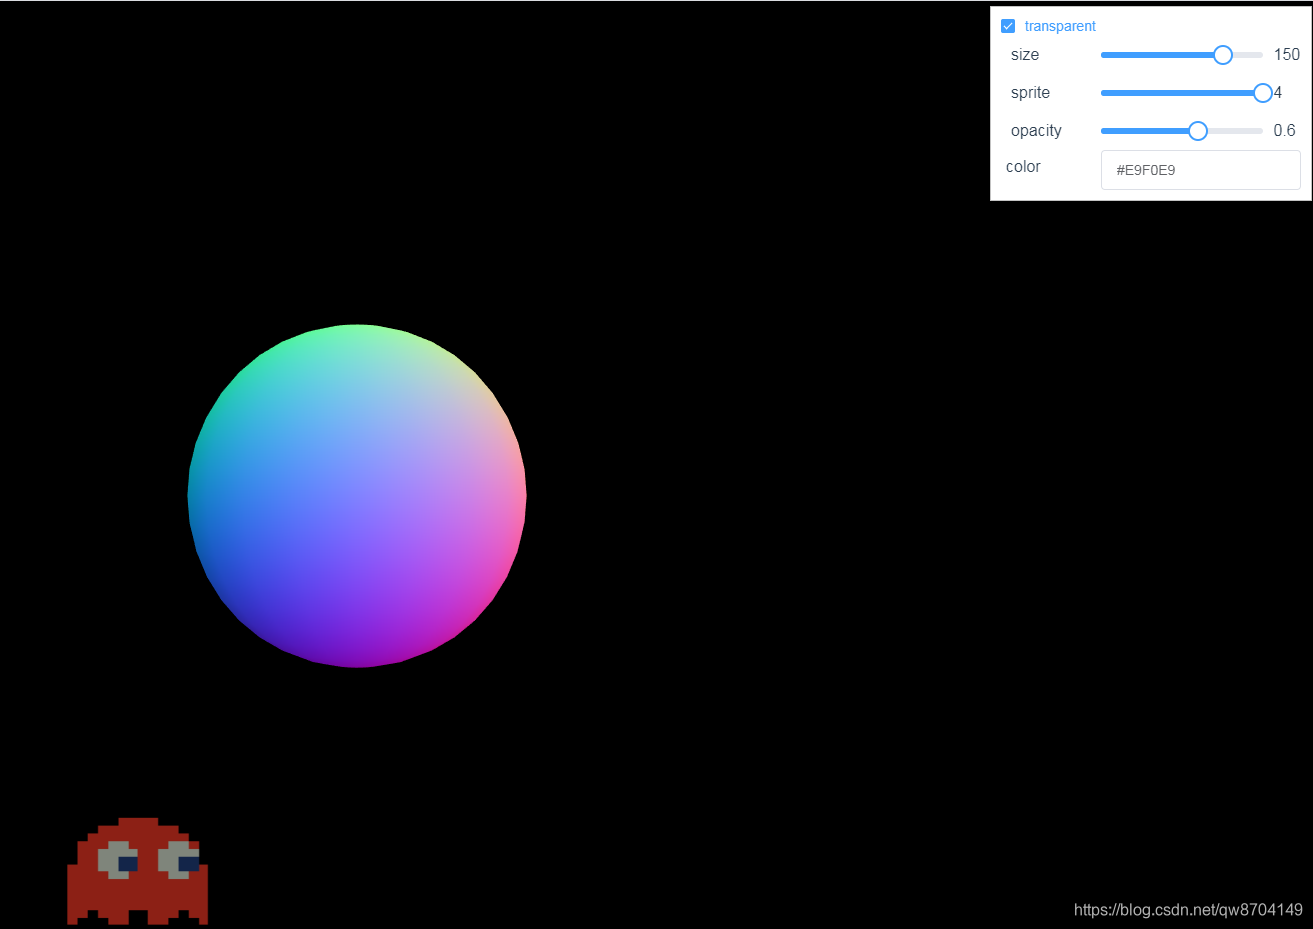
3.demo效果
4.demo代码
<template>
  <div>
    <div id="container"></div>
    <div class="controls-box">
      <section>
        <el-row>
          <el-checkbox v-model="properties.transparent" @change="redraw">transparent</el-checkbox>
        </el-row>
        <el-row>
          <div v-for="(item,key) in properties" :key="key">
            <div v-if="item&&item.name!=undefined">
              <el-col :span="8">
                <span class="vertice-span">{

    {

    item.name}}</span>
              </el-col>
              <el-col :span="13">
                <el-slider v-model="item.value" :min="item.min" :max="item.max" :step="item.step" :format-tooltip="formatTooltip" @change="redraw"></el-slider>
              </el-col>
              <el-col :span="3">
                <span class="vertice-span">{

    {

    item.value}}</span>
              </el-col>
            </div>
          </div>
        </el-row>
        <el-row>
          <el-col :span="8" class="label-col"><label> color</label></el-col>
          <el-col :span="16">
            <div @click="inputClick">
              <el-input :value="properties.color"></el-input>
            </div>
            <div v-show="isShowColors" class="color-select-layer">
              <sketch-picker v-model="properties.color" @input="colorChange"></sketch-picker>
            </div>
          </el-col>
        </el-row>
      </section>
    </div>
  </div>
</template>

<script>
import * as THREE from 'three'
import {

     OrbitControls } from 'three/examples/jsm/controls/OrbitControls.js'
import {

     Sketch } from 'vue-color'
export default {


  components: {


    'sketch-picker': Sketch
  },
  data () {


    return {


      publicPath: process.env.BASE_URL,
      properties: {


        size: {


          name: 'size',
          value: 150,
          min: 0,
          max: 200,
          step: 1
        },
        sprite: {


          name: 'sprite',
          value: 0,
          min: 0,
          max: 4,
          step: 1
        },
        opacity: {


          name: 'opacity',
          value: 0.6,
          min: 0,
          max: 1,
          step: 0.1
        },
        transparent: true,
        color: '#E9F0E9'
      },
      step: 1,
      isShowColors: false,
      camera: null,
      spriteCamera: null,
      scene: null,
      spriteScene: null,
      renderer: null,
      sprite: null,
      controls: null
    }
  },
  mounted () {


    this.init()
  },
  methods: {


    formatTooltip (val) {


      return val
    },
    inputClick () {


      this.isShowColors = !this.isShowColors
    },
    colorChange (val) {


      this.properties.color = val.hex
      this.redraw()
    },
    // 初始化
    init () {


      this.createScene() // 创建场景
      this.createSphere() // 创建球体
      this.createSprite() // 创建小怪兽
      this.createCamera() // 创建相机
      this.createRender() // 创建渲染器
      this.createControls() // 创建控件对象
      this.render() // 渲染
    },
    // 创建场景
    createScene () {


      // 创建一个场景
      this.scene = new THREE.Scene()
      // 创建另一个场景
      this.spriteScene = new THREE.Scene()
    },
    // 获取贴图
    getTexture () {


      const THIS = this
      const textureLoader = new THREE.TextureLoader()
      const loadTexture = textureLoader.load(
        `${

      THIS.publicPath}images/sprite-sheet.png`
      )
      return loadTexture
    },
    createSpriteMaterial () {


      const spriteMaterial = new THREE.SpriteMaterial({


        transparent: this.properties.transparent,
        opacity: this.properties.opacity.value,
        color: this.properties.color,
        map: this.getTexture()
      })

      spriteMaterial.map.offset = new THREE.Vector2(
        0.2 * this.properties.sprite.value,
        0
      )
      spriteMaterial.map.repeat = new THREE.Vector2(1 / 5, 1)
      spriteMaterial.depthTest = false

      spriteMaterial.blending = THREE.AdditiveBlending
      return spriteMaterial
    },
    createSprite () {


      this.sprite = new THREE.Sprite(this.createSpriteMaterial())
      this.sprite.scale.set(
        this.properties.size.value,
        this.properties.size.value,
        this.properties.size.value
      )
      this.sprite.position.set(1800, 25, 0)
      this.sprite.velocityX = 5

      this.spriteScene.add(this.sprite)
    },
    // 创建球
    createSphere () {


      const material = new THREE.MeshNormalMaterial()
      const geom = new THREE.SphereGeometry(15, 20, 20)
      const mesh = new THREE.Mesh(geom, material)
      this.scene.add(mesh)
    },

    // 创建相机
    createCamera () {


      const element = document.getElementById('container')
      const width = element.clientWidth // 窗口宽度
      const height = element.clientHeight // 窗口高度
      const k = width / height // 窗口宽高比

      // 创建第一个相机
      this.camera = new THREE.PerspectiveCamera(45, k, 0.1, 200)
      this.camera.position.set(0, 0, 100) // 设置相机位置

      this.camera.lookAt(new THREE.Vector3(10, 0, 0)) // 设置相机方向
      this.scene.add(this.camera)

      // 创建第二个相机
      // THREE.OrthographicCamera( left,right,top,bottom,near,far)
      // 创建时注意这个相机是正投影相机,左边界是0,这样是为了把第二个场景全部展示到屏幕中
      this.spriteCamera = new THREE.OrthographicCamera(
        0,
        width,
        height,
        -50,
        0,
        20
      )
    },
    // 创建渲染器
    createRender () {


      const element = document.getElementById('container')
      this.renderer = new THREE.WebGLRenderer({

     antialias: true })
      this.renderer.setSize(element.clientWidth, element.clientHeight) // 设置渲染区域尺寸
      this.renderer.setClearColor(new THREE.Color(0xffffff)) // 设置背景颜色
      element.appendChild(this.renderer.domElement)
    },
    redraw () {


      this.spriteScene.remove(this.sprite)
      this.createSprite()
    },

    spriteAnimation () {


      // 球沿y轴来回运动
      this.camera.position.y = Math.sin((this.step += 0.01)) * 40

      // 小怪兽沿X轴底部来回运动
      this.sprite.position.x = this.sprite.position.x + this.sprite.velocityX
      if (this.sprite.position.x > window.innerWidth) {


        this.properties.sprite.value++
        this.sprite.velocityX = -5
        this.sprite.material.map.offset.set(
          (1 / 5) * (this.properties.sprite.value % 4),
          0
        )
      }
      if (this.sprite.position.x < 0) {


        this.sprite.velocityX = 5
      }
    },
    render () {


      this.spriteAnimation()

      // 渲染第一个场景
      this.renderer.render(this.scene, this.camera)
      // 渲染器是否在渲染每一帧之前自动清除其输出,设置为false
      this.renderer.autoClear = false
      // 渲染第二个场景 即可将两个场景融合
      this.renderer.render(this.spriteScene, this.spriteCamera)

      requestAnimationFrame(this.render)
    },
    // 创建控件对象
    createControls () {


      this.controls = new OrbitControls(this.camera, this.renderer.domElement)
    }
  }
}
</script>
<style>
#container {


  position: absolute;
  width: 100%;
  height: 100%;
}
.controls-box {


  position: absolute;
  right: 5px;
  top: 5px;
  width: 300px;
  padding: 10px;
  background-color: #fff;
  border: 1px solid #c3c3c3;
}
.label-col {


  padding: 8px 5px;
}
.color-select-layer {


  position: relative;
  left: -20px;
  padding: 15px 0;
}
.vertice-span {


  line-height: 38px;
  padding: 0 2px 0 10px;
}
</style>