目录
Deploying the database backend to production
我们通常希望对存储在应用数据库中的数据应用一些约束, 比如不应该接受缺少或空的content 属性的便笺。
在路由处理程序中检查便笺的有效性:
app.post('/api/notes', (request, response) => {
  const body = request.body
  if (body.content === undefined) {
    return response.status(400).json({ error: 'content missing' })
  }
  // ...
})如果便笺没有content 属性,我们将使用状态码400 bad request 响应该请求。
在数据存储到数据库之前验证数据格式更好的的方法是使用 Mongoose 提供的validation功能。
可以为模式中的每个字段定义特定的验证规则:
const noteSchema = new mongoose.Schema({
  content: {
    type: String,
    minlength: 5,
    required: true
  },
  date: {
    type: Date,
    required: true
  },
  important: Boolean
})现在要求content 字段至少有五个字符长。date 字段被设置为必需的,这意味着它不能丢失。 同样的约束也适用于content 字段,因为最小长度限制允许字段为空。 我们没有向important 字段添加任何约束,因此模式中的定义没有更改。
minlength 和 required 验证器是内置的 ,由 Mongoose 提供。 Mongoose允许我们创建新的验证器自定义验证器,如果没有一个内置的验证器满足我们的需求的话。
如果尝试在数据库中存储一个打破其中一个约束的对象,操作将引发异常。 改变我们的处理程序来创建一个新的便笺,这样它就可以将任何潜在的异常传递给错误处理中间件:
app.post('/api/notes', (request, response, next) => {
  const body = request.body

  const note = new Note({
    content: body.content,
    important: body.important || false,
    date: new Date(),
  })

  note.save()
    .then(savedNote => {
      response.json(savedNote.toJSON())
    })
    .catch(error => next(error))
})
展开错误处理程序来处理这些验证错误:
const errorHandler = (error, request, response, next) => {
  console.error(error.message)

  if (error.name === 'CastError') {
    return response.status(400).send({ error: 'malformatted id' })
  } else if (error.name === 'ValidationError') {
    return response.status(400).json({ error: error.message })
  }

  next(error)
}
当验证一个对象失败时,从 Mongoose 返回如下缺省错误消息:

Promise chaining
【承诺链】
路由处理程序会隐式地调用 toJSON 方法,将response.json 数据转换成正确的格式。为了演示,我们可以在 then 中显示地调用 toJSON 方法 到这个对象上:
app.post('/api/notes', (request, response, next) => {
  // ...

  note.save()
    .then(savedNote => {
      response.json(savedNote.toJSON())
    })
    .catch(error => next(error))
})可以用一种更简洁的方式来实现同样的功能,比如承诺链 :
app.post('/api/notes', (request, response, next) => {
  // ...

  note
    .save()
    .then(savedNote => {
      return savedNote.toJSON()
    })
    .then(savedAndFormattedNote => {
      response.json(savedAndFormattedNote)
    })
    .catch(error => next(error))
})
在第一个 then收到 savedNote 对象返回的 Mongoose 和格式化它。 返回操作的结果。 然后then 的方法也返回了一个承诺。 可以通过使用 then 方法注册一个新的回调函数来访问带格式的便笺。
使用箭头函数的紧凑语法来清理代码:
app.post('/api/notes', (request, response, next) => {
  // ...

  note
    .save()
    .then(savedNote => savedNote.toJSON())    .then(savedAndFormattedNote => {
      response.json(savedAndFormattedNote)
    })
    .catch(error => next(error))
})
在这里承诺链没有提供多少好处。 但要是有许多必须按顺序进行的异步操作,情况就会发生变化。 JavaScript 中的async/await语法,这将使编写后续的异步操作变得容易得多。
Deploying the database backend to production
【将数据库后端部署到生产环境】
该应用在 Heroku 的运行情况应该基本一样。 由于我们对后端进行了更改,我们必须生成一个新的前端生产版本。
dotenv 中定义的环境变量仅在后端时使用,不处于生产模式 (即 Heroku)。
我们在文件 .env中定义了用于开发的环境变量。 但是在生产环境中定义数据库 URL 的环境变量应该使用 heroku config:set 命令来设置 Heroku。
$ heroku config:set MONGODB_URI=mongodb+srv://fullstack:[email protected]/note-app?retryWrites=true注意:如果命令行产生了一个错误,在撇号中给 MONGODB_URI 设置一个值
$ heroku config:set MONGODB_URI='mongodb+srv://fullstack:[email protected]/note-app?retryWrites=true'应用现在应该可以工作了。
Lint
看一个重要的工具,叫做lint,维基百科:
Generically, lint or a linter is any tool that detects and flags errors in programming languages, including stylistic errors. The term lint-like behavior is sometimes applied to the process of flagging suspicious language usage. Lint-like tools generally perform static analysis of source code.
通常,lint 或 linter 是检测和标记编程语言中的错误,包括文本错误的一种工具。 lint-like 这个术语有时用于标记可疑的语言使用情况。 类似 lint 的工具通常对源代码执行静态分析。
在像 Java 这样的编译静态类型语言中,像 NetBeans 这样的 ide 可以指出代码中的错误,甚至那些不仅仅是编译错误的错误。
执行静态分析的额外工具,如检查样式 ,可以用来扩展 IDE 的功能,也指出与样式有关的问题,如缩进。
JavaScript 主要的静态分析工具又名“ linting”是ESlint。
安装 ESlint 作为后端项目的开发依赖项:
npm install eslint --save-dev在这之后,我们可以使用如下命令初始化默认的 ESlint 配置:
node_modules/.bin/eslint --init回答所有问题:

该配置将保存在.eslintrc.js 文件中:
module.exports = {
    'env': {
        'commonjs': true,
        'es6': true,
        'node': true
    },
    'extends': 'eslint:recommended',
    'globals': {
        'Atomics': 'readonly',
        'SharedArrayBuffer': 'readonly'
    },
    'parserOptions': {
        'ecmaVersion': 2018
    },
    'rules': {
        'indent': [
            'error',
            4
        ],
        'linebreak-style': [
            'error',
            'unix'
        ],
        'quotes': [
            'error',
            'single'
        ],
        'semi': [
            'error',
            'never'
        ]
    }
}
修改关于缩进的规则,使缩进级别为两个空格。
"indent": [
    "error",
    2
],
检查和验证像 index.js 这样的文件可以通过如下命令完成:
node_modules/.bin/eslint index.js建议为 linting 创建一个单独的 npm 脚本:
{
  // ...
  "scripts": {
    "start": "node index.js",
    "dev": "nodemon index.js",
    // ...
    "lint": "eslint ."
  },
  // ...
}
现在 npm run lint 命令将检查项目中的每个文件。
当命令运行时, build 目录中的文件也会被检查。 我们不希望这种情况发生,我们可以通过创建一个 .eslintignore文件,内容如下:
build这将导致 ESlint 不检查整个 build 目录。
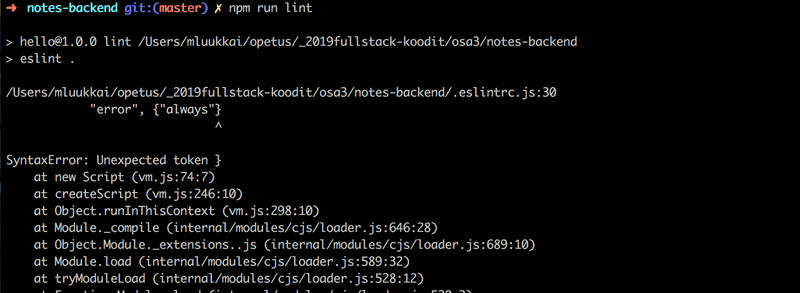
Lint 对我们的代码有很多要说的:

先不管这些问题。
从命令行执行连接程序的一个更好的替代方法是为编辑器配置一个eslint-plugin,它可以连续运行lint程序。 通过使用该插件,您将立即看到代码中的错误。 你可以找到更多关于 Visual Studio ESLint 插件的信息点击这里。
代码 ESlint 插件会用红线来强调违反:
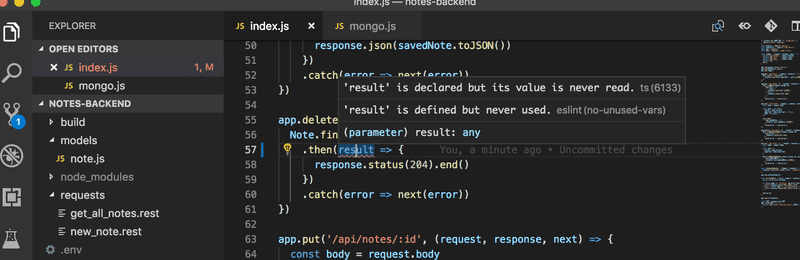
这使得错误很容易发现和修复。
Eslint 的规则可以通过编辑 .eslintrc.js 文件轻松使用。
eqeqeq规则警告,如果除了三个等于运算符之外,相等是被检查的。 该规则是在配置文件的rules 字段下添加的。
{
  // ...
  'rules': {
    // ...
   'eqeqeq': 'error',
  },
}对规则做一些其他的改变:在行的末尾避免不必要的拖尾空格,要求在大括号之前和之后总有一个空格 ,在箭头函数的函数参数中一致使用空格。
{
  // ...
  'rules': {
    // ...
    'eqeqeq': 'error',
    'no-trailing-spaces': 'error',
    'object-curly-spacing': [
        'error', 'always'
    ],
    'arrow-spacing': [
        'error', { 'before': true, 'after': true }
    ]
  },
}
我们的默认配置从 eslint:recommended来的:
'extends': 'eslint:recommended',这包括一个警告 console.log 命令的规则。 禁用规则可以通过在配置文件中将其“ value”定义为0来实现。 在此期间让我们这样做把no-console检查关掉 。
{
  // ...
  'rules': {
      // ...
      'eqeqeq': 'error',
      'no-trailing-spaces': 'error',
      'object-curly-spacing': [
          'error', 'always'
      ],
      'arrow-spacing': [
          'error', { 'before': true, 'after': true }
      ]
    },
    'no-console': 0  },
}
修改 .eslintrc.js 文件中,从命令行运行 linter。 将验证配置文件的格式是否正确: