目录
More tests and refactoring the backend
Error handling and async/await
Optimizing the beforeEach function
现在要开始为后端写测试。
由于我们的后端并没有包含任何复杂逻辑,为它编写单元测试并没有什么意义。唯一有必要写的就是格式化 note 的 toJSON 方法。
通过模拟数据库数据而非使用真正的数据库来进行后端测试。有一个可以模拟 mongo 的库mongo-mock。
由于后端应用相对简单,我们将会通过它的 REST API 来测试整个应用,数据库也包含在内。这种将系统的多个组件联合进行测试的方法称为集成测试。
Test environment
【测试环境】
当后端服务器在 Heroku 运行时,它处于 production 模式。
Node 约定用 NODE_ENV 环境变量定义应用的执行模式。 当前的应用中,如果应用不是在 production 模式下,只加载 .env 中定义的环境变量。
通常的做法是为开发和测试定义不同的模式。
修改package.json 中的脚本,以便在运行测试时,NODE_ENV 获得值test:
{
  // ...
  "scripts": {
    "start": "NODE_ENV=production node index.js",    "dev": "NODE_ENV=development nodemon index.js",    "build:ui": "rm -rf build && cd ../../../2/luento/notes && npm run build && cp -r build ../../../3/luento/notes-backend",
    "deploy": "git push heroku master",
    "deploy:full": "npm run build:ui && git add . && git commit -m uibuild && git push && npm run deploy",
    "logs:prod": "heroku logs --tail",
    "lint": "eslint .",
    "test": "NODE_ENV=test jest --verbose --runInBand"  },
  // ...
}
在执行测试的 npm 脚本中添加了runInBand选项。 这个选项将防止 Jest 并行运行测试,我们将在使用数据库时讨论它的重要性。
npm run dev 脚本中指定了应用的模式为 development 。 还指定了默认的 npm start 命令将模式定义为production。
在脚本中指定应用模式的方式有一个小问题: 它不能在 Windows 上工作。 可以安装cross-env作为一个开发依赖包来纠正这个问题:
npm install --save-dev cross-env然后,我们可以通过在package.json 中定义的 npm 脚本中使用跨平台兼容性的 cross-env 库来实现:
{
  // ...
  "scripts": {
    "start": "cross-env NODE_ENV=production node index.js",
    "dev": "cross-env NODE_ENV=development nodemon index.js",
    // ...
    "test": "cross-env NODE_ENV=test jest --verbose --runInBand",
  },
  // ...
}
现在可以修改应用在不同模式下运行的方式, 比如可以定义应用在运行测试时使用单独的测试数据库。
最好使用安装并跑在开发人员本地机器上的数据库来运行测试, 让每个测试用例执行时使用自己独立的数据库, 通过运行内存中的 Mongo或使用Docker容器来实现。 简单起见,在 Mongo DB Atlas 中创建单独的测试数据库。
对定义应用配置的模块进行一些修改:
require('dotenv').config()

let PORT = process.env.PORT
let MONGODB_URI = process.env.MONGODB_URI

if (process.env.NODE_ENV === 'test') {  MONGODB_URI = process.env.TEST_MONGODB_URI}
module.exports = {
  MONGODB_URI,
  PORT
}
在 .env 文件中,为开发和测试数据库的数据库地址分别设置变量:
MONGODB_URI=mongodb+srv://fullstack:[email protected]/note-app?retryWrites=true
PORT=3001

TEST_MONGODB_URI=mongodb+srv://fullstack:[email protected]/note-app-test?retryWrites=true
supertest
使用supertest包来帮助我们编写 API 的测试。
将这个软件包作为一个开发依赖项安装:
npm install --save-dev supertest在tests/note_api.test.js文件中编写第一个测试:
const mongoose = require('mongoose')
const supertest = require('supertest')
const app = require('../app')

const api = supertest(app)

test('notes are returned as json', async () => {
  await api
    .get('/api/notes')
    .expect(200)
    .expect('Content-Type', /application\/json/)
})

afterAll(() => {
  mongoose.connection.close()
})测试从app.js 模块导入 Express 应用,并用supertest 函数将其包装成一个所谓的superagent对象。 这个对象被分配给api 变量,测试可以使用它向后端发出 HTTP 请求。
测试向api/notes url 发出 HTTP GET 请求,并验证请求是否用状态码200响应。 测试还验证Content-Type 头是否设置为 application/json,表明数据是所需的格式。
定义测试的箭头函数的前面是async 关键字,对api 对象的方法调用的前面是await 关键字。 async/await 语法与向 API 发出的请求是异步 操作。 Async/await 语法可以用于编写具有同步代码外观的异步代码 。
一旦所有的测试(目前只有一个)已经完成运行,必须关闭Mongoose数据库连接, 通过afterAll方法来实现:
afterAll(() => {
  mongoose.connection.close()
})
在运行测试时,可能会遇到如下控制台警告:

如果发生这种情况,在项目的根目录添加一个jest.config.js 文件:
module.exports = {
  testEnvironment: 'node'
}
将 Express 应用提取到app.js 文件中,并且改变了index.js 文件的角色,使用 Node 的内置http 对象在指定端口启动应用:
const app = require('./app') // the actual Express app
const http = require('http')
const config = require('./utils/config')
const logger = require('./utils/logger')

const server = http.createServer(app)

server.listen(config.PORT, () => {
  logger.info(`Server running on port ${config.PORT}`)
})测试只使用app.js 文件中定义的express应用:
const mongoose = require('mongoose')
const supertest = require('supertest')
const app = require('../app')
const api = supertest(app)
// ...
supertest的文档说明如下:
if the server is not already listening for connections then it is bound to an ephemeral port for you so there is no need to keep track of ports.
如果服务器还没有监听连接,那么它就会绑定到一个临时端口,因此没有必要跟踪端口。
supertest 负责在内部使用端口启动被测试的应用。
再写一些测试:
test('there are two notes', async () => {
  const response = await api.get('/api/notes')

  expect(response.body).toHaveLength(2)
})

test('the first note is about HTTP methods', async () => {
  const response = await api.get('/api/notes')

  expect(response.body[0].content).toBe('HTML is easy')
})
这两个测试都存储了请求对响应变量的响应,并与前面的测试不同,前面的测试使用 supertest 提供的方法来验证状态代码和报头,这次检查存储在 response.body 属性中的响应数据。的测试使用 Jest 的expect方法验证响应数据的格式和内容。
使用async/await 语法。 通常情况下,我们必须使用回调函数来访问由 promises 返回的数据,但是使用新的语法会更加方便:
const response = await api.get('/api/notes')

// execution gets here only after the HTTP request is complete
// the result of HTTP request is saved in variable response
expect(response.body).toHaveLength(2)
输出 HTTP 请求信息的中间件阻碍了测试执行输出。 让我们修改日志记录器,使其不会在测试模式下打印到控制台:
const info = (...params) => {
  if (process.env.NODE_ENV !== 'test') {     console.log(...params)  }}

const error = (...params) => {
  console.error(...params)
}

module.exports = {
  info, error
}
Running tests one by one
【一个接一个的测试】
npm test 命令执行应用的所有测试。 在编写测试时,通常明智的做法是一次只执行一个或两个测试。 Jest 提供了几种不同的方法来实现这一点,其中一种就是 only 方法。 如果测试是跨多个文件编写的,那么这种方法不是很好。
更好的选择是指定需要运行的测试作为npm test 命令的参数。
下面的命令只运行 tests/note_api.test.js文件中的测试:
npm test -- tests/note_api.test.js-t 选项可用于运行具有特定名称的测试:
npm test -- -t 'a specific note is within the returned notes'提供的参数可以引用测试或描述块的名称。 参数也可以只包含名称的一部分。 下面的命令将运行名称中包含notes 的所有测试:
npm test -- -t 'notes'注意: 当运行单个测试时,如果运行的测试没有使用该连接,则 mongoose 连接可能保持打开状态。
因为 supertest 为连接优先,但是 jest 并不运行代码的 afterAll 部分。
async/await
async 和 await 关键字。
async/await 语法是在 ES7 引入 JS 的,其目的是使用异步调用函数来返回一个 promise,但使代码看起来像是同步调用。
举个例子,我们从数据库中利用 promise 返回 note 的代码如下所示:
Note.find({}).then(notes => {
  console.log('operation returned the following notes', notes)
})
Note.find() 方法会返回一个 promise, 可以通过使用 then 来注册一个回调函数,来访问上一个操作的结果。
之前想在操作完成后处理的逻辑都可以写到回调函数中。但如果我们想要创建多个异步函数顺序调用,就必须要在回调函数中写异步调用。这不但会导致代码变得更加复杂,而且可能产生回调地狱
通过链式 Promise 可以一定程度上让这种熵增变得可控, then 方法的链式调用来避免回调地狱。可以看如下例子,利用函数来获取所有的 note 并删除第一个:
Note.find({})
  .then(notes => {
    return notes[0].remove()
  })
  .then(response => {
    console.log('the first note is removed')
    // more code here
  })
ES7 引入的 async 和 await 关键字带来了和生成器相同的功能,但是以一种更容易理解以及看起来更像同步的方式来展现的,使得所有的 Javascript 使用者都更容易理解。
使用await操作符来获取所有的 note,代码如下:
const notes = await Note.find({})

console.log('operation returned the following notes', notes)
代码看起来十分像同步函数。代码的执行会在 const notes = await Note.find({}) 处暂停等待,直到相关的 promise 都满足了,然后代码会继续执行到下一行。当继续执行,所有 promise 返回的结果都指向了 notes 这个变量。
前面稍微复杂一点的例子用 await 实现的代码如下所示。
const notes = await Note.find({})
const response = await notes[0].remove()

console.log('the first note is removed')
这种语法代码比之前的 then 链式调用看起来简单多了。
为了使用 await 操作符来执行异步操作,它的返回必须是一个 promise。
在 Javascript 中,await 关键字只能在async函数中使用。
这也就是说为了保证之前那个例子能正常运行,就必须使用 async 来声明整个函数。注意第一行箭头函数的定义:
const main = async () => {  const notes = await Note.find({})
  console.log('operation returned the following notes', notes)

  const response = await notes[0].remove()
  console.log('the first note is removed')
}

main()
代码声明了 main 是一个异步函数,然后才进行 main()的调用。
async/await in the backend
【后端中的 async/await】
下面将后端代码改为 async 和 await 的方式。 由于当前所有的异步操作都是在函数那完成的,因此只需要将 route handler 函数更改声明为异步的即可。
获取所有 note 的路由函数更改如下:
notesRouter.get('/', async (request, response) => {
  const notes = await Note.find({})
  response.json(notes)
})
可以通过在浏览器中执行端测试和运行我们之前写的测试代码来验证我们的重构是否成功。
More tests and refactoring the backend
【更多的测试和后端重构】
代码重构有regression的风险,现有的功能可能会中断。 通过为 API 的每个路由编写测试来重构剩余的操作。
从添加新便笺的操作开始。 让我们编写一个测试,添加一个新的便笺,并验证 API 返回的便笺数量是否增加,以及新添加的便笺是否在列表中。
test('a valid note can be added', async () => {
  const newNote = {
    content: 'async/await simplifies making async calls',
    important: true,
  }

  await api
    .post('/api/notes')
    .send(newNote)
    .expect(200)
    .expect('Content-Type', /application\/json/)

  const response = await api.get('/api/notes')

  const contents = response.body.map(r => r.content)

  expect(response.body).toHaveLength(initialNotes.length + 1)
  expect(contents).toContain(
    'async/await simplifies making async calls'
  )
})
测试通过。
还要编写一个测试,验证没有内容的便笺不会保存到数据库中。
test('note without content is not added', async () => {
  const newNote = {
    important: true
  }

  await api
    .post('/api/notes')
    .send(newNote)
    .expect(400)

  const response = await api.get('/api/notes')

  expect(response.body).toHaveLength(initialNotes.length)
})
这两个测试都通过获取应用的所有便笺来检查保存操作之后存储在数据库中的状态。
const response = await api.get('/api/notes')相同的测试步骤将在稍后的其他测试中重复,最好将这些步骤提取到 辅助函数中。 让我们将该函数添加到一个名为 tests/test_helper.js 的新文件中,该文件与测试文件位于同一目录中。
const Note = require('../models/note')

const initialNotes = [
  {
    content: 'HTML is easy',
    date: new Date(),
    important: false
  },
  {
    content: 'Browser can execute only Javascript',
    date: new Date(),
    important: true
  }
]

const nonExistingId = async () => {
  const note = new Note({ content: 'willremovethissoon',date: new Date() })
  await note.save()
  await note.remove()

  return note._id.toString()
}

const notesInDb = async () => {
  const notes = await Note.find({})
  return notes.map(note => note.toJSON())
}

module.exports = {
  initialNotes, nonExistingId, notesInDb
}该模块定义了notesInDb函数,该函数可用于检查数据库中存储的便笺。 包含初始数据库状态的 initialNotes 数组也在模块中。 我们还提前定义了 nonExistingId 函数,该函数可用于创建不属于数据库中任何便笺对象的数据库对象 ID。
现在可以使用 helper 模块,像下面这样修改:
const supertest = require('supertest')
const mongoose = require('mongoose')
const helper = require('./test_helper')const app = require('../app')
const api = supertest(app)

const Note = require('../models/note')

beforeEach(async () => {
  await Note.deleteMany({})

  let noteObject = new Note(helper.initialNotes[0])  await noteObject.save()

  noteObject = new Note(helper.initialNotes[1])  await noteObject.save()
})

test('notes are returned as json', async () => {
  await api
    .get('/api/notes')
    .expect(200)
    .expect('Content-Type', /application\/json/)
})

test('all notes are returned', async () => {
  const response = await api.get('/api/notes')

  expect(response.body).toHaveLength(helper.initialNotes.length)})

test('a specific note is within the returned notes', async () => {
  const response = await api.get('/api/notes')

  const contents = response.body.map(r => r.content)
  expect(contents).toContain(
    'Browser can execute only Javascript'
  )
})

test('a valid note can be added ', async () => {
  const newNote = {
    content: 'async/await simplifies making async calls',
    important: true,
  }

  await api
    .post('/api/notes')
    .send(newNote)
    .expect(200)
    .expect('Content-Type', /application\/json/)

  const notesAtEnd = await helper.notesInDb()  expect(notesAtEnd).toHaveLength(helper.initialNotes.length + 1)
  const contents = notesAtEnd.map(n => n.content)  expect(contents).toContain(
    'async/await simplifies making async calls'
  )
})

test('note without content is not added', async () => {
  const newNote = {
    important: true
  }

  await api
    .post('/api/notes')
    .send(newNote)
    .expect(400)

  const notesAtEnd = await helper.notesInDb()
  expect(notesAtEnd).toHaveLength(helper.initialNotes.length)})

afterAll(() => {
  mongoose.connection.close()
})
使用 promises 的代码可以工作,并且测试通过。 使用 async/await 语法重构代码了。
对负责添加新便笺的代码进行如下更改(注意,路由处理程序的定义前面有 async 关键字) :
notesRouter.post('/', async (request, response, next) => {
  const body = request.body

  const note = new Note({
    content: body.content,
    important: body.important || false,
    date: new Date(),
  })

  const savedNote = await note.save()
  response.json(savedNote)
})
现在的代码有一个小问题: 我们没有处理错误情况。
Error handling and async/await
【错误处理与async/await】
如果在处理 POST 请求时出现了异常,我们就会陷入熟悉的情况:
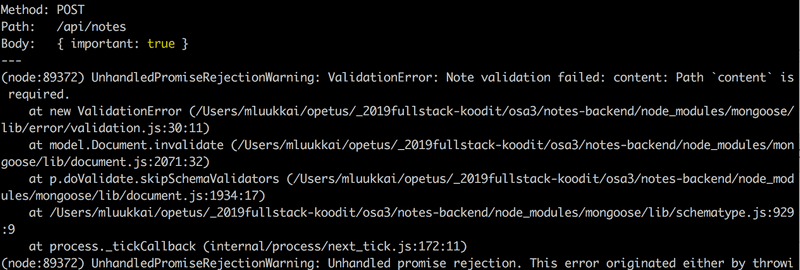
最终得到的是一个未处理的 promise 拒绝,而且请求未收到响应。
async/await 处理异常的推荐方法是 try/catch 机制:
notesRouter.post('/', async (request, response, next) => {
  const body = request.body

  const note = new Note({
    content: body.content,
    important: body.important || false,
    date: new Date(),
  })
  try {
    const savedNote = await note.save()
    response.json(savedNote)
  } catch(exception) {
    next(exception)
  }
})
Catch 块只是简单调用next函数,该函数将请求处理传递给错误处理中间件。
改变之后所有的测试都将再次通过。
接下来编写获取和删除单个便笺的测试:
test('a specific note can be viewed', async () => {
  const notesAtStart = await helper.notesInDb()

  const noteToView = notesAtStart[0]

  const resultNote = await api
    .get(`/api/notes/${noteToView.id}`)
    .expect(200)
    .expect('Content-Type', /application\/json/)

  const processedNoteToView = JSON.parse(JSON.stringify(noteToView))
  expect(resultNote.body).toEqual(processedNoteToView)
})

test('a note can be deleted', async () => {
  const notesAtStart = await helper.notesInDb()
  const noteToDelete = notesAtStart[0]

  await api
    .delete(`/api/notes/${noteToDelete.id}`)
    .expect(204)

  const notesAtEnd = await helper.notesInDb()

  expect(notesAtEnd).toHaveLength(
    helper.initialNotes.length - 1
  )

  const contents = notesAtEnd.map(r => r.content)

  expect(contents).not.toContain(noteToDelete.content)
})
在第一个测试中, 收到的note对象,作为response body,经过JSON的序列化和格式化处理。这种处理会将note 对象的date 属性的值类型从Date 类型转换成string。因此我们不能直接比较resultNote.body 和 noteToView 是否相等。而是必须像服务器对note 对象的操作那样,首先利用类似的方法,用JSON来序列化和格式化noteToView 。
这两个测试有着相似的结构。 在初始化阶段,它们从数据库中获取一个便笺。 在此之后,测试调用被测试的实际操作,测试验证了操作的结果是符合预期的。
测试通过了,安全地重构测试的路由,同样使用 async/await:
notesRouter.get('/:id', async (request, response, next) => {
  try{
    const note = await Note.findById(request.params.id)
    if (note) {
      response.json(note)
    } else {
      response.status(404).end()
    }
  } catch(exception) {
    next(exception)
  }
})

notesRouter.delete('/:id', async (request, response, next) => {
  try {
    await Note.findByIdAndRemove(request.params.id)
    response.status(204).end()
  } catch (exception) {
    next(exception)
  }
})
Eliminating the try-catch
【消除try-catch】
Async/await 简化了代码,但是‘ 代价’是增加捕获异常所需的try/catch 结构。
所有的路由处理程序遵循相同的结构
try {
  // do the async operations here
} catch(exception) {
  next(exception)
}express-async-errors库为此提供了一个方案, 重构代码以从方法中消除catch
安装这个库
npm install express-async-errors使用这个库很容易,在app.js 中导入:
const config = require('./utils/config')
const express = require('express')
require('express-async-errors')const app = express()
const cors = require('cors')
const notesRouter = require('./controllers/notes')
const middleware = require('./utils/middleware')
const logger = require('./utils/logger')
const mongoose = require('mongoose')

// ...

module.exports = app
这个库的“魔法”允许我们完全消除 try-catch 块。例如,删除便笺的路由
notesRouter.delete('/:id', async (request, response, next) => {
  try {
    await Note.findByIdAndRemove(request.params.id)
    response.status(204).end()
  } catch (exception) {
    next(exception)
  }
})
可以变成
notesRouter.delete('/:id', async (request, response) => {
  await Note.findByIdAndRemove(request.params.id)
  response.status(204).end()
})由于库的存在,我们不再需要next(exception) 这种调用方式了。
如果在async 路由中发生异常,执行将自动传递到错误处理中间件。
其他的路由修改为:
notesRouter.post('/', async (request, response) => {
  const body = request.body

  const note = new Note({
    content: body.content,
    important: body.important || false,
    date: new Date(),
  })

  const savedNote = await note.save()
  response.json(savedNote)
})

notesRouter.get('/:id', async (request, response) => {
  const note = await Note.findById(request.params.id)
  if (note) {
    response.json(note)
  } else {
    response.status(404).end()
  }
})
Optimizing the beforeEach function
【优化 beforeEach 函数】
研究一下设置测试的 beforeEach 函数:
beforeEach(async () => {
  await Note.deleteMany({})

  let noteObject = new Note(helper.initialNotes[0])
  await noteObject.save()

  noteObject = new Note(helper.initialNotes[1])
  await noteObject.save()
})
函数使用两个单独的操作将前两个便笺从 helper.initialNotes 数组保存到数据库中。 有一个更好的方法将多个对象保存到数据库中:
beforeEach(async () => {
  await Note.deleteMany({})
  console.log('cleared')

  helper.initialNotes.forEach(async (note) => {
    let noteObject = new Note(note)
    await noteObject.save()
    console.log('saved')
  })
  console.log('done')
})

test('notes are returned as json', async () => {
  console.log('entered test')
  // ...
}
将存储在数组中的便笺保存到 forEach 循环中的数据库中。 然而,这些测试似乎并不能正常工作,因此我们添加了一些控制台日志来帮助我们找到问题所在。
控制台显示如下输出:
cleared
done
entered test
saved
saved
尽管使用了 async/await 语法,但是我们的解决方案并不像我们期望的那样工作。 测试在数据库初始化之前就开始了!
问题在于 forEach 循环的每次迭代都会生成自己的异步操作,而 beforeEach 不会等待它们完成执行。在 forEach 循环中定义的 await 命令不在 beforeEach 函数中,而是在 beforeEach 不会等待的独立函数中。
由于测试的执行在 beforeEach 完成执行之后立即开始,因此测试的执行在初始化数据库状态之前开始。
解决这个问题的一个方法是等待所有的异步操作,使用 Promise.all 方法完成:
beforeEach(async () => {
  await Note.deleteMany({})

  const noteObjects = helper.initialNotes
    .map(note => new Note(note))
  const promiseArray = noteObjects.map(note => note.save())
  await Promise.all(promiseArray)
})
noteObjects 变量分配给一个 Mongoose 对象数组,这些对象是用 helper.initialNotes 数组中的每个便笺的 Note 构造函数创建的。 下一行代码创建一个由 consists of promises组成的新数组,这个数组是通过调用 noteObjects 数组中每个项的 save 方法创建的。 换句话说,它是将每个项保存到数据库的Promise数组。
Promise.all 方法可以用于将一个promises 数组转换为一个单一的promise,一旦数组中的每个promise作为参数被解析传递给它,它就会被实现。 最后一行代码 await Promise.all(promiseArray) 会等待着每个保存便笺的承诺都完成,这意味着数据库已经初始化。
当使用 Promise.all 方法时,仍然可以访问数组中每个promise的返回值。 如果我们使用 await 语法 const results = await Promise.all(promiseArray) 等待Promises被解析,操作将返回一个数组,该数组包含在 promiseArray 中的每个promise的解析值,并且它们与数组中的promise以相同的顺序出现。
Promise.all 并行执行它所收到的promises。 如果promise需要按照特定顺序执行,这将是个问题。 在这样的情况下,操作可以在一个for... of块中执行,这样保证一个特定的执行顺序。
beforeEach(async () => {
  await Note.deleteMany({})

  for (let note of helper.initialNotes) {
    let noteObject = new Note(note)
    await noteObject.save()
  }
})
Refactoring tests
【重构测试】
测试覆盖率目前还不够。 有些请求,比如GET /api/notes/:id 和DELETE /api/notes/:id,在使用无效 id 发送请求时没有进行测试。 测试的分组和组织也可以使用一些改进,因为所有测试都存在于测试文件的同一“顶层”上。 如果我们将相关的测试与describe 块分组,测试的可读性将得到提高。
做了一些小改进后的测试文件:
const supertest = require('supertest')
const mongoose = require('mongoose')
const helper = require('./test_helper')
const app = require('../app')
const api = supertest(app)

const Note = require('../models/note')

beforeEach(async () => {
  await Note.deleteMany({})

  const noteObjects = helper.initialNotes
    .map(note => new Note(note))
  const promiseArray = noteObjects.map(note => note.save())
  await Promise.all(promiseArray)
})

describe('when there is initially some notes saved', () => {
  test('notes are returned as json', async () => {
    await api
      .get('/api/notes')
      .expect(200)
      .expect('Content-Type', /application\/json/)
  })

  test('all notes are returned', async () => {
    const response = await api.get('/api/notes')

    expect(response.body).toHaveLength(helper.initialNotes.length)
  })

  test('a specific note is within the returned notes', async () => {
    const response = await api.get('/api/notes')

    const contents = response.body.map(r => r.content)
    expect(contents).toContain(
      'Browser can execute only Javascript'
    )
  })
})

describe('viewing a specific note', () => {
  test('succeeds with a valid id', async () => {
    const notesAtStart = await helper.notesInDb()

    const noteToView = notesAtStart[0]

    const resultNote = await api
      .get(`/api/notes/${noteToView.id}`)
      .expect(200)
      .expect('Content-Type', /application\/json/)

    const processedNoteToView = JSON.parse(JSON.stringify(noteToView))
    expect(resultNote.body).toEqual(processedNoteToView)
  })

  test('fails with statuscode 404 if note does not exist', async () => {
    const validNonexistingId = await helper.nonExistingId()

    console.log(validNonexistingId)

    await api
      .get(`/api/notes/${validNonexistingId}`)
      .expect(404)
  })

  test('fails with statuscode 400 id is invalid', async () => {
    const invalidId = '5a3d5da59070081a82a3445'

    await api
      .get(`/api/notes/${invalidId}`)
      .expect(400)
  })
})

describe('addition of a new note', () => {
  test('succeeds with valid data', async () => {
    const newNote = {
      content: 'async/await simplifies making async calls',
      important: true,
    }

    await api
      .post('/api/notes')
      .send(newNote)
      .expect(200)
      .expect('Content-Type', /application\/json/)


    const notesAtEnd = await helper.notesInDb()
    expect(notesAtEnd).toHaveLength(helper.initialNotes.length + 1)

    const contents = notesAtEnd.map(n => n.content)
    expect(contents).toContain(
      'async/await simplifies making async calls'
    )
  })

  test('fails with status code 400 if data invaild', async () => {
    const newNote = {
      important: true
    }

    await api
      .post('/api/notes')
      .send(newNote)
      .expect(400)

    const notesAtEnd = await helper.notesInDb()

    expect(notesAtEnd).toHaveLength(helper.initialNotes.length)
  })
})

describe('deletion of a note', () => {
  test('succeeds with status code 204 if id is valid', async () => {
    const notesAtStart = await helper.notesInDb()
    const noteToDelete = notesAtStart[0]

    await api
      .delete(`/api/notes/${noteToDelete.id}`)
      .expect(204)

    const notesAtEnd = await helper.notesInDb()

    expect(notesAtEnd).toHaveLength(
      helper.initialNotes.length - 1
    )

    const contents = notesAtEnd.map(r => r.content)

    expect(contents).not.toContain(noteToDelete.content)
  })
})

afterAll(() => {
  mongoose.connection.close()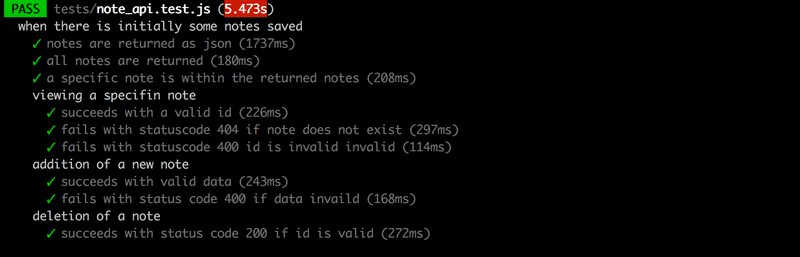
})测试输出根据describe 块进行分组: