文章目录

特别说明
笔记来源中国大学慕课课程——深度学习应用开发-TensorFlow实践,笔者学习并整理,课程讲解十分详细,课程直达地址
TensorFlow 简介
• TensorFlow™ 是一个开放源代码软件库,用于进行高性能数值计算
• 借助其灵活的架构,用户可以轻松地将计算工作部署到多种平台
(CPU、GPU、TPU)和设备(桌面设备、服务器集群、移动设备、边缘设备等)
• TensorFlow™ 最初是由 Google Brain 团队(隶属于 Google 的 AI 部门)中的研究人员和工程师开发的,可为机器学习和深度学习提供强力支持
• Tensorflow 目前已经发展到 2.x 版本


•TensorFlow的概念
TensorFlow = Tensor + Flow
Tensor 张量
数据结构:多维数组
Flow 流
计算模型:张量之间通过计算而转换的过程
TensorFlow是一个通过计算图的形式表述计算的编程系统
每一个计算都是计算图上的一个节点
节点之间的边描述了计算之间的关系
一、TensorFlow 1.x
TensorFlow 1.x版本代码的执行主要是基于传统的Graph Execution(静态图执行)机制,存在着一定弊端,如入门门槛高、调试困难、灵活性差、无法使用 Python 原生控制语句等。静态图执行模式对于即时执行模式效率会更高,所以通常当模型开发调试完成,部署。采用图执行模式会有更高运行效率。在TensorFlow 2里也支持已函数方式调用计算图
二、TensorFlow 2.x
TensorFlow 2代码的执行机制默认采用Eager Execution(动态图执行机制),具有更方便的调试方法,更贴近 Python 的语言描述机制,但执行效率不如静态图模式
TensorFlow 基本语法介绍
一、TensorFlow 1.x
计算图(数据流图)的概念
计算图是一个有向图,由以下内容构成:
• 一组节点,每个节点都代表一个操作,是一种运算
• 一组有向边,每条边代表节点之间的关系(数据传递和控制依赖)TensorFlow有两种边:
• 常规边(实线):代表数据依赖关系。一节点的运算输出成为另一节点的输入,两个节点之间有tensor流动(值传递)
• 特殊边(虚线):不携带值,表示两个节点之间的控制相关性。比如,happens-before关系,源节点必须在目的节点执行前完成执行
常量与变量
常量 constant
在运行过程中值不会改变的单元,在TensorFlow中无须进行初始化操作
创建语句:
constant_ name = tf.constant(value)
变量 Variable
在运行过程中值会改变的单元,在TensorFlow中须进行初始化操作
创建语句:
name_variable = tf.Variable(value, name)
个别变量初始化:
init_op = name_variable.initializer()
所有变量初始化:
init_op = tf.global_variables_initializer()
张量 Tensor
• 在TensorFlow中,所有的数据都通过张量的形式来表示
• 从功能的角度,张量可以简单理解为多维数组
零阶张量表示标量(scalar),也就是一个数;
一阶张量为向量(vector),也就是一维数组;
n阶张量可以理解为一个n维数组;
• 张量并没有真正保存数字,它保存的是计算过程
操作 Operation
• 计算图中的节点就是操作(Operation)
• 一次加法是一个操作
• 一次乘法也是一个操作
• 构建一些变量的初始值也是一个操作
• 每个运算操作都有属性,它在构建图的时候需要确定下来 • 操作可以和计算设备绑定,指定操作在某个设备上执行
• 操作之间存在顺序关系,这些操作之间的依赖就是“边”
• 如果操作A的输入是操作B执行的结果,那么这个操作A就依赖于操作B


占位符 placeholder
• TensorFlow中的Variable变量类型,在定义时需要初始化,但有些变量定义时并不知道其数值,只有当真正开始运行程序时,才由外部输入,比如训练数据,这时候需要用到占位符
• tf.placeholder占位符,是TensorFlow中特有的一种数据结构,类似动态变量,函数的参数、或者C语言或者Python语言中格式化输出时的“%”占位符
会话 Session
会话(session)
会话拥有并管理TensorFlow程序运行时的所有资源
当所有计算完成之后需要关闭会话帮助系统回收资源
TensorFlow 1.x 采用会话的模式运行

二、TensorFlow 2.x
Tensorflow 2.x 保留了 Tensorflow 1.x 的数据类型,但是实行动态图机制运算,不再使用 Session 操作,在 TensorFlow 2x & TensorFlow 1.x toturial 会详细解释
三、TensorFlow 2.x 安装
参考 NO.1 Tensorflow在win10下实现object detection
安装命令为:
pip install tensorflow-gpu==2.0.0由于之前安装 TensorFlow 1.x 选择安装的 1.15.2 版本,TensorFlow 2.0.0 与 TensorFLow 1.15.2 适用同样的 CUDA,CUDNN,根据自己电脑配置,自行选择安装 TensorFlow 2.x 版本
从源码编译安装 TensorFlow 2.x 参考 Win10系统下从tensorflow源码编译tensorflow-gpu 1.15
安装 jupyter
pip install jupyter安装 jupyter-tensorboard,这样可以从 jupyter 内部查看 tensorboard
pip install jupyter-tensorboard安装 jupyter_http_over_ws
pip install jupyter_http_over_wsTensorFlow 2x & TensorFlow 1.x toturial
!/usr/bin/env python
coding: utf-8
TensorFlow 2.0模式
Eager Execution(动态图执行机制)
版本号
import tensorflow as tf

tf.__version__'2.0.0'定义节点
node1 = tf.constant([[3.0, 1.5], [2.5, 6.0]], tf.float32)
node2 = tf.constant([[4.0, 1.0], [5.0, 2.5]], tf.float32)
node3 = tf.add(node1, node2)
查看节点信息
node1<tf.Tensor: id=0, shape=(2, 2), dtype=float32, numpy=
array([[3. , 1.5],
[2.5, 6. ]], dtype=float32)>node2<tf.Tensor: id=1, shape=(2, 2), dtype=float32, numpy=
array([[4. , 1. ],
[5. , 2.5]], dtype=float32)>node3<tf.Tensor: id=2, shape=(2, 2), dtype=float32, numpy=
array([[7. , 2.5],
[7.5, 8.5]], dtype=float32)>Tensor 转 Numpy
print('Class:', type(node3.numpy()),
      '\nValue:\n', node3.numpy(),
      '\nShape:', node3.shape,
'\nDtype:', node3.dtype)Class: <class 'numpy.ndarray'>
Value:
[[7. 2.5]
[7.5 8.5]]
Shape: (2, 2)
Dtype: <dtype: 'float32'>张量形状
shape 与 get_shape()具有相同的作用
scalar = tf.constant(100)
vector = tf.constant([1, 2, 3, 4, 5])
matrix = tf.constant([[1, 2, 3], [4, 5, 6]])
cube_matrix = tf.constant([[[1], [2], [3]], [[4], [5], [6]], [[7], [8], [9]]])

print('scalar shape', ' ' * 3, ':', scalar.shape)
print('vector shape', ' ' * 3, ':',  vector.shape)
print('matrix shape', ' ' * 3, ':',  matrix.shape)
print('cube_matrix shape:', cube_matrix.get_shape())
scalar shape : ()
vector shape : (5,)
matrix shape : (2, 3)
cube_matrix shape: (3, 3, 1)通过下标获取值
print('A value in cube_matrix[1, 2, 0]:', cube_matrix.numpy()[1, 2, 0])A value in cube_matrix[1, 2, 0]: 6TensorFlow 严控数据类型
tf.constant(
value,
dtype=None,
shape=None,
name=‘Const’
)
node_a = tf.constant([1, 2], dtype=tf.int32)
node_b = tf.constant([3.0, 4.0], dtype=tf.float32)

try:
    node_result = tf.add(node_a, node_b)
except:
    print('INFO:cannot compute Add as input #1(zero-based) was expected to be a int32 tensor but is a float tensor [Op:Add]')
    print('INFO:you\'d, transform the dtype')
finally:
    node_cast_a = tf.cast(node_a, tf.float32)
    node_result = tf.add(node_cast_a, node_b)
    print('Result:', node_result,
         '\nValue:', node_result.numpy())
INFO:cannot compute Add as input #1(zero-based) was expected to be a int32 tensor but is a float tensor [Op:Add]
INFO:you'd, transform the dtype
Result: tf.Tensor([4. 6.], shape=(2,), dtype=float32)
Value: [4. 6.]TensorFlow 变量
tf.Variable(
initial_value,
dtype=None,
shape=None,
trainable=True,
name=‘Variable’,
)
TensorFlow 变量一般用于机器迭代自动修改值,但人工也可以主动进行修改,变量创建必须指定初始值,像定义常量一样,变量的类型由初始值确定,如下
variable_1 = tf.Variable([1, 2])
variable_2 = tf.Variable([3, 4], tf.float32)

variable_1, variable_2(<tf.Variable 'Variable:0' shape=(2,) dtype=int32, numpy=array([1, 2])>,
<tf.Variable 'Variable:0' shape=(2,) dtype=int32, numpy=array([3, 4])>)可以使用张量作为初始值
variable_3 = tf.constant(1, dtype=tf.float32)
variable_4 = tf.Variable(variable_3)

variable_3, variable_4(<tf.Tensor: id=28, shape=(), dtype=float32, numpy=1.0>,
<tf.Variable 'Variable:0' shape=() dtype=float32, numpy=1.0>)特殊情况需要人工更新,可用变量赋值语句 assign() 实现,比如在断点续训例子中,将会用到这个功能,TensorFlow 2.x提供 assign_add()、assign_sub()实现变量加减
variable_5 = tf.Variable(5)
variable_6 = tf.Variable(5)
variable_7 = tf.Variable(7)

variable_5.assign(variable_5 + 1)
variable_6.assign_add(1)
variable_7.assign_sub(1)
print('variable_5 + 1:', variable_5,
      '\nvariable_6 + 1:', variable_6,
      '\nvariable_7 + 1:', variable_7)
variable_5 + 1: <tf.Variable 'Variable:0' shape=() dtype=int32, numpy=6>
variable_6 + 1: <tf.Variable 'Variable:0' shape=() dtype=int32, numpy=6>
variable_7 + 1: <tf.Variable 'Variable:0' shape=() dtype=int32, numpy=6>TensorFlow 2.0 实现 1.x模式
Graph Execution(静态图执行机制)
compat 中文意思为兼容,v1指 tensorflow 1.x,tensorflow.compat.v1 含义则是兼容 tensorflow 1.x 的接口,实际上,tensorflow 2.x 将 tensorflow 1.x 全部接口写入了 tensorflow.compat.v1
import tensorflow.compat.v1 as tf

tf.disable_eager_execution()
node1 = tf.constant(3.0, tf.float32, name='node1')
node2 = tf.constant(3.0, tf.float32, name='node2')
node3 = tf.add(node1, node2)
node3<tf.Tensor 'Add:0' shape=() dtype=float32>tf.Session()创建一个会话,当上下文管理器退出时会话关闭和资源释放自动完成
tf.Session().as_default()创建一个默认会话,当上下文管理器退出时会话没有关闭,还可以通过调用会话进行run()和eval()操作
在管理器内部直接使用 eval(),在管理器外部[未启用 sess.close()],使用 eval(session=sess)
在非 with 结构也需要使用 eval(session=sess)
with tf.Session() as sess:
    print('node1 result:', sess.run(node1))
    print('node2 result:', sess.run(node2))
    print('node3 result:', sess.run(node3))
    print('node3 eval:', node3.eval())

try:
    print('Even out with session, the node3 value is:', node3.eval(session=sess))
except RuntimeError:
    print('RuntimeError:attempted to use a closed Session.')
finally:
    print('session done')
node1 result: 3.0
node2 result: 3.0
node3 result: 6.0
node3 eval: 6.0
RuntimeError:attempted to use a closed Session.
session donewith tf.Session().as_default() as sess:
print('node1 result:', sess.run(node1))
print('node2 result:', sess.run(node2))
print('node3 result:', sess.run(node3))
print('node3 eval:', node3.eval())
try:
print('Even out with session, the node3 value is:', node3.eval(session=sess))
except RuntimeError:
print('RuntimeError:attempted to use a closed Session.')
finally:
print('session done')
sess.close()
try:
print('Closed session, the node3 value is:', node3.eval(session=sess))
except RuntimeError:
print('RuntimeError:attempted to use a closed Session.')
finally:
print('Session done, cause I use sess.close()')node1 result: 3.0
node2 result: 3.0
node3 result: 6.0
node3 eval: 6.0
Even out with session, the node3 value is: 6.0
session done
RuntimeError:attempted to use a closed Session.
Session done, cause I use sess.close()sess = tf.Session()
try:
print('node3.eval() value', node3.eval())
except ValueError:
print(('Cannot evaluate tensor using `eval()`: No default session is registered.'
'Use `with sess.as_default()` or pass an explicit session to `eval(session=sess)`'))
finally:
print('node3.eval() value:', node3.eval(session=sess))Cannot evaluate tensor using `eval()`: No default session is registered.Use `with sess.as_default()` or pass an explicit session to `eval(session=sess)`
node3.eval() value: 6.0在交互式环境下,Python 脚本或者 Jupyter 编辑器下,通过设置默认会话来获取张量的取值更加方便
tf.InteractiveSession 这个函数会自动将生成的会话注册为默认会话
sess = tf.InteractiveSession()

print('node3 InteractiveSession value:', node3.eval())
sess.close()
node3 InteractiveSession value: 6.0TensorFlow 1.x Variable
变量 Variable 在 Tensorflow 中需进行初始化操作:
name_variable = tf.Variable(value, name)
init_op = name_variable.initializer() 个别变量初始化
init_op = tf.global_variables_initializer() 所有变量初始化
node1 = tf.Variable(3.0, tf.float32, name='node1')
node2 = tf.Variable(3.0, tf.float32, name='node2')
result = tf.add(node1, node2)

try:
    sess = tf.Session()
    print('sess.run(result) value:', sess.run(result))
except:
    init = tf.global_variables_initializer()
    sess = tf.Session()
    sess.run(init)
    print('sess.run(result) value:', sess.run(result))
finally:
    print('Variables must be initialized')
sess.close()WARNING:tensorflow:From e:\anaconda3\envs\tensorflow2.x\lib\site-packages\tensorflow_core\python\ops\resource_variable_ops.py:1630: calling BaseResourceVariable.__init__ (from tensorflow.python.ops.resource_variable_ops) with constraint is deprecated and will be removed in a future version.
Instructions for updating:
If using Keras pass *_constraint arguments to layers.
sess.run(result) value: 6.0
Variables must be initialized变量复制案例
tf.assign(variable_to_be_updated, new_value),将 new_value 的值赋给 variable_to_be_updated
import os


tf.reset_default_graph()

value = tf.Variable(0, name='value')
one = tf.constant(1)
new_value = tf.add(value, one)
update_value = tf.assign(value, new_value)

init = tf.global_variables_initializer()
print('result:', end='')

with tf.Session() as sess:
    sess.run(init)
    for _ in range(10):
        sess.run(update_value)
        print(sess.run(value),end=' ')

logdir='TensorFlow_2.x_tutorial_logs'

if not os.path.exists(logdir):
    os.mkdir(logdir)

writer = tf.summary.FileWriter(logdir, tf.get_default_graph())
writer.close()
result:1 2 3 4 5 6 7 8 9 10思考题
TensorFlow 表示
sum_value = tf.Variable(0, name='sum_value')
num_value = tf.Variable(0, name='num_value')
one = tf.constant(1, name='one')

new_num_value = tf.add(num_value, one)
new_sum_value = tf.add(sum_value, num_value)
update_num_value = tf.assign(num_value, new_num_value)
update_sum_value = tf.assign(sum_value, new_sum_value)

init = tf.global_variables_initializer()
print('Result:1+2+3+4+5+6+7+8+9+10=', end='')
with tf.Session() as sess:
    sess.run(init)
    for i in range(10):
        sess.run(update_num_value)
        sess.run(update_sum_value)
print(sess.run(sum_value))Result:1+2+3+4+5+6+7+8+9+10=55基础 Python 表示
List = [i for i in range(1, 11)]
result_value = sum(List)
print('Result:1+2+3+4+5+6+7+8+9+10=%d' % result_value)Result:1+2+3+4+5+6+7+8+9+10=55Tensorflow 基本运算
TensorFlow 数据喂入 feed 与占位符 placeholder
tf.placeholder(dtype, shape=None, name=None)
未用到变量 tf.Variable() 可以不用初始化,注释 sess.run(init) 与 init 不会报错
a = tf.placeholder(tf.float32, name='a')
b = tf.placeholder(tf.float32, name='b')
c = tf.multiply(a, b, name='c')

init = tf.global_variables_initializer()

with tf.Session() as sess:
    sess.run(init)
    result_sess_run = sess.run(c, feed_dict={a:5.20, b:13.14})
    result_eval = c.eval(feed_dict={a:5.20, b:13.14})
    print('sess.run caculate c value:', result_sess_run)
print('c.eval caculate c value:', result_eval)sess.run caculate c value: 68.328
c.eval caculate c value: 68.328计算多个值
a = tf.placeholder(tf.float32, name='a')
b = tf.placeholder(tf.float32, name='b')
c = tf.multiply(a, b, name='c')
d = tf.subtract(a, b, name='d')

init = tf.global_variables_initializer()

with tf.Session() as sess:
    sess.run(init)
    result = sess.run([c, d], feed_dict={a:[1, 2, 3], b:[4, 5, 6]})
    print('value:', result)
    print('first value:', result[0])
print('*******the another pattern*******')
with tf.Session() as sess:
    sess.run(init)
    result_1, result_2 = sess.run([c, d], feed_dict={a:[1, 2, 3], b:[4, 5, 6]})
    print('result_1:', result_1)
    print('result_2:', result_2)
value: [array([ 4., 10., 18.], dtype=float32), array([-3., -3., -3.], dtype=float32)]
first value: [ 4. 10. 18.]
*******the another pattern*******
result_1: [ 4. 10. 18.]
result_2: [-3. -3. -3.]Tensorboard 基本可视化操作
基本函数介绍
tf.add_n(inputs, name=None)
A Tensor. Has the same type as inputs.Add all input tensors element wise.
inputs: A list of at least 1 Tensor objects of the same type in: float32, float64, int64, int32, uint8, int16, int8, complex64, qint8, quint8, qint32. Must all be the same size and shape.
name: A name for the operation (optional).
Returns:A Tensor. Has the same type as inputs.
输入是一个列表,里面包含了一些 tensor(数据类型必须相同),用于将列表中的 tensor 求和并返回
tf.random_uniform(
shape,
minval=0,
maxval=None,
dtype=tf.float32,
seed=None,
name=None
)
从均匀分布中输出随机值。生成的值在该 [minval, maxval)范围内遵循均匀分布.下限 minval 包含在范围内,而上限 maxval 被排除在外。对于浮点数,默认范围是 [0, 1)。对于整数,至少 maxval 必须明确地指定。在整数情况下,随机整数稍有偏差,除非 maxval - minval 是 2 的精确幂。对于maxval - minval 的值,偏差很小,明显小于输出(2^32 或者 2^64)的范围。
参数:
shape:一维整数张量或 Python 数组.输出张量的形状.
minval:dtype 类型的 0-D 张量或 Python 值;生成的随机值范围的下限;默认为0.
maxval:dtype 类型的 0-D 张量或 Python 值.要生成的随机值范围的上限.如果 dtype 是浮点,则默认为1 .
dtype:输出的类型:float16、float32、float64、int32、orint64.
seed:一个 Python 整数.用于为分布创建一个随机种子.查看 tf.set_random_seed 行为.
name:操作的名称(可选).
返回值:
用于填充随机均匀值的指定形状的张量.
可能引发的异常:
ValueError:如果 dtype 是整数并且 maxval 没有被指定.
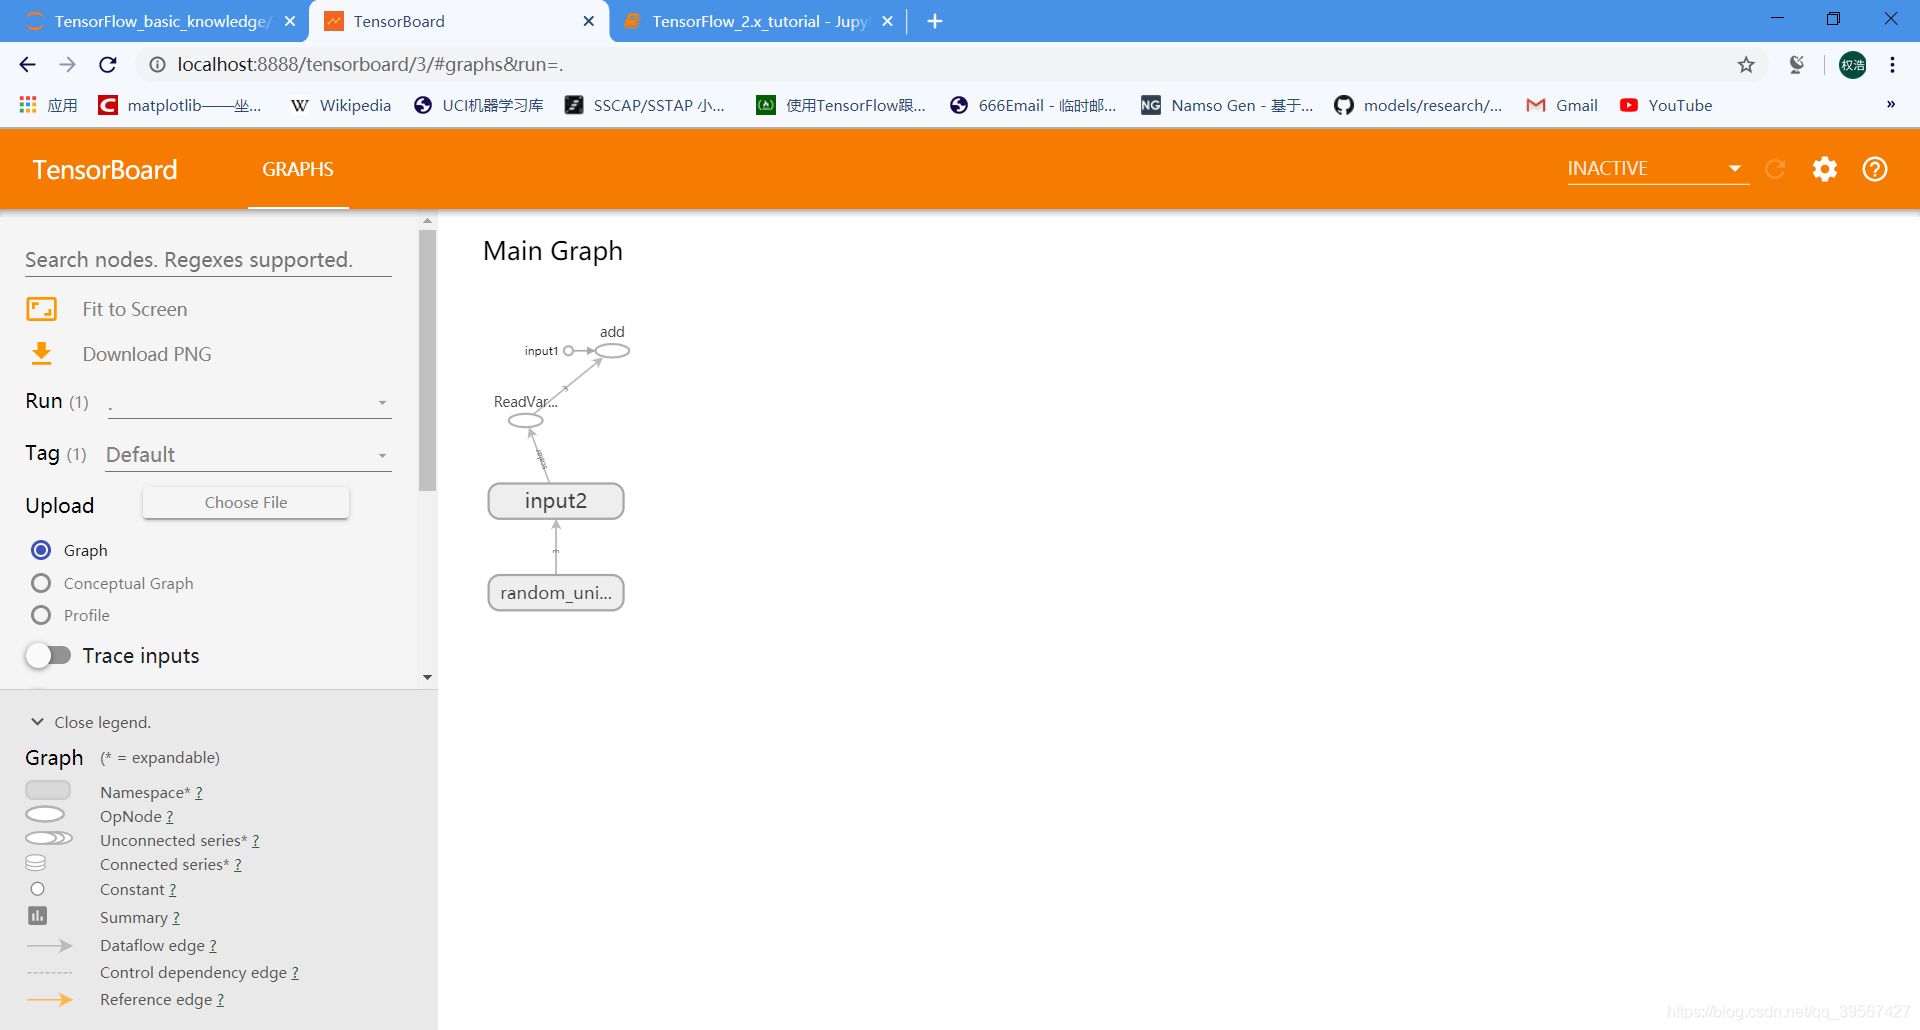
tf.reset_default_graph()

logdir='./Tensorboard_basic_operation_logs'

if not os.path.exists(logdir):
    os.mkdir(logdir)

input1 = tf.constant([1.0, 2.0, 3.0], name='input1')

input2 = tf.Variable(tf.random_uniform([3]), name='input2')
output = tf.add_n([input1, input2], name='add')

writer = tf.summary.FileWriter(logdir, tf.get_default_graph())
writer.close()
上述 input2 采用 tf.random_uniform() 生成随机数,从输入参数可以表明其为一个具有三个元素的一维数组
sess = tf.Session()
sess.run(tf.global_variables_initializer())
print('class:', type(sess.run(input2)))
print('value:', sess.run(input2))

sess.close()
补充 jupyter 查看 Tensorboard
新页面查看方式
安装方式已在上方写出,这里总结一下
pip install jupyter
pip install jupyter-tensorboard
pip install jupyter_http_over_ws
在 jupyter 内进入日志文件夹,例如进入 TensorFlow_2.x_tutorial_logs 点击 new Tensorboard 如下
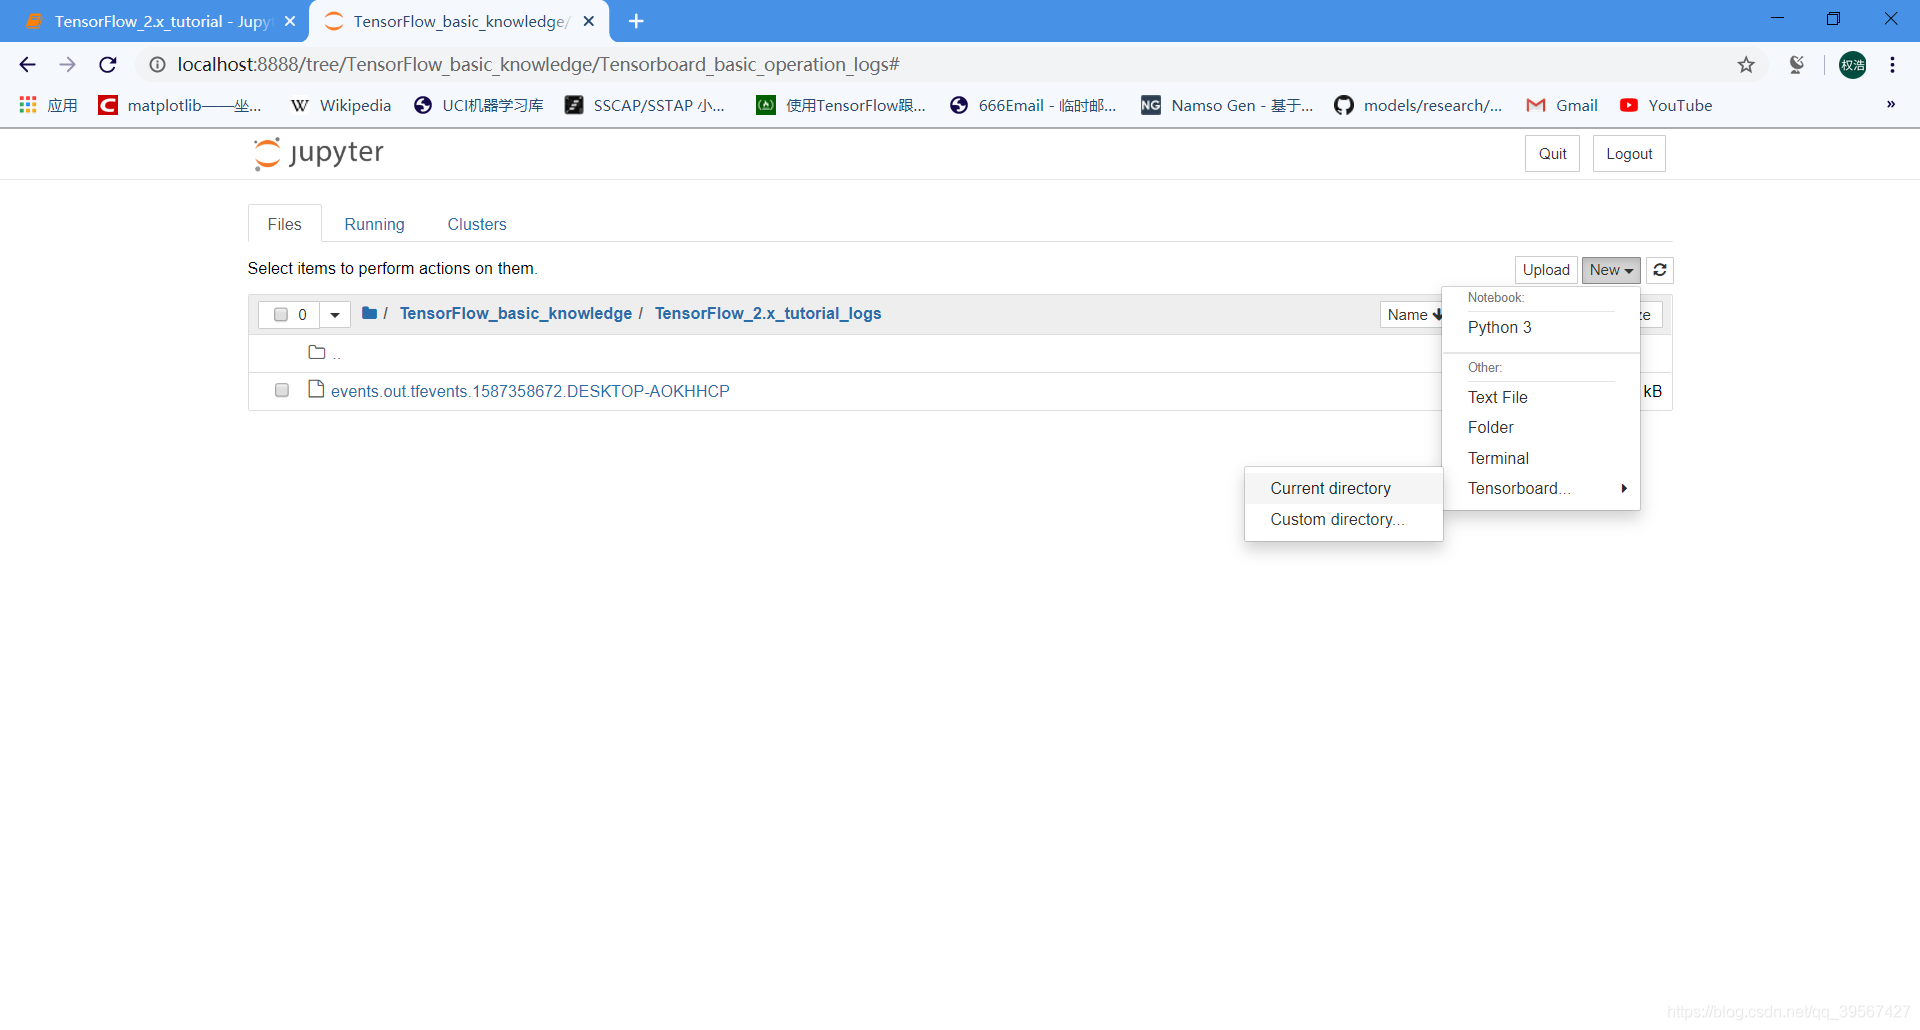
选择 Current directory,打开如下
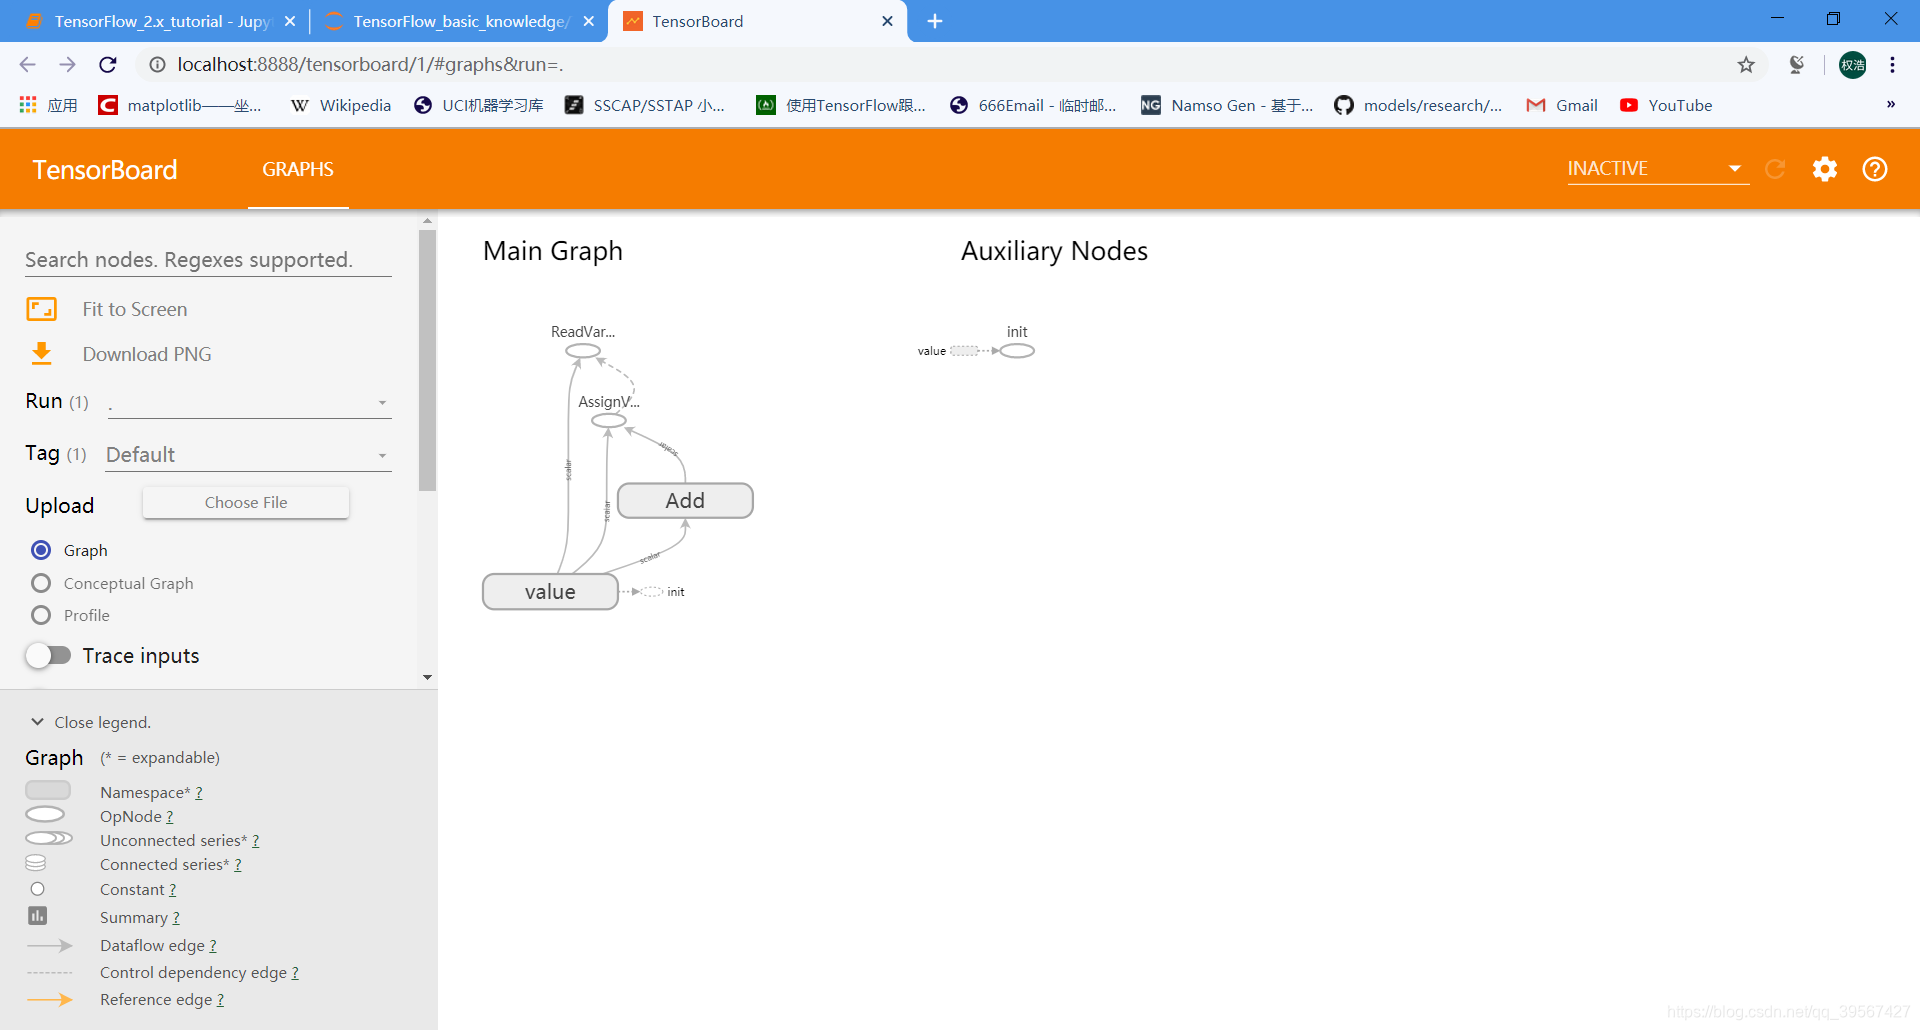
在 jupyter 内进入日志文件夹,例如进入 Tensorboard_basic_operation_logs 点击 new Tensorboard 如下
在 jupyter 输出框显示
%load_ext tensorboard%tensorboard --logdir Tensorboard_basic_operation_logs效果如下
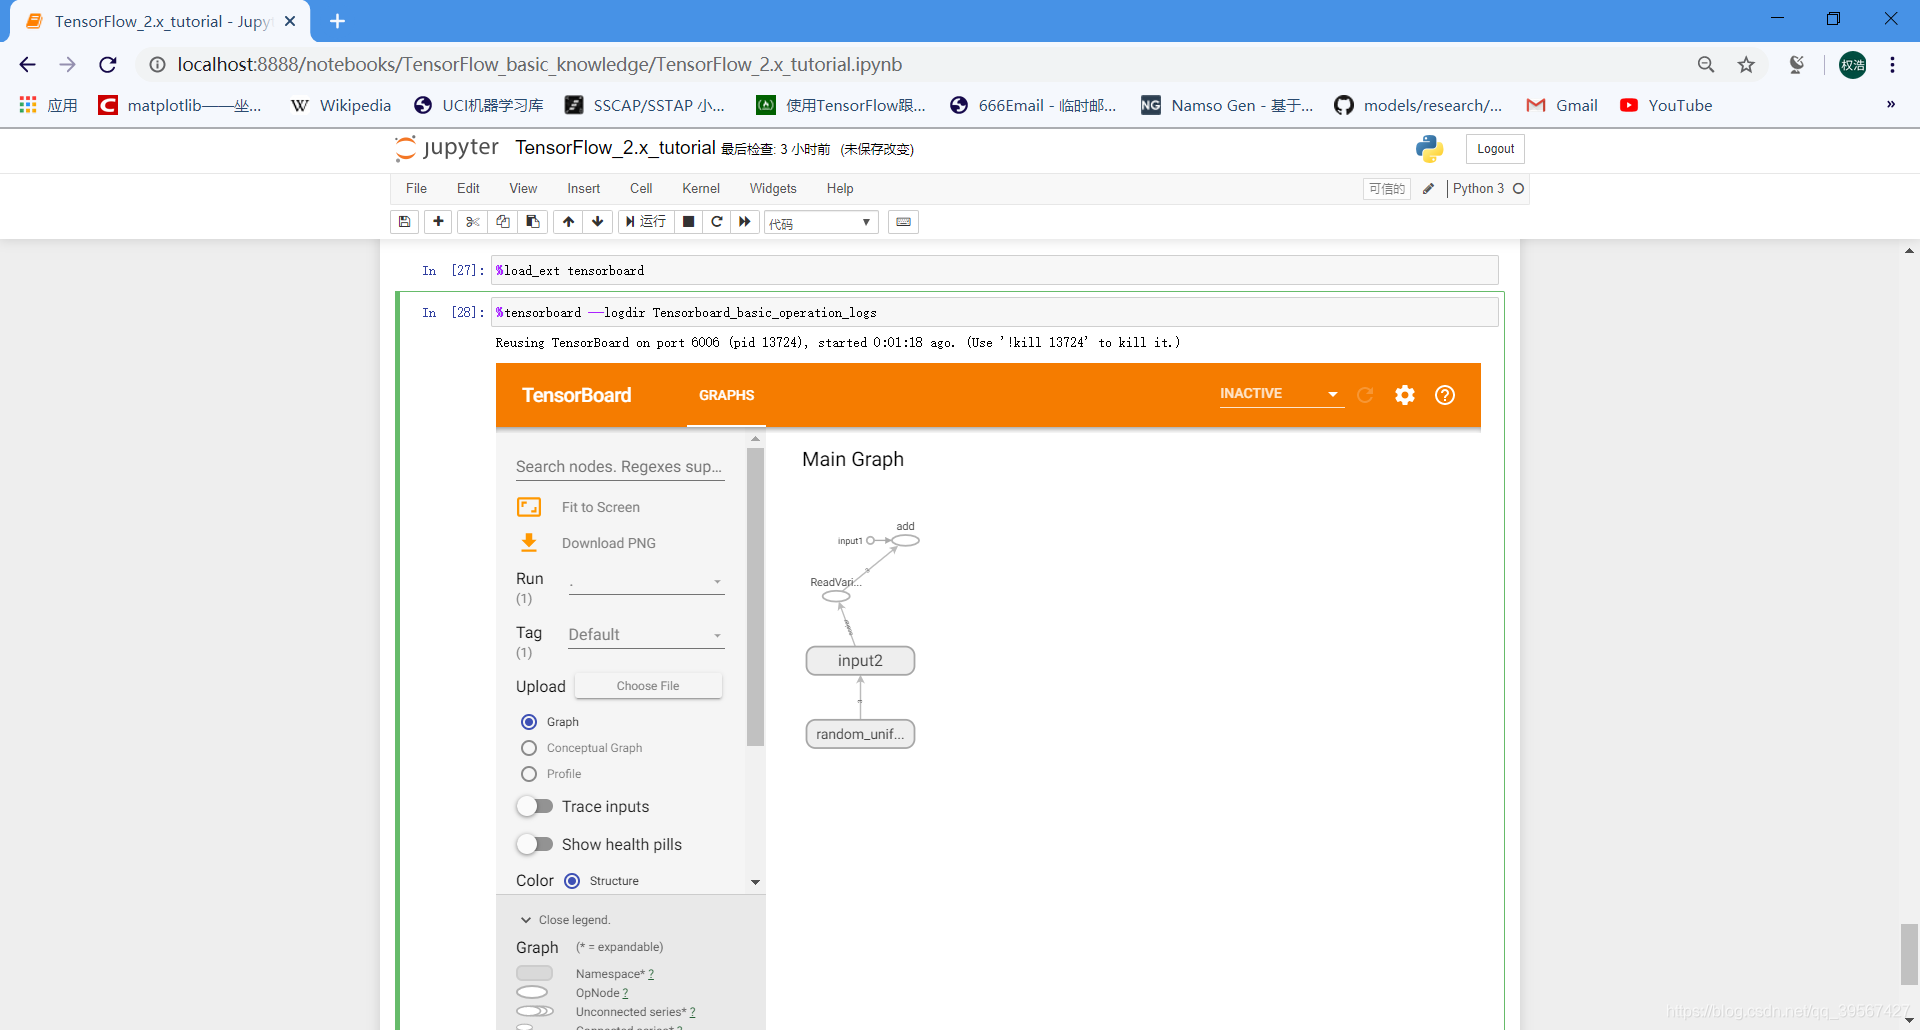
如果出现 localhost refused to connect(localhost 拒绝了我们的连接请求),第二行命令修改如下,来手动指定 localhost
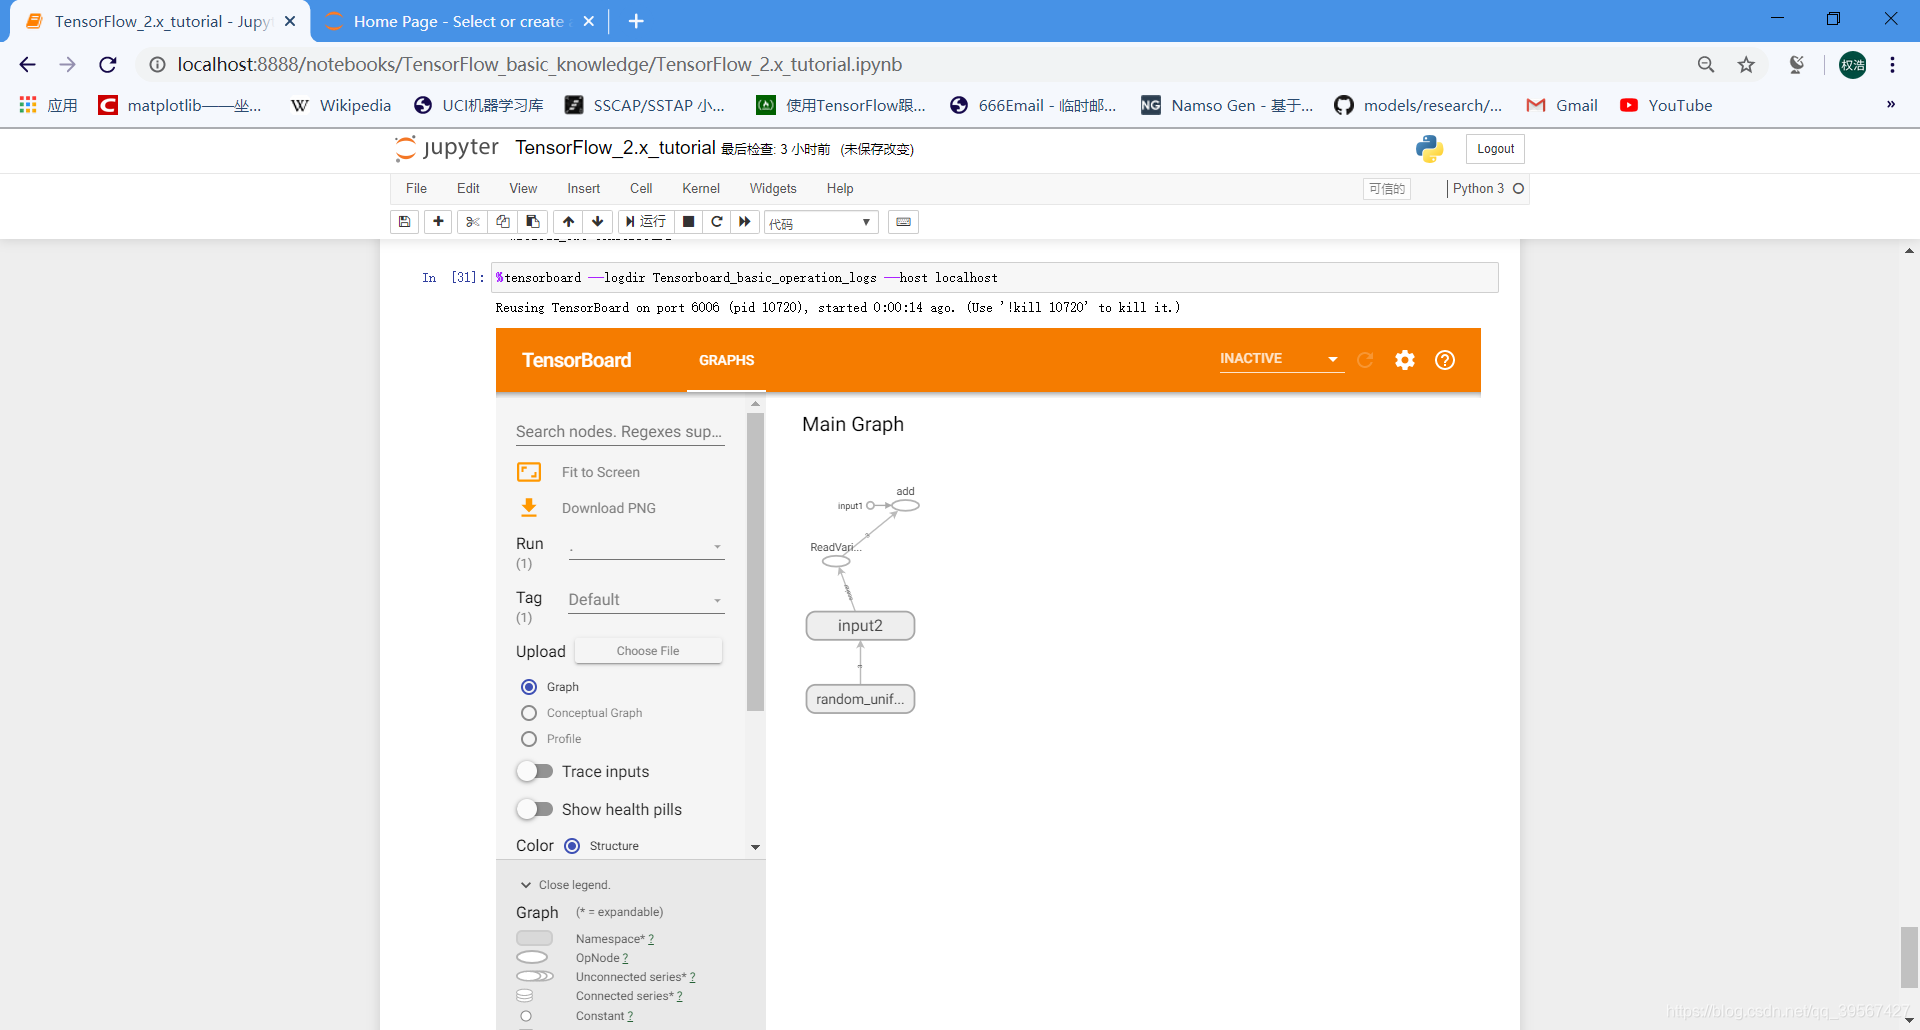
%tensorboard --logdir Tensorboard_basic_operation_logs --host localhost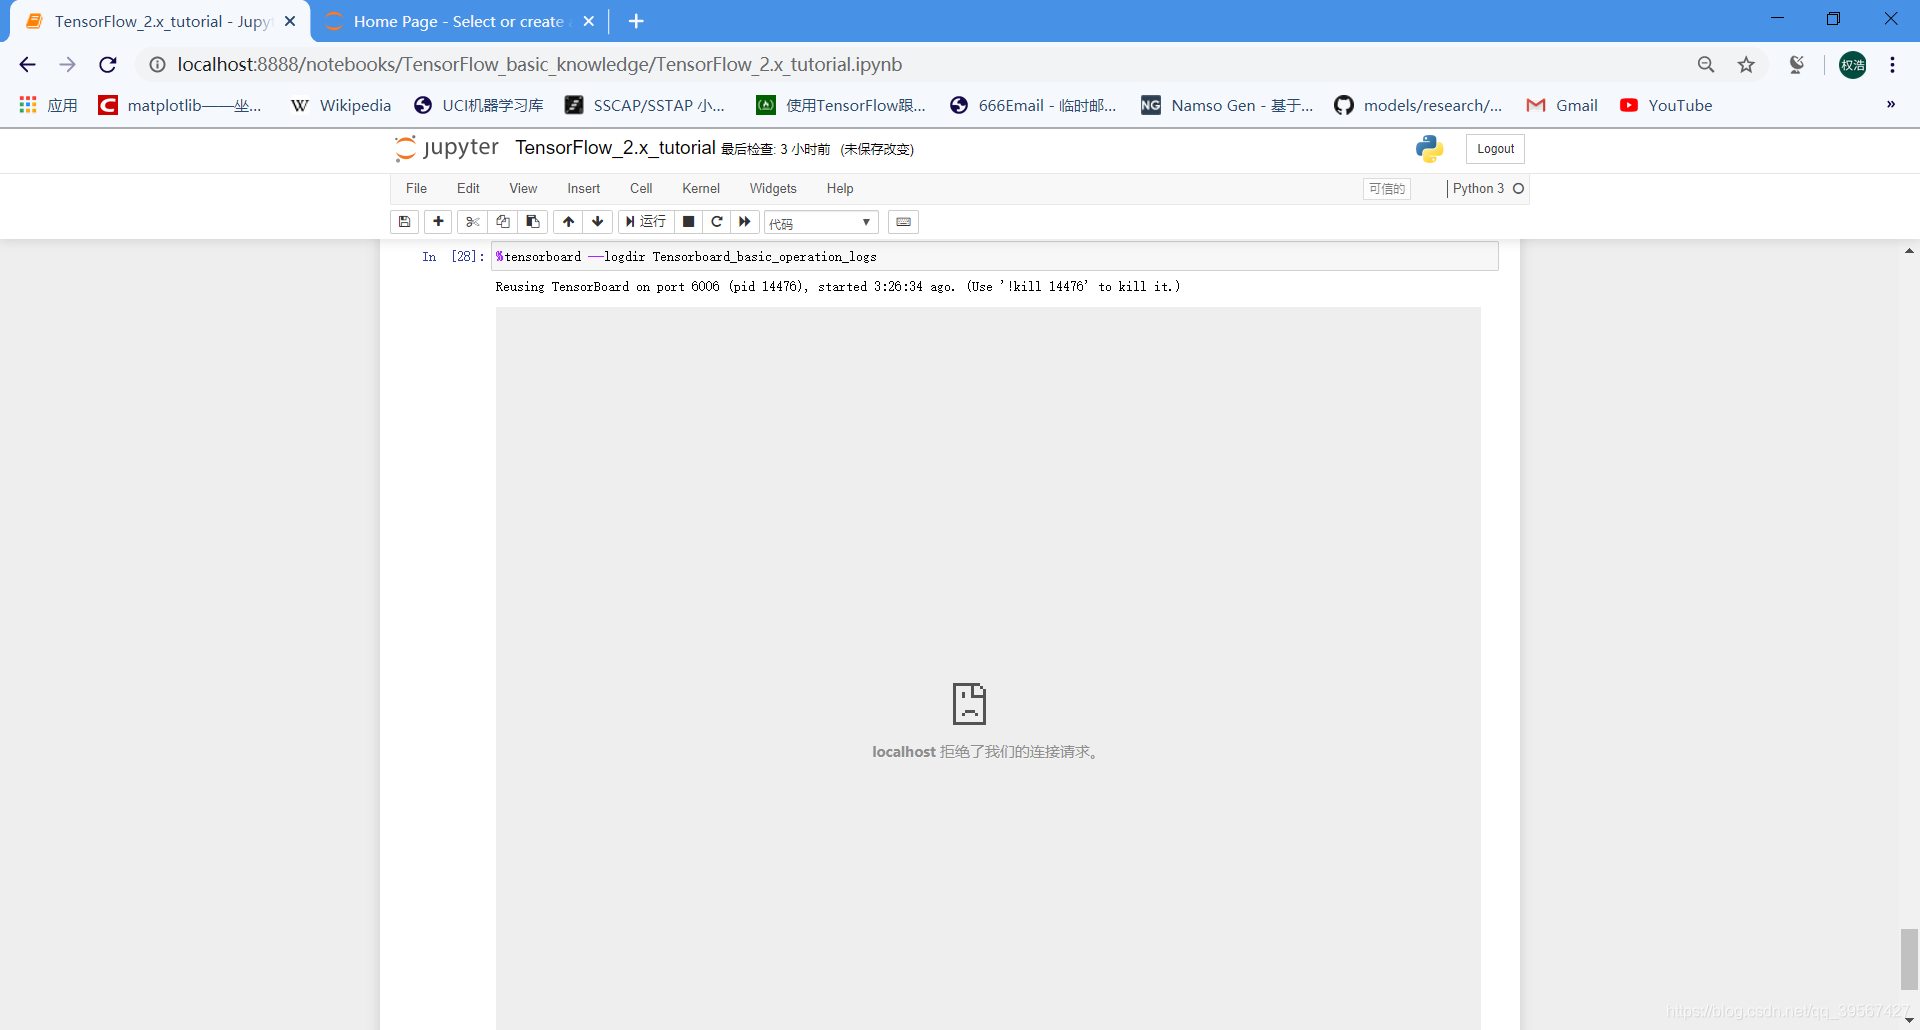
完美解决
结束语
到此 TensorFlow 1.x 与 TensorFlow 2.x 基础编程就结束了