使用TF Lite将Mobilenet SSD移植至安卓客户端
1. 配置
| 基本配置 | 版本号 |
|---|---|
| CPU | Intel® Core™ i5-8400 CPU @ 2.80GHz × 6 |
| GPU | GeForce RTX 2070 SUPER/PCIe/SSE2 |
| OS | Ubuntu18.04 |
| openjdk | 1.8.0_242 |
| python | 3.6.9 |
| bazel | 0.21.0 |
| gcc | 4.8.5 |
| g++ | 4.8.5 |
hint:
- bazel会在转换模型的时候用到, 我的另一篇博客有讲如何配置.
https://blog.csdn.net/weixin_43056275/article/details/105124979 - bazel编译时, gcc和g++版本需要一致.
2. 准备工作
2.1 下载
2.1.1 下载models-1.12.0
https://github.com/tensorflow/models/tree/v1.12.0
在~/.bashrc中加入配置
export PYTHONPATH=$PYTHONPATH:pwd:pwd/slim
2.1.2 下载模型
https://github.com/tensorflow/models/blob/master/research/object_detection/g3doc/detection_model_zoo.md
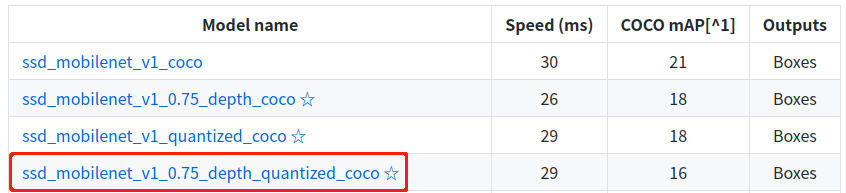 红框内的模型用于需要对模型进行量化处理的
2.1.3 下载tensorflow-r1.13源码
https://github.com/tensorflow/tensorflow/tree/r1.13
2.2 使用bazel编译tensorflow-r1.13源码
我的另一篇博客写的很详细
https://blog.csdn.net/weixin_43056275/article/details/105124979
3. 训练Mobilenet SSD quantized模型
省略如何标记以及得到记录数据集的record文件
3.1 配置config
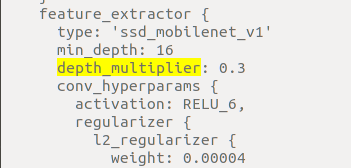
找到./models/models-1.12.0/research/object_detection/samples/configs/ssd_mobilenet_v1_0.75_depth_quantized_300x300_coco14_sync.config
将config文件复制到./models/models-1.12.0/research/object_detection/training(自己新建文件夹)
- 修改depth_multiplier参数值(将模型压缩到30%)
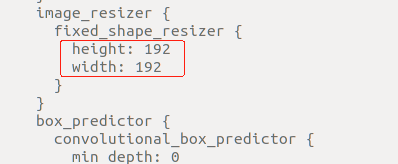
- 修改输入模型的训练图像的大小(降低图像输入的模型中的分辨率同样可提高模型推理效率)
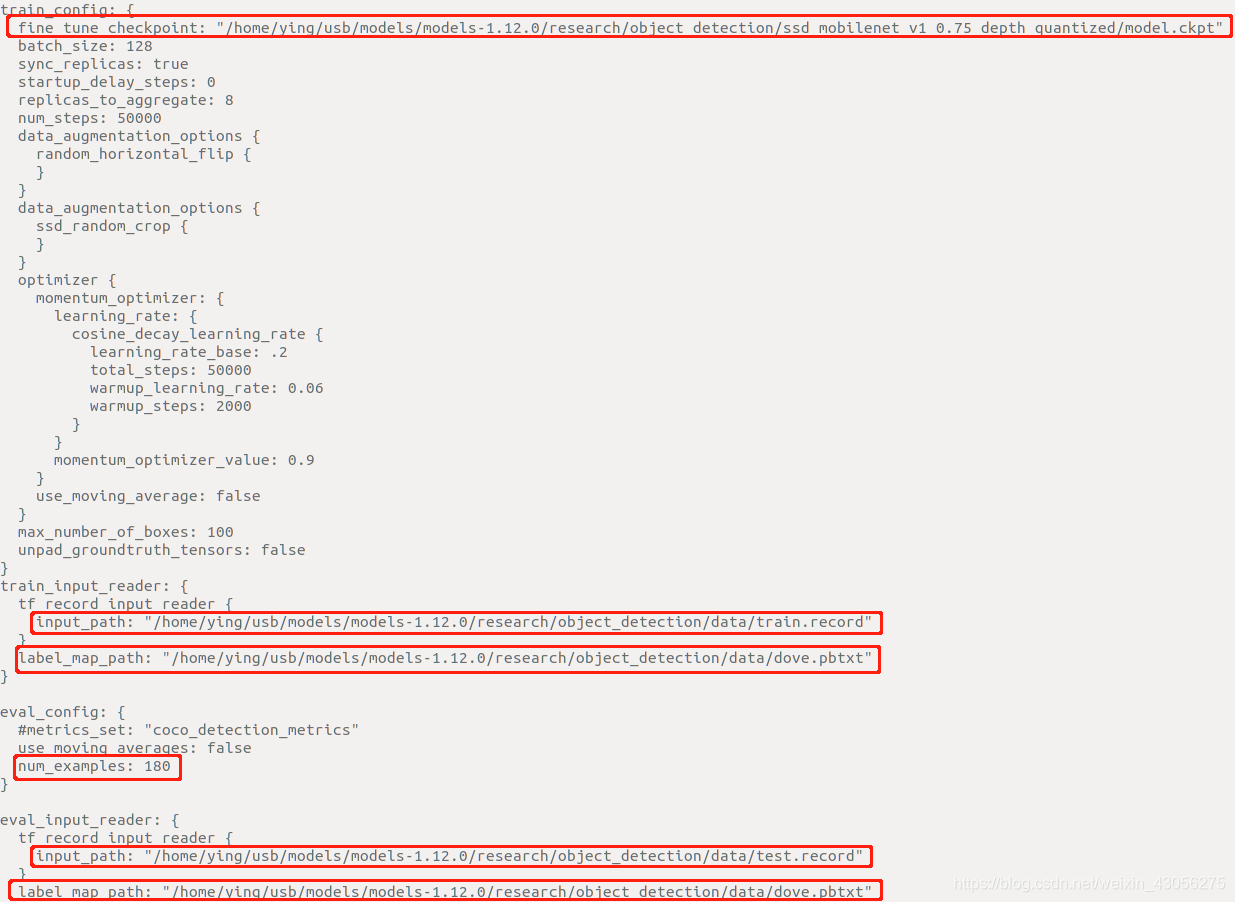
- 修改下载的预训练模型的路径, 训练集和测试集的record和pbtxt, eval_config中的num_examples改成自己测试图片的数量.
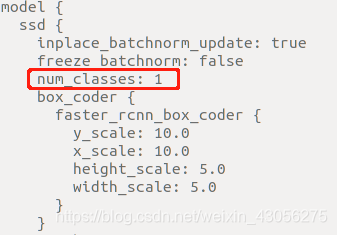
 4. 修改num_classes
3.2 开始训练
在./models/models-1.12.0/research新建 train.sh, 内容如下
PIPELINE_CONFIG_PATH=/home/ying/usb/models/models-1.12.0/research/object_detection/training/ssd_mobilenet_v1_0.75_depth_quantized_300x300_coco14_sync.config
MODEL_DIR=/home/ying/usb/models/models-1.12.0/research/object_detection/train
NUM_TRAIN_STEPS=20000
SAMPLE_1_OF_N_EVAL_EXAMPLES=1
python object_detection/model_main.py \
    --pipeline_config_path=${PIPELINE_CONFIG_PATH} \
    --model_dir=${MODEL_DIR} \
    --num_train_steps=${NUM_TRAIN_STEPS} \
    --sample_1_of_n_eval_examples=$SAMPLE_1_OF_N_EVAL_EXAMPLES \
    --logtostderr
pipeline_config_path: config路径
model_dir: 训练的模型的输出路径
运行train.sh
bash train.sh
3.2.1 转换ckpt模型到pb
在./models/models-1.12.0/research新建export_tflite_ssd_graph.sh, 内容如下
PIPELINE_CONFIG_PATH=/home/ying/usb/models/models-1.12.0/research/object_detection/training/ssd_mobilenet_v1_0.75_depth_quantized_300x300_coco14_sync.config
TRAINED_CKPT_PREFIX=/home/ying/usb/models/models-1.12.0/research/object_detection/train/model.ckpt-20000
EXPORT_DIR=/home/ying/usb/models/models-1.12.0/research/object_detection/eval

python object_detection/export_tflite_ssd_graph.py \
    --pipeline_config_path=${PIPELINE_CONFIG_PATH} \
    --trained_checkpoint_prefix=${TRAINED_CKPT_PREFIX}    \
    --output_directory=${EXPORT_DIR}  \
    --add_postprocessing_op=true
生成的pb模型保存在output_directory
运行export_tflite_ssd_graph.sh得到pb文件
4. 转换pb模型为tflite
根据2.2我提供的博客先编译通过bazel, 以下要用到bazel命令.
4.1 获取pb文件的输入输出
有两种方式
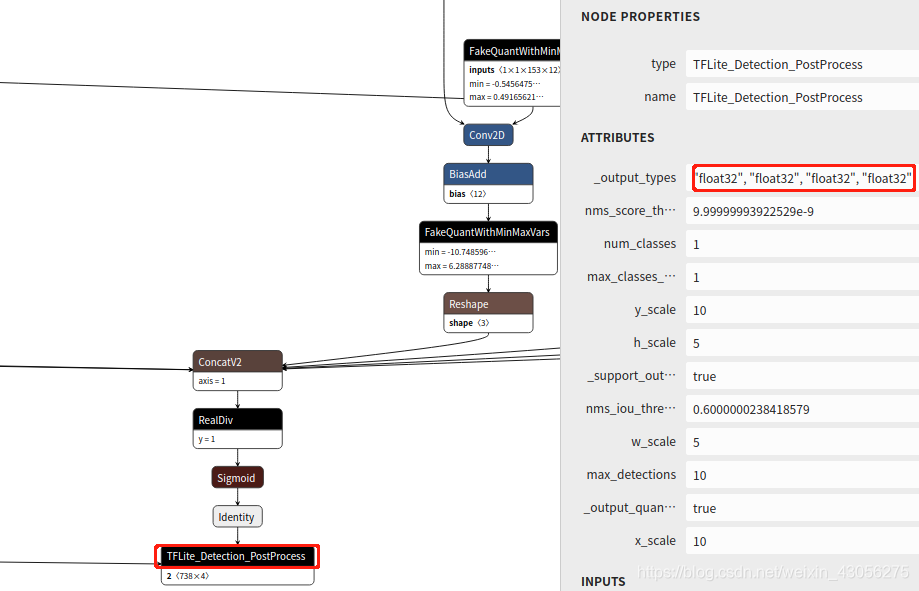
4.1.1 通过netron
https://lutzroeder.github.io/netron/
可以在线上传模型, 得到输入输出
输入:
 输出:
输出:
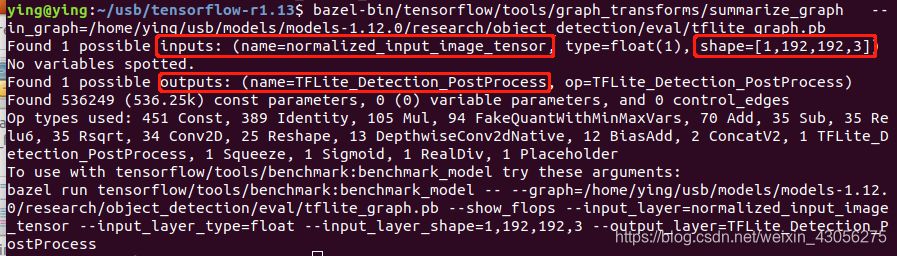
4.1.2 通过summarize_graph命令
在./tensorflow-r1.13运行
bazel build tensorflow/tools/graph_transforms:summarize_graph
bazel-bin/tensorflow/tools/graph_transforms/summarize_graph \
  --in_graph=/home/ying/usb/models/models-1.12.0/research/object_detection/eval/tflite_graph.pb
得到
4.2 开始转换模型
在./tensorflow-r1.13运行
bazel run --config=opt tensorflow/lite/toco:toco -- \
--input_file=/home/ying/usb/models/models-1.12.0/research/object_detection/eval/tflite_graph.pb \
--output_file=/home/ying/usb/models/models-1.12.0/research/object_detection/eval/detect1.tflite \
--input_shapes=1,192,192,3 \ (根据训练图片的大小)
--input_arrays=normalized_input_image_tensor \
--output_arrays='TFLite_Detection_PostProcess','TFLite_Detection_PostProcess:1','TFLite_Detection_PostProcess:2','TFLite_Detection_PostProcess:3' \
--inference_type=QUANTIZED_UINT8 \  (量化模型的时候使用QUANTIZED_UINT8)
--mean_values=128 \
--std_values=128 \
--change_concat_input_ranges=false \
--allow_custom_ops
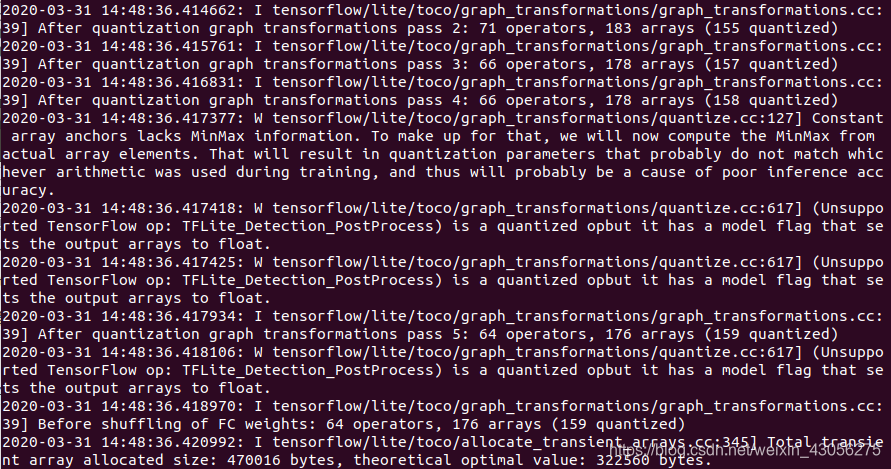
最终得到tflite量化模型
4.3 PC端测试模型
#-*- coding:utf-8 -*-
import numpy as np
import os
import six.moves.urllib as urllib
import sys
import tarfile
import tensorflow as tf
import zipfile

from PIL import Image
import cv2
import time
import random
'''
    tflite 获取视频每帧推理
'''


# This is needed since the notebook is stored in the object_detection folder.
sys.path.append("..")
#改为自己的量化模型的路径
PATH_TO_CKPT = r'./models/models-1.12.0/research/object_detection/eval/detect1.tflite'
#改为自己训练图片的大小
image_size = 192

def tflite_run_main(frame):
    interpreter = tf.lite.Interpreter(model_path=PATH_TO_CKPT)
    interpreter.allocate_tensors()
    # Get input and output tensors.
    input_details = interpreter.get_input_details()
    output_details = interpreter.get_output_details()

    print(str(input_details))
    print(str(output_details))

    image_np = cv2.cvtColor(frame, cv2.COLOR_BGR2RGB)
    crop_width, crop_height = image_np.shape[:2]
    image_np = image_np.astype(np.uint8)
    image_np = cv2.resize(image_np, (image_size, image_size))
    image_np_expanded = np.expand_dims(image_np, axis=0)
    print('len', len(image_np_expanded))

    start_time = time.time()

    interpreter.set_tensor(input_details[0]['index'], image_np_expanded)
    interpreter.invoke()
    scores = interpreter.get_tensor(output_details[2]['index'])
    bboxes = interpreter.get_tensor(output_details[0]['index'])

    print('infrence_time', (time.time() - start_time))

    # print('argmax', np.argmax(scores[0]))

    idx = np.argmax(scores[0])
    print('score = ', scores[0][idx])

    ymin, xmin, ymax, xmax = bboxes[0][idx]

    if scores[0][idx] > 0.65:
        cv2.rectangle(frame, (int(xmin * crop_height), int(ymin * crop_width)),
                      (int(xmax * crop_height), int(ymax * crop_width)), (0, 255, 0))

    cv2.imshow("video_test", frame)
    cv2.waitKey(0)
    cv2.destroyAllWindows()
if __name__ == "__main__":
#改为自己测试图片的路径
    img = cv2.imread('./98new.jpg')
    tflite_run_main(img)

4.4 部署模型到Android
打开./tensorflow-r1.13/tensorflow/lite/examples/android
将tflite和txt放到./tensorflow-r1.13/tensorflow/lite/examples/android/app/src/main/assets文件下
4.4.1 修改文件
1. DetectorActivity.java
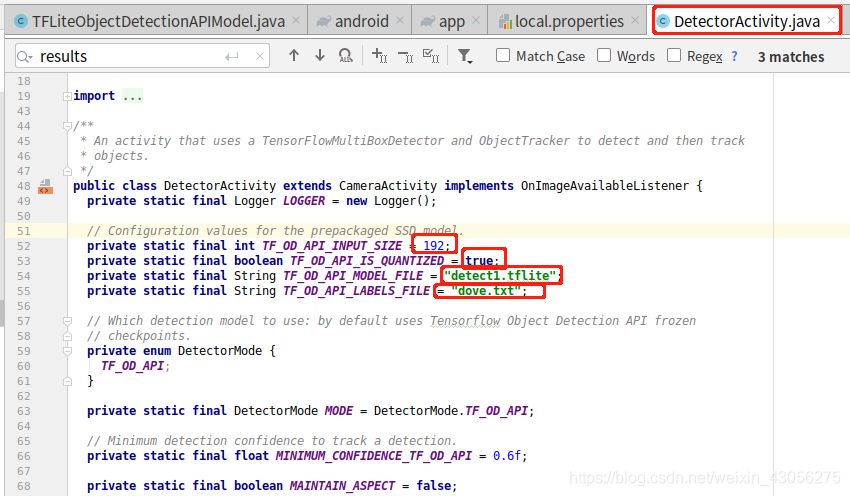 TF_API_INPUT_SIZE: 改成训练图片的大小
TF_OD_API_IS_QUANTIZED: 因为是量化模型, 所以true
TF_OD_API_MODEL_FILE和TF_OD_API_LABELS_FILE: 模型和标签txt的路径
2. TFLiteObjectDetectionAPIModel.java
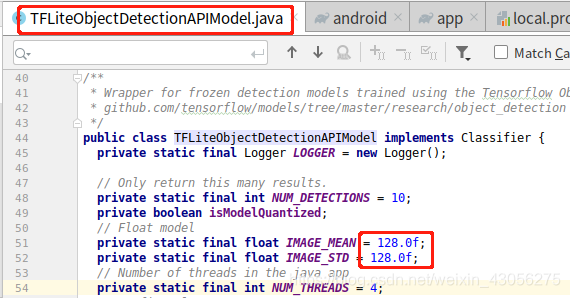 IMAGE_MEAN 和 IMAGE_STD: toco命令中mean_values=128 和 std_values=128 的参数
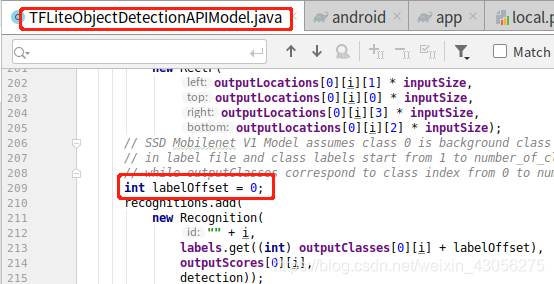 因为我的标签在 dove.txt 中在第一行, 所以代码中标签的偏移需要改成0.
还有一种改法, 将标签文件中的第一行改为自己不需要的标签, labelOffset就可以为1
以下为配置文件的更改
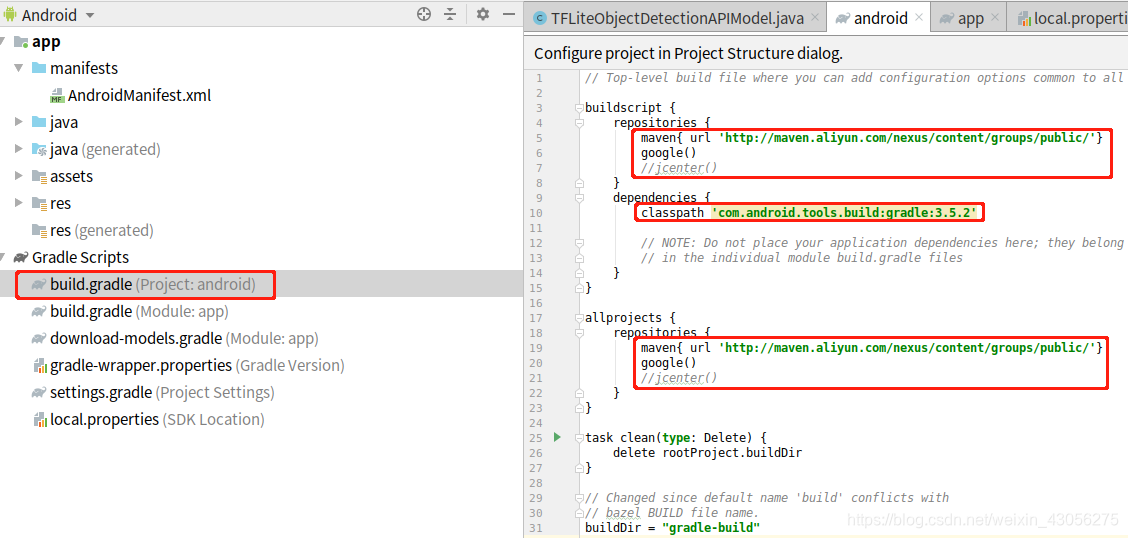
3. 配置文件的更改 build.gradle(Project: android)
4. 配置文件的更改 build.gradle(Module: app)
apply plugin: 'com.android.application'

android {
    compileSdkVersion 28
    buildToolsVersion '28.0.3'
    defaultConfig {
        applicationId "org.tensorflow.lite.demo"
        minSdkVersion 21
        targetSdkVersion 28
        versionCode 1
        versionName "1.0"

        // Remove this block.
//        jackOptions {
//            enabled true
//        }
    }
    lintOptions {
        abortOnError false
    }
    buildTypes {
        release {
            minifyEnabled false
            proguardFiles getDefaultProguardFile('proguard-android.txt'), 'proguard-rules.pro'
        }
    }
    aaptOptions {
        noCompress "tflite"
    }

    compileOptions {
        sourceCompatibility JavaVersion.VERSION_1_8
        targetCompatibility JavaVersion.VERSION_1_8
    }
}

repositories {
    maven {
        url 'https://google.bintray.com/tensorflow'
    }
}

// import DownloadModels task
project.ext.ASSET_DIR = projectDir.toString() + '/src/main/assets'
project.ext.TMP_DIR   = project.buildDir.toString() + '/downloads'

// Download default models; if you wish to use your own models then
// place them in the "assets" directory and comment out this line.
apply from: "download-models.gradle"

dependencies {
    implementation fileTree(dir: 'libs', include: ['*.jar'])
    implementation 'org.tensorflow:tensorflow-lite:0.1.2-nightly'
    implementation 'org.tensorflow:tensorflow-lite:2.0.0'
}
5. 配置文件的更改 AndroidManifest.xml
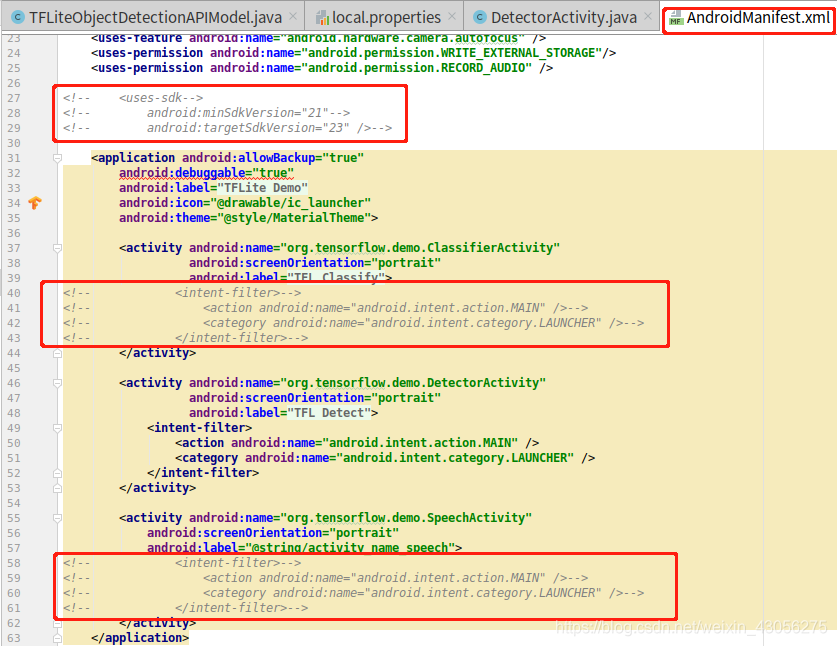 注释掉分类和语音的app的内容, 只留下目标检测.
4.4.2 设备端落地

历时一周, 呕心沥血, 心态几乎崩溃
- bazel的时候很坑, 有点耐心, 过程略麻烦.
- 转换为tflite模型时, 参数的设置纠结很久, 模型一开始其实已经转换完成, 但是部署到安卓端有bug, 一直以为是模型的问题, 走了很多弯路.
- 欢迎大家提问, 指导, 互相学习~
感谢LiangJun
https://blog.csdn.net/qq_26535271/article/details/83031412#comments
https://blog.csdn.net/qq_26535271/article/details/84930868#commentBox
以下博客可看可不看
https://blog.csdn.net/qq_16564093/article/details/78996563
https://blog.csdn.net/qq_33200967/article/details/82773677#comments
