源代码来自Halcon/Example/C#/MatchingWPF,主要目的是熟悉Halcon中Matching的应用,当然,我不会忘记WPF的介绍。
代码的整个流程可以解释为:定义模板 -> 加载不同的图像 -> 再次定位模板的位置。
针对Halcon 13版本,选择的.Net版本还是3.5.
文中注释特别提到:由于WPF中与界面的互相交流的限制,我们从控件中得到Halcon窗体最好的地方是窗体控件的HInitWindow事件中;同时注意到,在这部分可能存在异常,而且,异常没有处理的话会一直向上传播,所以,这部分最好也加上Try-Catch语句。
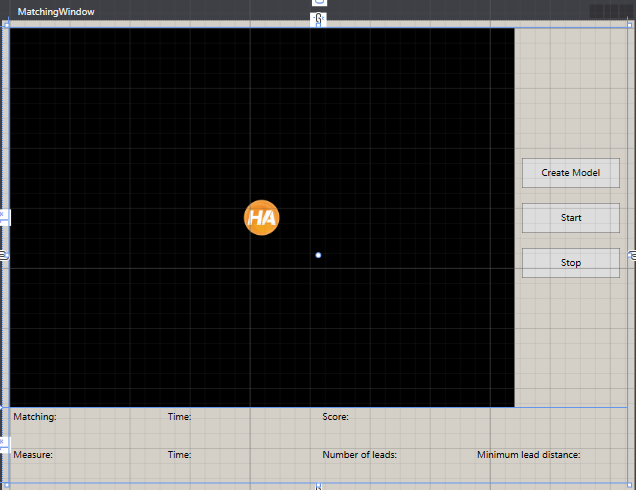
1)grid分布
整体上分为两行一列:
<Grid Margin="10, 10, 10, 10">
        <Grid.RowDefinitions>
            <RowDefinition Height="*"/>
            <RowDefinition MaxHeight="100"/>
        </Grid.RowDefinitions>
        <Grid.ColumnDefinitions>
            <ColumnDefinition />
        </Grid.ColumnDefinitions>
</Grid>
上面一行放图像,下面一行是信息显示;
2)针对上面一行Grid(0,0),又细分为一行两列:
<Grid Grid.Row="0" Grid.Column="0">
            <Grid.RowDefinitions>
                <RowDefinition/>
            </Grid.RowDefinitions>
            <Grid.ColumnDefinitions>
                <ColumnDefinition Width="*">
                </ColumnDefinition>
                <ColumnDefinition MaxWidth="150"></ColumnDefinition>
            </Grid.ColumnDefinitions>
            <StackPanel Grid.Row="0" Grid.Column="1" VerticalAlignment="Center">
                <Button Name="CreateBtn" Click="CreateBtn_Click" Grid.Row="0" Grid.Column="1" MinHeight="40" Margin="10">Create Model</Button>
                <Button Name="StartBtn" Click="StartBtn_Click" Grid.Row="0" Grid.Column="1"  MinHeight="40" Margin="10">Start</Button>
                <Button Name="StopBtn" Click="StopBtn_Click" Grid.Row="0" Grid.Column="1"  MinHeight="40" Margin="10">Stop</Button>
            </StackPanel>
            <my:HSmartWindowControlWPF Loaded="hWindowControlWPF1_HInitWindow" Name="hWindowControlWPF1"
                                   xmlns:my="clr-namespace:HalconDotNet;assembly=halcondotnet" Grid.Column="0" Grid.Row="0" />
        </Grid>
上面看到列宽分别为*和150(按钮的宽度);三个按钮又放在StackPanel(0,1)上,并分别提供Click事件;在Grid(0,0)处放置Halcon Window,在这里提供Load事件(*_HInitWindow),并补充xmlns(在这里写,感觉很奇怪!)。
3)针对下面一行Grid(1,0),细分为两行四列:
<Grid Grid.Row="1" Grid.Column="0">
            <Grid.RowDefinitions>
                <RowDefinition/>
                <RowDefinition/>
            </Grid.RowDefinitions>
            <Grid.ColumnDefinitions>
                <ColumnDefinition/>
                <ColumnDefinition/>
                <ColumnDefinition/>
                <ColumnDefinition/>
            </Grid.ColumnDefinitions>

            <Label Name="MatchingLabel"      FontSize="12" Grid.Row="0" Grid.Column="0" HorizontalAlignment="Left">Matching:</Label>
            <Label Name="MatchingTimeLabel"  FontSize="12" Grid.Row="0" Grid.Column="1" HorizontalAlignment="Left">Time:</Label>
            <Label Name="MatchingScoreLabel" FontSize="12" Grid.Row="0" Grid.Column="2" HorizontalAlignment="Left">Score:</Label>

            <Label Name="MeasureLabel"     FontSize="12" Grid.Row="1" Grid.Column="0" HorizontalAlignment="Left">Measure:</Label>
            <Label Name="MeasureTimeLabel" FontSize="12" Grid.Row="1" Grid.Column="1" HorizontalAlignment="Left">Time:</Label>
            <Label Name="MeasureNumLabel"  FontSize="12" Grid.Row="1" Grid.Column="2" HorizontalAlignment="Left">Number of leads:</Label>
            <Label Name="MeasureDistLabel" FontSize="12" Grid.Row="1" Grid.Column="3">Minimum lead distance:</Label>
        </Grid>
4)至此,界面部分完成:
5)接下来进入C#代码中,先看看Halcon窗体的HInitWindow事件:
      Window = hWindowControlWPF1.HalconWindow;

      try
      {
        // Initialize enabled states
        CreateBtn.IsEnabled= true;
        StartBtn.IsEnabled = false;
        StopBtn.IsEnabled = false;

        // Create a timer for execution loop;
        Timer = new DispatcherTimer();
        Timer.Interval = new TimeSpan(10);
        Timer.Tick += new EventHandler(Timer_Tick);

        // Prepare image processing
        string ImgType;
        Framegrabber = new HFramegrabber("File", 1, 1, 0, 0, 0, 0, "default",
                        -1, "default", -1, "default",
                        "board/board.seq", "default", 1, -1);
        Img = Framegrabber.GrabImage();
        Img.GetImagePointer1(out ImgType, out ImgWidth, out ImgHeight);
        Window.SetPart(0, 0, ImgHeight - 1, ImgWidth - 1);
        Img.DispObj(Window);
        Window.SetDraw("margin");
        Window.SetLineWidth(3);
        Rectangle = new HRegion(188.0, 182, 298, 412);
        Rectangle.AreaCenter(out Row, out Column);
        Rect1Row = Row - 102;
        Rect1Col = Column + 5;
        Rect2Row = Row + 107;
        Rect2Col = Column + 5;
        RectPhi = 0;
        RectLength1 = 170;
        RectLength2 = 5;
      }
      catch (Exception ex)
      {
        // Catch all
        MessageBox.Show("Error in HInitWindow:" + ex.ToString());
      }
这部分完成了:指定halcon窗体;创建程序处理主体的Timer及事件Timer_Tick;加载系列图像并显示第一张;指定Rectangle;
6)创建模板的Click事件: CreateBtn_Click
      HImage ImgReduced;
      HRegion Rectangle1 = new HRegion();
      HRegion Rectangle2 = new HRegion();

      CreateBtn.IsEnabled = false;
      Window.SetColor("red");
      Window.SetDraw("margin");
      Window.SetLineWidth(3);

      ImgReduced = Img.ReduceDomain(Rectangle);
      ImgReduced.InspectShapeModel(out ModelRegion, 1, 30);
      Rectangle1.GenRectangle2(Rect1Row, Rect1Col, RectPhi, RectLength1, RectLength2);
      Rectangle2.GenRectangle2(Rect2Row, Rect2Col, RectPhi, RectLength1, RectLength2);
      ShapeModel = new HShapeModel(ImgReduced, 4, 0, new HTuple(360.0).TupleRad().D,
                new HTuple(1.0).TupleRad().D, "none", "use_polarity", 30, 10);

      Window.SetColor("green");
      Window.SetDraw("fill");
      ModelRegion.DispObj(Window);
      Window.SetColor("blue");
      Window.SetDraw("margin");
      Rectangle1.DispObj(Window);
      Rectangle2.DispObj(Window);

      StopBtn.IsEnabled = false;
      StartBtn.IsEnabled = true;
在这之中,指定显示窗体的颜色(不是很明白?);根据上一步创建的Rectangle来构建ShapeModel;显示Model及两个IC针脚的矩形框;
7)Start按钮中指定Timer.Start();对应的Stop按钮中指定Timer.Stop()。接下来的主体就是Timer中的Tick事件;
7.1) 重新抓取图像:
Img.Dispose();
Img.GrabImage(Framegrabber);
Img.DispObj(Window);
7.2)查找ShapeModel(最低匹配度70%,数量一个):
// Find the IC in the current image.
S1 = HSystem.CountSeconds();
ShapeModel.FindShapeModel(Img, 0,
                          new HTuple(360).TupleRad().D,
                          0.7, 1, 0.5, "least_squares",
                          4, 0.9, out RowCheck, out ColumnCheck,
                          out AngleCheck, out Score);
S2 = HSystem.CountSeconds();
MatchingTimeLabel.Content = "Time: " + String.Format("{0,4:F1}", (S2 - S1)*1000) + "ms";
MatchingScoreLabel.Content = "Score: ";
7.3)如果有结果存在(RowCheck.Length==1),则显示找到的Model:
MatchingScoreLabel.Content = "Score: " + String.Format("{0:F5}", Score.D);
// Rotate the model for visualization purposes.
Matrix.VectorAngleToRigid(new HTuple(Row), new HTuple(Column), new HTuple(0.0),
                      RowCheck, ColumnCheck, AngleCheck);

ModelRegionTrans = ModelRegion.AffineTransRegion(Matrix, "false");
Window.SetColor("green");
Window.SetDraw("fill");
ModelRegionTrans.DispObj(Window);
说实话,为什么要使用VectorAngleRigid来显示Model不是很明白。
7.4)根据上一步中的Matrix来计算两个矩形框并显示(用蓝色显示):
// Compute the parameters of the measurement rectangles.
Matrix.AffineTransPixel(Rect1Row, Rect1Col, out Rect1RowCheck, out Rect1ColCheck);
Matrix.AffineTransPixel(Rect2Row, Rect2Col, out Rect2RowCheck, out Rect2ColCheck);

// For visualization purposes, generate the two rectangles as regions and display them.
Rectangle1.GenRectangle2(Rect1RowCheck.D, Rect1ColCheck.D, RectPhi + AngleCheck.D, RectLength1, RectLength2);
Rectangle2.GenRectangle2(Rect2RowCheck.D, Rect2ColCheck.D, RectPhi + AngleCheck.D, RectLength1, RectLength2);
Window.SetColor("blue");
Window.SetDraw("margin");
Rectangle1.DispObj(Window);
Rectangle2.DispObj(Window);
7.5)计算两个矩形框实际的位置:
S1 = HSystem.CountSeconds();
Measure1 = new HMeasure(Rect1RowCheck.D, Rect1ColCheck.D, RectPhi + AngleCheck.D, RectLength1, RectLength2, ImgWidth, ImgHeight, "bilinear");
Measure2 = new HMeasure(Rect2RowCheck.D, Rect2ColCheck.D, RectPhi + AngleCheck.D, RectLength1, RectLength2, ImgWidth, ImgHeight, "bilinear");
Measure1.MeasurePairs(Img, 2, 90, "positive", "all",
                  out RowEdgeFirst1, out ColumnEdgeFirst1, out AmplitudeFirst1, out RowEdgeSecond1, out ColumnEdgeSecond1, out AmplitudeSecond1,
                  out IntraDistance1, out InterDistance1);
Measure2.MeasurePairs(Img, 2, 90, "positive", "all",
                  out RowEdgeFirst2, out ColumnEdgeFirst2, out AmplitudeFirst2, out RowEdgeSecond2, out ColumnEdgeSecond2, out AmplitudeSecond2,
                  out IntraDistance2, out InterDistance2);
S2 = HSystem.CountSeconds();
MeasureTimeLabel.Content = "Time: " + String.Format("{0,5:F1}", (S2 - S1)*1000) + "ms";
Window.SetColor("red");
Window.DispLine(RowEdgeFirst1 - RectLength2*Math.Cos(AngleCheck), ColumnEdgeFirst1 - RectLength2*Math.Sin(AngleCheck),
                RowEdgeFirst1 + RectLength2*Math.Cos(AngleCheck), ColumnEdgeFirst1 + RectLength2*Math.Sin(AngleCheck));
Window.DispLine(RowEdgeSecond1 - RectLength2*Math.Cos(AngleCheck), ColumnEdgeSecond1 - RectLength2*Math.Sin(AngleCheck),
                RowEdgeSecond1 + RectLength2*Math.Cos(AngleCheck), ColumnEdgeSecond1 + RectLength2*Math.Sin(AngleCheck));
Window.DispLine(RowEdgeFirst2 - RectLength2*Math.Cos(AngleCheck), ColumnEdgeFirst2 - RectLength2*Math.Sin(AngleCheck),
                RowEdgeFirst2 + RectLength2*Math.Cos(AngleCheck), ColumnEdgeFirst2 + RectLength2*Math.Sin(AngleCheck));
Window.DispLine(RowEdgeSecond2 - RectLength2*Math.Cos(AngleCheck), ColumnEdgeSecond2 - RectLength2*Math.Sin(AngleCheck),
                RowEdgeSecond2 + RectLength2*Math.Cos(AngleCheck), ColumnEdgeSecond2 + RectLength2*Math.Sin(AngleCheck));
NumLeads = IntraDistance1.Length + IntraDistance2.Length;
MeasureNumLabel.Content = "Number of leads: " + String.Format("{0:D2}", NumLeads);
MinDistance = InterDistance1.TupleConcat(InterDistance2).TupleMin();
MeasureDistLabel.Content = "Minimum lead distance: " + String.Format("{0:F3}", MinDistance.D);
Window.FlushBuffer();
Measure1.Dispose();
Measure2.Dispose();
两个Measure的构造函数指定找与矩形框垂直的边;MeasureParis找边(阈值90,从灰度值低到高找),得到的IntraDistance1/2是个数组,代表14*2个边;使用DispLine显示边(用红色显示);TupleMin计算距离的最小值。
运行结果如下:
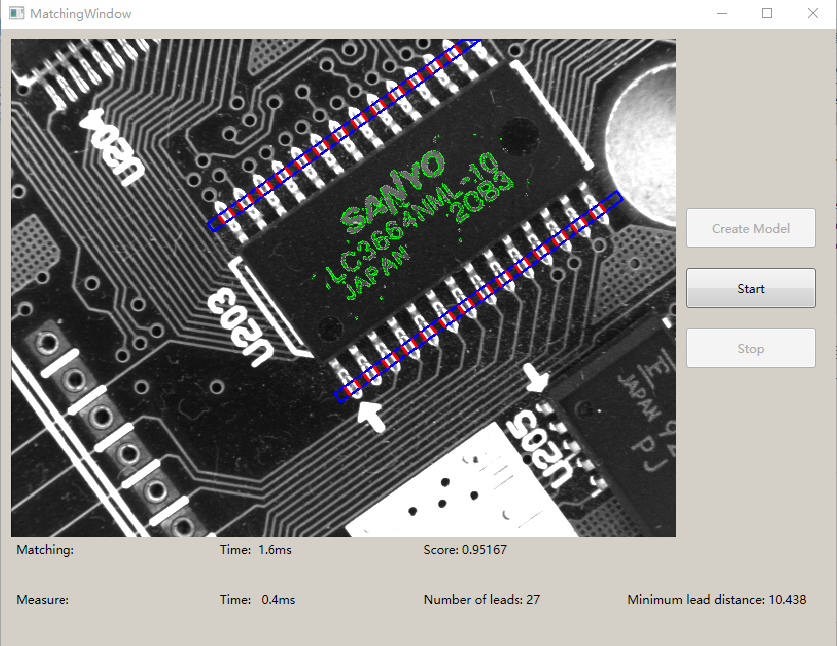
看起来运行时间很快,都是ms级的。