本实例完全是翻译Halcon 13.0中的实例代码BindingWPF(WPF新手)。
1)构建编程环境
1.1)参照实例代码,在VS2017 Community中选择WPF窗体模式(WPF应用(.Net Framework),同时选择框架.Net Framework 3.5),选择代码保存的位置,直接生成即可。
1.2)这一步,可以选编译试试,选择Run,看看代码是否能正常生成,运行。
1.3)添加引用,我们需要选择Halcondotnet 3.5版本的库。同时打开文件MainWindow.xaml添加引用
xmlns:HalconDotnet="clr-namespace:HalconDotNet;assembly=halcondotnet"
xmlns:local="clr-namespace:MyBinding1"
上面MyBinding1使我们工程的名字。
1.4)更改窗体大小:
Title="MainWindow" Height="800" Width="600" MinWidth="450" MinHeight="400">
再次测试,如同1.2)步,看是否能正常运行。
2)准备数据转换类
在运行源代码时候,这个转换类会有Exception显示,原因是解析的时候出错,把
string[] ImagePartArg = value.ToString().Split(';');换成
string[] ImagePartArg = value.ToString().Split(',');
即可。最终完整代码为:
public class ImagePartDecimalPlaceConverter : IValueConverter
{
        public object Convert(object value, Type targetType, object parameter, System.Globalization.CultureInfo culture)
        {
            try
            {
                //seems just return value is also ok
                string[] ImagePartArg = value.ToString().Split(',');
                Console.WriteLine(value.ToString());

                string shortForm = ImagePartArg[0] + ','
                                   + ImagePartArg[1] + ','
                                   + ImagePartArg[2] + ','
                                   + ImagePartArg[3];
                return shortForm;
            }
            catch (Exception)
            {
                // In error case, just return the input value, do nothing
                return value.ToString();
            }
        }

        public object ConvertBack(object value, Type targetType, object parameter, System.Globalization.CultureInfo culture)
        {
            // Nothing to do in set mode
            return value.ToString();
        }
 }
IValueConverter必须要实现Convert和ConvertBack两个函数。
3)准备Resource
打开App.xaml文件,把这个转换类作为Resource作为App的资源,添加以下代码:
<Application.Resources>
        <local:ImagePartDecimalPlaceConverter x:Key="ImagePart"/>
</Application.Resources>
我原来想把这部分同源代码一样放入MainWindow.xaml中作为<Window.Resources></Window.Resources>的一部分,后面在调试时发现报错,就改到放到App.xaml文件中。对命名空间这块可能还是没整明白。
4)设置Grid布局部分
整体分为两行一列,第一行放按钮及相关Label等,第二行放置图像及两个Slider(竖直和水平各一个):
<Grid.RowDefinitions>
     <RowDefinition MaxHeight="200"></RowDefinition>
     <RowDefinition/>
</Grid.RowDefinitions>
<Grid.ColumnDefinitions>
     <ColumnDefinition/>
</Grid.ColumnDefinitions>
以下为第一行的子网格(又分为6行5列):
<Grid Grid.Row="0" Grid.Column="0" MaxHeight="150">
            <Grid.RowDefinitions>
                <RowDefinition/>
                <RowDefinition/>
                <RowDefinition/>
                <RowDefinition/>
                <RowDefinition/>
                <RowDefinition/>
            </Grid.RowDefinitions>
            <Grid.ColumnDefinitions>
                <ColumnDefinition/>
                <ColumnDefinition/>
                <ColumnDefinition/>
                <ColumnDefinition/>
                <ColumnDefinition/>
            </Grid.ColumnDefinitions>
</Grid>
接下来是第二行内容,分为两行两列:
<Grid Grid.Row="1" Grid.Column="0">
            <Grid.RowDefinitions>
                <RowDefinition MaxHeight="25"></RowDefinition>
                <RowDefinition/>
            </Grid.RowDefinitions>
            <Grid.ColumnDefinitions>
                <ColumnDefinition MaxWidth="25"></ColumnDefinition>
                <ColumnDefinition/>
            </Grid.ColumnDefinitions>
</Grid>
至此,网格设计完成(都是直接拷贝的)。这些网格只是方便后面对其它控件布置。运行代码,界面上没看到什么特别的。
5)在Grid(0,0)部分添加4个按钮,用于加载4张不同的图像:
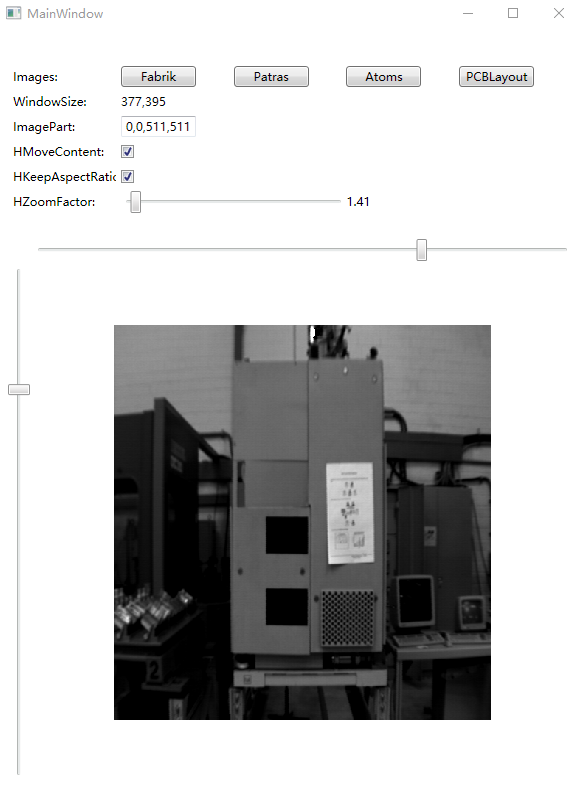
<Button Content="Fabrik"    HorizontalAlignment="Left" VerticalAlignment="Center" Grid.Row="0" Grid.Column="1" Width="75" Click="Button_Click_Fabrik"/>
<Button Content="Patras"    HorizontalAlignment="Left" VerticalAlignment="Center" Grid.Row="0" Grid.Column="2" Width="75" Click="Button_Click_Patras"/>
<Button Content="Atoms"     HorizontalAlignment="Left" VerticalAlignment="Center" Width="75" Grid.Row="0" Grid.Column="3" Click="Button_Click_Atoms"/>
<Button Content="PCBLayout" HorizontalAlignment="Left" VerticalAlignment="Center" Width="75" Grid.Row="0" Grid.Column="4" Click="Button_Click_PCBLayout"/>
以第一个按钮为例,按钮文本=Fabik,接下来是对其格式,放置在子网格的(0,1)处,对应的事件Button_Click_Fabrik。
打开MainWindow.xaml.cs文件,添加4个按钮的处理事件:
private void Button_Click_Fabrik(object sender, RoutedEventArgs e)
{
   hwindow.HDisplayCurrentObject = new HImage("fabrik");
}

private void Button_Click_Patras(object sender, RoutedEventArgs e)
{
   hwindow.HDisplayCurrentObject = new HImage("patras");
}

private void Button_Click_Atoms(object sender, RoutedEventArgs e)
{
   hwindow.HDisplayCurrentObject = new HImage("atoms");
}

private void Button_Click_PCBLayout(object sender, RoutedEventArgs e)
{
   hwindow.HDisplayCurrentObject = new HImage("pcb_layout");
   HRegion region = ((HImage)hwindow.HDisplayCurrentObject).Threshold(0, 50.0);
   HRegion connected_region = region.Connection();
   hwindow.HDisplayCurrentObject = connected_region;
}
4个按钮分别加载4张不同的图像,其中PCBLayout部分,加载图像后二值化,找边并显示边界图像。
VS会提示很多错误,主要由于Halcon引起的,在文件开始部分先添加Halcon的引用:
using HalconDotNet;
其它会显示hwindow无法识别,这是由于我们还没有把窗体hwindow添加进去,这一步暂时放一放。
6)接下来添加Label,注意它们在Grid中的位置:
<Label  Content="Images:"   HorizontalAlignment="Left" VerticalAlignment="Center" Grid.Row="0" Grid.Column="0" />
<Label Content="WindowSize:"      HorizontalAlignment="Left" VerticalAlignment="Center" Grid.Row="1" Grid.Column="0" />
<Label Content="ImagePart:"       HorizontalAlignment="Left" VerticalAlignment="Center" Grid.Row="2" Grid.Column="0" />
<Label Content="HMoveContent:"    HorizontalAlignment="Left" VerticalAlignment="Center" Grid.Row="3" Grid.Column="0" />
<Label Content="HKeepAspectRatio" HorizontalAlignment="Left" VerticalAlignment="Center" Grid.Row="4" Grid.Column="0" />
<Label Content="HZoomFactor:"     HorizontalAlignment="Left" VerticalAlignment="Center" Grid.Row="5" Grid.Column="0" />
7)添加其它相关控件:
<TextBlock Name="WindowSize"       HorizontalAlignment="Left" VerticalAlignment="Center" Grid.Row="1" Grid.Column="1"
                       Text="{Binding ElementName=hwindow, Path=WindowSize, UpdateSourceTrigger=PropertyChanged}"/>
<TextBox   Name="ImagePart"        HorizontalAlignment="Left" VerticalAlignment="Center" Grid.Row="2" Grid.Column="1"
                       Text="{Binding ElementName=hwindow, Path=HImagePart, UpdateSourceTrigger=PropertyChanged, Converter={StaticResource ImagePart}}"/>
<CheckBox  Name="HMoveContent"     HorizontalAlignment="Left" VerticalAlignment="Center" Grid.Row="3" Grid.Column="1"
                       IsChecked="{Binding ElementName=hwindow, Path=HMoveContent}"/>
<CheckBox  Name="HKeepAspectRatio" HorizontalAlignment="Left" VerticalAlignment="Center" Grid.Row="4" Grid.Column="1"
                       IsChecked="{Binding ElementName=hwindow, Path=HKeepAspectRatio}"/>
<Slider    Name="HZoomFactor"      IsSnapToTickEnabled="True" VerticalAlignment="Center" Grid.Row="5" Grid.Column="1"
                       Value="{Binding ElementName=hwindow, Path=HZoomFactor, UpdateSourceTrigger=PropertyChanged}" Grid.ColumnSpan="2" Minimum="1.01" Maximum="9.99"
                       TickFrequency="0.01"/>
<TextBlock Name="HZoomFactorValue" HorizontalAlignment="Left" VerticalAlignment="Center" Grid.Row="5" Grid.Column="3"
                       Text="{Binding ElementName=HZoomFactor, Path=Value}"/>
其中,WindowSize显示hwindow的大小;
ImagePart显示图像大小,它与HImagePart绑定,当这个属性改变时这个值也跟着改变;
HMoveContent设置图像位置是否与鼠标移动相关联,前提是鼠标需要放到图像上;
HKeepAspectRatio设置图像开始显示时是否完全填充图像框;
HZoomFactor图像缩放,并把缩放的比例大小放到HZoomFactorValue文本当中。
8)添加窗体:
8.1)进入窗体设计界面,点击左上角的‘工具箱’;
8.2)右键点击’常用WPF控件’,选择’选择项...’;
8.3)进入到WPF组件界面,点击’浏览...’找到HalconDotnet (3.5版本),加载;
8.4)这时候在工具箱中能看到HSmartWindowControlWPF及HWindowControlWPF,选择前一个并拖到主界面下边中间位置,实际就是Grid(1,1)位置,设置控件名称为hwindow。第5)步报错就是由于它引起的,现在没有了。
9)添加窗体及两个Slider:
<HalconDotnet:HSmartWindowControlWPF Name="hwindow" Width="{Binding ElementName=WidthSlider, Path=Value}"
                                     Height="{Binding ElementName=HeightSlider, Path=Value}" Loaded="HSmartWindowControlWPF_Loaded"
                                     Grid.Row="1" Grid.Column="1"/>

<Slider Name="HeightSlider" Minimum="20" Maximum="512" Value="512" TickFrequency="1" IsSnapToTickEnabled="True" Grid.Row="1" Grid.Column="0" Orientation="Vertical"/>
<Slider Name="WidthSlider"  Minimum="20" Maximum="512" Value="512" TickFrequency="1" IsSnapToTickEnabled="True" Grid.Row="0" Grid.Column="1" />
上面窗体的宽度与水平Slider的相关联,高度与竖直Slider相关联,同时在窗体加载时,同时加载图像“fabrik”,并计算WindowSize和ImagePart两个参数。
10)运行代码,改变两个Slider的位置,会看到图像大小也跟着改变。