本文代码运行环境:
- cudatoolkit = 10.1.243
- cudnn = 7.6.5
- tensorflow-gpu = 2.1.0
- keras-gpu = 2.3.1
相关文章:
LSTM 01:理解LSTM网络及训练方法
LSTM 02:如何为LSTMs准备数据
LSTM 03:如何使用Keras编写LSTMs
LSTM 04:4种序列预测模型及Keras实现
LSTM 05:如何开发 Vanilla LSTMs 和 Stacked LSTMs
LSTM 06:如何用Keras开发CNN LSTM
LSTM 07:如何用Keras开发 Encoder-Decoder LSTM
文章目录
- 相关文章:
- 8. How to Develop CNN LSTMs
- 8.1 The CNN LSTM
- 8.2 Moving Square Video Prediction Problem
- 8.2.1 Image Initialization
- 8.2.2 Adding Steps
- 8.2.3 Instance Generator
- 8.2.4 Prepare Input for Model
- 8.3 Define and Compile the Model
- 8.4 Fit the Model
- 8.5 Evaluate the Model
- 8.6 Make Predictions With the Model
- 8.7 Complete Example
- 8.8 关于jupyter notebook报错的问题解决
8. How to Develop CNN LSTMs
本节介绍了如何开发在前端使用卷积神经网络的LSTM模型。有以下内容:
- 关于CNN LSTM架构的起源和适合它的问题类型。
- 如何在Keras中实现CNN LSTM架构。
- 如何开发一个滑动窗口的视频预测问题的CNN LSTM。
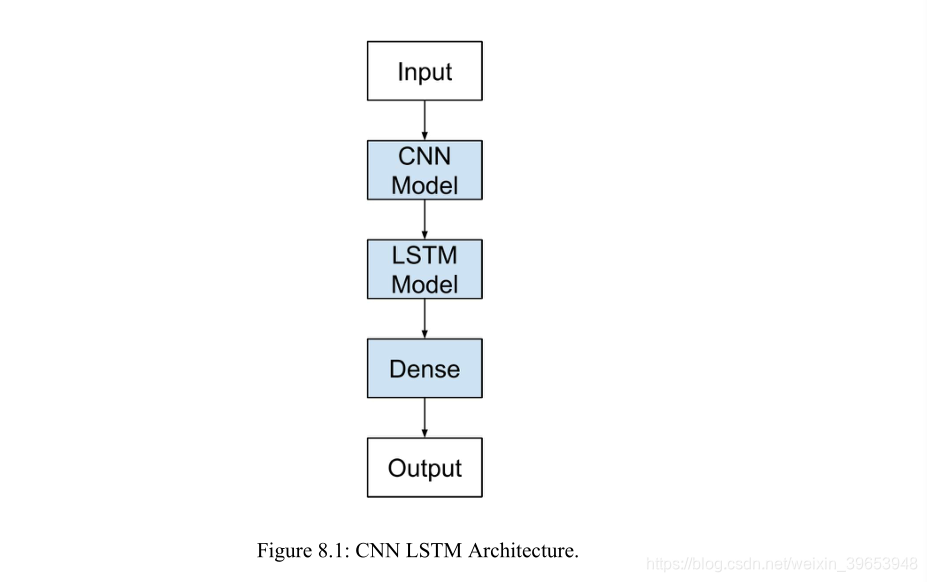
8.1 The CNN LSTM
8.1.1 Architecture
CNN-LSTM体系结构包括使用卷积神经网络(CNN)层对输入数据进行特征提取,并结合LSTM来支持序列预测。CNN-LSTMs是为视觉时间序列预测问题和从图像序列(如视频)生成文本描述的应用而开发的。具体而言,存在以下问题:
- 活动识别(Activity Recognition):生成一系列图像中显示的活动的文本描述。
- 图像描述(Image Description):生成单个图像的文本描述。
- 视频描述(Video Description):生成图像序列的文本描述。
[CNN LSTMs]是一类在空间和时间上都很深的模型,它具有灵活性,可以应用于包括顺序输入和输出的各种视觉任务。——Long-term Recurrent Convolutional Networks for Visual Recognition and Description, 2015.
这种结构最初被称为长期递归卷积网络或LRCN模型,尽管在本课中我们将使用更通用的名称CNN LSTM来指使用CNN作为前端的LSTMs。此架构用于生成图像的文本描述。关键是CNN的使用,它是在一个具有挑战性的图像分类任务中预先训练的,该任务被重新用作标题生成问题的特征提取程序。
… 使用CNN作为图像“编码器”是很自然的,首先对其进行图像分类任务的预训练,然后使用最后一个隐藏层作为生成句子的RNN解码器的输入。——Show and Tell: A Neural Image Caption Generator, 2015.
这种体系结构也被用于语音识别和自然语言处理问题,其中CNNs被用作音频和文本输入数据的LSTMs的特征提取器。此体系结构适用于以下问题:
- 在输入中具有空间结构(spatial structure),例如图像中的二维结构或像素,或句子、段落或文档中单词的ID结构。
- 在其输入中具有时间结构(temporal structure),例如视频中的图像顺序或文本中的单词,或者需要生成具有时间结构的输出,例如文本描述中的单词。
8.1.2 Implementation
定义一个CNN LSTM模型,在Keras联合训练。CNN LSTM可以通过在前端添加CNN层,然后在输出端添加具有全连接层(Dense)的LSTM层来定义。
将这种体系结构定义为两个子模型是很有帮助的:用于特征提取的CNN模型和用于跨时间步长解释特征的LSTM模型。 Lefs在一系列2D输入的背景下研究了这两个子模型,我们将假设它们是图像。

CNN Model
作为更新,我们可以定义一个二维卷积网络(2D convolutional network),它由Conv2D和MaxPooling2D层组成,这些层被排列成所需深度的堆栈。Conv2D将解释图像的快照(例如小正方形),轮询层(polling layers)将合并或抽象解释。
例如,下面的代码片段期望读取10×10像素的单通道图像(例如黑白图像)。Conv2D将读取2x2个快照中的图像,并输出一个新的10x10图像解释。MaxPooling2D使用2x2的最大池化,将输出减少到5x5合并。平坦层(Flatten layer )采用单个5x5映射,并将其转换为25个元素的向量,以便其他层处理,例如用于输出预测的全连接层。
cnn = Sequential()
cnn.add(Conv2D(1, (2,2), activation:’relu',padding= * same', input_shape=(10,10,1)))
cnn.add(MaxPooling2D(pool_size=(2, 2)))
cnn.add(Flatten())
LSTM Model
上面的CNN模型只能处理单个图像,将其从输入像素转换为内部矩阵或向量表示。我们需要在多个图像中重复此操作,并允许LSTM在输入图像的内部向量表示序列中使用BPTT建立内部状态和更新权重。
在使用现有的预训练模型(如VGG)从图像中提取特征的情况下,CNN可以被修复。CNN可能没有经过训练,我们希望通过将错误从LSTM反向传播到多个输入图像到CNN模型来训练它。在这两种情况下,在概念上都有一个单独的CNN模型和一个LSTM模型序列,每个LSTM模型对应一个时间步长。我们希望将CNN模型应用于每个输入图像,并将每个输入图像的输出作为单个时间步长传递给LSTM。
我们可以通过在TimeDistributed层中包装整个CNN输入模型(一层或多层)来实现这一点。这一层实现了多次应用同一层或多个层的期望结果。在本例中,将其多次应用于多个输入时间步骤,并依次为LSTM模型提供一系列图像解释或图像特性。
model.add(TimeDistributed(...))
model.add(LSTM(...))
model.add(Dense(...))
CNN LSTM Model
我们可以在Keras中定义一个CNN LSTM模型,首先定义一个或多个CNN层,将它们包装在TimeDistributed层中,然后定义LSTM和输出层。我们有两种定义模型的方法,它们是等价的,只是在口味上有所不同。您可以先定义CNN模型,然后将其添加到LSTM模型中,方法是将整个CNN层序列包装在TimeDistributed层中,如下所示:
# define CNN model
cnn = Sequential()
cnn.add(Conv2D(...))
cnn.add(MaxPooling2D(...))
cnn.add(Flatten())
# define CNN LSTM model
model = Sequential()
model.add(TimeDistributed(cnn,...))
model.add(LSTM(..))
model.add(Dense(...))
另一种方法是将CNN模型中的每一层封装在TimeDistributed层中,并将其添加到主模型中,这种方法可能更易于阅读。
model = Sequential()
model.add(TimeDistributed(Conv2D(...))
model.add(TimeDistributed(MaxPooling2D(...)))
model.add(TimeDistributed(Flatten()))
model.add(LSTM(...))
model.add(Dense(...))
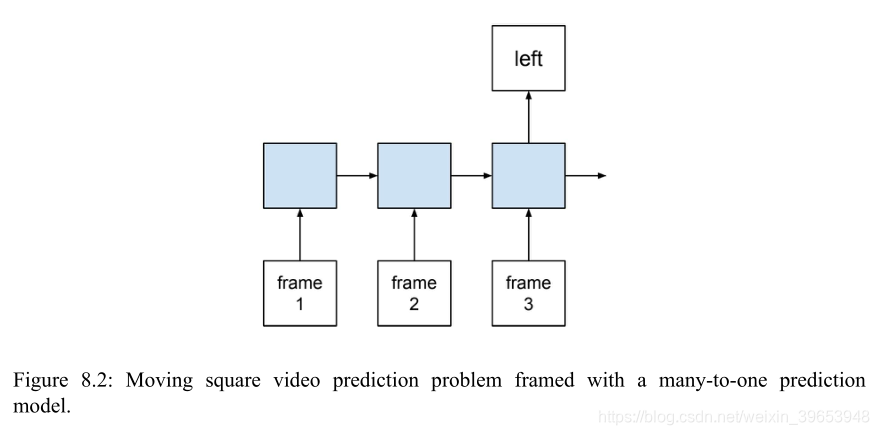
8.2 Moving Square Video Prediction Problem
设计了移动方块视频预测问题来演示CNN的LSTM算法。这个问题涉及到一系列帧的生成。在每个图像中,从左到右或从右到左画一条线。每一帧显示一行的一个像素的扩展。模型的任务是在帧序列中对这条线是向左移动还是向右移动进行分类。从技术上讲,该问题是一个多对一预测模型框架下的序列分类问题。
这个测试问题可以分解为以下几个步骤:
- Image Initialization.
- Adding Steps.
- Instance Generator.
8.2.1 Image Initialization
定义一个填充0值的2D NumPy数组,生成10×10的像素方块。
from numpy import zeros
frame = zeros((10,10))
为该行的第一步选择行。使用randint()函数来选择0到9之间的一致随机整数。
from random import randint
step = randint(0, 10-1)
使用random()函数决定是在图像的左侧还是右侧绘制这条线。如果是右边,将从左边开始,或者第0列;如果是左边,将从右边开始,或者第9列。
from random import random
right = 1 if random() < 0.5 else 0
col = 0 if right else size-1
标出这条线的起点。
frame[step, col] = 1
8.2.2 Adding Steps
将步骤(steps)添加到行中。下一步必须是前一步的一个函数。将它限制在沿着(左或右)的下一列中,并在同一行中,即上面的行或下面的行。\通过图像的边界来限制移动,例如,在第0行以下或第9行以上没有移动。
使用上面相同的randint()函数来选择下一步,并对上下值施加移动约束。上次选择的步骤值存储在最后一个步骤中。一步变量。
lower = max(0, last_step-l)
upper = min(10-l, last_step+l)
step = randint(lower, upper)
复制上一幅图像并标记下一列的新位置。
column = i if right else size-l-i
frame = last_frame.copy()
frame[step, column] = 1
根据选择的方向,可以重复此过程,直到到达第一列或最后一列。
8.2.3 Instance Generator
可以在两个函数中捕获上述所有行为。函数的作用是:获取一个参数来定义图像的大小,并返回一系列图像,以及行是向右移动(1)还是向左移动(0)。因为行在图像上移动,此函数调用另一个函数next_frame(),以在第一帧之后创建每一个后续帧。
为了使问题具体化,画出一个序列。生成一个每个图像5x5像素和5帧的小序列,并排绘制帧。
from numpy import zeros
from random import randint
from random import random
from matplotlib import pyplot
# generate the next frame in the sequence
def next_frame(last_step, last_frame, column):
    # define the scope of the next step
    lower = max(0, last_step-1)
    upper = min(last_frame.shape[0]-1, last_step+1)
    # choose the row index for the next step
    step = randint(lower, upper)
    # copy the prior frame
    frame = last_frame.copy()
    # add the new step
    frame[step, column] = 1
    return frame, step

# generate a sequence of frames of a dot moving across an image
def build_frames(size):
    frames = list()
    # create the first frame
    frame = zeros((size,size))
    step = randint(0, size-1)
    # decide if we are heading left or right
    right = 1 if random() < 0.5 else 0
    col = 0 if right else size-1
    frame[step, col] = 1
    frames.append(frame)
    # create all remaining frames
    for i in range(1, size):
        col = i if right else size-1-i
        frame, step = next_frame(step, frame, col)
        frames.append(frame)
    return frames, right

# generate sequence of frames
size = 5
frames, right = build_frames(size)

# plot all feames
pyplot.figure(dpi=200)
for i in range(size):
    # create a grayscale subplot for each frame
    pyplot.subplot(1, size, i+1)
    pyplot.imshow(frames[i], cmap='Greys')
    # turn of the scale to make it cleaer
    ax = pyplot.gca()
    ax.get_xaxis().set_visible(False)
    ax.get_yaxis().set_visible(False)
# show the plot
pyplot.show()
运行该示例将生成一个随机序列并并排绘制帧。可以看到这条线在图像上从左到右摆动,每一个像素一个时间步。

8.2.4 Prepare Input for Model
准备一个函数生成具有正确形状的多个序列,以便对LSTM模型进行拟合和评估。名为generate_examples()函数以要生成的图像大小和要生成的序列数作为参数。
生成并存储每个序列。注意,模型的输入序列必须调整大小以适合2D CNN:
[width, height, channels]
在上述例子中,对于对称的黑白图像,它是[size,size,1]。因为有多个图像序列,所以必须将模型的输入重塑为:
[samples, timesteps, width, height, channels]
本例中的尺寸为:(由前文知方块的timesteps,width,height是一样的)
[n_patterns, size, size, size, 1]
下面列出了生成随机视频的新函数。
# generate multiple sequences of frames and reshape for network input
def generate_examples(size, n_patterns):
    X, y = list(), list()
    for _ in range(n_patterns):
        frames, right = build_frames(size)
        X.append(frames)
        y.append(right)
        # resize as [samples, timesteps, width, height, channels]
    X = array(X).reshape(n_patterns, size, size, size, 1)
    y = array(y).reshape(n_patterns, 1)
    return X, y
8.3 Define and Compile the Model
定义一个CNN LSTM来拟合模型。将图像配置为50x50像素,或总共2500个binary value。
# configure problem
size = 50
用一个单独的TimeDistributed层来定义在CNN模型中包装每个层的模型。这是为了确保模型摘要对网络如何挂起有一个清晰的概念。定义一个Conv2D作为一个输入层,带有两个过滤器(filters)和一个2x2内核(kernel)来通过输入图像。在一些实验中发现使用了两个过滤器,并且习惯上使用较小的内核大小。Conv2D将输出2个49x49像素。
卷积层通常紧接着一个池化层。在这里,使用一个大小为2x2的MaxPooling2D池化层,这会将上一层每个过滤器输出的大小减半,从而输出2个24x24映射。
池化层之后是一个Flatten层,用于将MaxPooling2D层的[24,24,2] 3D输出转换为一维1,152元素向量。 CNN模型是特征提取模型。希望的是,展平层的矢量输出是图像的压缩和/或比原始像素值更显著的表示。
定义LSTM模型的组件。使用具有50个记忆单元的单个LSTM层,在经过反复试验后将其配置。在整个CNN模型周围使用TimeDistribted包装器,这意味着LSTM将看到50个时间步长,每个时间步长显示1152个元素向量作为输入。
这是一个二分类问题,因此使用具有单个神经元和sigmoid激活函数的Dense输出。编译该模型以使用梯度下降的Adam实施最小化对数损失(二分类交叉熵),并打印二分类精度。完整代码如下。
# define the model
model = Sequential()
model.add(TimeDistributed(Conv2D(2, (2,2), activation= relu ),
input_shape=(None,size,size,1)))
model.add(TimeDistributed(MaxPooling2D(pool_size=(2, 2))))
model.add(TimeDistributed(Flatten()))
model.add(LSTM(50))
model.add(Dense(1, activation= sigmoid ))
model.compile(loss= binary_crossentropy , optimizer= adam , metrics=[ acc ])
print(model.summary())
运行此示例打印已编译模型的摘要。
_________________________________________________________________
Layer (type)  Output Shape  Param #
=================================================================
time_distributed_1 (TimeDist (None, None, 49, 49, 2) 10
_________________________________________________________________
time_distributed_2 (TimeDist (None, None, 24, 24, 2) 0
_________________________________________________________________
time_distributed_3 (TimeDist (None, None, 1152)  0
_________________________________________________________________
lstm_1 (LSTM)  (None, 50)  240600
_________________________________________________________________
dense_1 (Dense)  (None, 1)  51
=================================================================
Total params: 240,661
Trainable params: 240,661
Non-trainable params: 0
_________________________________________________________________
8.4 Fit the Model
将模型拟合到随机生成的问题示例上。上面定义的generate_examples()函数将准备一定数量的随机序列,可以将其保留在内存中并有效地拟合模型。随机生成的示例数量代表训练时期的数量,因为希望模型在唯一的问题实例上进行训练,而不是一次又一次地使用同一组随机实例。
在5,000个随机生成序列的单个epoch上训练模型。理想情况下,LSTM的内部状态将在每个序列的末尾重置。可以通过将批处理大小(batch_size)设置为1来实现。在模型的保真度(fidelity of the model)上进行权衡以提高计算效率,并将批处理大小设置为32。
# fit model
X, y = generate_examples(size, 5000)
model.fit(X, y, batch_size=32, epochs=1)
运行示例将在命令行上执行时显示进度条,指示每批结束时的损失和准确性。如果在IDE或笔记本电脑上运行示例,可通过设置verbose = 0关闭进度条。
5000/5000 [==============================] - 37s - loss: 0.1507 - acc: 0.9208
8.5 Evaluate the Model
生成100个新的随机序列,并评估模型的准确性。
# evaluate model
X, y = generate_examples(size, 100)
loss, acc = model.evaluate(X, y, verbose=0)
print( loss: %f, acc: %f % (loss, acc*100))
运行示例将同时显示拟合模型的损失和准确性。运行结果可能会有所不同,如果不是100%准确性,尝试多运行该示例几次。
loss: 0.001120, acc: 100.000000
8.6 Make Predictions With the Model
生成一个新的单个随机序列,并预测线是向左还是向右移动。
# prediction on new data
X, y = generate_examples(size, 1)
yhat = model.predict_classes(X, verbose=0)
expected = "Right" if y[0]==1 else "Left"
predicted = "Right" if yhat[0]==1 else "Left"
print( Expected: %s, Predicted: %s % (expected, predicted))
运行示例将打印解码后的期望值和预测值。
Expected: Right, Predicted: Right
8.7 Complete Example
import os
os.environ['CUDA_VISIBLE_DEVICES'] = '/gpu:0'

from random import random
from random import randint
from numpy import array
from numpy import zeros
from keras.models import Sequential
from keras.layers import Conv2D
from keras.layers import MaxPooling2D
from keras.layers import LSTM
from keras.layers import Dense
from keras.layers import Flatten
from keras.layers import TimeDistributed
# generate the next frame in the sequence
# generate the next frame in the sequence
def next_frame(last_step, last_frame, column):
    # define the scope of the next step
    lower = max(0, last_step-1)
    upper = min(last_frame.shape[0]-1, last_step+1)
    # choose the row index for the next step
    step = randint(lower, upper)
    # copy the prior frame
    frame = last_frame.copy()
    # add the new step
    frame[step, column] = 1
    return frame, step

# generate a sequence of frames of a dot moving across an image
def build_frames(size):
    frames = list()
    # create the first frame
    frame = zeros((size,size))
    step = randint(0, size-1)
    # decide if we are heading left or right
    right = 1 if random() < 0.5 else 0
    col = 0 if right else size-1
    frame[step, col] = 1
    frames.append(frame)
    # create all remaining frames
    for i in range(1, size):
        col = i if right else size-1-i
        frame, step = next_frame(step, frame, col)
        frames.append(frame)
    return frames, right

# generate multiple sequences of frames and reshape for network input
def generate_examples(size, n_patterns):
    X, y = list(), list()
    for _ in range(n_patterns):
        frames, right = build_frames(size)
        X.append(frames)
        y.append(right)
    # resize as [samples, timesteps, width, height, channels]
    X = array(X).reshape(n_patterns, size, size, size, 1)
    y = array(y).reshape(n_patterns, 1)
    return X, y

# configure problem
size = 50

# define the model
model = Sequential()
model.add(TimeDistributed(Conv2D(2, (2,2), activation='relu'),
    input_shape=(None,size,size,1)))
model.add(TimeDistributed(MaxPooling2D(pool_size=(2, 2))))
model.add(TimeDistributed(Flatten()))
model.add(LSTM(50))
model.add(Dense(1, activation='sigmoid'))
model.compile(loss='binary_crossentropy', optimizer='adam', metrics=['acc'])
print(model.summary())

# fit model
X, y = generate_examples(size, 1000)
model.fit(X, y, batch_size=32, epochs=1)

# evaluate model
X, y = generate_examples(size, 100)
loss, acc = model.evaluate(X, y, verbose=0)
print("loss:%f, acc:%f" % (loss, acc*100))

# prediction on new data
X, y = generate_examples(size, 1)
yhat = model.predict_classes(X, verbose=0)
expected = "Right" if y[0]==1 else "Left"
predicted = "Right" if yhat[0]==1 else "Left"
print("Expected: %s, Predicted: %s" % (expected, predicted))
输出:
Model: "sequential_1"
_________________________________________________________________
Layer (type)                 Output Shape              Param #
=================================================================
time_distributed_1 (TimeDist (None, None, 49, 49, 2)   10
_________________________________________________________________
time_distributed_2 (TimeDist (None, None, 24, 24, 2)   0
_________________________________________________________________
time_distributed_3 (TimeDist (None, None, 1152)        0
_________________________________________________________________
lstm_1 (LSTM)                (None, 50)                240600
_________________________________________________________________
dense_1 (Dense)              (None, 1)                 51
=================================================================
Total params: 240,661
Trainable params: 240,661
Non-trainable params: 0
_________________________________________________________________
None
Epoch 1/1
1000/1000 [==============================] - 12s 12ms/step - loss: 0.5922 - acc: 0.6660
loss:0.103276, acc:100.000000
Expected: Left, Predicted: Left
8.8 关于jupyter notebook报错的问题解决
报错:
...
UnknownError:  Failed to get convolution algorithm. This is probably because cuDNN failed to initialize, so try looking to see if a warning log message was printed above.
	 [[node time_distributed_1/convolution (defined at C:\anaconda3\envs\keras\lib\site-packages\keras\backend\tensorflow_backend.py:3009) ]] [Op:__inference_keras_scratch_graph_1967]

Function call stack:
keras_scratch_graph
有文章说退回旧版本可以解决问题,其实不用,只需要指定运行的GPU即可正常运行(注意先查看本机的GPU信息,再指定name):
import os
os.environ['CUDA_VISIBLE_DEVICES'] = '/device:GPU:0'  #GPU/CPU的name
查看本机CPU/GPU信息:
from tensorflow.python.client import device_lib
device_lib.list_local_devices()
参考:
cudnn报错解决
Jason Brownlee《long-short-term-memory-networks-with-python》chapter 8
