【Scrapy学习心得】爬虫实战二(异步保存数据到数据库)
声明:仅供技术交流,请勿用于非法用途,如有其它非法用途造成损失,和本博客无关
爬取的网站:京东图书商品信息(所有类别下的第一页数据) 点击跳转
一、配置环境
python3.7pycharmScrapy1.7.3win10pymysql
二、准备工作
- 在cmd命令行中进入需要创建项目的目录运行
scrapy startproject hehe - 创建成功后继续执行
cd hehe - 然后执行
scrapy genspider jd jd.com - 最后在spider文件夹下可以看到刚创建的
jd.py爬虫文件
三、分析网页

可以看到,所有的大分类都在一起,右键检查一下很容易找到这些大分类名称以及它的url地址,然后在大分类下小分类名称以及它的url地址也可以轻松找到:

右键点检查也可以轻松找到对应的小分类的url地址。然后我们再来看看具体的商品信息,这里我只想要爬取这本书的名字和它的价格信息

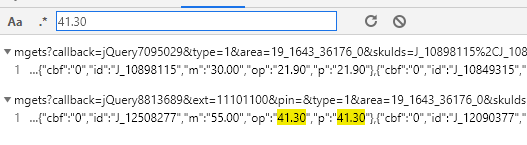
但是在爬取的过程中你会遇到一个问题,就是价格爬取不了,为什么呢,后来我发现这个价格信息是通过AJAX渲染的,而不是HTML,于是在返回的response中不会显示价格,也就爬取不了了,那怎么办呢,不急,下面分析了这些价格是怎么被渲染出来的。
- 右键打开检查,在控制台中随便找一本书的价格输入并按回车,这时会出现下面的两个东西,如下图第一个
- 然后发现它是通过请求
https://p.3.cn/prices/mgets?callback=jQuery9186544&type=1&area=19_1643_36176_0&skuIds=J_54816170278%2CJ_55178298366%2CJ_52359934836%2CJ_56652847646%2CJ_27852197042&pdbp=0&pdtk=&pdpin=&pduid=1565946264342744483359&source=list_pc_front&_=1569742616673这一个网页来获取价格的,然后通过删减这个url的不必要的参数,最终得到一个商品它的价格对应请求的url为:https://p.3.cn/prices/mgets?skuIds=J_54816170278,不同商品的url只是后面那一串数字不一样而已,那么那一串数字怎么取到呢 - 可以发现商品本身的一个标签里就有写着,如下图第二个,那我们只要先取到这个值,再构造
url请求就行了

所以总共我要爬取的内容有:
- 大分类的名称以及其
url - 小分类的名称以及其
url - 书名以及价格
查找元素的那些操作我就不放上来了,因为没什么难度的,会来学scrapy框架的同学肯定是跟我一样那些什么requests啊,urllib啊,selenium啊等等都是用腻了才来的,是吧
四、爬取数据
下面直接放上jd.py的代码:
# -*- coding: utf-8 -*-
import scrapy
from copy import deepcopy
import json
import urllib

class JdSpider(scrapy.Spider):
    name = 'jd'
    allowed_domains = ['jd.com','p.3.cn']  #域名,注意这里要添加请求价格的网站域名
    start_urls = ['https://list.jd.com/list.html?cat=1713,3258']

    def parse(self, response):
        type_name_list=response.xpath('//ul[@class="menu-drop-list"]/li')
        for type_name in type_name_list:
            item={}  #自己定义了一个item,这次没有用到item.py
            item['type_name']=type_name.xpath('./a/text()').get()   #大分类名称
            item['type_name_url'] = type_name.xpath('./a/@href').get()  #大分类url
            #补全url
            if item['type_name_url'] is not None:
                item['type_name_url']=urllib.parse.urljoin(response.url,item['type_name_url'])
            yield scrapy.Request(
                item['type_name_url'],
                callback=self.parse_type_list,
                meta={'item':deepcopy(item)}  #这里要用deepcopy,这样item才不会在前后两次请求中被修改
            )

    def parse_type_list(self,response):
        item=response.meta['item']  #获取传过来的item
        fenlei_list=response.xpath('//div[@id="J_selectorCategory"]//ul/li')
        for fenlei in fenlei_list:
            item['fenlei_name']=fenlei.xpath('./a/@title').get() #小分类名称
            item['fenlei_url']=fenlei.xpath('./a/@href').get()   #小分类url
            #补全url
            if item['fenlei_url'] is not None:
                item['fenlei_url']=urllib.parse.urljoin(response.url,item['fenlei_url'])
            yield scrapy.Request(
                item['fenlei_url'],
                callback=self.parse_fenlei_list,
                meta={'item':deepcopy(item)}  #注意,这里同样需要使用deepcopy
            )

    def parse_fenlei_list(self,response):
        item=response.meta['item']
        book_list=response.xpath('//ul[@class="gl-warp clearfix"]/li')
        for book in book_list:
            item['book_name']=book.xpath('.//div[@class="p-name"]/a/em/text()').get().strip() #书名
            item['book_author']=book.xpath('.//span[@class="author_type_1"]/a/text()').getall() #书的作者
            sku=book.xpath('./div[1]/@data-sku').get()  #每本书的那个标签码
            #构造价格请求url
            if sku is not None:
                item['book_price_url']="https://p.3.cn/prices/mgets?skuIds=J_{}".format(sku)
                yield scrapy.Request(
                    item['book_price_url'],
                    callback=self.parse_book_price,
                    meta={'item':deepcopy(item)}  #注意。。。
                )

    def parse_book_price(self,response):
        item=response.meta['item']
        item['book_price']=json.loads(response.body.decode())[0]['op'] #价格
        # print(item)
        yield item  #交给pipeline进行保存数据
五、保存数据(同步存入数据库)
保存数据是交给pipeline.py文件进行操作的
这里我把数据保存到了mysql数据库中,如果没有安装pymysql的,可以在cmd命令下执行pip install pymysql来安装一下即可
然后pipeline.py文件的代码如下:
import pymysql

conn=pymysql.connect(host='localhost',user='yourroot',password='yourpassword',database='yourdatabase',charset='utf8')
cursor=conn.cursor()

class HehePipeline(object):
    def process_item(self, item, spider):
        if spider.name == 'jd':
            type_name=item['type_name']
            fenlei_name=item['fenlei_name']
            book_name=item['book_name']
            book_price=item['book_price']
            sql='insert into jd3(type_name,fenlei_name,book_name,book_price) values(%s,%s,%s,%s)'
            cursor.execute(sql,[type_name,fenlei_name,book_name,book_price])
            conn.commit()
现在我们的爬虫大致已经是写完了,不过我还要修改一下setting.py文件的一些设置,需要增加的语句有:
LOG_LEVEL='WARNING' #设置日志输出级别
USER_AGENT = 'Mozilla/5.0 (Windows NT 10.0; Win64; x64) AppleWebKit/537.36 (KHTML, like Gecko) Chrome/75.0.3770.142 Safari/537.36'  #设置请求头
ROBOTSTXT_OBEY = False  #把这个设置成False,就不会去请求网页的robots.txt,因为不改为False的话,scrapy就会去访问该网站的robots.txt协议,如果网站没有这个协议,那么它就不会去访问该网站,就会跳过,进而爬不到数据
ITEM_PIPELINES = {
   'hehe.pipelines.HehePipeline': 300,
}
最后在cmd中先进入到这个项目的根目录下,即有scrapy.cfg文件的目录下,然后输入并运行scrapy crawl jd,最后静静等待就行了
打开数据库你会看到:

六、保存数据(异步存入数据库)
异步存储到数据库中比同步会快很多(提升1倍的速度左右),要用到twisted模块下的adbapi,因为在安装scrapy时就已经安装好twisted模块,因此可以直接导入就行了,下面只需更改pipeline.py文件:
# -*- coding: utf-8 -*-

# Define your item pipelines here
#
# Don't forget to add your pipeline to the ITEM_PIPELINES setting
# See: https://docs.scrapy.org/en/latest/topics/item-pipeline.html
import pymysql
from pymysql import cursors  #导入mysql的游标类
from twisted.enterprise import adbapi

class XixiPipeline(object):
    def __init__(self):
        dbparams={
            'host' : 'localhost',
            'user' : 'yourroot',
            'password' : 'yourpassword',
            'database' : 'yourdatabase',
            'charset' : 'utf8',
            'cursorclass' : cursors.DictCursor #这里需要传多一个参数:游标的一个参数给它
        }
        self.adpool=adbapi.ConnectionPool('pymysql',**dbparams)
        self._sql=None

    @property  #意思是把下面sql这个函数当作是一个变量,即相当于声明一个sql变量一样
    def sql(self):
        if not self._sql:
            self._sql='insert into jd2(type_name,fenlei_name,book_name,book_price) values(%s,%s,%s,%s)'
        return self._sql

    def process_item(self,item,spider):
        defer=self.adpool.runInteraction(self.insert_item,item)  #需要传一个真正导入数据库操作的函数给它,不然跟同步下载一样
        defer.addErrback(self.handle_error,item,spider)  #添加一个接收错误信息的函数

    def insert_item(self,cursor,item):
        cursor.execute(self.sql,[item['type_name'],item['fenlei_name'],item['book_name'],item['book_price']])

    def handle_error(self,error,item,spider):
        print('-' * 30)
        print('Error:',error)
        print('-' * 30)
同样需要在setting.py文件中设置修改pipeline才能把这个新的pipeline给生效,如下添加一行并把之前的给注释掉:
ITEM_PIPELINES = {
   # 'hehe.pipelines.HehePipeline': 300,
   'hehe.pipelines.XixiPipeline': 300,
}
那么这次的爬虫就到这里结束了
写在最后
总结这次的爬虫呢,我感觉是提升了一个档次的,之前并没有了解和实现过异步保存数据到数据库当中,也体会到了异步的厉害之处。说一下,同步保存数据我用了差不多1个钟,而用异步保存数据我只用了20分钟左右。总共数据有4万7千多条数据。因为scrapy框架本身就是采用多协程来处理的了,已经比一般的爬虫要快,那么再加上异步保存数据,可想而知,简直不要太爽!!
