背景
最近基于RESTful API开发Spring boot的接口,由于接口url众多,不同的url的uri对应的业务资源有不一样(业务逻辑是一样的,主要是通过改变接口的uri来辨别要处理对应的资源),面对不同的接口,我们一般的想法就是,会创建一份RESTful API文档来记录所有接口的细节;如果想要做的有质量又有效率,然而不是一件简单的事情,会存在以下两个问题:
1.如果详细考虑接口请求,涉及到HTTP请求类型、HTTP请求头部信息、HTTP请求内容、HTTP安全验证的问题等等;想很好很快的完成这部分的文档就显得非常吃力了,对于调用这些接口的同事就会显得很吃力。
2.如果接口需要修改,则必须要同步修改接口文档,而文档与代码处于两个不同的媒介,这个同步起来很容易出问题,导致接口文档与实际接口功能出现不一致的现象。
swagger2就应运而生了,非常完美的与RESTful API进行结合;在程式代码里面集成使用swagger2可以在修改代码的时候,生成的接口文档也随之改变;大大的节约了时间;并且完美同步,质量高效。
swagger2是非常实用的插件,主要用于生成、描述、调用和可视化RESTful风格的WEB服务,在UI上面可以显示API的具体细节并且使客户端和文件系统作为服务器以同样的速度来更新显示;文件的方法、参数和模型紧密集成到服务端代码,允许API来始终保持同步。同时非常方便功能测试。以前是使用一些接口测试工具如postman,调试测试接口,手动找并输入url,找到各种需要的输入参数,少了什么条件参数,输错url或uri等等都会给测试带来很大的不便,如果各种条件参数和uri改变了,又得要重头再来try agin;简直要崩溃的节奏;还好swagger2帮你省了很多麻烦,只需要输入的参数的值就好了,其他一切有swagger2帮你同步更新上去,非常方便实用。
具体实现
1.Maven中的pom.xml依赖
<dependencies>
		<dependency>
		    <groupId>io.springfox</groupId>
		    <artifactId>springfox-swagger2</artifactId>
		    <version>2.4.0</version>
		 </dependency>
		 <dependency>
		    <groupId>io.springfox</groupId>
		    <artifactId>springfox-swagger-ui</artifactId>
		    <version>2.4.0</version>
		 </dependency>
<dependencies>
2.创建Swagger2配置类
主要用使用swagger2的相关属性的配置
/*
	import必要的类
*/
import org.springframework.context.annotation.Bean;
import org.springframework.context.annotation.Configuration;
import springfox.documentation.builders.ApiInfoBuilder;
import springfox.documentation.builders.PathSelectors;
import springfox.documentation.builders.RequestHandlerSelectors;
import springfox.documentation.service.ApiInfo;
import springfox.documentation.service.Contact;
import springfox.documentation.spi.DocumentationType;
import springfox.documentation.spring.web.plugins.Docket;
import springfox.documentation.swagger2.annotations.EnableSwagger2;
/*
	@configuration注解让Spring来加载该配置
	@EnableSwagger2注解启动swagger2
	@Bean注解加载bean类,返回的是Docket类实例
*/
@Configuration
@EnableSwagger2
public class Swagger2 {
	/*
	swagger2的配置文件,这里可以配置swagger2的一些基本的内容,比如扫描的包等等
	1.apiInfo()方法用来创建该API的基本信息,这些信息会展现在文档页面上。信息包括:
	2.select()函数返回一个ApiSelectorBuilder实例来控制那些接口暴露给swagger2来展示。
	3.apis(RequestHandlerSelectors.basePackage("路径"))需要展示的接口通过扫描包的路径来获取路径下的
		controller定义api,并产生文档内容(除了那些被@ApiIgnore指定忽略的请求)多包可以使用逗号分隔。
	4.paths(PathSelectors.any())扫描路径下的所有API。
	5.build()创建生效。
	*/
	@Bean
	public Docket createRestApi() {
		return new Docket(DocumentationType.SWAGGER_2)
				.apiInfo(apiInfo())
				.select()
				.apis(RequestHandlerSelectors.basePackage("com.myself.thirdpartyinterface.controller"))
				.paths(PathSelectors.any())
				.build();

	}
	/*
	构建 api文档的展示基本信息函数;这些信息将会展示在接口文档Swagger-ui.html上面
	*/
	private ApiInfo apiInfo() {
		// TODO Auto-generated method stub
		return new ApiInfoBuilder()
                //页面标题
                .title("基于springBoot的通用查询数据 API")
                //创建人
                .contact(new Contact("use_admin", "https://blog.csdn.net/use_admin/article/details/88901342",""))
                //版本号
                .version("1.0.1")
                //描述
                .description("SpringBoot使用swagge2构建的API")
                .build();
	}
}
3.给显示接口文档添加内容
完成上面的配置之后,其实就可以产生文档内容了,但那些都是基本信息;在用户实际调用的接口文档说明还需要增加一些注解说明来丰富文档内容;使用之前先说一下常用的Swagger2注解说明:
注解主要分成三类:
(1)用在controller类上面
–@Api
注解:协议集作用描述,放在请求类上面的作用描述说明,与@RestController并列,属性如下:
		-tags  显示api资源名称
		-value  没什么意义,可以不用配置
		-description 	对api资源的描述
		-basePath 	基本路径
		-position 	如果配置多个Api 想改变显示的顺序位置
		-produces 	如, “application/json, application/xml”
		-consumes 	如, “application/json, application/xml”
		-protocols 	协议类型,如: http, https, ws, wss.
		-authorizations 	高级特性认证时配置
		-hidden 	配置为true ,将在文档中隐藏
实例:
@RestController
@RequestMapping("/QueryData")
@Api(tags="SpringBooot api",description="相关接口")
public class ThirdPartyCommonController {
.....
}
(2)用在方法上面
–@ApiOperation
注解:用在请求的方法上,用于说明该请求的作用,属性:
		-value 请求方法api名称
		-notes 该请求方法的备注信息
–@ApilmplicitParams
注解:用在请求的方法上,包含一组参数说明,配合@ApilmplicitParam使用,属性:
-value 存放多组参数
–@ApilmplicitParam
注解:放在@ApilmplicitParams里面,对单个参数的说明,属性:
     -	name:参数名
     		-	value:参数的汉字说明、解释
    		-	required:参数是否必须传
     		-	paramType:参数放在哪个地方 ·
    					--header --> 请求参数的获取:@RequestHeader ·
     					--query --> 请求参数的获取:@RequestParam ·
    				    -- path(用于restful接口)--> 请求参数的获取:@PathVariable ·
     					--body(请求体)--> @RequestBody
    					--form(不常用)
     		-  dataType:参数类型,默认String
     		-  defaultValue:参数的默认值
–@ApiResponses
注解:方法返回对象的说明,结合@ApiResponse使用
–@ApiResponse
注解:每个参数的说明,属性:
		-code 响应代码,数字如:400
		-message 响应信息
		-response 响应的类
实例:
	@ApiOperation(value="通用查询数据接口api",notes="通过筛选过滤API的URL来分发查询数据并返回")
	@ApiImplicitParams(
		value = {
		@ApiImplicitParam(name="factory",value="url请求的参数",required=true,dataType="String",paramType="query"),
		@ApiImplicitParam(name="api_path_name", value="URI",required=true,dataType="String",paramType="path"),
		@ApiImplicitParam(name="jsonObj",value="参数格式:key=value&
							key1=value1",required=true,dataType="String",paramType="query")
	})
	@ApiResponses({
		@ApiResponse(code=400,message="请求参数不满足条件"),
	})
	@RequestMapping(value="/{api_path_name}",method=RequestMethod.POST)
	public String queryData_Request(@PathVariable String api_path_name, @RequestParam String jsonObj,
									@RequestParam String factory) {
									......
									}
(3)用在返回对象类上面(本次没有使用)
–@ApiModel
注解:用于响应类上,表示一个返回响应数据的信息
–@ApiModelProperty
注解:用在属性上,描述响应类的属性

代码实例:
import java.util.Map;
import javax.servlet.http.HttpServletRequest;
import org.slf4j.Logger;
import org.slf4j.LoggerFactory;
import org.springframework.web.bind.annotation.PathVariable;
import org.springframework.web.bind.annotation.RequestMapping;
import org.springframework.web.bind.annotation.RequestMethod;
import org.springframework.web.bind.annotation.RequestParam;
import org.springframework.web.bind.annotation.RestController;
import com.myself.action.Constants;
import com.myself.thirdpartyinterface.service.ThirdPartyCommonService;
import com.myself.util.IOUtil;
import io.swagger.annotations.Api;
import io.swagger.annotations.ApiImplicitParam;
import io.swagger.annotations.ApiImplicitParams;
import io.swagger.annotations.ApiOperation;
import io.swagger.annotations.ApiResponse;
import io.swagger.annotations.ApiResponses;
import net.sf.json.JSONObject;

@RestController
@RequestMapping("/QueryData")
@Api(tags="SpringBooot api",description="相关接口")
public class ThirdPartyCommonController {

	private static Logger log=LoggerFactory.getLogger(ThirdPartyCommonController.class);
	private ThirdPartyCommonService commonService=new ThirdPartyCommonService(log);
	/*
	 * 处理request请求
	 * @param HttpServletRequest
	 * @return String
	 * */
	public String dealRequest(HttpServletRequest request)  {

	    String url=request.getRequestURI();	//获取url
	    String res="NO REQUEST URL,Not Found";
		if(url.contains("QueryData")) {
			/*
			 * 通用查询请求接口,根据request请求信息进行筛选
			 * 1.获取请求url的信息,包括:url、api_path_name、参数key-value值
			 *
			 * */
			String url_match=IOUtil.getPropertyByName("com.myself.thirdparty.common.url.header",
													 	Constants.getPath()).trim();
			String api_path_name=url.substring(url_match.length()-2);//获取api_path_name
			JSONObject jsonObj=new JSONObject();//保存所有的参数
			Map<String, String[]> maps=request.getParameterMap();//获取参数的key-value值
			if(maps.containsKey("factory")||maps.containsKey("FACTORY")) {
				for(String key:maps.keySet()) {
					String value=maps.get(key)[0].toString();
					if(!value.equals("")) {
						jsonObj.put(key.toUpperCase(), value);
					}
				}
				log.info("获取请求的url信息,url:"+url+",url参数:"+jsonObj.toString());
				res=queryData_Request(api_path_name, jsonObj.toString(),null);
			}else {
				res="The Request param: factory can not null!";
			}
		}
		return res;
	}
	/*
	 * 1.通用查询请求处理,映射的URI通过输入的参数获取,如下{api_path_name}获取输入的api_path_name的值代替
	 * @param String -url:请求的地址
	 * @param String -api_path_name:请求的uri标识符
	 * @param JSONObject -jsonObj:请求的参数列表,已转json格式
	 * @return String -返回相应信息
	 * */
	@ApiOperation(value="通用查询数据接口api",notes="通过筛选过滤API的URL来分发查询数据并返回")
	@ApiImplicitParams(
		value = {
		@ApiImplicitParam(name="factory",value="url请求的参数",required=true,dataType="String",paramType="query"),
		@ApiImplicitParam(name="api_path_name", value="URI",required=true,dataType="String",paramType="path"),
		@ApiImplicitParam(name="jsonObj",value="参数格式:key=value&
							key1=value1",required=true,dataType="String",paramType="query")
	})
	@ApiResponses({
		@ApiResponse(code=400,message="请求参数不满足条件"),
	})
	@RequestMapping(value="/{api_path_name}",method=RequestMethod.POST)
	public String queryData_Request(@PathVariable String api_path_name, @RequestParam String jsonObj,@RequestParam String factory) {
		System.out.println("123");
		JSONObject jsonObj_res=new JSONObject();//返回响应的结果信息
		jsonObj_res.put("Result", "Fail");
		jsonObj_res.put("Message", "response fail");
		/*
		 * 1.根据api_path_name获取需要查询的信息
		 * 包括:
		 * 1).所做的动作action,如query,add,update,delete
		 * 2).api_path_name和factory唯一值,获取执行的环境schema和执行的sql
		 * 3).将sql的参数使用请求保存的jsonObj来代替
		 * */
		String selectInfo=commonService.getInfoToUri(api_path_name);
		log.info("根据api_path_name查询到的信息:"+selectInfo);
		if(selectInfo.startsWith("Exception")) {//异常
			jsonObj_res.put("Result", "Exception");
			jsonObj_res.put("Message", selectInfo.substring(10));
		}else if(selectInfo.equals("[]")){
			jsonObj_res.put("Message", "URL address Error,please Checked");
		}else{
			/*
			 * 2.根据jsonObj参数匹配并替换掉selectInfo的sql参数,并执行sql,返回json格式参数
			 * */
			String query_res=commonService.selectSQLjsonArr(JSONObject.fromObject(jsonObj), selectInfo);
			log.info("执行查询数据的结果:"+query_res);
			if(query_res.startsWith("Exception")) {
				jsonObj_res.put("Result", "Exception");
				jsonObj_res.put("Message", query_res.substring(10));
			}else if(query_res.startsWith("Null")) {
				jsonObj_res.put("Message", "The factory is not exist,Data not found ");
			}else if(query_res.startsWith("Fail")){
				jsonObj_res.put("Message",query_res.substring(5));
			}else{
				jsonObj_res.put("Result", "OK");
				jsonObj_res.put("Message", query_res);
			}
		}
		log.info("最后返回的结果信息:"+jsonObj_res);
		return jsonObj_res.toString();
	}
}
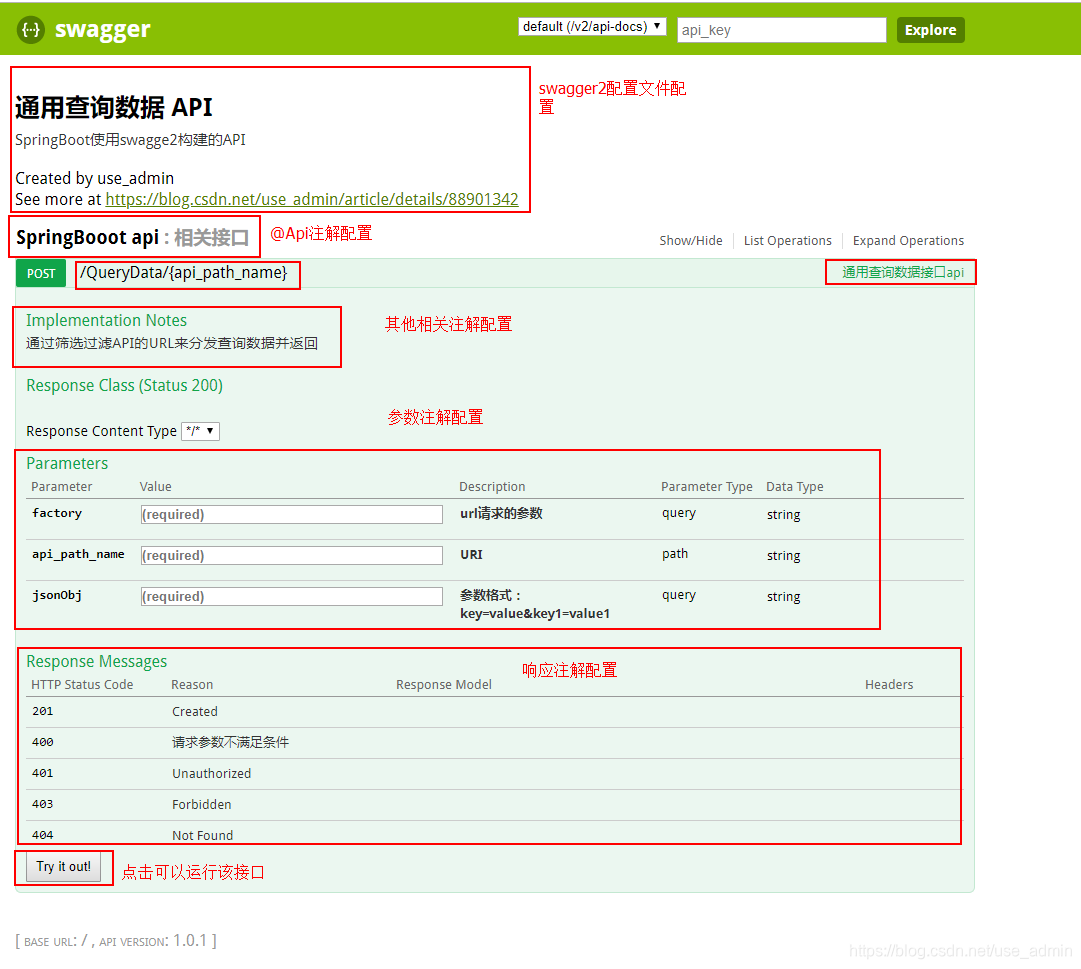
实现效果
将Spring Boot项目服务启动,访问:http://localhost:11004/swagger-ui.html
11004为自己设置的端口号,在application.properties中server.port=11004设置。