版权声明:本文为博主原创文章,未经博主允许不得转载。 https://blog.csdn.net/wang_shuyu/article/details/78744555
Swagger™的目标是为REST APIs 定义一个标准的,与语言无关的接口,使人和计算机在看不到源码或者看不到文档或者不能通过网络流量检测的情况下能发现和理解各种服务的功能。当服务通过Swagger定义,消费者就能与远程的服务互动通过少量的实现逻辑。类似于低级编程接口,Swagger去掉了调用服务时的很多猜测。
浏览 Swagger-Spec 去了解更多关于Swagger 项目的信息,包括附加的支持其他语言的库。SpringBoot对其进行了很好的集成。
修改pom.添加依赖:
<!--swagger-->
        <dependency>
            <groupId>io.springfox</groupId>
            <artifactId>springfox-swagger2</artifactId>
            <version>2.6.1</version>
        </dependency>

        <dependency>
            <groupId>io.springfox</groupId>
            <artifactId>springfox-swagger-ui</artifactId>
            <version>2.6.1</version>
        </dependency>
添加配置类:
@Configuration
@EnableSwagger2
public class SwaggerConfig {
@Bean
public Docket createRestApi() {
Predicate<RequestHandler> predicate = new Predicate<RequestHandler>() {
@SuppressWarnings("deprecation")
@Override
public boolean apply(RequestHandler input) {
Class<?> declaringClass = input.declaringClass();
if (declaringClass == BasicErrorController.class)// 排除
return false;
if(declaringClass.isAnnotationPresent(RestController.class)) // 被注解的类
return true;
if(input.isAnnotatedWith(ResponseBody.class)) // 被注解的方法
return true;
return false;
}
};
return new Docket(DocumentationType.SWAGGER_2)
.apiInfo(apiInfo())
.useDefaultResponseMessages(false)
.select()
.apis(predicate)
.build();
}
@SuppressWarnings("deprecation")
private ApiInfo apiInfo() {
return new ApiInfoBuilder()
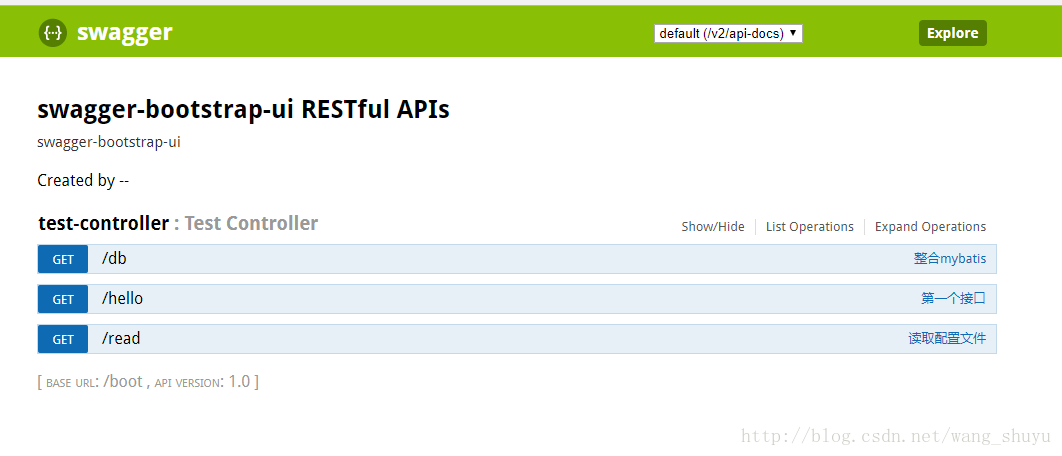
.title("swagger-bootstrap-ui RESTful APIs")//大标题
.description("swagger-bootstrap-ui")
.termsOfServiceUrl("http://127.0.0.1:8082/")
.contact("--")
.version("1.0")//版本
.build();
}
}
在controller类中添加相应的注释:
@ApiOperation(value="第一个接口", notes="hello接口")
    @RequestMapping(value = "/hello",method = RequestMethod.GET)
    public String hello(){
        return  "hello Spring boot";
    }


    @Autowired
    private ReadProperties readProperties;
    @ApiOperation(value="读取配置文件", notes="读取配置文件")
    @RequestMapping(value = "/read",method = RequestMethod.GET)
    public String read(){
        readProperties.read();
        logeer.info("over");
        return  "over";
    }
     @Autowired
     private UserMapper userMapper;
    @ApiOperation(value="整合mybatis", notes="整合mybatis")
    @RequestMapping(value = "/db",method = RequestMethod.GET)
    public List<Map<String,Object>> db(){
        return  userMapper.listUsers();
    }
swagger通过注解表明该接口会生成文档,包括接口名、请求方法、参数、返回信息的等等。
- @Api:修饰整个类,描述Controller的作用
- @ApiOperation:描述一个类的一个方法,或者说一个接口
- @ApiParam:单个参数描述
- @ApiModel:用对象来接收参数
- @ApiProperty:用对象接收参数时,描述对象的一个字段
- @ApiResponse:HTTP响应其中1个描述
- @ApiResponses:HTTP响应整体描述
- @ApiIgnore:使用该注解忽略这个API
- @ApiError :发生错误返回的信息
- @ApiParamImplicitL:一个请求参数
- @ApiParamsImplicit 多个请求参数
*
可以根据自身需求添加相应的注释:
运行程序,请求:http://localhost:8082/boot/swagger-ui.html#/