####环境部署###
1.快照三台6.5的虚拟机

2.导入虚拟机,修改主机名、设置网络、地址解析
vim /etc/sysconfig/network #修改主机名
vim /etc/sysconfig/network-script/ifcfg-eth0 #配置网络
vim /etc/hosts #增加地址解析
getenforce=disabled #关闭selinux
/etc/init.d/iptables stop #关闭防火墙

3.generic1和generic2要搭建高级的yum源


4.在generic1上下载ricci(图形集群管理)、luci(图形界面),设置ricci的密码并打开ricci和luci设置开机自启
[root@generic1 ~]# yum install -y luci ricci  ##安装ricci、luci
[root@generic1 ~]# getenforce  #查看selinux
Disabled   #关闭
[root@generic1 ~]# /etc/init.d/iptables status  #查看火墙状态
iptables: Firewall is not running.  #关闭
[root@generic1 ~]# id ricci  #安装好的ricci会自动生成id
uid=140(ricci) gid=140(ricci) groups=140(ricci)
[root@generic1 ~]# passwd ricci  #设置ricci的密码
Changing password for user ricci.
New password:   #输入密码
BAD PASSWORD: it is based on a dictionary word
BAD PASSWORD: is too simple
Retype new password:   #再次输入密码
passwd: all authentication tokens updated successfully.
[root@generic1 ~]# /etc/init.d/ricci start   #打开ricci
Starting system message bus:                               [  OK  ]
Starting oddjobd:                                          [  OK  ]
generating SSL certificates...  done
Generating NSS database...  done
Starting ricci:                                            [  OK  ]
[root@generic1 ~]# /etc/init.d/luci start   #打开luci
Adding following auto-detected host IDs (IP addresses/domain names), corresponding to `generic1' address, to the configuration of self-managed certificate `/var/lib/luci/etc/cacert.config' (you can change them by editing `/var/lib/luci/etc/cacert.config', removing the generated certificate `/var/lib/luci/certs/host.pem' and restarting luci):
	(none suitable found, you can still do it manually as mentioned above)

Generating a 2048 bit RSA private key
writing new private key to '/var/lib/luci/certs/host.pem'
Start luci...                                              [  OK  ]
Point your web browser to https://generic1:8084 (or equivalent) to access luci
[root@generic1 ~]# chkconfig ricci on   #设置开机自启
[root@generic1 ~]# chkconfig luci on   ##设置开机自启
[root@generic1 ~]# netstat -antlp  ##查看端口
Active Internet connections (servers and established)
Proto Recv-Q Send-Q Local Address               Foreign Address             State       PID/Program name
tcp        0      0 0.0.0.0:8084                0.0.0.0:*                   LISTEN       ##生成8084端口
generic2 只下载ricci 设置密码和开机自启
[root@generic2 ~]# yum install -y ricci
[root@generic2 ~]# id ricci
uid=140(ricci) gid=140(ricci) groups=140(ricci)
[root@generic2 ~]# passwd
Changing password for user root.
New password:
BAD PASSWORD: it is based on a dictionary word
BAD PASSWORD: is too simple
Retype new password:
passwd: all authentication tokens updated successfully.
[root@generic2 ~]# /etc/init.d/ricci start
Starting system message bus:                               [  OK  ]
Starting oddjobd:                                          [  OK  ]
generating SSL certificates...  done
Generating NSS database...  done
Starting ricci:                                            [  OK  ]
[root@generic2 ~]# chkconfig ricci on
##图形界面创建集群###
1.)在浏览器中访问https://172.25.40.110:8084,因为是https访问,所以需要认证,点击Advanced—>Add Expection…

点击Confirm Security Expextion

输入登陆用户和密码(generic1的root用户和密码)

点击Manager Clusters—>Create

创建集群

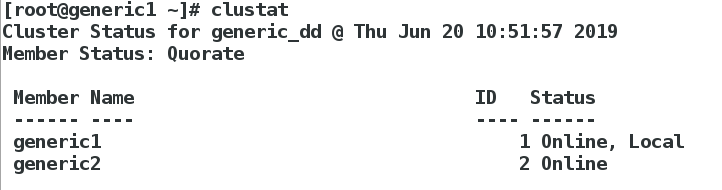
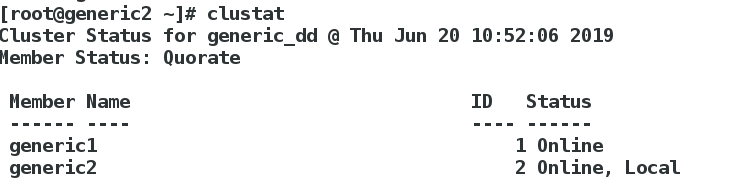
创建后点击Create Cluster,进入等待页面会自动安装所用的软件包并重启generic1和generci2节点添加成功,会出现下图

此时两个主机上也都可以查看到集群信息
 ###配置fence###
fence的原理:
配置过程:
1.在主机上安装fence,编辑fence配置文件
[root@foundation40 ~]# yum search fence
[root@foundation40 ~]# yum install -y fence-virtd.x86_64 fence-virtd-libvirt.x86_64 fence-virtd-multicast.x86_64
[root@foundation40 ~]# fence_virtd -c
Module search path [/usr/lib64/fence-virt]:
Available backends:
libvirt 0.1
Available listeners:
multicast 1.2
Listener modules are responsible for accepting requests
from fencing clients.
Listener module [multicast]:
The multicast listener module is designed for use environments
where the guests and hosts may communicate over a network using
multicast.
The multicast address is the address that a client will use to
send fencing requests to fence_virtd.
Multicast IP Address [225.0.0.12]:

Using ipv4 as family.
Multicast IP Port [1229]:
Setting a preferred interface causes fence_virtd to listen only
on that interface. Normally, it listens on all interfaces.
In environments where the virtual machines are using the host
machine as a gateway, this must be set (typically to virbr0).
Set to ‘none’ for no interface.
Interface [virbr0]: br0 ##改成br0 只改变这一处,其余的都回车键
The key file is the shared key information which is used to
authenticate fencing requests. The contents of this file must
be distributed to each physical host and virtual machine within
a cluster.
Key File [/etc/cluster/fence_xvm.key]:
Backend modules are responsible for routing requests to
the appropriate hypervisor or management layer.
Backend module [libvirt]:
Configuration complete.
=== Begin Configuration ===
fence_virtd {
listener = “multicast”;
backend = “libvirt”;
module_path = “/usr/lib64/fence-virt”;
}
listeners {
multicast {
key_file = “/etc/cluster/fence_xvm.key”;
address = “225.0.0.12”;
interface = “br0”;
family = “ipv4”;
port = “1229”;
}
}
backends {
libvirt {
uri = “qemu:///system”;
}
}
=== End Configuration ===
Replace /etc/fence_virt.conf with the above [y/N]? y
改完可以去 /etc/fence_virt.conf 查看是否改成br0

建立一个钥匙目录,截取密钥并将 密钥文件发送给generic1节点和generic2节点 (两个节点用的是同一个钥匙)
[root@foundation40 ~]# mkdir /etc/cluster/    ##建立钥匙目录
[root@foundation40 ~]# dd if=/dev/urandom of=/etc/cluster/fence_xvm.key bs=128 count=1  #截取密钥
1+0 records in
1+0 records out
128 bytes (128 B) copied, 0.000226116 s, 566 kB/s
[root@foundation40 cluster]# scp /etc/cluster/fence_xvm.key  [email protected]:/etc/cluster/  #将密钥发送给generic1
[root@foundation40 cluster]# scp /etc/cluster/fence_xvm.key  [email protected]:/etc/cluster/   #将密钥发送给generic2
[root@foundation40 cluster]# systemctl start fence_virtd.service   ##开启fence服务
[root@foundation40 cluster]# systemctl status fence_virtd.service
● fence_virtd.service - Fence-Virt system host daemon
   Loaded: loaded (/usr/lib/systemd/system/fence_virtd.service; disabled; vendor preset: disabled)
   Active: active (running) since Thu 2019-06-20 11:31:35 CST; 6s ago
  Process: 7962 ExecStart=/usr/sbin/fence_virtd $FENCE_VIRTD_ARGS (code=exited, status=0/SUCCESS)
 Main PID: 7967 (fence_virtd)
   CGroup: /system.slice/fence_virtd.service
           └─7967 /usr/sbin/fence_virtd -w
generic1 generic2两个节点也都可以查看到钥匙


添加Fence设备
1.点击 Fence Devices —>Add

2.)选择多播模式的fence,建立一个名字

 绑定节点(两个节点都要绑定)
点击Nodes -->generic1

点击Add Fence Method ,编辑一个method名

点击Add Fence Instance

Domain地址添加虚拟机管理界面的UUID

绑定成功后

generic2和generic1操作一样
3.两个节点都绑定都会出现以下配置文件

测试:
在generic上fence 断电generic2,断电并接管服务为成功

####高可用服务配置(httpd)###
1.generic1和generic2都要安装httpd,并编写默认测试页面
[root@generic1 ~]# yum install -y httpd
[root@generic1 ~]# cd /var/www/html
[root@generic1 html]# vim index.html
[root@generic1 html]# cat index.html
generic1
[root@generic1 ~]# vim /etc/init.d/httpd  ##httpd的启动脚本
[root@generic1 ~]# /etc/init.d/httpd status
httpd is stopped
2.添加故障转移域
将geteric1和geteric2 添加在Failover Domian -->add

当其中一个节点出现故障,自动切换到正常那那个上;集群打开服务落在优先极高的节点上(数字越小,优先级越高)

添加成功后显示

2.添加服务要用的资源 Resources–>Add

添加IP Adress(集群对外的ip)


添加服务要用的资源 Resources–>Add–>选择Script模式


创建一个资源组


测试:
真机访问172.25.40.100

访问到的是generic1,则generic1 在服务时会有以下表明它在工作
[root@generic1 html]# /etc/init.d/httpd status  #httpd打开状态
httpd (pid  19375) is running...
[root@generic1 html]# clustat
Cluster Status for generic_dd @ Thu Jun 20 14:17:04 2019
Member Status: Quorate

 Member Name                              ID   Status
 ------ ----                              ---- ------
 generic1                                     1 Online, Local, rgmanager
 generic2                                     2 Online, rgmanager

 Service Name                    Owner (Last)                    State
 ------- ----                    ----- ------                    -----
 service:apache                  generic1                        started       ##
[root@generic1 html]# ip addr show
1: lo: <LOOPBACK,UP,LOWER_UP> mtu 16436 qdisc noqueue state UNKNOWN
    link/loopback 00:00:00:00:00:00 brd 00:00:00:00:00:00
    inet 127.0.0.1/8 scope host lo
    inet6 ::1/128 scope host
       valid_lft forever preferred_lft forever
2: eth0: <BROADCAST,MULTICAST,UP,LOWER_UP> mtu 1500 qdisc pfifo_fast state UP qlen 1000
    link/ether 52:54:00:44:3b:8c brd ff:ff:ff:ff:ff:ff
    inet 172.25.40.110/24 brd 172.25.40.255 scope global eth0
    inet 172.25.40.150/24 scope global secondary eth0
    inet6 fe80::5054:ff:fe44:3b8c/64 scope link
       valid_lft forever preferred_lft forever
[root@generic1 html]# echo c >/proc/sysrq-trigger Write failed: Broken pipeWrite failed: Broken pipe
[kiosk@foundation40 ~]$
真机测试:

geteric2:
[root@generic2 html]# clustat
Cluster Status for generic_dd @ Thu Jun 20 14:24:16 2019
Member Status: Quorate

 Member Name                              ID   Status
 ------ ----                              ---- ------
 generic1                                     1 Online, rgmanager
 generic2                                     2 Online, Local, rgmanager

 Service Name                    Owner (Last)                    State
 ------- ----                    ----- ------                    -----
 service:apache                  generic2                        started
[root@generic2 html]# ip addr show
1: lo: <LOOPBACK,UP,LOWER_UP> mtu 16436 qdisc noqueue state UNKNOWN
    link/loopback 00:00:00:00:00:00 brd 00:00:00:00:00:00
    inet 127.0.0.1/8 scope host lo
    inet6 ::1/128 scope host
       valid_lft forever preferred_lft forever
2: eth0: <BROADCAST,MULTICAST,UP,LOWER_UP> mtu 1500 qdisc pfifo_fast state UP qlen 1000
    link/ether 52:54:00:5f:fa:68 brd ff:ff:ff:ff:ff:ff
    inet 172.25.40.111/24 brd 172.25.40.255 scope global eth0
    inet 172.25.40.150/24 scope global secondary eth0
    inet6 fe80::5054:ff:fe5f:fa68/64 scope link
       valid_lft forever preferred_lft forever
[root@generic2 html]# /etc/init.d/httpd status
httpd (pid  10362) is running...
[root@generic2 html]# /etc/init.d/httpd stop
Stopping httpd:
测试: