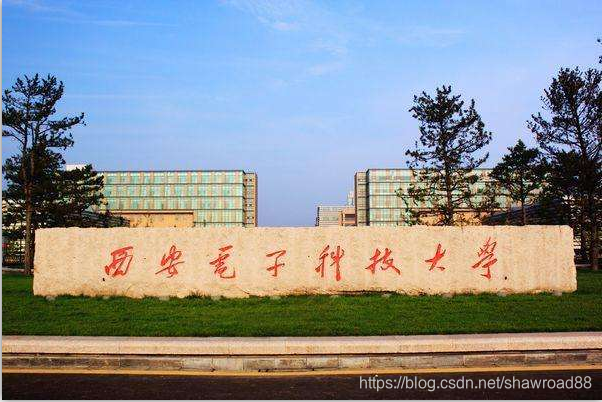
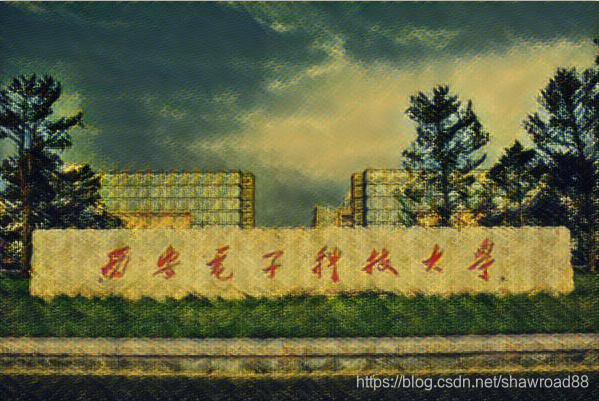
图像风格迁移是指,将一幅内容图的内容,和一幅或多幅风格图的风格融合在一起,从而生成一些有意思的图片
一:传统的图像风格迁移
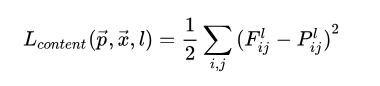
为了让我们生成的迁移图在风格上与风格图片尽可能相似,在内容上尽可能与内容图相似,我们这里引入两种损失:内容损失函数和风格损失函数。
内容损失:
两张图片在内容上相似,不能仅仅靠简单的纯像素比较。
CNN具有抽象和理解图像的能力,因此可以考虑将各个卷积层的输出作为图像的内容。我们看一下VGG网络:

它包含有多个卷积层,我们用conv4_2这一层输出的特征图计算内容损失,怎样计算呢? 它就是将内容图片塞进这个网络,接着将随机产生的噪音也塞进网络,然后计算它们到这一层的特征图,最后逐像素点计算差值。
注意:这里的VGG网络是不进行参数更新的。我们只是选用已经训练好的模型。
风格损失:
风格是一个很难说清楚的概念,可能是笔触、纹理、结构、布局、用色等等
这里我们使用卷积层各个特征图之间的互相关作为图像的风格,以conv1_1为例
- 共包含64个特征图即feature map,或者说图像的深度、通道的个数
- 每个特征图都是对上一层输出的一种理解,可以类比成64个人对同一幅画的不同理解
- 这些人可能分别偏好印象派、现代主义、超现实主义、表现主义等不同风格
- 当图像是某一种风格时,可能这一部分人很欣赏,但那一部分人不喜欢
- 当图像是另一种风格时,可能这一部分人不喜欢,但那一部分人很欣赏
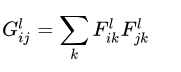
- 64个人之间理解的差异,可以用特征图的互相关表示,这里使用
Gram矩阵计算互相关 - 不同的风格会导致差异化的互相关结果
Gram矩阵的计算如下,如果有64个特征图,那么Gram矩阵的大小便是 ,第
行第
列的值表示第
个特征图和第
个特征图之间的互相关,用内积计算

风格损失函数定义如下,对多个卷积层的风格表示差异进行加权。

这里我们使用conv1_1、conv2_1、conv3_1、conv4_1、conv5_1五个卷积层,进行风格损失函数的计算,不同的权重会导致不同的迁移效果
总的损失函数
总的损失函数即内容损失函数和风格损失函数的加权,不同的权重会导致不同的迁移效果
二:快速风格迁移
在之前介绍的图像风格迁移中,我们根据内容图片和风格图片优化输入图片,使得内容损失函数和风格损失函数尽可能小
和DeepDream一样,属于网络参数不变,根据损失函数调整输入数据,因此每生成一张图片都相当于训练一个模型,需要很长时间。
使用快速图像风格迁移可大大缩短生成一张迁移图片所需的时间,其模型结构如下,包括转换网络和损失网络

风格图片是固定的,而内容图片是可变的输入,因此以上模型用于将任意图片快速转换为指定风格的图片
- 转换网络:参数需要训练,将内容图片转换成迁移图片
- 损失网络:计算迁移图片和风格图片之间的风格损失,以及迁移图片和原始内容图片之间的内容损失
经过训练后,转换网络所生成的迁移图片,在内容上和输入的内容图片相似,在风格上和指定的风格图片相似
进行推断时,仅使用转换网络,输入内容图片,即可得到对应的迁移图片
如果有多个风格图片,对每个风格分别训练一个模型即可。。
白话讲:就是让损失网络不动,我们训练转换网络,让网络达到这样的效果:随便给一张图片,都能转移成ys所对应风格的图片。这里我们需要大量的图片x, 将不同的x都能训练成ys所具有的风格。 训练好后,将模型保存,我们下次使用的时候,就不需要再经过损失网络,我们只需将待转移风格的图片塞进转换网络,它将能生成所对应的风格图片。
用代码实现快速风格迁移:
import tensorflow as tf
import numpy as np
import cv2
from imageio import imread, imsave
import scipy.io
import os
import glob
from tqdm import tqdm
import matplotlib.pyplot as plt
import cv2

# 进行图片的统一化处理
style_images = glob.glob('styles/*.jpg')


# 加载内容图片,去掉黑白图片,处理成指定大小,暂时不进行归一化,像素值范围为0至255之间
def resize_and_crop(image, image_size):
    h = image.shape[0]   # 获取高
    w = image.shape[1]   # 获取宽
    # 也就是截取中间的正方形
    if h > w:
        # 高大于宽,则高要截取一部分
        image = image[h // 2 - w // 2: h // 2 + w // 2, :, :]
    else:
        image = image[:, w // 2 - h // 2: w // 2 + h // 2, :]
    image = cv2.resize(image, (image_size, image_size))
    return image

X_data = []
image_size = 256
# 加载训练集
paths = glob.glob('train2014/*.jpg')
for i in tqdm(range(len(paths))):
    path = paths[i]
    image = imread(path)
    if len(image.shape) < 3:   # 如果不是彩色,则不要
        continue

    X_data.append(resize_and_crop(image, image_size))  # 将符合条件的图片进行放缩
X_data = np.array(X_data)
print(X_data.shape)   # 82216张

# 加载matlab训练好的模型
vgg = scipy.io.loadmat('imagenet-vgg-verydeep-19.mat')
vgg_layers = vgg['layers']
def vgg_endpoints(inputs, reuse=None):
    with tf.variable_scope('endpoints', reuse=reuse):
        def _weights(layer, expected_layer_name):
            W = vgg_layers[0][layer][0][0][2][0][0]
            b = vgg_layers[0][layer][0][0][2][0][1]
            layer_name = vgg_layers[0][layer][0][0][0][0]
            assert layer_name == expected_layer_name
            return W, b

        def _conv2d_relu(prev_layer, layer, layer_name):
            W, b = _weights(layer, layer_name)
            W = tf.constant(W)
            b = tf.constant(np.reshape(b, (b.size)))
            return tf.nn.relu(tf.nn.conv2d(prev_layer, filter=W, strides=[1, 1, 1, 1], padding='SAME') + b)

        def _avgpool(prev_layer):
            return tf.nn.avg_pool(prev_layer, ksize=[1, 2, 2, 1], strides=[1, 2, 2, 1], padding='SAME')

        graph = {}
        graph['conv1_1']  = _conv2d_relu(inputs, 0, 'conv1_1')
        graph['conv1_2']  = _conv2d_relu(graph['conv1_1'], 2, 'conv1_2')
        graph['avgpool1'] = _avgpool(graph['conv1_2'])
        graph['conv2_1']  = _conv2d_relu(graph['avgpool1'], 5, 'conv2_1')
        graph['conv2_2']  = _conv2d_relu(graph['conv2_1'], 7, 'conv2_2')
        graph['avgpool2'] = _avgpool(graph['conv2_2'])
        graph['conv3_1']  = _conv2d_relu(graph['avgpool2'], 10, 'conv3_1')
        graph['conv3_2']  = _conv2d_relu(graph['conv3_1'], 12, 'conv3_2')
        graph['conv3_3']  = _conv2d_relu(graph['conv3_2'], 14, 'conv3_3')
        graph['conv3_4']  = _conv2d_relu(graph['conv3_3'], 16, 'conv3_4')
        graph['avgpool3'] = _avgpool(graph['conv3_4'])
        graph['conv4_1']  = _conv2d_relu(graph['avgpool3'], 19, 'conv4_1')
        graph['conv4_2']  = _conv2d_relu(graph['conv4_1'], 21, 'conv4_2')
        graph['conv4_3']  = _conv2d_relu(graph['conv4_2'], 23, 'conv4_3')
        graph['conv4_4']  = _conv2d_relu(graph['conv4_3'], 25, 'conv4_4')
        graph['avgpool4'] = _avgpool(graph['conv4_4'])
        graph['conv5_1']  = _conv2d_relu(graph['avgpool4'], 28, 'conv5_1')
        graph['conv5_2']  = _conv2d_relu(graph['conv5_1'], 30, 'conv5_2')
        graph['conv5_3']  = _conv2d_relu(graph['conv5_2'], 32, 'conv5_3')
        graph['conv5_4']  = _conv2d_relu(graph['conv5_3'], 34, 'conv5_4')
        graph['avgpool5'] = _avgpool(graph['conv5_4'])

        return graph


# 选择一张风格图,减去通道颜色均值后,得到风格图片在vgg19各个层的输出值,
# 计算四个风格层对应的Gram矩阵
style_index = 1   # 读取第二张风格图  这样训练的就是生成第二张风格的网络
X_style_data = resize_and_crop(imread(style_images[style_index]), image_size)
X_style_data = np.expand_dims(X_style_data, 0)   # 讲风格图扩展一维,因为网络的输入为四维
print(X_style_data.shape)

MEAN_VALUES = np.array([123.68, 116.779, 103.939]).reshape((1, 1, 1, 3))

X_style = tf.placeholder(dtype=tf.float32, shape=X_style_data.shape, name='X_style')
style_endpoints = vgg_endpoints(X_style - MEAN_VALUES)
# 选下面四层计算我们的风格
STYLE_LAYERS = ['conv1_2', 'conv2_2', 'conv3_3', 'conv4_3']
style_features = {}

sess = tf.Session()
for layer_name in STYLE_LAYERS:
    # 输入层的名字,得到各层的输出
    features = sess.run(style_endpoints[layer_name], feed_dict={X_style: X_style_data})
    features = np.reshape(features, (-1, features.shape[3]))
    # 计算Gram矩阵
    gram = np.matmul(features.T, features) / features.size
    style_features[layer_name] = gram


# 转换网络的定义
batch_size = 4
X = tf.placeholder(dtype=tf.float32, shape=[None, None, None, 3], name='X')
k_initializer = tf.truncated_normal_initializer(0, 0.1)  # 初始化一张图,均值0,方差0.1


def relu(x):
    return tf.nn.relu(x)


def conv2d(inputs, filters, kernel_size, strides):
    p = int(kernel_size / 2)

    # reflect反射填充边缘信息。。即就是将边缘像素反射填充 上下分别反射填充p个像素,左右也分别反射填充p个像素
    # same是以补零的方式进行填充
    # valid是以丢弃的方式适应卷积核
    h0 = tf.pad(inputs, [[0, 0], [p, p], [p, p], [0, 0]], mode='reflect')  # 等于就是把图形放大了二倍
    return tf.layers.conv2d(inputs=h0, filters=filters, kernel_size=kernel_size, strides=strides, padding='valid',
                            kernel_initializer=k_initializer)


def deconv2d(inputs, filters, kernel_size, strides):
    shape = tf.shape(inputs)
    height, width = shape[1], shape[2]
    # 这里将图像宽和高变为原来的2*strides倍
    h0 = tf.image.resize_images(inputs, [height * strides * 2, width * strides * 2],
                                tf.image.ResizeMethod.NEAREST_NEIGHBOR)
    return conv2d(h0, filters, kernel_size, strides)   # 再卷积的时候,还是变成了原来的2倍

def instance_norm(inputs):
    # 将每张图片进行归一化
    return tf.contrib.layers.instance_norm(inputs)

# 定义我们的残差块
def residual(inputs, filters, kernel_size):
    h0 = relu(conv2d(inputs, filters, kernel_size, 1))
    h0 = conv2d(h0, filters, kernel_size, 1)
    return tf.add(inputs, h0)


with tf.variable_scope('transformer', reuse=None):
    h0 = tf.pad(X - MEAN_VALUES, [[0, 0], [10, 10], [10, 10], [0, 0]], mode='reflect')
    h0 = relu(instance_norm(conv2d(h0, 32, 9, 1)))
    h0 = relu(instance_norm(conv2d(h0, 64, 3, 2)))
    h0 = relu(instance_norm(conv2d(h0, 128, 3, 2)))

    # 这里紧接着连五个残差块
    for i in range(5):
        h0 = residual(h0, 128, 3)

    h0 = relu(instance_norm(deconv2d(h0, 64, 3, 2)))
    h0 = relu(instance_norm(deconv2d(h0, 32, 3, 2)))
    h0 = tf.nn.tanh(instance_norm(conv2d(h0, 3, 9, 1)))
    h0 = (h0 + 1) / 2 * 255.
    shape = tf.shape(h0)
    g = tf.slice(h0, [0, 10, 10, 0], [-1, shape[1] - 20, shape[2] - 20, -1], name='g')


# 将转换网络的输出即迁移图片,以及原始内容图片都输入到vgg19,
# 得到各自对应层的输出,计算内容损失函数
CONTENT_LAYER = 'conv3_3'
content_endpoints = vgg_endpoints(X - MEAN_VALUES, True)
g_endpoints = vgg_endpoints(g - MEAN_VALUES, True)

def get_content_loss(endpoints_x, endpoints_y, layer_name):
    x = endpoints_x[layer_name]
    y = endpoints_y[layer_name]
    return 2 * tf.nn.l2_loss(x - y) / tf.to_float(tf.size(x))

content_loss = get_content_loss(content_endpoints, g_endpoints, CONTENT_LAYER)


# 根据迁移图片和风格图片在指定风格层的输出,计算风格损失函数
style_loss = []
for layer_name in STYLE_LAYERS:
    layer = g_endpoints[layer_name]
    shape = tf.shape(layer)
    bs, height, width, channel = shape[0], shape[1], shape[2], shape[3]

    features = tf.reshape(layer, (bs, height * width, channel))
    gram = tf.matmul(tf.transpose(features, (0, 2, 1)), features) / tf.to_float(height * width * channel)

    style_gram = style_features[layer_name]
    style_loss.append(2 * tf.nn.l2_loss(gram - style_gram) / tf.to_float(tf.size(layer)))

style_loss = tf.reduce_sum(style_loss)

# 计算全变差正则,得到总的损失函数
def get_total_variation_loss(inputs):
    h = inputs[:, :-1, :, :] - inputs[:, 1:, :, :]
    w = inputs[:, :, :-1, :] - inputs[:, :, 1:, :]
    return tf.nn.l2_loss(h) / tf.to_float(tf.size(h)) + tf.nn.l2_loss(w) / tf.to_float(tf.size(w))

total_variation_loss = get_total_variation_loss(g)

content_weight = 1
style_weight = 250
total_variation_weight = 0.01

loss = content_weight * content_loss + style_weight * style_loss + total_variation_weight * total_variation_loss


# 定义优化器,通过调整转换网络中的参数降低总损失
vars_t = [var for var in tf.trainable_variables() if var.name.startswith('transformer')]
optimizer = tf.train.AdamOptimizer(learning_rate=0.001).minimize(loss, var_list=vars_t)

# 训练模型,每轮训练结束后,用一张测试图片进行测试,并且将一些tensor的值写入
# events文件,便于使用tensorboard查看
style_name = style_images[style_index]
style_name = style_name[style_name.find('/') + 1:].rstrip('.jpg')
OUTPUT_DIR = 'samples_%s' % style_name
if not os.path.exists(OUTPUT_DIR):
    os.mkdir(OUTPUT_DIR)

tf.summary.scalar('losses/content_loss', content_loss)
tf.summary.scalar('losses/style_loss', style_loss)
tf.summary.scalar('losses/total_variation_loss', total_variation_loss)
tf.summary.scalar('losses/loss', loss)
tf.summary.scalar('weighted_losses/weighted_content_loss', content_weight * content_loss)
tf.summary.scalar('weighted_losses/weighted_style_loss', style_weight * style_loss)
tf.summary.scalar('weighted_losses/weighted_total_variation_loss', total_variation_weight * total_variation_loss)
tf.summary.image('transformed', g)
tf.summary.image('origin', X)
summary = tf.summary.merge_all()
writer = tf.summary.FileWriter(OUTPUT_DIR)

sess.run(tf.global_variables_initializer())
losses = []
epochs = 2

X_sample = imread('sjtu.jpg')
h_sample = X_sample.shape[0]
w_sample = X_sample.shape[1]

for e in range(epochs):
    data_index = np.arange(X_data.shape[0])
    np.random.shuffle(data_index)
    X_data = X_data[data_index]

    for i in tqdm(range(X_data.shape[0] // batch_size)):
        X_batch = X_data[i * batch_size: i * batch_size + batch_size]
        ls_, _ = sess.run([loss, optimizer], feed_dict={X: X_batch})
        losses.append(ls_)

        if i > 0 and i % 20 == 0:
            writer.add_summary(sess.run(summary, feed_dict={X: X_batch}), e * X_data.shape[0] // batch_size + i)
            writer.flush()

    print('Epoch %d Loss %f' % (e, np.mean(losses)))
    losses = []

    gen_img = sess.run(g, feed_dict={X: [X_sample]})[0]
    gen_img = np.clip(gen_img, 0, 255)
    result = np.zeros((h_sample, w_sample * 2, 3))
    result[:, :w_sample, :] = X_sample / 255.
    result[:, w_sample:, :] = gen_img[:h_sample, :w_sample, :] / 255.
    plt.axis('off')
    plt.imshow(result)
    plt.show()
    imsave(os.path.join(OUTPUT_DIR, 'sample_%d.jpg' % e), result)

# 保存模型
saver = tf.train.Saver()
saver.save(sess, os.path.join(OUTPUT_DIR, 'fast_style_transfer'))
可以针对不同的风格图训练我们的模型。。