《深度学习之PyTorch实战计算机视觉》学习笔记(1)
这部分的笔记包括python的基本知识,同时还介绍了jupyter notebook 的使用,numpy包的使用等。代码基于python3.7, pytorch 1.0,cuda 10.0 .
print('hello world!!!')
for i in range(3):
    print(i)
    print(' - '*10)
hello world!!!
0
 -  -  -  -  -  -  -  -  -  -
1
 -  -  -  -  -  -  -  -  -  -
2
 -  -  -  -  -  -  -  -  -  -
# 一级标题
## 二级标题
### 三级标题
$f(x)=a^2+4*x$
一级标题
二级标题
三级标题
string = 'Hello world'
string0 = string[-1]
string1 = string[5:12]
string2 = string[5:]
print(string)
print(string0)
print(string1)
print(string2)
Hello world
d
 world
 world
列表与元组类似,通过索引来读取数据,但是元组的值是固定的,不能被重新赋值。
字典的值的读取和赋值是通过键值来进行的。
dict_1 = {}
dict_1['one'] = 'This is one'
dict_1['2'] = 'this is two'
dict_info = {'name' : 'Tang', 'num' : 724 ,'city' : 'guangzhou' }
print(dict_1['one'])
print(dict_1['2'])
print(dict_1)
print(dict_info)
print(dict_info.keys())
print(dict_info.values())
This is one
this is two
{'one': 'This is one', '2': 'this is two'}
{'name': 'Tang', 'num': 724, 'city': 'guangzhou'}
dict_keys(['name', 'num', 'city'])
dict_values(['Tang', 724, 'guangzhou'])
list_1 = ['super','man','spider',1]
a = 'super'
b = 1
print(a in list_1)
print(b in list_1)
True
True
a = 500
b = 500
print('a的内存地址',id(a))
print('b的内存地址',id(b))
print('a is b',a is b)
print('a is not b',a is not b)
print('a == b',a == b)
c = 500
d = 400
print('c的内存地址',id(c))
print('d的内存地址',id(d))
print('c is d',c is d)
print('c is not d',c is not d)
print('c == d',c == d)
a的内存地址 2873924784496
b的内存地址 2873924784528
a is b False
a is not b True
a == b True
c的内存地址 2873924784240
d的内存地址 2873924784624
c is d False
c is not d True
c == d False
num = 10
for i in range(10):
    if i == 5:
        break
    if i < num:
        print(i)
num1 = 10
for i in range(10):
    if i == 5:
        continue
    if i < num1:
        print(i)
num2 = 10
for i in range(10):
    if i == 5:
        pass
    if i < num2:
        print(i)
0
1
2
3
4
0
1
2
3
4
6
7
8
9
0
1
2
3
4
5
6
7
8
9
def func_1(string):
    print('what you say is : ', string)
    return
def func_2(string = 'hi'):
    print('what you say is : ', string)
    return
def func_3(string1 = 'hello',string2 = 'welcome'):
    print('what you say is : ', string1,string2)
    return
def func_4(arg1, *arg2):
    print(arg1)
    for i in (arg2):
        print(i)
    return
func_1('hello')
func_2()
func_3()
func_4(10, 1, 2, 2, 4)
what you say is :  hello
what you say is :  hi
what you say is :  hello welcome
10
1
2
2
4
class student:
    student_count = 0
    def __init__(self, name, age):
        self.name = name
        self.age = age
        student.student_count += 1
    def dis_student(self):
        print('student name is :', self.name,'student age is : ',self.age)
student1 = student('Tang','20')
student2 = student('li', '22')
student1.dis_student()
student2.dis_student()
print('Total student : ', student.student_count)
student name is : Tang student age is :  20
student name is : li student age is :  22
Total student :  2
class people:
    def __init__(self, name, age):
        self.name = name
        self.age = age
    def dis_name(self):
        print('name is : ',self.name)
    def set_age(self, age):
        self.age = age
    def dis_age(self):
        print('age is : ', self.age)
class student(people):
    def __init__(self,name,age,school_name):
        self.name = name
        self.age = age
        self.school_name = school_name
    def dis_student(self):
        print('school name is : ', self.school_name)
student = student('WU','22','SZU')
student.dis_student()
student.dis_age()
student.dis_name()
student.set_age('25')
student.dis_age()
school name is :  SZU
age is :  22
name is :  WU
age is :  25
class parent:
    def __init__(self):
        pass
    def print_info(self):
        print('this is parent')
class child(parent):
    def __init__(self):
        pass
    def print_info(self):
        print('this is child')
child = child()
child.print_info()
this is child
import numpy as np
# 创建数组
a = np.array([1,2,3])
b = np.array([[1,2,3],[4,5,6]])
c = np.ones([2,3])
# print(a)
# print(b)
# print(c)
c[1,2] = 3
# print(c)
d = np.zeros([2,3])
e = np.empty([2,3])
# print(d)
# print(e)
# print(b.ndim)
# print(b.shape)
# 创建矩阵
f = np.matrix([[2,3],[3,4]],dtype = np.float64) # 用 dtype 可以定义数据的类型
# print(f)
# print(f.shape)
# print(f.size)
# print(f.dtype)
g = np.array([1,2,3])
h = np.array([4,5,6])
print('g*h = ',g*h)
c = g.dot(h)
print('Matrix1: g*h = ',c)
d = np.dot(g,h)
print('Matrix2: g*h = ',d)
g*h =  [ 4 10 18]
Matrix1: g*h =  32
Matrix2: g*h =  32
import numpy as np
a = np.array([[1,2,3],[7,8,9]])
# print(a.min())
# print(a.max())
# print(a.sum())
# print(a.min(axis=0))
# print(a.min(axis=1))
# print(a.max(axis=0))
# print(a.max(axis=1))
# print(a.sum(axis=0))
# print(a.sum(axis=1))
b = np.array([1,2,3])
print(np.exp(b))
print(np.sqrt(b))
print(np.square(b))
[ 2.71828183  7.3890561  20.08553692]
[1.         1.41421356 1.73205081]
[1 4 9]
import numpy as np
np.random.seed(2)
print(np.random.rand(2,3)) #  生成一个在[0,1)范围内满足均匀分布的随机样本数
print(np.random.randn(2,3)) # 生成一个满足平均值为0且方差为1的正太分布随机样本数
print(np.random.randint(1,10))  # 在给定的范围内生成类型为整数的随机样本数
print(np.random.binomial(6,1))  # 生成一个维度指定且满足二项分布的随机样本数
print(np.random.beta(2,3))  # 生成一个指定维度且满足beta分布的随机样本数
print(np.random.normal(2,3)) # 生成一个指定维度且满足高斯正太分布的随机样本数
[[0.4359949  0.02592623 0.54966248]
 [0.43532239 0.4203678  0.33033482]]
[[ 0.50288142 -1.24528809 -1.05795222]
 [-0.90900761  0.55145404  2.29220801]]
4
6
0.551544729105564
-1.6353904641378887
import numpy as np
a = np.arange(10)
print(a)
print(a[:5])
for i in a:
    print(i)
[0 1 2 3 4 5 6 7 8 9]
[0 1 2 3 4]
0
1
2
3
4
5
6
7
8
9
import numpy as np
a = np.array([[1,2,3],
             [4,5,6],
             [7,8,9]])
print(a)
print('-'*10)
print(a[1])
print('-'*10)
print(a[0:2,1:3])
for i in a:
    for j in i:
        print(j)
#  相当于将多维数组进行了扁平化处理
for i in a.flat:
    print(i)
[[1 2 3]
 [4 5 6]
 [7 8 9]]
----------
[4 5 6]
----------
[[2 3]
 [5 6]]
1
2
3
4
5
6
7
8
9
1
2
3
4
5
6
7
8
9
import matplotlib.pyplot as plt #如果是在Jupyter Notebook的Notebook文件中使用的,则要想直接显示Matplotlib绘制的图像,就需要添加“%matplotlibinline”语句
%matplotlib inline
import numpy as np
np.random.seed(3)
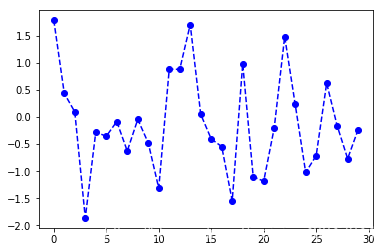
# 画线型图
x = np.random.randn(30)
plt.plot(x,'b--o')
[<matplotlib.lines.Line2D at 0x29d33f62ba8>]
import matplotlib.pyplot as plt
%matplotlib inline
import numpy as np
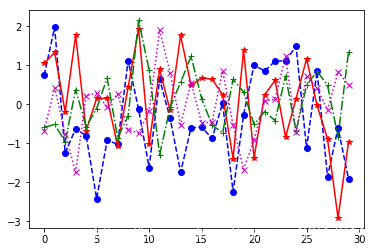
a = np.random.randn(30)
b = np.random.randn(30)
c = np.random.randn(30)
d = np.random.randn(30)
plt.plot(a,'b--o',b,'r-*',c,'g-.+',d,'m:x')
[<matplotlib.lines.Line2D at 0x29d33fcf6a0>,
 <matplotlib.lines.Line2D at 0x29d33fcf7b8>,
 <matplotlib.lines.Line2D at 0x29d33fcfb00>,
 <matplotlib.lines.Line2D at 0x29d33fcfe48>]
import matplotlib.pyplot as plt
%matplotlib inline
import numpy as np
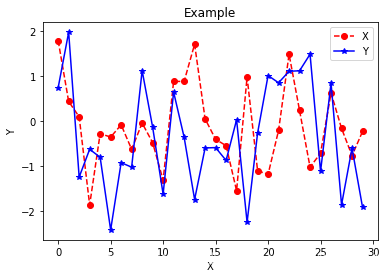
np.random.seed(3)
x = np.random.randn(30)
y = np.random.randn(30)
plt.title('Example')
plt.xlabel('X')
plt.ylabel('Y')
X, = plt.plot(x,'r--o')
Y, = plt.plot(y,'b-*')
plt.legend([X,Y],['X','Y'])
<matplotlib.legend.Legend at 0x29d35aa5828>
import matplotlib.pyplot as plt
%matplotlib inline
import numpy as np
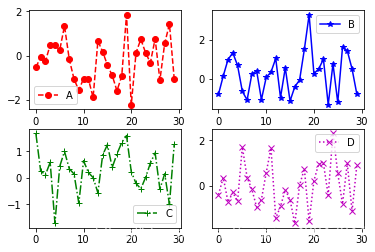
# 画子图
a = np.random.randn(30)
b = np.random.randn(30)
c = np.random.randn(30)
d = np.random.randn(30)
fig = plt.figure()
ax1 = fig.add_subplot(2,2,1)
ax2 = fig.add_subplot(2,2,2)
ax3 = fig.add_subplot(2,2,3)
ax4 = fig.add_subplot(2,2,4)
A, = ax1.plot(a,'r--o')
ax1.legend([A],['A'])
B, = ax2.plot(b,'b-*')
ax2.legend([B],['B'])
C, = ax3.plot(c,'g-.+')
ax3.legend([C],['C'])
D, = ax4.plot(d,'m:x')
ax4.legend([D],['D'])
<matplotlib.legend.Legend at 0x29d35839a58>
import matplotlib.pyplot as plt
%matplotlib inline
import numpy as np
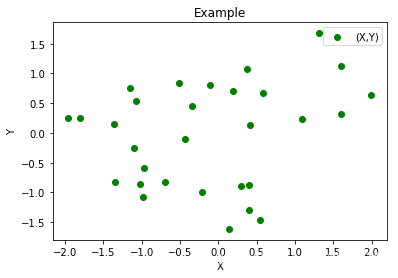
# 画散点图
x = np.random.randn(30)
y = np.random.randn(30)
plt.scatter(x,y,c = 'g',marker = 'o',label = '(X,Y)')
plt.title('Example')
plt.xlabel('X')
plt.ylabel('Y')
plt.legend(loc = 1)
plt.show()
import matplotlib.pyplot as plt
%matplotlib inline
import numpy as np
x = np.random.randn(1000)
plt.hist(x,bins = 20, color='r')
plt.title('Example')
plt.xlabel('X')
plt.ylabel('Y')
plt.show()

import matplotlib.pyplot as plt
%matplotlib inline
import numpy as np
labels = ['dog', 'cat', 'pig']
sizes = [15, 50, 35]
plt.pie(sizes, explode=(0,0,0.1),labels = labels, autopct='%1.1f%%',startangle=90) #;explode定义每部分数据系列之间的间隔,如果设置两个0和一个0.1,就能突出第 3部分
plt.axis('equal')  # 是必不可少的,用于使X轴和Y轴的刻度保持一致
plt.show()