本文不阐述各个知识点具体内容,只给出代码实现和理解,其中涉及到的知识点如下
- matplotlib画图
- 锚框的概念和实现
- 交并比
- 偏移量
- 非极大值抑制
目标检测和边框值
import d2lzh as d2l
from mxnet import image
d2l.set_figsize()
img = image.imread('img/catdog.jpg').asnumpy()
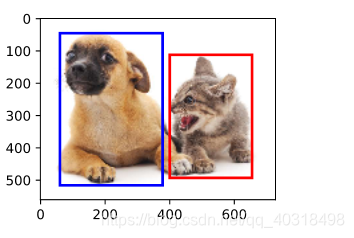
# 边界框(bounding_box)
dog_bbox,cat_bbox = [60,45,378,516],[400,112,655,493]
# bbox_to_reat 将边界框表示成matplotlib的边界形式
def bbox_to_rect(bbox,color):
# 左上x,左上y,右下x,右下y
# ((左上x,左上y),宽,高)
return d2l.plt.Rectangle(
xy=(bbox[0],bbox[1]),width=bbox[2]-bbox[0],height=bbox[3]-bbox[1],
fill=False,edgecolor=color,linewidth=2
# 不填充,边界颜色color,线宽2
)
fig = d2l.plt.imshow(img)
fig.axes.add_patch(bbox_to_rect(dog_bbox,'blue'))
fig.axes.add_patch(bbox_to_rect(cat_bbox,'red'))
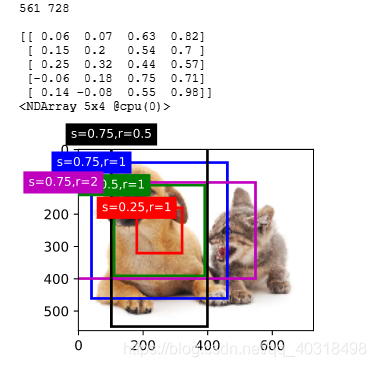
锚框
以每个像素的中心生成多个大小和宽高比不同的边界框。这些边界框称为锚框
from mxnet import image,contrib,gluon,nd
import numpy as np
import d2lzh as d2l
np.set_printoptions(2)

img = image.imread('img/catdog.jpg').asnumpy()
h,w = img.shape[0:2]	#高和宽
print(h,w)
X = nd.random.uniform(shape=(1,3,h,w))
Y = contrib.nd.MultiBoxPrior(X,sizes=[0.75,0.5,0.25],ratios=[1,2,0.5])	# 一个像素5个锚框
Y.shape	#(1,2042040,4)
boxes = Y.reshape((h,w,5,4))

print(boxes[250,250,:,:])

def show_bboxes(axes,bboxes,labels=None,colors=None):
    def _make_list(obj,default_values=None):
        if obj is None:
            obj = default_values
        elif not isinstance(obj,(list,tuple)):
            obj = [obj]
        return obj
    labels = _make_list(labels)
    #['s=0.75,r=1', 's=0.5,r=1', 's=0.25,r=1', 's=0.75,r=2', 's=0.75,r=0.5']
    colors = _make_list(colors,['b','g','r','m','c'])
    #['b', 'g', 'r', 'm', 'c']
    for i,bbox in enumerate(bboxes):
        color = colors[i%len(colors)]
        rect = d2l.bbox_to_rect(bbox.asnumpy(),color)
        axes.add_patch(rect)
        print(i)
        if labels and len(labels)>i:    #个数判定
            text_color = 'k' if color == 'w' else 'w'   # 因为是颜色,w是白色
            #增加外框,如文字说名.
            axes.text(rect.xy[0],rect.xy[1],labels[i],va='center',ha='center',
                      fontsize=9,color=text_color,bbox=dict(facecolor=color,lw=0))
d2l.set_figsize()
bbox_scale = nd.array((w,h,w,h))
fig = d2l.plt.imshow(img)
# 因为x轴和y轴坐标除了宽和高,这里需要还原.
show_bboxes(fig.axes,boxes[250,250,:,:]*bbox_scale,['s=0.75,r=1','s=0.5,r=1',
                                                        's=0.25,r=1','s=0.75,r=2',
                                                        's=0.75,r=0.5'])

d2l.plt.show()
# 在上面的基础上,注释掉show_bboxes(fig.axes,boxes[250,250,:,:]*bbox_scale,['s=0.75,r=1','s=0.5,r=1',
#                                                      's=0.25,r=1','s=0.75,r=2',
#                                                        's=0.75,r=0.5'])
#In[6]
# 第一个元素是类别,0为狗,1为猫,剩下4个是锚框坐标
ground_truth = nd.array([[0,0.1,0.08,0.52,0.92],[1,0.55,0.2,0.9,0.88]])
# 其余5个锚框坐标
anchors = nd.array([[0,0.1,0.2,0.3],[0.15,0.2,0.4,0.4],[0.63,0.05,0.88,0.98],[0.66,0.45,0.8,0.8],
                    [0.57,0.3,0.92,0.9]])
fig = d2l.plt.imshow(img)
# k与5个锚框颜色区分。
show_bboxes(fig.axes,ground_truth[:,1:]*bbox_scale,['dog','cat'],'k')
show_bboxes(fig.axes,anchors*bbox_scale,['0','1','2','3','4'])
d2l.plt.show()

#In[1]
from mxnet import image,contrib,gluon,nd
import numpy as np
import d2lzh as d2l
np.set_printoptions(2)
#In[2]
img = image.imread('img/catdog.jpg').asnumpy()
h,w = img.shape[0:2]
print(h,w)
X = nd.random.uniform(shape=(1,3,h,w))
Y = contrib.nd.MultiBoxPrior(X,sizes=[0.75,0.5,0.25],ratios=[1,2,0.5])
Y.shape
#In[3]
boxes = Y.reshape((h,w,5,4))
#In[4]
def show_bboxes(axes,bboxes,labels=None,colors=None):
def _make_list(obj,default_values=None):
if obj is None:
obj = default_values
elif not isinstance(obj,(list,tuple)):
obj = [obj]
return obj
labels = _make_list(labels)
#['s=0.75,r=1', 's=0.5,r=1', 's=0.25,r=1', 's=0.75,r=2', 's=0.75,r=0.5']
colors = _make_list(colors,['b','g','r','m','c'])
#['b', 'g', 'r', 'm', 'c']
for i,bbox in enumerate(bboxes):
color = colors[i%len(colors)]
rect = d2l.bbox_to_rect(bbox.asnumpy(),color)
axes.add_patch(rect)
if labels and len(labels)>i: #个数判定
text_color = 'k' if color == 'w' else 'w' # 因为是颜色,w是白色
#增加外框,如文字说名.
axes.text(rect.xy[0],rect.xy[1],labels[i],va='center',ha='center',
fontsize=9,color=text_color,bbox=dict(facecolor=color,lw=0))
#In[5]
d2l.set_figsize()
bbox_scale = nd.array((w,h,w,h))
#In[6]
# 第一个元素是类别,0为狗,1为猫,剩下4个是锚框坐标
ground_truth = nd.array([[0,0.1,0.08,0.52,0.92],[1,0.55,0.2,0.9,0.88]])
# 其余5个锚框坐标
anchors = nd.array([[0,0.1,0.2,0.3],[0.15,0.2,0.4,0.4],[0.63,0.05,0.88,0.98],[0.66,0.45,0.8,0.8],
[0.57,0.3,0.92,0.9]])
#In[7]
#MultiBoxTarget函数为锚框标注类别和偏移量.
#expand_dims扩展数组形状,原来是5x4,现在是1x5x4
#nd.zeros((1,3,5)) 生成1x3x5的0矩阵
#第一个元素,输入的锚框,形状为(1,锚框总数,4)
#第二个元素,训练集的真实标签,形状为(批量大小,每张图片最多真实锚框数,5,类别标签+坐标值(归一化))
#第三个元素,输入的锚框,预测类别分数,形状为(批量大小,预测类别+1,锚框总数)
labels = contrib.nd.MultiBoxTarget(anchors.expand_dims(axis=0),ground_truth.expand_dims(axis=0),
nd.zeros((1,3,5)))
#返回结果第三项,锚框标注类别,背景设为0,开始索引自加1
labels[2] #[[0. 1. 2. 0. 2.]]
# 锚框0,交并比小于某一阈值,归为背景,其他类似.
#返回结果第二项掩码(mask),形状为(批量大小,锚框数的4倍),与每个锚框4个偏移量对应。
labels[1] #[[0. 0. 0. 0. 1. 1. 1. 1. 1. 1. 1. 1. 0. 0. 0. 0. 1. 1. 1. 1.]]
#返回结果第一项是每个锚框标注的4个偏移量,负类锚框偏移量为0
labels[0]
#[[ 0.00e+00 0.00e+00 0.00e+00 0.00e+00 1.40e+00 1.00e+01 2.59e+00
# 7.18e+00 -1.20e+00 2.69e-01 1.68e+00 -1.57e+00 0.00e+00 0.00e+00
# 0.00e+00 0.00e+00 -5.71e-01 -1.00e+00 -8.94e-07 6.26e-01]]
#In[8]
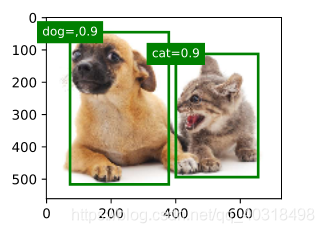
#输出预测边界框,非极大值抑制.
anchors = nd.array([[0.1,0.08,0.52,0.92],[0.08,0.2,0.56,0.95],[0.15,0.3,0.62,0.91],
[0.55,0.2,0.9,0.88]]) #16
offset_preds = nd.array([0]*anchors.size) #假设预测偏移量为0
cls_probs = nd.array([[0]*4, #背景的预测概率
[0.9,0.8,0.7,0.1], #狗的预测概率
[0.1,0.2,0.3,0.9] #猫的预测概率
])
#In[9]
#MultiBoxDetection函数来执行非极大值抑制并设阈值为0.5
#返回结果形状(批量大小,锚框个数,6)
#第一行6个元素代表同意预测边界框的输出信息。
#第一个是分类的类别,第二个置信度,剩下坐标,-1表示被移除
#第一个参数预测的各个锚框的概率,一般要经过softmax运算,形状为(批量大小,预测总类别数+1,锚框总数)
#第二个参数是预测的各个偏移量,形状为(批量大小,锚框总数*4)
#第三个参数是生成的默认锚框,形状为(1,锚框总数,4)
#nms_threshold 非极大值抑制的阈值
output = contrib.ndarray.MultiBoxDetection(cls_probs.expand_dims(axis=0),
offset_preds.expand_dims(axis=0),
anchors.expand_dims(axis=0),
nms_threshold=0.5)
output
fig = d2l.plt.imshow(img)
for i in output[0].asnumpy():
if i[0]==-1:
continue
label = ('dog=,','cat=')[int(i[0])]+str(i[1])
show_bboxes(fig.axes,[nd.array(i[2:])*bbox_scale],label,'g')
d2l.plt.show()
小结
- 以每个像素为中心,生成多个大小和宽高比不同的锚框
- 交并比是两个边界框相交面积与相并面积之比
- 在训练集中,为每个锚框标注两类标签,一是锚框所含目标的类别;二是真实边界框相对锚框的偏移量。
- 预测时,可以使用非极大值抑制来移除相似的预测边界框,使结果简洁。