一 仿射变换
仿射变换是一种二维坐标之间的变换,变换前后保持图形的平直性和平行性。仿射变换可以理解为是向量经过一次线性变换和一次平移变换。
- Opencv中有封装好的仿射变换函数:
void warpAffine(InputArray src, OutputArray dst, InputArray M, Size dsize, int flags=INTER_LINEAR, int borderMode=BORDER_CONSTANT, const Scalar& borderValue=Scalar())
参数InputArray src:输入变换前图像
参数OutputArray dst:输出变换后图像,需要初始化一个空矩阵用来保存结果,不用设定矩阵尺寸
参数InputArray M:变换矩阵,用另一个函数getAffineTransform()计算
参数Size dsize:设置输出图像大小
参数int flags=INTER_LINEAR:设置插值方式,默认方式为线性插值
- 生成变换矩阵的函数getAffineTransform():
Mat getAffineTransform(const Point2f* src, const Point2f* dst)
参数const Point2f* src:原图的三个固定顶点
参数const Point2f* dst:目标图像的三个固定顶点
返回值:Mat型变换矩阵,可直接用于warpAffine()函数
注意,顶点数组长度超过3个,则会自动以前3个为变换顶点;数组可用Point2f[]或Point2f*表示
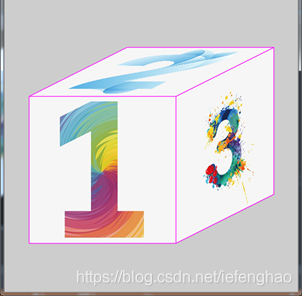
- 实例
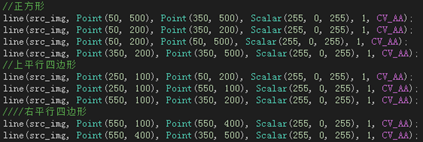
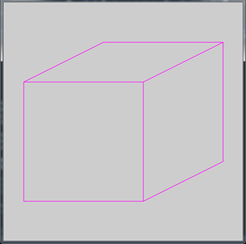
1 画出立方体
图片大小为600*600,立方体边长为300。
首先画出前面,各点坐标为(50,200),(350,200),(350,500),(50,500)。
然后画出上边平行四边形,坐标为(250,100),(550,100)。
最后画出右边平行四边形,坐标(550,400)。
2 导入图片
图片大小为300*300


3 正面图片嵌入

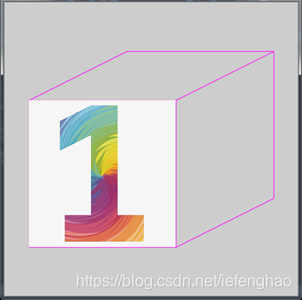
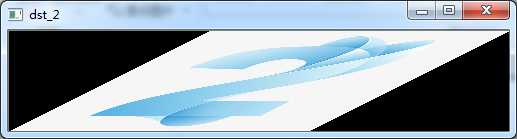
4 上平行四边形仿射变换
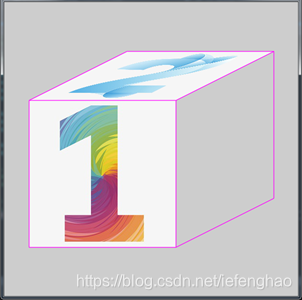
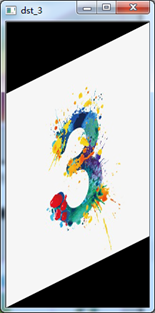
5 右平行四边形仿射变换
- 仿射变换程序
//仿射变换源程序
#include<opencv2/opencv.hpp>
#include<iostream>
#include<math.h>
using namespace cv;
using namespace std;
int main(int argc, char* argv) {
Mat src, dst;
Mat src_img(600, 600, CV_8UC3);
//读入图像
Mat img_1 = imread("F:/OpenCV_work/CV_AR/Task_2_Affine/pic/1.jpg");
Mat img_2 = imread("F:/OpenCV_work/CV_AR/Task_2_Affine/pic/2.jpg");
Mat img_3 = imread("F:/OpenCV_work/CV_AR/Task_2_Affine/pic/3.jpg");
////正面图像嵌入
Mat roi_1 = src_img(Rect(50, 200, img_1.rows, img_1.cols));
Mat mask_1(roi_1.rows, roi_1.cols, roi_1.depth(), Scalar(1));
img_1.copyTo(roi_1, mask_1);
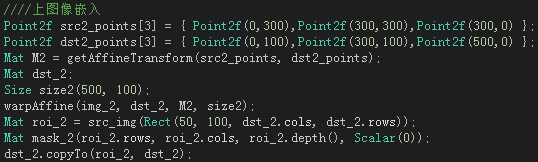
////上图像嵌入
Point2f src2_points[3] = { Point2f(0,300),Point2f(300,300),Point2f(300,0) };
Point2f dst2_points[3] = { Point2f(0,100),Point2f(300,100),Point2f(500,0) };
Mat M2 = getAffineTransform(src2_points, dst2_points);
Mat dst_2;
Size size2(500, 100);
warpAffine(img_2, dst_2, M2, size2);
Mat roi_2 = src_img(Rect(50, 100, dst_2.cols, dst_2.rows));
Mat mask_2(roi_2.rows, roi_2.cols, roi_2.depth(), Scalar(0));
dst_2.copyTo(roi_2, dst_2);
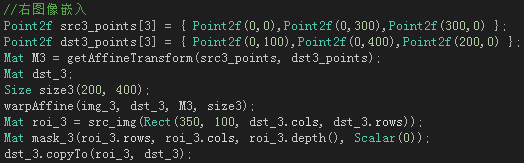
//右图像嵌入
Point2f src3_points[3] = { Point2f(0,0),Point2f(0,300),Point2f(300,0) };
Point2f dst3_points[3] = { Point2f(0,100),Point2f(0,400),Point2f(200,0) };
Mat M3 = getAffineTransform(src3_points, dst3_points);
Mat dst_3;
Size size3(200, 400);
warpAffine(img_3, dst_3, M3, size3);
Mat roi_3 = src_img(Rect(350, 100, dst_3.cols, dst_3.rows));
Mat mask_3(roi_3.rows, roi_3.cols, roi_3.depth(), Scalar(0));
dst_3.copyTo(roi_3, dst_3);
//正方形
line(src_img, Point(50, 500), Point(350, 500), Scalar(255, 0, 255), 1, CV_AA);
line(src_img, Point(50, 200), Point(350, 200), Scalar(255, 0, 255), 1, CV_AA);
line(src_img, Point(50, 200), Point(50, 500), Scalar(255, 0, 255), 1, CV_AA);
line(src_img, Point(350, 200), Point(350, 500), Scalar(255, 0, 255), 1, CV_AA);
//上平行四边形
line(src_img, Point(250, 100), Point(50, 200), Scalar(255, 0, 255), 1, CV_AA);
line(src_img, Point(250, 100), Point(550, 100), Scalar(255, 0, 255), 1, CV_AA);
line(src_img, Point(550, 100), Point(350, 200), Scalar(255, 0, 255), 1, CV_AA);
//右平行四边形
line(src_img, Point(550, 100), Point(550, 400), Scalar(255, 0, 255), 1, CV_AA);
line(src_img, Point(550, 400), Point(350, 500), Scalar(255, 0, 255), 1, CV_AA);
imshow("img_1", img_1);
imshow("img_2", img_2);
imshow("img_3", img_3);
imshow("dst_2", dst_2);
imshow("dst_3", dst_3);
imshow("180121", src_img);
waitKey(0);
return 0;
}
下一篇,透视变换,欢迎指正!