目录
1.图像仿射变换介绍
仿射变换:
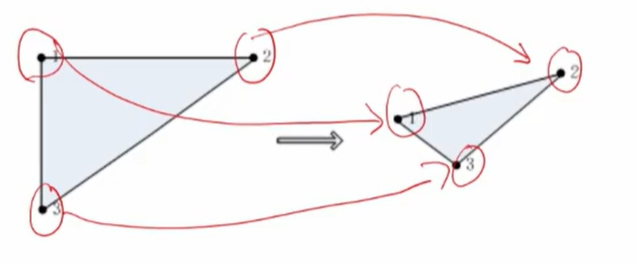
仿射变换是由平移、缩放、旋转、翻转和错切组合得到,也称为三点变换。
仿射变换矩阵:
仿射变换可以通过一个2x3的仿射变换矩阵来表示,该矩阵包含了平移、缩放、旋转和剪切等变换的参数。仿射变换矩阵的一般形式如下:
| A B Tx |
| C D Ty |
其中 (A, B) 和 (C, D) 控制了图像的旋转和缩放,(Tx, Ty) 控制了图像的平移。
仿射变换公式:
对于一个点 P(x, y) 在原始坐标系中,经过仿射变换后得到的新坐标 P'(x', y') 可以通过以下公式计算:
x' = A * x + B * y + Tx
y' = C * x + D * y + Ty
其中,
-
(x, y) 是原始坐标系中点的坐标。
-
(x', y') 是仿射变换后点的新坐标。
-
A、B、C 和 D 是控制旋转、缩放和剪切的矩阵元素。
-
Tx 和 Ty 是平移的量。
这两个公式描述了仿射变换对坐标点的影响。通过适当地设置矩阵元素和平移量,你可以实现各种类型的仿射变换,包括平移、旋转、缩放和剪切。
2.仿射变换函数
仿射变换函数:warpAffine()
void cv::warpAffine ( InputArray src,
OutputArray dst,
InputArray M,
Size dsize,
int flags = INTER_LINEAR,
int borderMode =BORDER CONSTANT,
const Scalar & borderValue = scalar()
)
- src:输入图像
- dst:仿射变换后输出图像,与src数据类型相同,但是尺寸与dsize相同
- M:2X3的变换矩阵。
- dsize:输出图像的尺寸
- flags:插值方法标志
- borderMode:像素边界外推方法的标志
- borderValue:填充边界使用的数值,默认情况下为0
其中,边界填充方法和对应标志:

图像旋转:getRotationMatrix2D()
Mat cv::getRotationMatrix2D ( Point2f center.
double angle
double scale
)
- center:图像旋转的中心位置。
- angle:图像旋转的角度,单位为度,正值为逆时针旋转。
- scale: 两个轴的比例因子,可以实现旋转过程中的图像缩放,不缩放输入1。

计算仿射变换矩阵:getAffineTransform()
Mat cv::getAffineTransform ( const Point2f src[]
const Point2f dst[]
)
- src[]:原图像中的三个像素坐标。
- dst[]:目标图像中的三个像素坐标。
3.demo
#include <jni.h>
#include <string>
#include <android/bitmap.h>
#include <opencv2/opencv.hpp>
#include <iostream>
#include <android/log.h>

#define LOG_TAG "xxx"
#define LOGD(...) __android_log_print(ANDROID_LOG_DEBUG, LOG_TAG, __VA_ARGS__)

using namespace cv;
using namespace std;
extern "C"
JNIEXPORT void JNICALL
Java_com_example_myapplication_MainActivity_opencv_1test(JNIEnv *env, jclass clazz,
                                                         jobject bitmap) {
    AndroidBitmapInfo info;
    void *pixels;

    CV_Assert(AndroidBitmap_getInfo(env, bitmap, &info) >= 0);
    //判断图片是位图格式有RGB_565 、RGBA_8888
    CV_Assert(info.format == ANDROID_BITMAP_FORMAT_RGBA_8888 ||
              info.format == ANDROID_BITMAP_FORMAT_RGB_565);
    CV_Assert(AndroidBitmap_lockPixels(env, bitmap, &pixels) >= 0);
    CV_Assert(pixels);

    //将bitmap转化为Mat类  原图像Mat
    Mat image(info.height, info.width, CV_8UC4, pixels);

    Mat rotation0,img_warp0;
    double angle=30;//设置图像的旋转角度
    Size dst_size(image.rows,image.cols);//设置输出图像
    Point2f center(image.rows/2.0,image.cols/2.0);//设置图像的旋转中心

    rotation0=getRotationMatrix2D(center,angle,1);//计算仿射变换矩阵

    warpAffine(image,img_warp0,rotation0,dst_size);
    imwrite("/sdcard/DCIM/img_warp0.jpg",img_warp0);

    //根据定义的三个点进行仿射变换
    Point2f src_points[3];
    Point2f dst_points[3];
    //原始图像中的三个点
    src_points[0]=Point2f(0,0);
    src_points[1]=Point2f (0,(float )(image.cols-1));
    src_points[2]=Point2f ((float )(image.rows-1),(float )(image.cols-1));
    //仿射变换后图像中的三个点
    dst_points[0]=Point2f ((float )(image.rows)*0.11,(float )(image.cols)*0.20);
    dst_points[1]=Point2f ((float )(image.rows)*0.15,(float )(image.cols)*0.70);
    dst_points[2]=Point2f ((float )(image.rows)*0.81,(float )(image.cols)*0.85);
    Mat rotation1,img_warp1;

    rotation1= getAffineTransform(src_points,dst_points);//根据对应点求取仿射变换矩阵
    warpAffine(image,img_warp1,rotation1,dst_size);//进行仿射变换
    imwrite("/sdcard/DCIM/img_warp1.jpg",img_warp1);


}
(img_warp0) (img_warp1)