版权声明:本文为博主原创文章,未经博主允许不得转载。 https://blog.csdn.net/u010122972/article/details/78345447
一直知道怎么用,最近需要旋转图像,并保证图像不能被剪切,并实现来回的坐标转换,就把原理好好捋了捋。
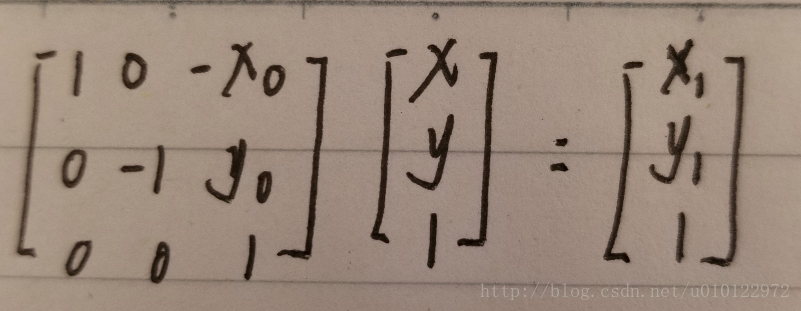
1.改变坐标系
首先,opencv的坐标系是图像左上角为原点,垂直方向往下为y轴正方向,水平方向往右为x轴正方向,而在图像旋转过程中,需要改变坐标系,将图像原点移到图像中心点,并将y轴反向。
因此,如图(x0,y0)表示图像的中心点坐标(坐标原点为图像左上角)
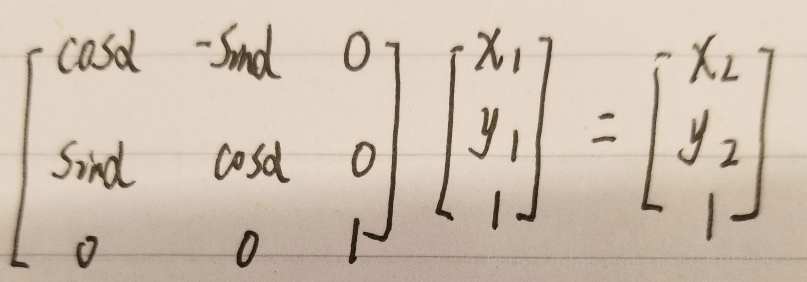
2.旋转
之后,对图片进行旋转,如下图,阿尔法为旋转角度
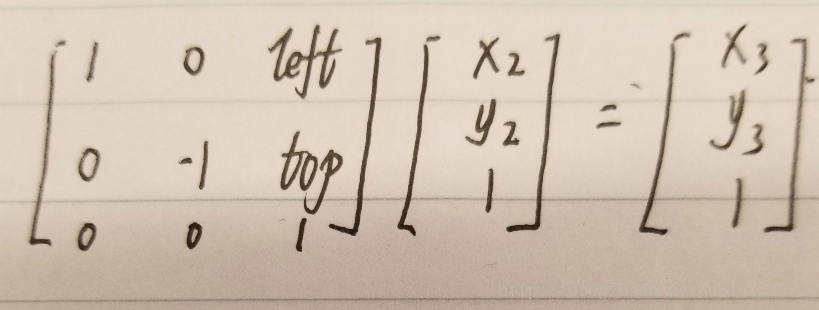
3.切换回原坐标系
现在的坐标原点依然为图像中心点,所以需要把原点切换回图像的左上角,并将y轴反向
4.仿射变换矩阵
综上,可以得到放射变换矩阵,如图
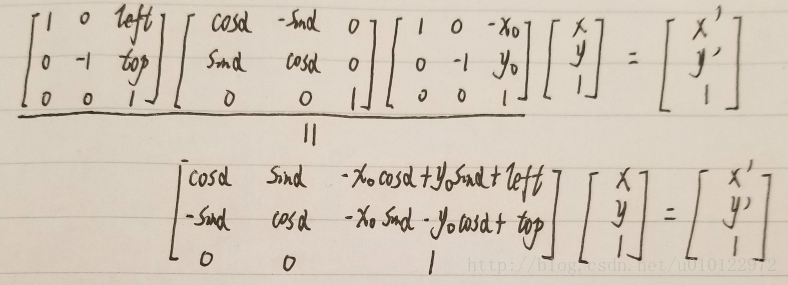
下式左边的矩阵即为旋转的放射变换矩阵,opencv中的getRotationMatrix2D函数得到的仿射变换矩阵即为该矩阵的前两行
5.旋转后的大小变化
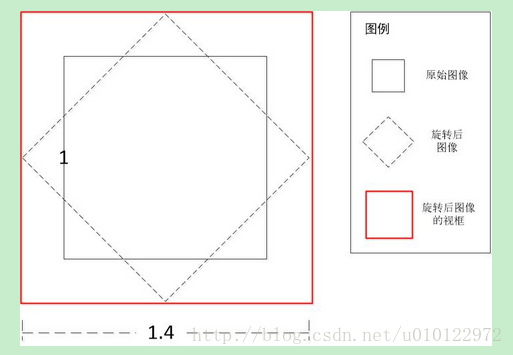
引用网上的一张图,可以看到图像旋转后所需的视窗大小发生了变化。如果不作处理,旋转的图像将被切割而不完整。有的方法直接将扩大到原图的1.4倍,但感觉略显粗暴。根据计算,图像旋转后所需要的视窗大小为(公式编辑太慢,用python代码的形式展示):
 height_1=int(width_ori*fabs(sin(radians(degree)))+height_ori*fabs(cos(radians(degree))))
 width_1=int(height_ori*fabs(sin(radians(degree)))+width_ori*fabs(cos(radians(degree))))
利用opencv的getRotationMatrix2D函数,得到以原图中心点为旋转中心旋转degree度的旋转矩阵
matRotation=cv2.getRotationMatrix2D((width_ori/2,height_ori/2),degree,1)利用得到的旋转矩阵,和warpAffine函数就可以得到旋转后的图像。为了避免图像被切割,可以
设置变换后的图像size为(width_1,height_1):
imgRotation=cv2.warpAffine(img,matRotation,(width_1,height_1),borderValue=(255,255,255))但是,由于得到的仿射矩阵是对于原图大小而言的,即第三步只是把坐标原点从图中的C点移到A点
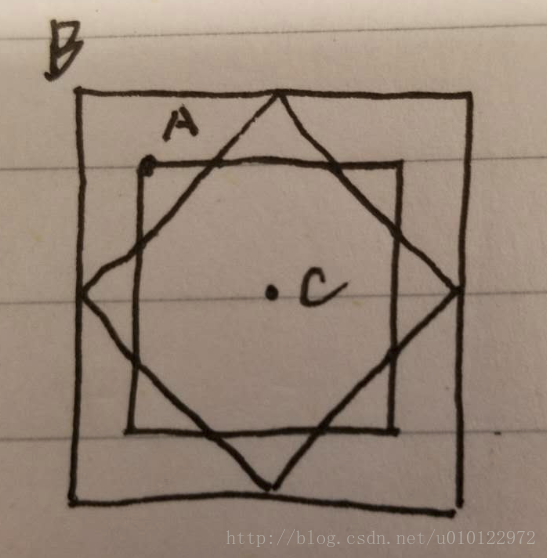
但若我们要将原点移到B点,所以需要改变left和top的值:
 matRotation[0,2] +=(width_1-width_ori)/2
 matRotation[1,2] +=(height_1-height_ori)/2
这样就能得到完美的旋转后图像,完整代码为
height_ori,width_ori=img.shape[:2]
height_1=int(width_ori*fabs(sin(radians(degree)))+height_ori*fabs(cos(radians(degree))))
width_1=int(height_ori*fabs(sin(radians(degree)))+width_ori*fabs(cos(radians(degree))))
matRotation=cv2.getRotationMatrix2D((width_ori/2,height_ori/2),degree,1)
matRotation[0,2] +=(width_1-width_ori)/2
matRotation[1,2] +=(height_1-height_ori)/2
imgRotation=cv2.warpAffine(img,matRotation,(width_1,height_1),borderValue=(255,255,255))