版权声明:本文为博主原创文章,未经博主允许不得转载。 https://blog.csdn.net/zyxhangiian123456789/article/details/87855162
1.为什么使用Yolo进行实时目标检测任务
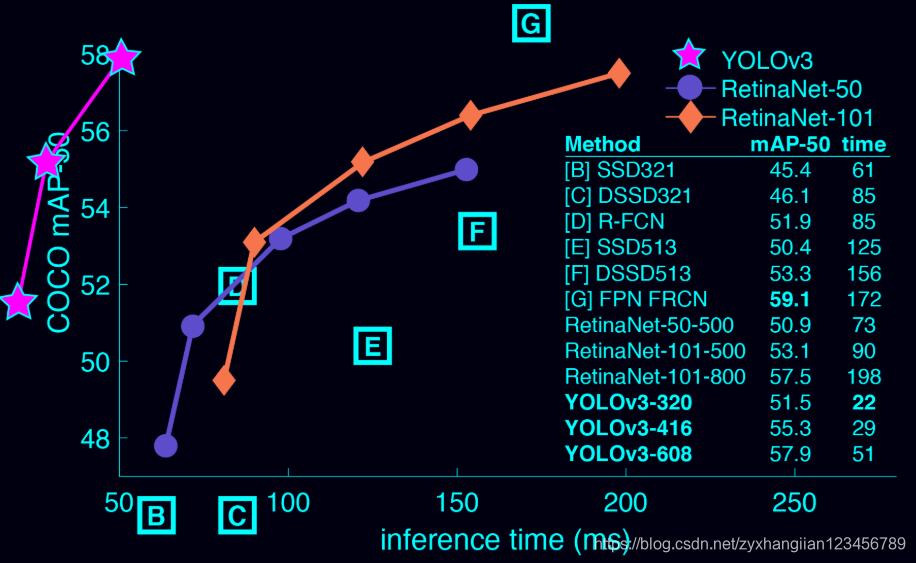
与其他目标检测器相比较而言,Yolov3非常快速和准确。在0.5度测得的地图上,Yolov3与RetinaNet持平,但大约快了4倍。此外,只需更改模型的大小,您就可以轻松地在速度和准确性之间进行权衡,不需要再训练!简单来说,就是Yolo比RetinaNet快很多。
2.使用预先训练的模型进行目标检测
2.1 从YOLO 网站上下载Darknet YOLO模型
A Keras implementation of YOLOv3 (Tensorflow backend) inspired by allanzelener/YAD2K.
2.2 将下载好的Darknet YOLO模型转换为Keras模型
python convert.py yolov3.cfg yolov3.weights model_data/yolo.h52.3 运行YOLO目标检测程序yolo_video.py
python yolo_video.py --input E:/test.mp4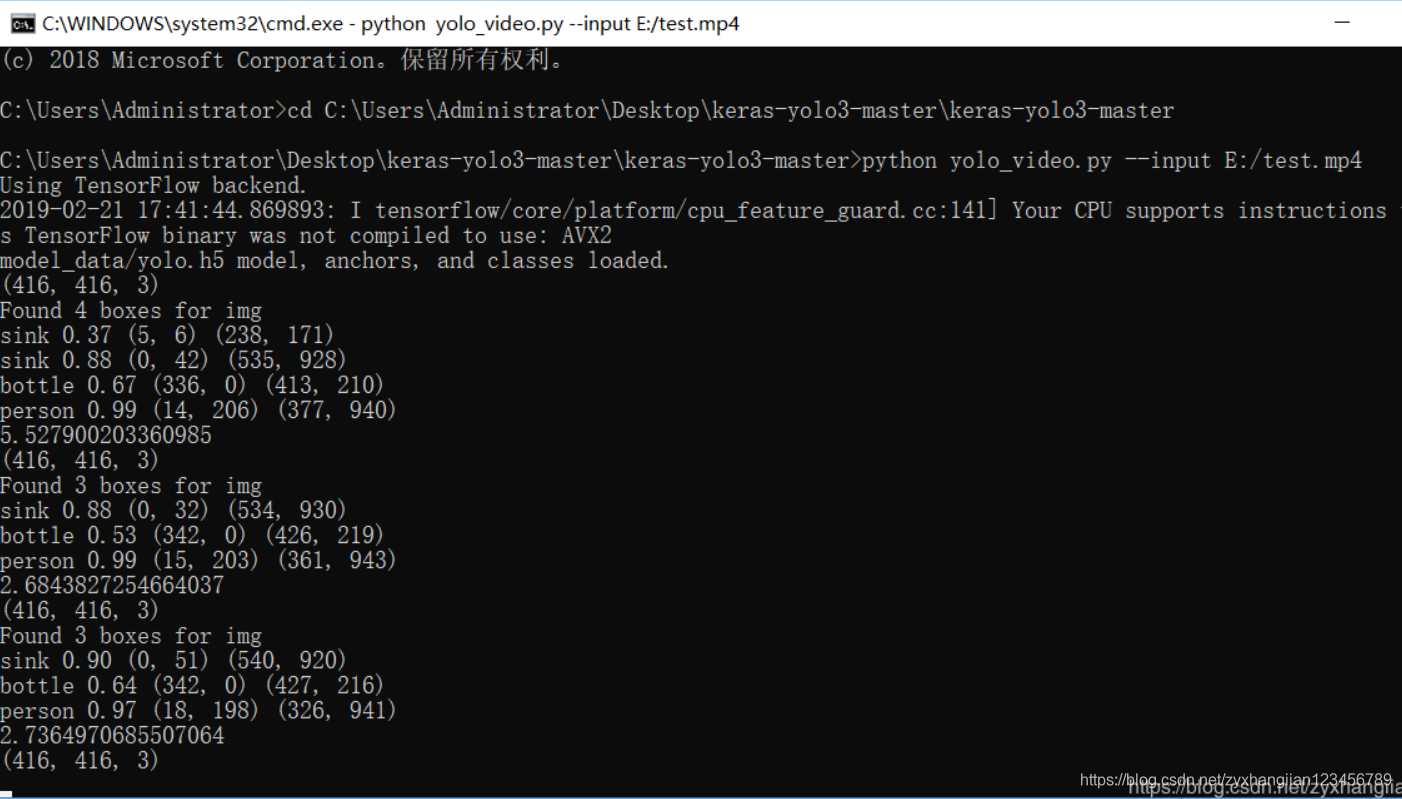
3.利用Yolo实现实时目标检测
由于上面项目只能够通过命令行的方式调用,因此,笔者接下来介绍一下如何利用该项目,得到一个适合自己需求的实时目标检测系统。具体的思路较为简单:首先,从摄像头中读取一帧图像。接着,将目标检测应用到每一帧里。最后,将结果显示出来,实例效果(没有训练风扇,识别成飞机了,哈哈):

自己定义的 real_time_object_detection.py 代码:
# import miscellaneous modules
import matplotlib.pyplot as plt
import numpy as np
import cv2
from PIL import Image,ImageFont,ImageDraw
from timeit import default_timer as timer
from keras.models import load_model
import os
import colorsys
from keras import backend as K
from yolo3.model import yolo_eval

configs = {
        "model_path": 'model_data/yolo.h5',
        "anchors_path": 'model_data/yolo_anchors.txt',
        "classes_path": 'model_data/coco_classes.txt',
        "score" : 0.3,
        "iou" : 0.45,
        "model_image_size" : (416, 416),
        "gpu_num" : 1,
    };

# 载入网络模型
yolo_model = load_model('model_data/yolo.h5')

# 读取类名
classes_path = os.path.expanduser(configs['classes_path'])
with open(classes_path) as f:
    class_names = f.readlines()
class_names = [c.strip() for c in class_names]

# 生成颜色
hsv_tuples = [(x / len(class_names), 1., 1.)
              for x in range(len(class_names))]
colors = list(map(lambda x: colorsys.hsv_to_rgb(*x), hsv_tuples))
colors = list(map(lambda x: (int(x[0] * 255), int(x[1] * 255), int(x[2] * 255)), colors))
np.random.seed(10101)  # Fixed seed for consistent colors across runs.
np.random.shuffle(colors)  # Shuffle colors to decorrelate adjacent classes.
np.random.seed(None)  # Reset seed to default.

# anchors
anchors_path = os.path.expanduser(configs['anchors_path'])
with open(anchors_path) as f:
    anchors = f.readline()
anchors = [float(x) for x in anchors.split(',')]
anchors =  np.array(anchors).reshape(-1, 2)

# 生成tensorflow对象.
input_image_shape = K.placeholder(shape=(2, ))
boxes, scores, classes = yolo_eval(yolo_model.output, anchors, len(class_names), input_image_shape,
                score_threshold=configs['score'], iou_threshold=configs['iou'])

# 获取摄像头对象
camera = cv2.VideoCapture(0)

# 获取tensorflow会话
sess = K.get_session()

#开启交互绘图模式
plt.ion()

# 逐帧处理
while True:
    # 开始计时
    start = timer()

    # 获取数据
    (ret, frame) = camera.read()
    # 将像素数据转换为图像
    image = Image.fromarray(frame)
    if not ret:
        break

    # 图像数据预处理
    image_data = np.array(frame, dtype='float32')
    image_data /= 255.
    image_data = np.expand_dims(image_data, 0)  # Add batch dimension.

    # 运行tensorflow会话
    out_boxes, out_scores, out_classes = sess.run(
        [boxes, scores, classes],
        feed_dict={
            yolo_model.input: image_data,
            input_image_shape: [image.size[1], image.size[0]],
            K.learning_phase(): 0
        })

    font = ImageFont.truetype(font='font/FiraMono-Medium.otf',
                size=np.floor(3e-2 * image.size[1] + 0.5).astype('int32'))
    thickness = (image.size[0] + image.size[1]) // 300

    # 在原图像的基础上绘制
    for i, c in reversed(list(enumerate(out_classes))):
        predicted_class = class_names[c]
        box = out_boxes[i]
        score = out_scores[i]

        # 计算识别内容所在区域
        label = '{} {:.2f}'.format(predicted_class, score)
        draw = ImageDraw.Draw(image)
        label_size = draw.textsize(label, font)
        top, left, bottom, right = box
        top = max(0, np.floor(top + 0.5).astype('int32'))
        left = max(0, np.floor(left + 0.5).astype('int32'))
        bottom = min(image.size[1], np.floor(bottom + 0.5).astype('int32'))
        right = min(image.size[0], np.floor(right + 0.5).astype('int32'))
        if top - label_size[1] >= 0:
            text_origin = np.array([left, top - label_size[1]])
        else:
            text_origin = np.array([left, top + 1])

        # 绘制识别内容所在区域
        for i in range(thickness):
            draw.rectangle(
                [left + i, top + i, right - i, bottom - i],
                outline=colors[c])
        draw.rectangle(
            [tuple(text_origin), tuple(text_origin + label_size)],
            fill=colors[c])
        draw.text(text_origin, label, fill=(0, 0, 0), font=font)
        del draw

    end = timer()
    print(end - start)
    plt.imshow(image)
    plt.axis('off')#关闭坐标轴显示
    plt.show()
    plt.pause(2)

# 释放资源并关闭所有窗口
plt.ioff() #关闭interactive模式,否则后面的plt.show()也会一闪而过
camera.release()
cv2.destroyAllWindows()
由于电脑配置的问题,处理一帧数据需要5s左右。因此,会显得不流畅。
10.776641618602282
4.792536805818951
4.796147291389371
5.000113367100862
4.962706422596163
5.18331226944607
5.804779053118786
5.265706358681378
5.215022867030655
4.780028169158641
4.718418981478251
4.7511960695672855
4.864659742409415
5.245915635282643
5.4219901384618225附代码地址:keras-yolo3 实时目标检测、原始项目的github地址。注意,由于模型文件过大,所以没有上传,有需要的可以在评论区留言。