一.项目简介
1.数据
需要数据QQ联系:1209028652
数据集:总共数据集由两部分组成:他人脸图片集及我自己的部分图片
自己图片目录:face_recog/my_faces
他人图片目录:face_recog/other_faces
我的测试图片目录:face_recog/test_faces
2.人脸识别
获取数据后,第一件事就对对图片进行处理,即人脸识别,把人脸的范围确定下来,人脸识别有很多方法,这里使用的是 dlib 来识别人脸部分,当然也可以使用 opencv 来识别人脸,
在实际使用过程中,dlib 的识别效果比 opencv 的好一些。
识别处理后的图片存放路径为:my_faces(存放预处理我的图片,里面还复制一些图片),other_faces(存放预处理别人图片)
3.建立模型,训练数据
这里使用卷积神经网络来建立模型,用了 3 个卷积层(采用了池化、dropout 等技术),一个全连接层,分类层、输出层。
4.性能评估
5. 用测试数据,验证模型
下面开始代码实现啦
二.数据准备
导入模块
import sys
import os
import cv2
import dlib
import matplotlib
import time
start=time.time()
1.获取数据
# 1.定义输入、输出目录,文件解压到当前目录,my_faces目录下,output_dir_myself 为检测以后我的的头像
input_dir_myself = 'face_recog/my_faces'
output_dir_myself = 'my_faces'
size = 64

*# 2.判断输出目录是否存在,不存在,则创建
if not os.path.exists(output_dir_myself):
    os.makedirs(output_dir_myself)

# 3.利用 dlib 的人脸特征提取器,使用 dlib 自带的 frontal_face_detector 作为我们的特征提取器
detector = dlib.get_frontal_face_detector()
2.预处理数据
# 接下来使用 dlib 来批量识别图片中的人脸部分,并对原图像进行预处理,并保存到指定目录下。
#1.预处理我的头像
index = 1
for (path, dirnames, filenames) in os.walk(input_dir_myself):
    for filename in filenames:
        if filename.endswith('.jpg'):
            print('Being processed picture %s' % index)
            img_path = path+'/'+filename
            # 从文件读取图片
            img = cv2.imread(img_path)
            # 转为灰度图片
            gray_img = cv2.cvtColor(img, cv2.COLOR_BGR2GRAY)
            # 使用 detector 进行人脸检测 dets 为返回的结果
            dets = detector(gray_img, 1)
            #使用 enumerate 函数遍历序列中的元素以及它们的下标
            #下标 i 即为人脸序号
            #left:人脸左边距离图片左边界的距离 ;right:人脸右边距离图片左边界的距离
            #top:人脸上边距离图片上边界的距离 ;bottom:人脸下边距离图片上边界的距离
            for i, d in enumerate(dets):
                x1 = d.top() if d.top() > 0 else 0
                y1 = d.bottom() if d.bottom() > 0 else 0
                x2 = d.left() if d.left() > 0 else 0
                y2 = d.right() if d.right() > 0 else 0
                # img[y:y+h,x:x+w]
                face = img[x1:y1,x2:y2]
                # 调整图片的尺寸
                face = cv2.resize(face, (size,size))
                cv2.imshow('image',face)
                # 保存图片
                cv2.imwrite(output_dir_myself + '/' + str(index) + '.jpg', face)
                index += 1
                # 不断刷新图像,频率时间为 30ms
                key = cv2.waitKey(30) & 0xff
                if key == 27:
                    sys.exit(0)


# 2.用同样方法预处理别人的头像(我只选用别人部分头像)
# 定义输入、输出目录,文件解压到当前目录,other_faces目录下
input_dir_other = 'face_recog/other_faces'
output_dir_other = 'other_faces'
size = 64
# 判断输出目录是否存在,不存在,则创建
if not os.path.exists(output_dir_other):
    os.makedirs(output_dir_other)
#使用 dlib 自带的 frontal_face_detector 作为我们的特征提取器
detector = dlib.get_frontal_face_detector()
# 预处理别人的头像
index = 1
for (path, dirnames, filenames) in os.walk(input_dir_other):
    for filename in filenames:
        if filename.endswith('.jpg'):
            print('Being processed picture %s' % index)
            img_path = path+'/'+filename
            # 从文件读取图片
            img = cv2.imread(img_path)
            # 转为灰度图片
            gray_img = cv2.cvtColor(img, cv2.COLOR_BGR2GRAY)
            # 使用 detector 进行人脸检测 dets 为返回的结果
            dets = detector(gray_img, 1)
            #使用 enumerate 函数遍历序列中的元素以及它们的下标
            #下标 i 即为人脸序号
            #left:人脸左边距离图片左边界的距离 ;right:人脸右边距离图片左边界的距离
            #top:人脸上边距离图片上边界的距离 ;bottom:人脸下边距离图片上边界的距离
            for i, d in enumerate(dets):
                x1 = d.top() if d.top() > 0 else 0
                y1 = d.bottom() if d.bottom() > 0 else 0
                x2 = d.left() if d.left() > 0 else 0
                y2 = d.right() if d.right() > 0 else 0
                # img[y:y+h,x:x+w]
                face = img[x1:y1,x2:y2]
                # 调整图片的尺寸
                face = cv2.resize(face, (size,size))
                cv2.imshow('image',face)
                # 保存图片
                cv2.imwrite(output_dir_other + '/' + str(index) + '.jpg', face)
                index += 1
                # 不断刷新图像,频率时间为 30ms
                key = cv2.waitKey(30) & 0xff
                if key == 27:
                    sys.exit(0)
三.训练模型
1.导入需要的库
import tensorflow as tf
import cv2
import numpy as np
import os
import random
import sys
from sklearn.model_selection import train_test_split
2.定义预处理后图片(我的和别人的)所在目录
my_faces_path = 'my_faces'
other_faces_path = 'other_faces'
size = 64
3.调整或规范图片大小
imgs = []
labs = []
#重新创建图形变量
tf.reset_default_graph()
#获取需要填充图片的大小
def getPaddingSize(img):
    h, w, _ = img.shape
    top, bottom, left, right = (0, 0, 0, 0)
    longest = max(h, w)
    if w < longest:
        tmp = longest - w
        # //表示整除符号
        left = tmp // 2
        right = tmp - left
    elif h < longest:
        tmp = longest - h
        top = tmp // 2
        bottom = tmp - top
    else:
        pass
    return top, bottom, left, right
4.读取测试图片
def readData(path , h=size, w=size):
    for filename in os.listdir(path):
        if filename.endswith('.jpg'):
            filename = path + '/' + filename
            img = cv2.imread(filename)
            top,bottom,left,right = getPaddingSize(img)
            # 将图片放大, 扩充图片边缘部分
            img = cv2.copyMakeBorder(img, top, bottom, left, right,cv2.BORDER_CONSTANT, value=[0,0,0])
            img = cv2.resize(img, (h, w))
            imgs.append(img)
            labs.append(path)
readData(my_faces_path)
readData(other_faces_path)
# 将图片数据与标签转换成数组
imgs = np.array(imgs)
labs = np.array([[0,1] if lab == my_faces_path else [1,0] for lab in labs])
# 随机划分测试集与训练集
train_x,test_x,train_y,test_y = train_test_split(imgs, labs, test_size=0.05,
random_state=random.randint(0,100))
# 参数:图片数据的总数,图片的高、宽、通道
train_x = train_x.reshape(train_x.shape[0], size, size, 3)
test_x = test_x.reshape(test_x.shape[0], size, size, 3)
# 将数据转换成小于 1 的数
train_x = train_x.astype('float32')/255.0
test_x = test_x.astype('float32')/255.0
print('train size:%s, test size:%s' % (len(train_x), len(test_x)))
# 图片块,每次取 100 张图片
batch_size = 20
num_batch = len(train_x) // batch_size
5.定义变量及神经网络层-
x = tf.placeholder(tf.float32, [None, size, size, 3])
y_ = tf.placeholder(tf.float32, [None, 2])
keep_prob_5 = tf.placeholder(tf.float32)
keep_prob_75 = tf.placeholder(tf.float32)
def weightVariable(shape):
    init = tf.random_normal(shape, stddev=0.01)
    return tf.Variable(init)
def biasVariable(shape):
    init = tf.random_normal(shape)
    return tf.Variable(init)
def conv2d(x, W):
    return tf.nn.conv2d(x, W, strides=[1,1,1,1], padding='SAME')
def maxPool(x):
    return tf.nn.max_pool(x, ksize=[1,2,2,1], strides=[1,2,2,1], padding='SAME')
def dropout(x, keep):
    return tf.nn.dropout(x, keep)
6.定义卷积神经网络框架
def cnnLayer():
    # 第一层
    W1 = weightVariable([3, 3, 3, 32])  # 卷积核大小(3,3), 输入通道(3), 输出通道(32)
    b1 = biasVariable([32])
    # 卷积
    conv1 = tf.nn.relu(conv2d(x, W1) + b1)
    # 池化
    pool1 = maxPool(conv1)
    # 减少过拟合,随机让某些权重不更新
    drop1 = dropout(pool1, keep_prob_5)
    # 第二层
    W2 = weightVariable([3, 3, 32, 64])
    b2 = biasVariable([64])
    conv2 = tf.nn.relu(conv2d(drop1, W2) + b2)
    pool2 = maxPool(conv2)
    drop2 = dropout(pool2, keep_prob_5)
    # 第三层
    W3 = weightVariable([3, 3, 64, 64])
    b3 = biasVariable([64])
    conv3 = tf.nn.relu(conv2d(drop2, W3) + b3)
    pool3 = maxPool(conv3)
    drop3 = dropout(pool3, keep_prob_5)
    # 全连接层
    Wf = weightVariable([8 * 16 * 32, 512])
    bf = biasVariable([512])
    drop3_flat = tf.reshape(drop3, [-1, 8 * 16 * 32])
    dense = tf.nn.relu(tf.matmul(drop3_flat, Wf) + bf)
    dropf = dropout(dense, keep_prob_75)
    # 输出层
    Wout = weightVariable([512, 2])
    bout = weightVariable([2])
    # out = tf.matmul(dropf, Wout) + bout
    out = tf.add(tf.matmul(dropf, Wout), bout)
    return out
7.训练模型
def cnnTrain():
    out = cnnLayer()
    cross_entropy =tf.reduce_mean(tf.nn.softmax_cross_entropy_with_logits(logits=out, labels=y_))
    train_step = tf.train.AdamOptimizer(0.01).minimize(cross_entropy)
    # 比较标签是否相等,再求的所有数的平均值,tf.cast(强制转换类型)
    accuracy = tf.reduce_mean(tf.cast(tf.equal(tf.argmax(out, 1), tf.argmax(y_,1)), tf.float32))
    # 将 loss 与 accuracy 保存以供 tensorboard 使用
    tf.summary.scalar('loss', cross_entropy)
    tf.summary.scalar('accuracy', accuracy)
    merged_summary_op = tf.summary.merge_all()
    # 数据保存器的初始化
    saver = tf.train.Saver()
    with tf.Session() as sess:
        sess.run(tf.global_variables_initializer())
        summary_writer = tf.summary.FileWriter('./tmp',graph=tf.get_default_graph())
        for n in range(10):
            # 每次取 128(batch_size)张图片
            for i in range(num_batch):
                batch_x = train_x[i * batch_size: (i + 1) * batch_size]
                batch_y = train_y[i * batch_size: (i + 1) * batch_size]
                # 开始训练数据,同时训练三个变量,返回三个数据
                _, loss, summary = sess.run([train_step, cross_entropy,merged_summary_op],
                                            feed_dict={x: batch_x, y_: batch_y,keep_prob_5: 0.5, keep_prob_75: 0.75})
                summary_writer.add_summary(summary, n * num_batch + i)
                # 打印损失
                print(n * num_batch + i, loss)
                if (n * num_batch + i) % 40 == 0:
                    # 获取测试数据的准确率
                    acc = accuracy.eval({x: test_x, y_: test_y, keep_prob_5: 1.0,keep_prob_75: 1.0})
                    print(n * num_batch + i, acc)
                    # 由于数据不多,这里设为准确率大于 0.80 时保存并退出
                    if acc > 0.8 and n > 2:
                # saver.save(sess,'./train_face_model/train_faces.model', global_step = n * num_batch + i)
                        saver.save(sess,'./train_face_model/train_faces.model')
                        # sys.exit(0)
        # print('accuracy less 0.80, exited!')
cnnTrain()
四.测试模型
input_dir='face_recog/test_faces'
index=1
output = cnnLayer()
predict = tf.argmax(output, 1)
#先加载 meta graph 并恢复权重变量
saver = tf.train.import_meta_graph('./train_face_model/train_faces.model.meta')
sess = tf.Session()
saver.restore(sess, tf.train.latest_checkpoint('./train_face_model/'))
#saver.restore(sess,tf.train.latest_checkpoint('./my_test_model/'))
def is_my_face(image):
    sess.run(tf.global_variables_initializer())
    res = sess.run(predict, feed_dict={x: [image/255.0], keep_prob_5:1.0,keep_prob_75: 1.0})
    if res[0] == 1:
        return True
    else:
        return False
#使用 dlib 自带的 frontal_face_detector 作为我们的特征提取器
detector = dlib.get_frontal_face_detector()
#cam = cv2.VideoCapture(0)
#while True:
    #_, img = cam.read()
for (path, dirnames, filenames) in os.walk(input_dir):
    for filename in filenames:
        if filename.endswith('.jpg'):
            print('Being processed picture %s' % index)
            index += 1
            img_path = path + '/' + filename
            # 从文件读取图片
            img = cv2.imread(img_path)
            gray_image = cv2.cvtColor(img, cv2.COLOR_BGR2GRAY)
            dets = detector(gray_image, 1)
            if not len(dets):
                print('Can`t get face.')
                cv2.imshow('img', img)
                key = cv2.waitKey(30) & 0xff
                if key == 27:
                    sys.exit(0)
            for i, d in enumerate(dets):
                x1 = d.top() if d.top() > 0 else 0
                y1 = d.bottom() if d.bottom() > 0 else 0
                x2 = d.left() if d.left() > 0 else 0
                y2 = d.right() if d.right() > 0 else 0
                face = img[x1:y1, x2:y2]
                # 调整图片的尺寸
                face = cv2.resize(face, (size, size))
                print('Is this my face? %s' % is_my_face(face))
                cv2.rectangle(img, (x2, x1), (y2, y1), (255, 0, 0), 3)
                cv2.imshow('image', img)
                key = cv2.waitKey(30) & 0xff
                if key == 27:
                    sys.exit(0)
sess.close()
成果展示
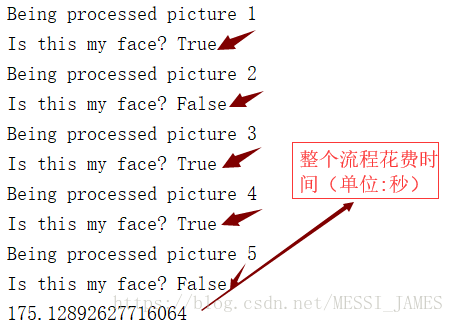
总结
由于图片数量比较少,最终结果不是很理想,但是整个流程的逻辑是很透彻的,本人电脑比较渣,跑的时候比较慢。样本图片越多,最终的结果也越准确。