话不多说直接上今天的操作流程,本博客更多为了记笔记方便自己使用。
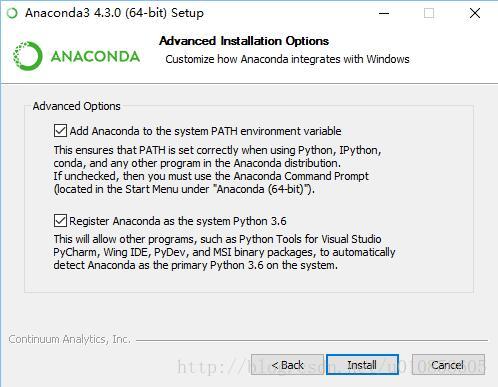
1.下载anaconda并安装(勾选path) 清华源链接:https://mirrors.tuna.tsinghua.edu.cn/anaconda/archive/
就和安装普通的软件一样,全部选择默认即可,注意勾选将python3.6添加进环境变量。
这样Anaconda就安装好了,我们可以通过下面的命令来查看Anaconda已经安装了哪些包。
运行 开始菜单->Anaconda3—>Anaconda Prompt :
(base) C:\Users\wangzhenlin>conda list
# packages in environment at C:\ProgramData\Anaconda3:
#
# Name                    Version                   Build  Channel_ipyw_jlab_nb_ext_conf    0.1.0                    py37_0alabaster                 0.7.11                   py37_0anaconda                  5.3.0                    py37_0anaconda-client           1.7.2                    py37_0
......
(base) C:\Users\wangzhenlin>conda --version
conda 4.5.11
2. 输入清华的仓库镜像,更新包更快:
为了把清华的仓库镜像地址放在首位,建议将下面的第一行命令输入两次
conda config --add channels https://mirrors.tuna.tsinghua.edu.cn/anaconda/pkgs/free/
conda config --set show_channel_urls yes
(base) C:\Users\wangzhenlin>conda config --add channels https://mirrors.tuna.tsinghua.edu.cn/anaconda/pkgs/free/
Warning: 'https://mirrors.tuna.tsinghua.edu.cn/anaconda/pkgs/free/' already in 'channels' list, moving to the top

(base) C:\Users\wangzhenlin>conda config --add channels https://mirrors.tuna.tsinghua.edu.cn/anaconda/pkgs/main/

(base) C:\Users\wangzhenlin>conda config --set show_channel_urls yes

The following NEW packages will be INSTALLED:

    certifi:        2018.8.24-py35_1       https://mirrors.tuna.tsinghua.edu.cn/anaconda/pkgs/main
    pip:            10.0.1-py35_0          https://mirrors.tuna.tsinghua.edu.cn/anaconda/pkgs/main
    python:         3.5.6-he025d50_0       https://mirrors.tuna.tsinghua.edu.cn/anaconda/pkgs/main
    setuptools:     40.2.0-py35_0          https://mirrors.tuna.tsinghua.edu.cn/anaconda/pkgs/main
    vc:             14.1-h0510ff6_4        https://mirrors.tuna.tsinghua.edu.cn/anaconda/pkgs/main
    vs2015_runtime: 14.15.26706-h3a45250_0 https://mirrors.tuna.tsinghua.edu.cn/anaconda/pkgs/main
    wheel:          0.31.1-py35_0          https://mirrors.tuna.tsinghua.edu.cn/anaconda/pkgs/main
    wincertstore:   0.2-py35hfebbdb8_0     https://mirrors.tuna.tsinghua.edu.cn/anaconda/pkgs/main

Proceed ([y]/n)?


Downloading and Extracting Packages
pip-10.0.1           | 1.8 MB    | ############################################################################ | 100%
vc-14.1              | 6 KB      | ############################################################################ | 100%
vs2015_runtime-14.15 | 2.2 MB    | ############################################################################ | 100%
wincertstore-0.2     | 13 KB     | ############################################################################ | 100%
setuptools-40.2.0    | 597 KB    | ############################################################################ | 100%
python-3.5.6         | 18.2 MB   | ############################################################################ | 100%
wheel-0.31.1         | 81 KB     | ############################################################################ | 100%
certifi-2018.8.24    | 140 KB    | ############################################################################ | 100%
Preparing transaction: done
Verifying transaction: done
Executing transaction: done
3.创建anaconda的tensorflow环境,环境名称为tensorflow(本博客的ananconda为python3.5)
(base) C:\Users\wangzhenlin>conda create -n tensorflow python=3.5
Solving environment: done
## Package Plan ##
environment location: C:\Users\wangzhenlin\AppData\Local\conda\conda\envs\tensorflow
added / updated specs:
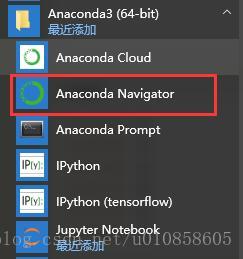
- python=3.5运行 开始菜单->Anaconda3—>Anaconda Navigator,点击左侧的Environments,可以看到tensorflow的环境已经创建好了。

在Anaconda Prompt中启动tensorflow环境并输入:pip install --upgrade --ignore-installed tensorflow安装tensorflow
(base) C:\Users\wangzhenlin>conda activate tensorflow

(tensorflow) C:\Users\wangzhenlin>pip install --upgrade --ignore-installed tensorflow
Collecting tensorflow
  Downloading https://files.pythonhosted.org/packages/8d/dd/1c16b9be09299e1557fdb28ed51b43f2b536fca289a48878b3fdd752c3c7/tensorflow-1.12.0-cp35-cp35m-win_amd64.whl (45.9MB)
    100% |████████████████████████████████| 45.9MB 13kB/s
Collecting wheel>=0.26 (from tensorflow)
  Downloading https://files.pythonhosted.org/packages/ff/47/1dfa4795e24fd6f93d5d58602dd716c3f101cfd5a77cd9acbe519b44a0a9/wheel-0.32.3-py2.py3-none-any.whl
Collecting gast>=0.2.0 (from tensorflow)
  Downloading https://files.pythonhosted.org/packages/5c/78/ff794fcae2ce8aa6323e789d1f8b3b7765f601e7702726f430e814822b96/gast-0.2.0.tar.gz
Collecting termcolor>=1.1.0 (from tensorflow)
  Downloading https://files.pythonhosted.org/packages/8a/48/a76be51647d0eb9f10e2a4511bf3ffb8cc1e6b14e9e4fab46173aa79f981/termcolor-1.1.0.tar.gz
Collecting astor>=0.6.0 (from tensorflow)
基本现在可以在anaconda promot里面运行:
import tensorflow as tf
hello = tf.constant('Hello, TensorFlow!')
sess = tf.Session()
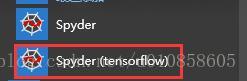
print(sess.run(hello))为了能在ipython 和Spyder中使用tensorflow,我们需要在tensorflow的环境中安装这两个的插件。打开Anaconda Navigator,选择Not installed,找到 ipython和Spyder并安装,笔者这里已经安装好,所以在这个页面没有显示。 切换到installed,可以看到两个都已经安装好,其实可以按照自己的需要安装。下图显示已经安装好的Spyder: 安装好插件后,我们需要测试一下。在Anaconda Prompt中启动tensorflow环境,并运行ipython,import tensorflow发现成功: 同样,在Anaconda Prompt中启动tensorflow环境,并运行Spyder,等一会儿后会启动Spyder IDE,import tensorflow 同样成功: 注意:一定要启动tensorflow 环境下的Spyder才可以import tensorflow,不要去开始菜单运行Spyder,在那里是无法运行的,如:
4. 在pycharming里面运行tendorflow
这里博主整理了好久,其实很简单。在setting的解释其中新加上图中anaconda环境中创建的tensorflow环境路径即可;(实践发现,完全可以建立一个环境后在Navigator里面进行各种包的安装,只需要pycharming里面进行配置升级即可
)
参考链接:https://www.cnblogs.com/yingchuan-hxf/p/7715575.html
https://blog.csdn.net/u012052268/article/details/74202439
https://blog.csdn.net/csdn2017411/article/details/70052407

测试程序:
import os


import tensorflow as tf

import numpy as np

# import keras    装完keras后,去掉#尝试运行,用于检验安装
os.environ['TF_CPP_MIN_LOG_LEVEL'] = '2'

x = tf.placeholder("float")

y = tf.placeholder("float")

w = tf.Variable([1.0, 2.0], name='w')

y_pred = tf.multiply(x, w[0]) + w[1]

error = tf.square(y - y_pred)

train_op = tf.train.GradientDescentOptimizer(0.02).minimize(error)

model = tf.initialize_all_variables()

with tf.Session() as session:
    session.run(model)

    for i in range(1000):
        x_value = np.random.rand()

        y_value = x_value * 2 + 6

        session.run([train_op], feed_dict={x: x_value, y: y_value})

    w_value = session.run(w)  # get w

    print("ax+b,a=%.3f,b=%.3f" % (w_value[0], w_value[1]))