版权声明:本文为博主原创文章,未经博主允许不得转载。 https://blog.csdn.net/u010324331/article/details/84567009
vue加element ui 写的一个项目,请求用的 axios 。在做表单提交的时候常常遇到需要在表单中传文件或者图片,一般处理起来是先单个传完文件后得到路径然后再表单提交一起传给后端。如果接口是必须和表单其他参数一起传过去的时候操作起来就是下面要讲的了。
ps:接口是我写的,我不想改接口,我就得去找前端一起传参的解决办法咯,网上找了资料,感觉都是不太完整,对于我这种刚入前端大坑的菜鸡来说不友好,对着调试半天都不行,最后参考官方文档和各种资料解决后,整理下,方便下次查阅,下面是代码部分,其他说明见代码注释(为了查阅代码方便,部分无关的或重复性代码以…代替)
模板代码如下:
<el-tab-pane label="微信支付" name="weixin" :lazy=true>
  <!-- 微信配置 -->
  <el-form ref="weixinForm" :label-position="labelPosition" class="" label-width="200px">
    <el-form-item label="APP_ID">
      <el-input class="form-input" v-model="weixin.app_id"></el-input>
    </el-form-item>
    ...
    <el-form-item label="证书文件(apiclient_cert.pem )">
      <el-upload ref="upload" action="" :http-request="handleFile" :on-change="cert_path_file" :multiple="false" :limit="1" :file-list="cert_path" accept=".pem">
        <el-button size="small" type="primary" @click="clearUploadedImage('upload')">点击上传</el-button>
        <div slot="tip" class="el-upload__tip">只能上传.pem文件</div>
      </el-upload>
    </el-form-item>
    <el-form-item label="密钥文件(apiclient_key.pem)">
      <el-upload ref="upload1" action="" :http-request="handleFile" :on-change="key_path_file" :multiple="false" :limit="1" :file-list="key_path" accept=".pem">
        <el-button size="small" type="primary" @click="clearUploadedImage('upload1')">点击上传</el-button>
        <div slot="tip" class="el-upload__tip">只能上传.pem文件</div>
      </el-upload>
    </el-form-item>
    <el-form-item>
      <el-button type="primary" @click="onSubmit('weixin')">保存修改</el-button>
    </el-form-item>
  </el-form>
</el-tab-pane>
JavaScript代码:
<script>
import tzBreadcrumb from './../../components/breadcrumb/breadcrumb.vue';
import http from './../../config/index';
import api from './../../api/api';
export default {
mounted: function () {
this.initdata();
},
components: {
'tz-breadcrumb': tzBreadcrumb
},
data: () => {
return {
alipay: {},
weixin: {},
wsbank: {},
labelPosition: '',
loading: false,
cert_path: [],
key_path: []
};
},
methods: {
initdata: function () {
this.getData(api.getAlipayConf);
},
handleClick (tab, event) {
if (tab.name === 'alipay' && Object.keys(this.alipay).length === 0) {
this.getData(api.getAlipayConf);
} else if (tab.name === 'weixin' && Object.keys(this.weixin).length === 0) {
this.getData(api.getwechatpayconfig);
}
},
handleFile () { },
cert_path_file (file, fileList) {
// 证书上传组件 on-change 事件
this.cert_path = fileList;
},
key_path_file (file, fileList) {
// 秘钥上传组件 on-change 事件
this.key_path = fileList;
},
clearUploadedImage (type) {
// 重新选择文件时清空文件列表
if (type === 'upload') {
this.$refs.upload.clearFiles();
this.cert_path = [];
} else if (type === 'upload1') {
this.$refs.upload1.clearFiles();
this.key_path = [];
}
},
onSubmit (type) {
let data = {};
let url = '';
if (type === 'alipay') {
...
}
if (type === 'weixin') {
url = api.setwechatpayconfig;
// 表单带参数上传文件
// 获取表单
let form = this.$refs['weixinForm'].$el;
// 创建 FormData 对象
let formData = new FormData(form);
// 创建了 FormData 对象的时候传入了表单但是读不出来表单数据,不知道哪里的问题。所以下面用 append 方法添加参数,想打印出来看看的话可以 formData.get('id')
formData.append('token', localStorage.getItem('token'));
formData.append('id', this.weixin.id);
formData.append('app_id', this.weixin.app_id);
formData.append('merchant_id', this.weixin.merchant_id);
formData.append('secret', this.weixin.secret);
formData.append('key', this.weixin.key);
formData.append('notify_url', this.weixin.notify_url);
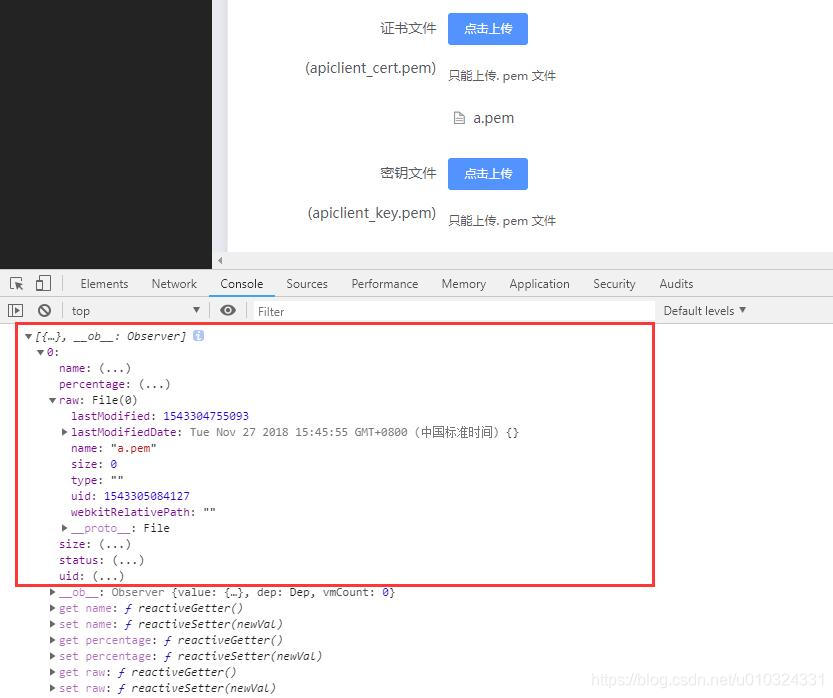
// 这里文件上传的字段一定要设置文件列表中的 raw 参数 this.cert_path[0].raw
formData.append('cert_path', this.cert_path[0] ? this.cert_path[0].raw : '');
formData.append('key_path', this.key_path[0] ? this.key_path[0].raw : '');
// 记得配置请求头中 Content-Type 为'multipart/form-data'
let config = {
headers: {
'Content-Type': 'multipart/form-data'
}
};
http.form(url, formData, config, response => {
// console.log(response.data);
this.loading = false;
if (response.code === '10001') {
this.cert_path = [];
this.key_path = [];
this.$message('设置完成');
} else {
this.$message.error(response.msg);
}
}, () => {
this.$message.error('网络错误');
this.loading = false;
});
}
},
setData (url, data) {
...
},
getData (url) {
...
}
}
};
</script>
引入的组件 import http from ‘./…/…/config/index’ 中http.form 方法
form (url, data, config, success, fail) {
  axios.post(baseURL + url, data, config).then(function (response) {
    return success(checkStatus(response));
  }).catch(function (res) {
    return fail(checkCode(res));
  });
}
console.log(this.cert_path);// 打印结果如下图
对于 element ui 上传组件用法具体的请查阅官方文档
Element UI ( Upload 上传 )