1. 获取图像像素指针
- CV_Assert(myImage.depth() == CV_8U);
- Mat.ptr(int i=0) 获取像素矩阵的指针,索引i表示第几行,从0开始计行数。
- 获得当前行指针const uchar* current= myImage.ptr(row );
- 获取当前像素点P(row, col)的像素值 p(row, col) =current[col]
2. 像素范围处理saturate_cast
这个函数的功能是确保RGB值得范围在0~255之间,如下所示:
saturate_cast(-100),返回 0。
saturate_cast(288),返回255
saturate_cast(100),返回100
3. 掩膜操作实现图像对比度调整
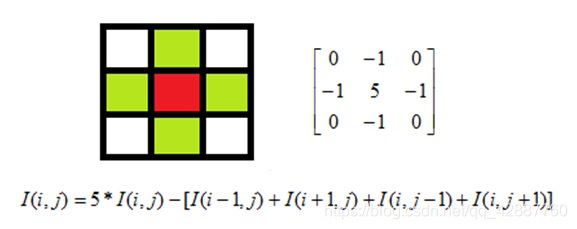
红色是中心像素,从上到下,从左到右对每个像素做同样的处理操作,得到最终结果就是对比度提高之后的输出图像Mat对象。

-
矩阵的掩膜操作十分简单,根据掩膜来重新计算每个像素的像素值,掩膜(mask 也被称为Kernel)
-
掩膜矩阵 3*3 在图像矩阵上移动与图像重合,与每一个重合的像素点做掩膜操作,
-
公式:中心点掩膜后的颜色数据
-
这里是3*3的矩阵,所以图像数据的第一行倒数第一行,第一列倒数第一列不做掩膜操作 。其中: i,j 表示像素的位置,第 i 行,第 j 列, I(i,j) 表示每个通道颜色数据。
-
掩膜操作不是矩阵乘法,由公式可以看出
-
该掩膜矩阵的作用: 掩膜操作可以提高图像对比度,对比度提高可以增加图像感官度、锐化,让看起来有点模糊的图像更清晰
程序代码
#include<opencv2/opencv.hpp>
#include<iostream>
#include<math.h>

using namespace cv;

int main(int argc,char** argv){
	Mat src,dst;
	src=imread("E:/Experiment/OpenCV/Pictures/dog2.jpg");

	if(!src.data){
		printf("could not load image ...");
		return -1;
	}
	//CV_Assert(src.depth()==CV_8U);

	//掩膜操作
	int channels=src.channels();//图像的通道数
	int cols=(src.cols)*src.channels();//列数*通道数
	int rows=src.rows;//行数

	dst=Mat::zeros(src.size(),src.type());//初始化 dst

	for(int row=1 ; row<rows-1 ; row++){
		const uchar* previous = src.ptr<uchar>(row - 1);//上一行
		const uchar* current=src.ptr<uchar>(row);//当前行
		const uchar* next =src.ptr<uchar>(row + 1);//下一行

		uchar* output=dst.ptr<uchar>(row);
		for(int col=1*channels ; col<cols-1*channels ; col++){
			//掩膜操作:I(i,j) = 5*I(i,j) - [I(i-1,j)+I(i+1,j)+I(i,j-1)+I(i,j+1)]
			output[col] =saturate_cast<uchar>( 5 * current[col] - (previous[col] + next[col] + current[col + channels] + current[col + channels]));
		}

	}

	namedWindow("output1",CV_WINDOW_AUTOSIZE);
	imshow("output1",src);

	namedWindow("output2",CV_WINDOW_AUTOSIZE);
	imshow("output2",dst);

	waitKey(0);

	return 0;
}
运行效果

但是如果不使用 saturate_cast 函数
(即:将32行中output[col] =saturate_cast( 5 * current[col] - (previous[col] + next[col] + current[col + channels] + current[col + channels]));
换成output[col] = 5 * current[col] - (previous[col] + next[col] + current[col + channels] + current[col + channels]);),
将会得到以下效果:

4. 函数调用filter2D功能
- 定义掩膜:Mat kernel = (Mat_(3,3) << 0, -1, 0, -1, 5, -1, 0, -1, 0);
filter2D( src, dst, src.depth(), kernel );其中src与dst是Mat类型变量、src.depth表示位图深度,有32、24、8等。
代码
#include<opencv2/opencv.hpp>
#include<iostream>
#include<math.h>

using namespace cv;

int main(int argc,char** argv){
	Mat src,dst;
	src=imread("E:/Experiment/OpenCV/Pictures/dog2.jpg");

	if(!src.data){
		printf("could not load image ...");
		return -1;
	}


	Mat kernel=(Mat_<char>(3,3)<< 0, -1, 0, -1, 5, -1 , 0, -1, 0);
	filter2D(src,dst,src.depth(),kernel);
	//filter2D(src,dst,-1,kernel);

	namedWindow("output1",CV_WINDOW_AUTOSIZE);
	imshow("output1",src);

	namedWindow("output2",CV_WINDOW_AUTOSIZE);
	imshow("output2",dst);

	waitKey(0);

	return 0;
}
运行效果(与上述代码效果一致):

5.测试运行时间
方法一:(需要头文件: time.h )
......
#include <time.h>
......
int main(){
	clock_t start, finish;
    double  duration;

    start = clock();

	//......
    //要执行的内容
    //......

    finish = clock();
    duration = (double)(finish - start) / CLOCKS_PER_SEC;
    printf("行优先用时: %f seconds\n", duration);

	return 0;
}
方法二:
......
......
int main(){
	double t=getTickCount();

	//......
    //要执行的内容
    //......

    double timeConsume = (getTickCount() - t) / getTickFrequency();
	printf("time consume %.2f",timeConsume);

	return 0;
}
案例代码:
#include<opencv2/opencv.hpp>
#include<iostream>
#include<math.h>

using namespace cv;

int main(int argc,char** argv){
	Mat src,dst;
	src=imread("E:/Experiment/OpenCV/Pictures/dog2.jpg");

	if(!src.data){
		printf("could not load image ...");
		return -1;
	}

	double t=getTickCount();

	Mat kernel=(Mat_<char>(3,3)<< 0, -1, 0, -1, 5, -1 , 0, -1, 0);
	filter2D(src,dst,src.depth(),kernel);
	//filter2D(src,dst,-1,kernel);

	double timeConsume = (getTickCount() - t) / getTickFrequency();
	printf("time consume %.2f",timeConsume);

	namedWindow("output1",CV_WINDOW_AUTOSIZE);
	imshow("output1",src);

	namedWindow("output2",CV_WINDOW_AUTOSIZE);
	imshow("output2",dst);

	waitKey(0);

	return 0;
}