前言
说到View的绘制大部分人都能说上一两句,但细节实在太多如果没系统的去看很难吃透。近期我专门抽了一周多的时间读了绘制相关的源码,这里准备用三篇博客做一个系统的讲述,目录如下。
- View绘制源码浅析(一)布局的加载
- View绘制源码浅析(二)布局的测量、布局、绘制
- View绘制源码浅析(三)
requestLayout、invalidate与postInvalidate三者的区别
本文的源码基于API27。
疑问
布局加载最重要的就是setContentView()方法了,只需要我们传入一个布局id即可完成布局的加载,但实际上这里是有几个疑问的。
- 如何根据xml创建View的。
- 如何读取xml中View相关属性的。
- 创建的View添加到了哪。
接下来我们带着这些问题再去看源码,避免迷失方向。
setContentView()
我们先从setContentView()这个布局加载的入口开始,看看究竟如何加载布局的。
//MainActivity.java
public class MainActivity extends AppCompatActivity {//继承appCompatActivity
    @Override
    protected void onCreate(Bundle savedInstanceState) {
        super.onCreate(savedInstanceState);
        setContentView(R.layout.activity_main);//布局加载的入口
    }
}

//AppCompatActivity.java
@Override
public void setContentView(@LayoutRes int layoutResID) {
    getDelegate().setContentView(layoutResID);//拿到Activity的委托对象调用setContentView()
}

//AppCompatActivity.java
@NonNull
public AppCompatDelegate getDelegate() {//获取Activity委托对象
    if (mDelegate == null) {
        mDelegate = AppCompatDelegate.create(this, this);
    }
    return mDelegate;
}

//AppCompatDelegate.java
public static AppCompatDelegate create(Activity activity, AppCompatCallback callback) {//创建Activity委托对象
    return create(activity, activity.getWindow(), callback);//这里将activity.getWindow()传入。
}

//AppCompatDelegate.java
private static AppCompatDelegate create(Context context, Window window,
                                        AppCompatCallback callback) {//根据不同的版本创建不同的Activity委托对象
    if (Build.VERSION.SDK_INT >= 24) {
        return new AppCompatDelegateImplN(context, window, callback);
    } else if (Build.VERSION.SDK_INT >= 23) {
        return new AppCompatDelegateImplV23(context, window, callback);
    } else {
        return new AppCompatDelegateImplV14(context, window, callback);
    }
}

//AppCompatDelegateImplV9.java
//最终是调到v9的setContentView方法
@Override
public void setContentView(int resId) {
    ensureSubDecor();//确保SubDecor相关布局初始化完成
    ViewGroup contentParent = (ViewGroup) mSubDecor.findViewById(android.R.id.content);//找到id为content的view
    contentParent.removeAllViews();
    LayoutInflater.from(mContext).inflate(resId, contentParent);//通过LayoutInflater直接把我们的布局添加到id为content的布局上
    mOriginalWindowCallback.onContentChanged();
}
由于继承的是appCompatActivity这个兼容的Activity所以是根据不同的api版本创建不同的AppCompatDelegate实现类以兼容老逻辑。setContentView()最终是调到了AppCompatDelegateImplV9的setContentView(),接下来具体实现分为两步。
- 通过
ensureSubDecor()方法确保SubDecor相关布局初始化完成。 - 找到
SubDecor中id为content的布局,将我们自己的布局inflater到content上。
这里说明下,SubDecor不是DecorView,只是一个变量名为subDecor的ViewGroup不过这里充当DecorView的角色,不要混淆了。
这里先说第一步ensureSubDecor()
//AppCompatDelegateImplV9.java
private void ensureSubDecor() {//确保SubDecor的创建
    if (!mSubDecorInstalled) {//如果没有创建SubDecor
        mSubDecor = createSubDecor();//创建SubDecor
        ...
    }
}

private ViewGroup createSubDecor() {
    TypedArray a = mContext.obtainStyledAttributes(R.styleable.AppCompatTheme);//拿到AppCompat相关的主题属性
	//根据主题中的属性执行对应的Feature方法
    if (a.getBoolean(R.styleable.AppCompatTheme_windowNoTitle, false)) {
        requestWindowFeature(Window.FEATURE_NO_TITLE);//我们比较熟悉的FEATURE_NO_TITLE Feature
    } else if (a.getBoolean(R.styleable.AppCompatTheme_windowActionBar, false)) {
        // Don't allow an action bar if there is no title.
        requestWindowFeature(FEATURE_SUPPORT_ACTION_BAR);
    }
    if (a.getBoolean(R.styleable.AppCompatTheme_windowActionBarOverlay, false)) {
        requestWindowFeature(FEATURE_SUPPORT_ACTION_BAR_OVERLAY);
    }
    if (a.getBoolean(R.styleable.AppCompatTheme_windowActionModeOverlay, false)) {
        requestWindowFeature(FEATURE_ACTION_MODE_OVERLAY);
    }
    mIsFloating = a.getBoolean(R.styleable.AppCompatTheme_android_windowIsFloating, false);
    a.recycle();

    mWindow.getDecorView();//确保DecorView的创建

    final LayoutInflater inflater = LayoutInflater.from(mContext);//用来填充SubDecor的inflater
    ViewGroup subDecor = null;//subDecor布局

	//接下来是根据主题属性初始化不同的subDecor布局
    if (!mWindowNoTitle) {
        if (mIsFloating) {
            // If we're floating, inflate the dialog title decor
            subDecor = (ViewGroup) inflater.inflate(
                R.layout.abc_dialog_title_material, null);

            // Floating windows can never have an action bar, reset the flags
            mHasActionBar = mOverlayActionBar = false;
        } else if (mHasActionBar) {
            /**
                 * This needs some explanation. As we can not use the android:theme attribute
                 * pre-L, we emulate it by manually creating a LayoutInflater using a
                 * ContextThemeWrapper pointing to actionBarTheme.
                 */
            TypedValue outValue = new TypedValue();
            mContext.getTheme().resolveAttribute(R.attr.actionBarTheme, outValue, true);

            Context themedContext;
            if (outValue.resourceId != 0) {
                themedContext = new ContextThemeWrapper(mContext, outValue.resourceId);
            } else {
                themedContext = mContext;
            }

            // Now inflate the view using the themed context and set it as the content view
            subDecor = (ViewGroup) LayoutInflater.from(themedContext)
                .inflate(R.layout.abc_screen_toolbar, null);

            mDecorContentParent = (DecorContentParent) subDecor
                .findViewById(R.id.decor_content_parent);
            mDecorContentParent.setWindowCallback(getWindowCallback());

            /**
                 * Propagate features to DecorContentParent
                 */
            if (mOverlayActionBar) {
                mDecorContentParent.initFeature(FEATURE_SUPPORT_ACTION_BAR_OVERLAY);
            }
            if (mFeatureProgress) {
                mDecorContentParent.initFeature(Window.FEATURE_PROGRESS);
            }
            if (mFeatureIndeterminateProgress) {
                mDecorContentParent.initFeature(Window.FEATURE_INDETERMINATE_PROGRESS);
            }
        }
    } else {
        if (mOverlayActionMode) {
            subDecor = (ViewGroup) inflater.inflate(
                R.layout.abc_screen_simple_overlay_action_mode, null);
        } else {
            subDecor = (ViewGroup) inflater.inflate(R.layout.abc_screen_simple, null);
        }

        if (Build.VERSION.SDK_INT >= 21) {
            // If we're running on L or above, we can rely on ViewCompat's
            // setOnApplyWindowInsetsListener
            ViewCompat.setOnApplyWindowInsetsListener(subDecor,
                                                      new OnApplyWindowInsetsListener() {
                                                          @Override
                                                          public WindowInsetsCompat onApplyWindowInsets(View v,
                                                                                                        WindowInsetsCompat insets) {
                                                              final int top = insets.getSystemWindowInsetTop();
                                                              final int newTop = updateStatusGuard(top);

                                                              if (top != newTop) {
                                                                  insets = insets.replaceSystemWindowInsets(
                                                                      insets.getSystemWindowInsetLeft(),
                                                                      newTop,
                                                                      insets.getSystemWindowInsetRight(),
                                                                      insets.getSystemWindowInsetBottom());
                                                              }

                                                              // Now apply the insets on our view
                                                              return ViewCompat.onApplyWindowInsets(v, insets);
                                                          }
                                                      });
        } else {
            // Else, we need to use our own FitWindowsViewGroup handling
            ((FitWindowsViewGroup) subDecor).setOnFitSystemWindowsListener(
                new FitWindowsViewGroup.OnFitSystemWindowsListener() {
                    @Override
                    public void onFitSystemWindows(Rect insets) {
                        insets.top = updateStatusGuard(insets.top);
                    }
                });
        }
    }

    if (subDecor == null) {//检查SubDecor是否创建
        throw new IllegalArgumentException(
            "AppCompat does not support the current theme features: { "
            + "windowActionBar: " + mHasActionBar
            + ", windowActionBarOverlay: "+ mOverlayActionBar
            + ", android:windowIsFloating: " + mIsFloating
            + ", windowActionModeOverlay: " + mOverlayActionMode
            + ", windowNoTitle: " + mWindowNoTitle
            + " }");
    }

    final ContentFrameLayout contentView = (ContentFrameLayout) subDecor.findViewById(
        R.id.action_bar_activity_content);//找到subDecor中id为action_bar_activity_content的布局

    final ViewGroup windowContentView = (ViewGroup) mWindow.findViewById(android.R.id.content);//找到PhoneWindow中id为content的布局
    if (windowContentView != null) {
        while (windowContentView.getChildCount() > 0) {//将windowContentView的子布局全部添加到subDecor中id为action_bar_activity_content的布局上
            final View child = windowContentView.getChildAt(0);
            windowContentView.removeViewAt(0);
            contentView.addView(child);
        }

        windowContentView.setId(View.NO_ID);//清除PhoneWindow中id为content的布局id
        contentView.setId(android.R.id.content);//给subDecor中id为action_bar_activity_content的布局设置上新的id为content以假乱真

        if (windowContentView instanceof FrameLayout) {
            ((FrameLayout) windowContentView).setForeground(null);
        }
    }

    // Now set the Window's content view with the decor
    mWindow.setContentView(subDecor);//将subDecor设置到window上
    return subDecor;
}
这里先拿到主题中的属性,然后根据主题中的属性设置对应的Feature,并根据条件创建对应的subDecor。接下来拿到PhoneWindow中id为content的View,把它的子布局全部添加到subDecor中id为action_bar_activity_content的布局上,然后将windowContentView的id移除,给subDecor中id为action_bar_activity_content的布局设置上新的id为content以假乱真充当ContentView的角色,最后将SubDecor通过mWindow.setContentView(subDecor)设置到window上。
那么经过ensureSubDecor()方法后我们就完成了DecorView和SubDecor的初始化并通过mWindow.setContentView(subDecor)将SubDecor添加到了DecorView上。完成了SubDecor和DecorView的关联。
在回到我们之前的setContentView()
//AppCompatDelegateImplV9.java
//最终是调到v9的setContentView方法
@Override
public void setContentView(int resId) {
    ensureSubDecor();//确保SubDecor相关布局初始化完成
    ViewGroup contentParent = (ViewGroup) mSubDecor.findViewById(android.R.id.content);//找到id为content的view
    contentParent.removeAllViews();
    LayoutInflater.from(mContext).inflate(resId, contentParent);//通过LayoutInflater直接把我们的布局添加到id为content的布局上
    mOriginalWindowCallback.onContentChanged();
}
完成SubDecor初始化后,我们通过mSubDecor.findViewById(android.R.id.content)找到contentParent,然后直接LayoutInflater.from(mContext).inflate(resId, contentParent)将布局添加到了contentParent上完成了布局的添加。
那么对于第一和第二个问题则必须在LayoutInflater.inflate()中寻找答案了,而第三个问题我们已经可以回答了
创建的View添加到了哪?
答:添加到了id为
android.R.id.content的view上。
LayoutInflater.inflate()
接下来我们看下inflate()是如何将我们的布局添加到id为content的view上的。
    //LayoutInflater.java
    public View inflate(@LayoutRes int resource, @Nullable ViewGroup root) {
            return inflate(resource, root, root != null);
    }

    public View inflate(@LayoutRes int resource, @Nullable ViewGroup root, boolean attachToRoot) {
		...
        final XmlResourceParser parser = res.getLayout(resource);//根据资源id创建解析器
        try {
            return inflate(parser, root, attachToRoot);
        } finally {
            parser.close();
        }
    }

    public View inflate(XmlPullParser parser, @Nullable ViewGroup root, boolean attachToRoot) {
        synchronized (mConstructorArgs) {
           	...
            final Context inflaterContext = mContext;
            final AttributeSet attrs = Xml.asAttributeSet(parser);
            Context lastContext = (Context) mConstructorArgs[0];
            mConstructorArgs[0] = inflaterContext;
            View result = root;

            try {
                // Look for the root node.
                int type;
                while ((type = parser.next()) != XmlPullParser.START_TAG &&
                        type != XmlPullParser.END_DOCUMENT) {//拿到第一个节点
                    // Empty
                }

                if (type != XmlPullParser.START_TAG) {//如果不是开始标签报错
                    throw new InflateException(parser.getPositionDescription()
                            + ": No start tag found!");
                }

                final String name = parser.getName();//拿到节点名字
                if (TAG_MERGE.equals(name)) {//merge单独处理
                    if (root == null || !attachToRoot) {
                        throw new InflateException("<merge /> can be used only with a valid "
                                + "ViewGroup root and attachToRoot=true");
                    }

                    rInflate(parser, root, inflaterContext, attrs, false);
                } else {//通用逻辑处理
                    // Temp is the root view that was found in the xml
                    final View temp = createViewFromTag(root, name, inflaterContext, attrs);//创建xml中根布局
                    ViewGroup.LayoutParams params = null;

                    if (root != null) {
                        if (DEBUG) {
                            System.out.println("Creating params from root: " +
                                    root);
                        }
                        // Create layout params that match root, if supplied
                        params = root.generateLayoutParams(attrs);//根据父布局创建xml中根布局的lp,因为自己的lp是跟父布局有关的。
                        if (!attachToRoot) {//当满足root不为null并且attachToRoot为false则直接将lp设置到temp上
                            // Set the layout params for temp if we are not
                            // attaching. (If we are, we use addView, below)
                            temp.setLayoutParams(params);
                        }
                    }

                    if (DEBUG) {
                        System.out.println("-----> start inflating children");
                    }

                    // Inflate all children under temp against its context.
                    rInflateChildren(parser, temp, attrs, true);//inflate temp的子布局,具体实现就是递归的把view添加到temp上

                    if (DEBUG) {
                        System.out.println("-----> done inflating children");
                    }

                    // We are supposed to attach all the views we found (int temp)
                    // to root. Do that now.
                    if (root != null && attachToRoot) {//如果root不为null 并且 attachToRoot为true则直接add到root上
                        root.addView(temp, params);
                    }

                    // Decide whether to return the root that was passed in or the
                    // top view found in xml.
                    if (root == null || !attachToRoot) {
                        result = temp;
                    }
                }

            } catch (XmlPullParserException e) {
                final InflateException ie = new InflateException(e.getMessage(), e);
                ie.setStackTrace(EMPTY_STACK_TRACE);
                throw ie;
            } catch (Exception e) {
                final InflateException ie = new InflateException(parser.getPositionDescription()
                        + ": " + e.getMessage(), e);
                ie.setStackTrace(EMPTY_STACK_TRACE);
                throw ie;
            } finally {
                // Don't retain static reference on context.
                mConstructorArgs[0] = lastContext;
                mConstructorArgs[1] = null;

                Trace.traceEnd(Trace.TRACE_TAG_VIEW);
            }

            return result;
        }
    }
它是先通过res.getLayout(resource)从布局id拿到解析器对象XmlResourceParser,然后通过createViewFromTag()方法创建根布局,再root.generateLayoutParams(attrs)创建根布局的lp,之后根据root和attachToRoot这两个条件判断是在addView()还是在setLayoutParams()给根布局加上lp,这中间还有一步rInflateChildren()将xml中的子布局依次添加到根布局上。
这中间有些细节值得深究下
createViewFromTag()如何创建布局的(解答第一个问题)root.generateLayoutParams(attrs)如何读取lp相关属性的(解答第二个问题)
我们先看root.generateLayoutParams(attrs),之所以要这样是因为每个view的lp的创建都是跟父布局有关的,比如root是LinearLayout那么创建的就是LinearLayout.LayoutParams并初始化LinearLayout独有的weight和gravity属性,而如果root是RelativeLayout那么创建的是RelativeLayout.LayoutParams并初始化跟各个布局的约束关系。
这里我们可以看下LinearLayout.generateLayoutParams()方法
	//LinearLayout.java
	@Override
    public LayoutParams generateLayoutParams(AttributeSet attrs) {
        return new LinearLayout.LayoutParams(getContext(), attrs);
    }

	//LinearLayout.LayoutParams 内部类
    public static class LayoutParams extends ViewGroup.MarginLayoutParams {
        public LayoutParams(Context c, AttributeSet attrs) {
            super(c, attrs);//这里还调用了父类MarginLayoutParams的构造方
            TypedArray a =
                c.obtainStyledAttributes(attrs, com.android.internal.R.styleable.LinearLayout_Layout);

            weight = a.getFloat(com.android.internal.R.styleable.LinearLayout_Layout_layout_weight, 0);//获取xml中weight属性
            gravity = a.getInt(com.android.internal.R.styleable.LinearLayout_Layout_layout_gravity, -1);//获取layout_gravity属性

            a.recycle();
        }
    }

	//ViewGroup.MarginLayoutParams 内部类 初始化margin属性
    public static class MarginLayoutParams extends ViewGroup.LayoutParams {
        public MarginLayoutParams(Context c, AttributeSet attrs) {
            super();

            TypedArray a = c.obtainStyledAttributes(attrs, R.styleable.ViewGroup_MarginLayout);
            setBaseAttributes(a,
                              R.styleable.ViewGroup_MarginLayout_layout_width,
                              R.styleable.ViewGroup_MarginLayout_layout_height);//调用父类ViewGroup.LayoutParams的setBaseAttributes()读取最基础的宽高属性
            //下面就是读取xml各种margin属性
            int margin = a.getDimensionPixelSize(
                com.android.internal.R.styleable.ViewGroup_MarginLayout_layout_margin, -1);
            if (margin >= 0) {//如果margin大于0则直接用margin属性
                leftMargin = margin;
                topMargin = margin;
                rightMargin= margin;
                bottomMargin = margin;
            } else {//分别读取left、top、right、bottom的margin属性
                int horizontalMargin = a.getDimensionPixelSize(
                    R.styleable.ViewGroup_MarginLayout_layout_marginHorizontal, -1);
                int verticalMargin = a.getDimensionPixelSize(
                    R.styleable.ViewGroup_MarginLayout_layout_marginVertical, -1);

                if (horizontalMargin >= 0) {
                    leftMargin = horizontalMargin;
                    rightMargin = horizontalMargin;
                } else {
                    leftMargin = a.getDimensionPixelSize(
                        R.styleable.ViewGroup_MarginLayout_layout_marginLeft,
                        UNDEFINED_MARGIN);
                    if (leftMargin == UNDEFINED_MARGIN) {
                        mMarginFlags |= LEFT_MARGIN_UNDEFINED_MASK;
                        leftMargin = DEFAULT_MARGIN_RESOLVED;
                    }
                    rightMargin = a.getDimensionPixelSize(
                        R.styleable.ViewGroup_MarginLayout_layout_marginRight,
                        UNDEFINED_MARGIN);
                    if (rightMargin == UNDEFINED_MARGIN) {
                        mMarginFlags |= RIGHT_MARGIN_UNDEFINED_MASK;
                        rightMargin = DEFAULT_MARGIN_RESOLVED;
                    }
                }

                startMargin = a.getDimensionPixelSize(
                    R.styleable.ViewGroup_MarginLayout_layout_marginStart,
                    DEFAULT_MARGIN_RELATIVE);
                endMargin = a.getDimensionPixelSize(
                    R.styleable.ViewGroup_MarginLayout_layout_marginEnd,
                    DEFAULT_MARGIN_RELATIVE);

                if (verticalMargin >= 0) {
                    topMargin = verticalMargin;
                    bottomMargin = verticalMargin;
                } else {
                    topMargin = a.getDimensionPixelSize(
                        R.styleable.ViewGroup_MarginLayout_layout_marginTop,
                        DEFAULT_MARGIN_RESOLVED);
                    bottomMargin = a.getDimensionPixelSize(
                        R.styleable.ViewGroup_MarginLayout_layout_marginBottom,
                        DEFAULT_MARGIN_RESOLVED);
                }

                if (isMarginRelative()) {
                    mMarginFlags |= NEED_RESOLUTION_MASK;
                }
            }

            final boolean hasRtlSupport = c.getApplicationInfo().hasRtlSupport();
            final int targetSdkVersion = c.getApplicationInfo().targetSdkVersion;
            if (targetSdkVersion < JELLY_BEAN_MR1 || !hasRtlSupport) {
                mMarginFlags |= RTL_COMPATIBILITY_MODE_MASK;
            }

            // Layout direction is LTR by default
            mMarginFlags |= LAYOUT_DIRECTION_LTR;

            a.recycle();
        }
    }

	//ViewGroup.LayoutParams 内部类
    public static class LayoutParams {
        protected void setBaseAttributes(TypedArray a, int widthAttr, int heightAttr) {//读取宽高
            width = a.getLayoutDimension(widthAttr, "layout_width");
            height = a.getLayoutDimension(heightAttr, "layout_height");
        }
	}
可以看到LinearLayout.LayoutParams有两层继承关系,LinearLayout.LayoutParams负责拿到LinearLayout的特有属性,ViewGroup.MarginLayoutParams负责拿到margin属性,ViewGroup.LayoutParams负责拿到宽高。一般的ViewGroup基本都是实现自己的lp然后继承ViewGroup.MarginLayoutParams。
这里可以回答我们第二个问题
如何读取xml中View相关属性的?
通过
root.generateLayoutParams(attrs)根据root不同创建不同的LayoutParams读取xml中相关属性
接下来看createViewFromTag()如何创建布局的
    private View createViewFromTag(View parent, String name, Context context, AttributeSet attrs) {
        return createViewFromTag(parent, name, context, attrs, false);//调用创建重载方法
    }

    View createViewFromTag(View parent, String name, Context context, AttributeSet attrs,
            boolean ignoreThemeAttr) {
        try {
            View view;
            //优先尝试通过Factory创建View
            if (mFactory2 != null) {
                view = mFactory2.onCreateView(parent, name, context, attrs);
            } else if (mFactory != null) {
                view = mFactory.onCreateView(name, context, attrs);
            } else {
                view = null;
            }

            //其次通过mPrivateFactory创建,一般情况下是为null的
            if (view == null && mPrivateFactory != null) {
                view = mPrivateFactory.onCreateView(parent, name, context, attrs);
            }
			//上面两种方式都创建失败了
            if (view == null) {
                final Object lastContext = mConstructorArgs[0];
                mConstructorArgs[0] = context;
                try {
                    if (-1 == name.indexOf('.')) {//如果view的名字中不带'.',其实就是系统控件,类似TextView这种我们在xml写的时候不是全类名。
                        view = onCreateView(parent, name, attrs);//创建系统控件
                    } else {//全类名控件的创建分支,一般都是自定义控件
                        view = createView(name, null, attrs);//创建自定义控件
                    }
                } finally {
                    mConstructorArgs[0] = lastContext;
                }
            }

            return view;
        } catch (InflateException e) {
            throw e;

        } catch (ClassNotFoundException e) {
            final InflateException ie = new InflateException(attrs.getPositionDescription()
                    + ": Error inflating class " + name, e);
            ie.setStackTrace(EMPTY_STACK_TRACE);
            throw ie;

        } catch (Exception e) {
            final InflateException ie = new InflateException(attrs.getPositionDescription()
                    + ": Error inflating class " + name, e);
            ie.setStackTrace(EMPTY_STACK_TRACE);
            throw ie;
        }
    }
代码中可以看出布局的创建是先用Factory2和Factory,如果创建失败在通过mPrivateFactory,如果还是失败则通过onCreateView()或者createView()方法创建。Factory我们稍后说,mPrivateFactory一般为null我们暂且忽略。
我们先看onCreateView()或者createView()
    protected View onCreateView(View parent, String name, AttributeSet attrs)
            throws ClassNotFoundException {//创建系统控件
        return onCreateView(name, attrs);
    }

    protected View onCreateView(String name, AttributeSet attrs)
            throws ClassNotFoundException {
        return createView(name, "android.view.", attrs);//给系统控件加上全类名前缀"android.view."
    }

	//最终都是通过createView创建View
    public final View createView(String name, String prefix, AttributeSet attrs)
            throws ClassNotFoundException, InflateException {
        Constructor<? extends View> constructor = sConstructorMap.get(name);//获取缓存的Constructor
        Class<? extends View> clazz = null;

        try {
            Trace.traceBegin(Trace.TRACE_TAG_VIEW, name);

            if (constructor == null) {
                // Class not found in the cache, see if it's real, and try to add it
                clazz = mContext.getClassLoader().loadClass(
                        prefix != null ? (prefix + name) : name).asSubclass(View.class);//拿到name对应的class

                if (mFilter != null && clazz != null) {
                    boolean allowed = mFilter.onLoadClass(clazz);
                    if (!allowed) {
                        failNotAllowed(name, prefix, attrs);
                    }
                }
                constructor = clazz.getConstructor(mConstructorSignature);//拿到View的构造方法
                constructor.setAccessible(true);
                sConstructorMap.put(name, constructor);//缓存
            } else {
                // If we have a filter, apply it to cached constructor
                if (mFilter != null) {
                    // Have we seen this name before?
                    Boolean allowedState = mFilterMap.get(name);
                    if (allowedState == null) {
                        // New class -- remember whether it is allowed
                        clazz = mContext.getClassLoader().loadClass(
                                prefix != null ? (prefix + name) : name).asSubclass(View.class);

                        boolean allowed = clazz != null && mFilter.onLoadClass(clazz);
                        mFilterMap.put(name, allowed);
                        if (!allowed) {
                            failNotAllowed(name, prefix, attrs);
                        }
                    } else if (allowedState.equals(Boolean.FALSE)) {
                        failNotAllowed(name, prefix, attrs);
                    }
                }
            }

            Object lastContext = mConstructorArgs[0];
            if (mConstructorArgs[0] == null) {
                // Fill in the context if not already within inflation.
                mConstructorArgs[0] = mContext;
            }
            Object[] args = mConstructorArgs;
            args[1] = attrs;

            final View view = constructor.newInstance(args);//通过反射创建View
            if (view instanceof ViewStub) {
                // Use the same context when inflating ViewStub later.
                final ViewStub viewStub = (ViewStub) view;
                viewStub.setLayoutInflater(cloneInContext((Context) args[0]));
            }
            mConstructorArgs[0] = lastContext;
            return view;

        } catch (NoSuchMethodException e) {
            final InflateException ie = new InflateException(attrs.getPositionDescription()
                    + ": Error inflating class " + (prefix != null ? (prefix + name) : name), e);
            ie.setStackTrace(EMPTY_STACK_TRACE);
            throw ie;

        } catch (ClassCastException e) {
            // If loaded class is not a View subclass
            final InflateException ie = new InflateException(attrs.getPositionDescription()
                    + ": Class is not a View " + (prefix != null ? (prefix + name) : name), e);
            ie.setStackTrace(EMPTY_STACK_TRACE);
            throw ie;
        } catch (ClassNotFoundException e) {
            // If loadClass fails, we should propagate the exception.
            throw e;
        } catch (Exception e) {
            final InflateException ie = new InflateException(
                    attrs.getPositionDescription() + ": Error inflating class "
                            + (clazz == null ? "<unknown>" : clazz.getName()), e);
            ie.setStackTrace(EMPTY_STACK_TRACE);
            throw ie;
        } finally {
            Trace.traceEnd(Trace.TRACE_TAG_VIEW);
        }
    }
可以看到如果Factory和Factory2创建View失败则会通过反射的方式创建View。
那么Factory和Factory2是在何时设置的呢,其实是在Activity的onCreate()
public class AppCompatActivity extends FragmentActivity implements AppCompatCallback,
        TaskStackBuilder.SupportParentable, ActionBarDrawerToggle.DelegateProvider {

    @Override
    protected void onCreate(@Nullable Bundle savedInstanceState) {
        final AppCompatDelegate delegate = getDelegate();
        delegate.installViewFactory();//拿到委托对象调用installViewFactory()设置factory
        super.onCreate(savedInstanceState);
    }
}
最后是调到AppCompatDelegateImplV9的installViewFactory()
    @Override
    public void installViewFactory() {
        LayoutInflater layoutInflater = LayoutInflater.from(mContext);//拿到LayoutInflater
        if (layoutInflater.getFactory() == null) {//如果Factory为空
            LayoutInflaterCompat.setFactory2(layoutInflater, this);//设置Fractory2
        } else {
            if (!(layoutInflater.getFactory2() instanceof AppCompatDelegateImplV9)) {
                Log.i(TAG, "The Activity's LayoutInflater already has a Factory installed"
                        + " so we can not install AppCompat's");
            }
        }
    }
这里有人可能会问明明是setFactory2()为何要判断layoutInflater.getFactory() == null,这里解释下,无论Factory还是Factory2都只是提供给我们一个可以根据xml中标签名字生成View的接口,而Factory2是继承的Factory,只是比Factory多一个方法,支持创建View时添加父布局参数,并且因为Factory2是继承Factory所以无论是setFactory2()或者setFactory()都会给Factory赋值,所以我们只需要判断layoutInflater.getFactory() == null就可以知道是否设置过。并且setFactory()也只能设置一次,多次次设置会报错的。
    public interface Factory {
        public View onCreateView(String name, Context context, AttributeSet attrs);
    }

    public interface Factory2 extends Factory {
        public View onCreateView(View parent, String name, Context context, AttributeSet attrs);//多一个View parent参数的方法
    }

    public final Factory getFactory() {
        return mFactory;
    }

    public void setFactory2(Factory2 factory) {
        if (mFactorySet) {//判断是否设置过了
            throw new IllegalStateException("A factory has already been set on this LayoutInflater");
        }
        if (factory == null) {
            throw new NullPointerException("Given factory can not be null");
        }
        mFactorySet = true;//设置标记为置为true
        if (mFactory == null) {
            mFactory = mFactory2 = factory;//给mFactory和mFactory2都赋值
        } else {
            mFactory = mFactory2 = new FactoryMerger(factory, factory, mFactory, mFactory2);
        }
    }

    public void setFactory(Factory factory) {
        if (mFactorySet) {//判断是否设置过了
            throw new IllegalStateException("A factory has already been set on this LayoutInflater");
        }
        if (factory == null) {
            throw new NullPointerException("Given factory can not be null");
        }
        mFactorySet = true;//设置标记为置为true
        if (mFactory == null) {
            mFactory = factory;//给mFactory赋值
        } else {
            mFactory = new FactoryMerger(factory, null, mFactory, mFactory2);
        }
    }
从代码上也印证了上面的结论。接下来回到AppCompatDelegateImplV9的installViewFactory()
    @Override
    public void installViewFactory() {
        LayoutInflater layoutInflater = LayoutInflater.from(mContext);//拿到LayoutInflater
        if (layoutInflater.getFactory() == null) {//如果Factory为空
            LayoutInflaterCompat.setFactory2(layoutInflater, this);//设置Fractory2
        } else {
            if (!(layoutInflater.getFactory2() instanceof AppCompatDelegateImplV9)) {
                Log.i(TAG, "The Activity's LayoutInflater already has a Factory installed"
                        + " so we can not install AppCompat's");
            }
        }
    }

	//LayoutInflaterCompat.setFactory2()
    public static void setFactory2(
            @NonNull LayoutInflater inflater, @NonNull LayoutInflater.Factory2 factory) {
        IMPL.setFactory2(inflater, factory);
    }

    static final LayoutInflaterCompatBaseImpl IMPL;
    static {
        if (Build.VERSION.SDK_INT >= 21) {
            IMPL = new LayoutInflaterCompatApi21Impl();//impl具体实现类
        } else {
            IMPL = new LayoutInflaterCompatBaseImpl();
        }
    }

    @RequiresApi(21)
    static class LayoutInflaterCompatApi21Impl extends LayoutInflaterCompatBaseImpl {
        @SuppressWarnings("deprecation")
        @Override
        public void setFactory(LayoutInflater inflater, LayoutInflaterFactory factory) {
            inflater.setFactory2(factory != null ? new Factory2Wrapper(factory) : null);
        }

        @Override
        public void setFactory2(LayoutInflater inflater, LayoutInflater.Factory2 factory)	{
            inflater.setFactory2(factory);//最终还是调的LayoutInflater.setFactory2()
        }
    }
可以看到LayoutInflaterCompat.setFactory2(layoutInflater, this)传入的第二个参数Factory2是this,那么我们看下AppCompatDelegateImplV9如何实现的。
    @Override
    public final View onCreateView(View parent, String name, Context context, AttributeSet attrs) {
        final View view = callActivityOnCreateView(parent, name, context, attrs);//先调用activity的onCreateView()一般情况下我们都没实现该方法所以返回值为null
        if (view != null) {
            return view;
        }

        return createView(parent, name, context, attrs);//所以创建View的方法在此
    }

    @Override
    public View onCreateView(String name, Context context, AttributeSet attrs) {//调用onCreateView(View parent, String name, Context context, AttributeSet attrs)
        return onCreateView(null, name, context, attrs);
    }
我们在看到createView()方法
    @Override
    public View createView(View parent, final String name, @NonNull Context context,
            @NonNull AttributeSet attrs) {
        //根据各种条件创建AppCompatViewInflater
        if (mAppCompatViewInflater == null) {
            TypedArray a = mContext.obtainStyledAttributes(R.styleable.AppCompatTheme);
            String viewInflaterClassName =
                    a.getString(R.styleable.AppCompatTheme_viewInflaterClass);
            if ((viewInflaterClassName == null)
                    || AppCompatViewInflater.class.getName().equals(viewInflaterClassName)) {
                mAppCompatViewInflater = new AppCompatViewInflater();//创建AppCompatViewInflater
            } else {
                try {
                    Class viewInflaterClass = Class.forName(viewInflaterClassName);
                    mAppCompatViewInflater =
                            (AppCompatViewInflater) viewInflaterClass.getDeclaredConstructor()
                                    .newInstance();//创建AppCompatViewInflater
                } catch (Throwable t) {
                    Log.i(TAG, "Failed to instantiate custom view inflater "
                            + viewInflaterClassName + ". Falling back to default.", t);
                    mAppCompatViewInflater = new AppCompatViewInflater();//创建AppCompatViewInflater
                }
            }
        }

        return mAppCompatViewInflater.createView(parent, name, context, attrs, inheritContext,
                IS_PRE_LOLLIPOP, /* Only read android:theme pre-L (L+ handles this anyway) */
                true, /* Read read app:theme as a fallback at all times for legacy reasons */
                VectorEnabledTintResources.shouldBeUsed() /* Only tint wrap the context if enabled */
        );//最终调用mAppCompatViewInflater.createView()创建View
    }
最终创建View是通过AppCompatViewInflater的createView()方法
    final View createView(View parent, final String name, @NonNull Context context,
            @NonNull AttributeSet attrs, boolean inheritContext,
            boolean readAndroidTheme, boolean readAppTheme, boolean wrapContext) {
        final Context originalContext = context;

		//拿到context
        if (inheritContext && parent != null) {
            context = parent.getContext();
        }
        if (readAndroidTheme || readAppTheme) {
            // We then apply the theme on the context, if specified
            context = themifyContext(context, attrs, readAndroidTheme, readAppTheme);
        }
        if (wrapContext) {
            context = TintContextWrapper.wrap(context);
        }

        View view = null;

        // We need to 'inject' our tint aware Views in place of the standard framework versions
        switch (name) {//根据标签名字创建对应的View
            case "TextView":
                view = createTextView(context, attrs);
                verifyNotNull(view, name);
                break;
            case "ImageView":
                view = createImageView(context, attrs);
                verifyNotNull(view, name);
                break;
            case "Button":
                view = createButton(context, attrs);
                verifyNotNull(view, name);
                break;
            case "EditText":
                view = createEditText(context, attrs);
                verifyNotNull(view, name);
                break;
            case "Spinner":
                view = createSpinner(context, attrs);
                verifyNotNull(view, name);
                break;
            case "ImageButton":
                view = createImageButton(context, attrs);
                verifyNotNull(view, name);
                break;
            case "CheckBox":
                view = createCheckBox(context, attrs);
                verifyNotNull(view, name);
                break;
            case "RadioButton":
                view = createRadioButton(context, attrs);
                verifyNotNull(view, name);
                break;
            case "CheckedTextView":
                view = createCheckedTextView(context, attrs);
                verifyNotNull(view, name);
                break;
            case "AutoCompleteTextView":
                view = createAutoCompleteTextView(context, attrs);
                verifyNotNull(view, name);
                break;
            case "MultiAutoCompleteTextView":
                view = createMultiAutoCompleteTextView(context, attrs);
                verifyNotNull(view, name);
                break;
            case "RatingBar":
                view = createRatingBar(context, attrs);
                verifyNotNull(view, name);
                break;
            case "SeekBar":
                view = createSeekBar(context, attrs);
                verifyNotNull(view, name);
                break;
            default:
                // The fallback that allows extending class to take over view inflation
                // for other tags. Note that we don't check that the result is not-null.
                // That allows the custom inflater path to fall back on the default one
                // later in this method.
                view = createView(context, name, attrs);
        }

        if (view == null && originalContext != context) {
            // If the original context does not equal our themed context, then we need to manually
            // inflate it using the name so that android:theme takes effect.
            view = createViewFromTag(context, name, attrs);
        }

        if (view != null) {
            // If we have created a view, check its android:onClick
            checkOnClickListener(view, attrs);
        }

        return view;
    }
接下来我们看下createTextView()方法
    @NonNull
    protected AppCompatTextView createTextView(Context context, AttributeSet attrs) {
        return new AppCompatTextView(context, attrs);
    }
看发现了什么,对于xml中的TextView实际创建的是AppCompatTextView,对没错这就是继承AppCompatActivity后他对我们xml中部分布局做了兼容。
到这里View的创建其实就说完了,这里可以回答第一个问题了。
如何根据xml创建View的?
View的创建是在
LayoutInflater.createViewFromTag()方法,依次先用Factory2和Factory创建,如果创建失败在通过mPrivateFactory创建,如果还是失败则通过onCreateView()或者createView()方法创建。
这里我们可以试着自己实现的一个Factory2然后在super.onCreate()之前设置给LayoutInflater将TextView标签解析为一个Button
public class MainActivity extends AppCompatActivity {

    @Override
    protected void onCreate(Bundle savedInstanceState) {
        if (LayoutInflater.from(this).getFactory() == null) {
            LayoutInflater.from(this).setFactory2(new LayoutInflater.Factory2() {
                @Override
                public View onCreateView(View parent, String name, Context context, AttributeSet attrs) {
                    View view = null;
                    switch (name) {
                        case "TextView":
                            view = new Button(context, attrs);
                            break;
                    }
                    return view;
                }

                @Override
                public View onCreateView(String name, Context context, AttributeSet attrs) {
                    return null;
                }
            });
        }
        super.onCreate(savedInstanceState);
        setContentView(R.layout.activity_main);

    }
}
<?xml version="1.0" encoding="utf-8"?>
<FrameLayout xmlns:android="http://schemas.android.com/apk/res/android"
    xmlns:app="http://schemas.android.com/apk/res-auto"
    xmlns:tools="http://schemas.android.com/tools"
    android:layout_width="match_parent"
    android:layout_height="match_parent"
    tools:context=".MainActivity">

    <TextView
        android:layout_width="wrap_content"
        android:layout_height="wrap_content"
        android:text="Hello World!"
        app:layout_constraintBottom_toBottomOf="parent"
        app:layout_constraintLeft_toLeftOf="parent"
        app:layout_constraintRight_toRightOf="parent"
        app:layout_constraintTop_toTopOf="parent" />


</FrameLayout>
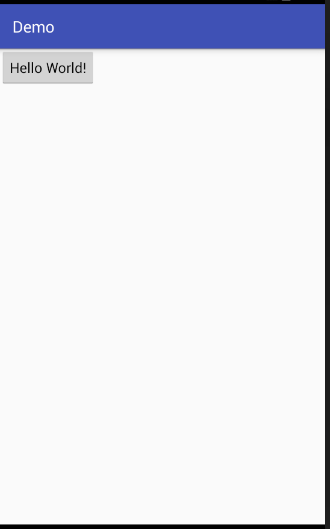
可以看到xml中TextView变成了一个Button。
总结
整体流程用一句话来说就是setContentView完成DecorView相关布局初始化并将我们的布局通过LayoutInflater.inflate()方法添加到id为Content的ViewGroup上。
具体细节的话就是我们前面那个三个问题
-
创建的View添加到了哪?
答:添加到了id为
android.R.id.content的view上。 -
如何读取xml中View相关属性的?
通过
root.generateLayoutParams(attrs)根据root不同创建不同的LayoutParams读取xml中相关属性 -
如何根据xml创建View的?
View的创建是在
LayoutInflater.createViewFromTag()方法,依次先用Factory2和Factory创建,如果创建失败在通过mPrivateFactory创建,如果还是失败则通过onCreateView()或者createView()方法创建。