这里写目录标题
一 前言
自定义View、多线程、网络,被认为是Android开发者必须牢固掌握的最基础的三大基本功。Android View的绘制流程原理又是学好自定义View的理论基础,所以掌握好View的绘制原理是Android开发进阶中无法绕过的一道坎。而关乎到原理性的东西往往又让很多初学者感到难以下手,所以真正掌握的人并不多。本文采用非常浅显的语言,从顺着Android源码的思路,对View的整个绘制流程进行近乎“地毯式搜索”般的方式,对其中的关键流程和知识点进行查证和分析,以图让初级程序员都能轻松读懂。本文最大的特点,就是最大限度地向源码要答案,从源码中追流程的来龙去脉,在注释中查功能的点点滴滴,所有的结论都尽量在源码和注释中找根据。
二 View绘制
2.1 View绘制的三个流程
我们知道,在自定义View的时候一般需要重写父类的onMeasure()、onLayout()、onDraw()三个方法,来完成视图的展示过程。当然,这三个暴露给开发者重写的方法只不过是整个绘制流程的冰山一角,更多复杂的幕后工作,都让系统给代劳了。一个完整的绘制流程包括measure、layout、draw三个步骤,其中:
- measure:测量。系统会先根据xml布局文件和代码中对控件属性的设置,来获取或者计算出每个View和ViewGrop的尺寸,并将这些尺寸保存下来。
- layout:布局。根据测量出的结果以及对应的参数,来确定每一个控件应该显示的位置。
- draw:绘制。确定好位置后,就将这些控件绘制到屏幕上。
2.2 Android视图层次结构简介
在介绍View绘制流程之前,咱们先简单介绍一下Android视图层次结构以及DecorView,因为View的绘制流程的入口和DecorView有着密切的联系。
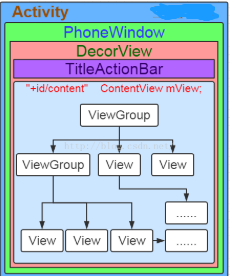
咱们平时看到的视图,其实存在如上的嵌套关系。上图是针对比较老的Android系统版本中制作的,新的版本中会略有出入,还有一个状态栏,但整体上没变。我们平时在Activity中setContentView(…)中对应的layout内容,对应的是上图中ViewGrop的树状结构,实际上添加到系统中时,会再裹上一层FrameLayout,就是上图中最里面的浅蓝色部分了。

这里咱们再通过一个实例来继续查看。AndroidStudio工具中提供了一个布局视察器工具,通过Tools > Android > Layout Inspector可以查看具体某个Activity的布局情况。下图中,左边树状结构对应了右边的可视图,可见DecorView是整个界面的根视图,对应右边的红色框,是整个屏幕的大小。黄色边框为状态栏部分;那个绿色边框中有两个部分,一个是白框中的ActionBar,对应了上图中紫色部分的TitleActionBar部分,即标题栏,平时咱们可以在Activity中将其隐藏掉;另外一个蓝色边框部分,对应上图中最里面的蓝色部分,即ContentView部分。下图中左边有两个蓝色框,上面那个中有个“contain_layout”,这个就是Activity中setContentView中设置的layout.xml布局文件中的最外层父布局,咱们能通过layout布局文件直接完全操控的也就是这一块,当其被add到视图系统中时,会被系统裹上ContentFrameLayout(显然是FrameLayout的子类),这也就是为什么添加layout.xml视图的方法叫setContentView(…)而不叫setView(…)的原因。
三 View绘制流程
3.1 DecorView的创建(setContentView)
我们知道Activity中的PhoneWindow对象帮我们创建了一个PhoneWindow内部类DecorView(父类为FrameLayout)窗口顶层视图,
然后通过LayoutInflater将xml内容布局解析成View树形结构添加到DecorView顶层视图中id为content的FrameLayout父容器上面。到此,我们已经知道Activity的content内容布局最终
会添加到DecorView窗口顶层视图上面,相信很多人也会有这样的疑惑:窗口顶层视图DecorView是怎么绘制到我们的手机屏幕上的呢?
这篇博客来尝试着分析DecorView的绘制流程。
首先来看一下Activity中setContentView源码:
public void setContentView(@LayoutRes int layoutResID) {


    getWindow().setContentView(layoutResID);
    initWindowDecorActionBar();
}
从代码可以看出, Activity的 setContentView实质是将 View传递到 Window的 setContentView()方法中, Window的 setContenView会在内部调用 installDecor()方法创建 DecorView,看一下它的部分源码:
public void setContentView(int layoutResID) {
        if (mContentParent == null) {


            //初始化DecorView以及其内部的content
            installDecor();
        } else if (!hasFeature(FEATURE_CONTENT_TRANSITIONS)) {


            mContentParent.removeAllViews();
        }
        if (hasFeature(FEATURE_CONTENT_TRANSITIONS)) {


        ...............
        } else {


            //将contentView加载到DecorVoew当中
            mLayoutInflater.inflate(layoutResID, mContentParent);
        }
        ...............
    }
  private void installDecor() {


        ...............
        if (mDecor == null) {


            //实例化DecorView
            mDecor = generateDecor(-1);
            ...............
            }
        } else {


            mDecor.setWindow(this);
        }
       if (mContentParent == null) {


            //获取Content
            mContentParent = generateLayout(mDecor);
       }
        ...............
 }
 protected DecorView generateDecor(int featureId) {


        ...............
        return new DecorView(context, featureId, this, getAttributes());
 }
通过 generateDecor()new一个 DecorView,然后调用 generateLayout()获取 DecorView中 content,最终通过 inflate将 Activity视图添加到 DecorView中的 content中,但此时 DecorView还未被添加到 Window中。添加操作需要借助 ViewRootImpl。
ViewRootImpl的作用是用来衔接 WindowManager和 DecorView,在 Activity被创建后会通过 WindowManager将 DecorView添加到 PhoneWindow中并且创建 ViewRootImpl实例,随后将 DecorView与 ViewRootImpl进行关联,最终通过执行 ViewRootImpl的 performTraversals()开启整个View树的绘制。
3.2 顶层视图DecorView添加到窗口的过程

DecorView是怎么添加到窗口的呢?这时候我们不得不从Activity是怎么启动的说起,当Activity初始化 Window和将布局添加到

PhoneWindow的内部类DecorView类之后,ActivityThread类会调用handleResumeActivity方法将顶层视图DecorView添加到PhoneWindow窗口,来看看handlerResumeActivity方法的实现:
final void handleResumeActivity(IBinder token,
            boolean clearHide, boolean isForward, boolean reallyResume) {


            ..................

            if (r.window == null && !a.mFinished && willBeVisible) {


                // //跟踪代码后发现其初始赋值为mWindow = new PhoneWindow(this, window, activityConfigCallback);
                r.window = r.activity.getWindow();
                //获得当前phoneWindow内部类DecorView对象
                View decor = r.window.getDecorView();
                //设置窗口顶层视图DecorView可见度
                decor.setVisibility(View.INVISIBLE);
                //得当当前Activity的WindowManagerImpl对象
                ViewManager wm = a.getWindowManager();
                WindowManager.LayoutParams l = r.window.getAttributes();
                a.mDecor = decor;
                l.type = WindowManager.LayoutParams.TYPE_BASE_APPLICATION;
                l.softInputMode |= forwardBit;
                if (a.mVisibleFromClient) {


                    //标记根布局DecorView已经添加到窗口
                    a.mWindowAdded = true;
                    //将根布局DecorView添加到当前Activity的窗口上面
                    wm.addView(decor, l);   // 1

            .....................
分析:详细步骤以上代码都有详细注释,这里就不一一解释。handlerResumeActivity()方法主要就是通过注释1代码将Activity的顶层视图DecorView添加到窗口视图上。我们来看看WindowManagerImpl类的addView()方法。我们先记一下这个方法的两个参数,这里将DecorView和PhoneWindow窗口的属性传入
源码很简单,ViewManager是一个接口,addView是其中定义个一个空方法,WindowManager是其子类,WindowManagerImpl是WindowManager的实现类(顺便啰嗦一句,这种方式叫做面向接口编程,在父类中定义,在子类中实现,在Java中很常见)。代码中的r.window的值可以根据Activity.java的如下代码得知,其值为PhoneWindow实例。
WindowManagerImpl最终调用的是直接调用了WindowManagerGlobal类中的方法,即 mGlobal对象的addView()方法。继续跟踪。进入WindowManagerGlobal类看addView()方法:
Class WindowManagerGlobal {


.......
public void addView(View view, ViewGroup.LayoutParams params,
            Display display, Window parentWindow) {


        ............

        ViewRootImpl root;
        View panelParentView = null;

        ............

        //获得ViewRootImpl对象root
         root = new ViewRootImpl(view.getContext(), display);

        ...........

        // do this last because it fires off messages to start doing things
        try {


            //将传进来的参数DecorView设置到root中
            root.setView(view, wparams, panelParentView);
        } catch (RuntimeException e) {


          ...........
        }
    }
    .......
}
该方法中创建了一个ViewRootImpl对象root,然后调用ViewRootImpl类中的setView成员方法()。继续跟踪代码进入ViewRootImpl类分析:
Class ViewRootImpl {


.....
 public void setView(View view, WindowManager.LayoutParams attrs, View panelParentView) {


        synchronized (this) {


            if (mView == null) {


            //将顶层视图DecorView赋值给全局的mView
                mView = view;
            .............
            //标记已添加DecorView
             mAdded = true;
            .............
            //请求布局
            requestLayout();

            .............
        }
 }
}
该方法实现有点长,我省略了其他代码,直接看以上几行代码:
- 将外部参数DecorView赋值给mView成员变量
- 标记DecorView已添加到ViewRootImpl
- 调用requestLayout方法请求布局
3.3 ViewRootImpl(DecorView与window沟通的桥梁)
3.3.1 执行流程
ok,终于到了我们常见的requestLayout()方法了,我们来看看:
Class ViewRootImpl {


........


@Override
    public void requestLayout() {


        if (!mHandlingLayoutInLayoutRequest) {


            checkThread();
            mLayoutRequested = true;
            scheduleTraversals();
        }
    }
    ................

void scheduleTraversals() {


        if (!mTraversalScheduled) {


            mTraversalScheduled = true;
            mTraversalBarrier = mHandler.getLooper().postSyncBarrier();
            mChoreographer.postCallback(
                    Choreographer.CALLBACK_TRAVERSAL, mTraversalRunnable, null);
            if (!mUnbufferedInputDispatch) {


                scheduleConsumeBatchedInput();
            }
            notifyRendererOfFramePending();
        }
    }

..............

final class TraversalRunnable implements Runnable {


        @Override
        public void run() {


            doTraversal();
        }
    }
final TraversalRunnable mTraversalRunnable = new TraversalRunnable();

...............

 void doTraversal() {


        if (mTraversalScheduled) {


            mTraversalScheduled = false;
            mHandler.getLooper().removeSyncBarrier(mTraversalBarrier);

            try {


                performTraversals();
            } finally {


                Trace.traceEnd(Trace.TRACE_TAG_VIEW);
            }
        }
    }
}

............
跟踪代码,最后DecorView的绘制会进入到ViewRootImpl类中的performTraversals()成员方法,这个过程可以参考上面的代码流程图。现在我们主要来分析下 ViewRootImpl类中的performTraversals()方法。

private void performTraversals() {


        // cache mView since it is used so much below...
        //我们在Step3知道,mView就是DecorView根布局
        final View host = mView;
        //在Step3 成员变量mAdded赋值为true,因此条件不成立
        if (host == null || !mAdded)
            return;
        //是否正在遍历
        mIsInTraversal = true;
        //是否马上绘制View
        mWillDrawSoon = true;

        .............
        //顶层视图DecorView所需要窗口的宽度和高度
        int desiredWindowWidth;
        int desiredWindowHeight;

        .....................
        //在构造方法中mFirst已经设置为true,表示是否是第一次绘制DecorView
        if (mFirst) {


            mFullRedrawNeeded = true;
            mLayoutRequested = true;
            //如果窗口的类型是有状态栏的,那么顶层视图DecorView所需要窗口的宽度和高度就是除了状态栏
            if (lp.type == WindowManager.LayoutParams.TYPE_STATUS_BAR_PANEL
                    || lp.type == WindowManager.LayoutParams.TYPE_INPUT_METHOD) {


                // NOTE -- system code, won't try to do compat mode.
                Point size = new Point();
                mDisplay.getRealSize(size);
                desiredWindowWidth = size.x;
                desiredWindowHeight = size.y;
            } else {

    //否则顶层视图DecorView所需要窗口的宽度和高度就是整个屏幕的宽高
                DisplayMetrics packageMetrics =
                    mView.getContext().getResources().getDisplayMetrics();
                desiredWindowWidth = packageMetrics.widthPixels;
                desiredWindowHeight = packageMetrics.heightPixels;
            }
    }
............
//获得view宽高的测量规格,mWidth和mHeight表示窗口的宽高,
//lp.widthhe和lp.height表示DecorView根布局宽和高
 int childWidthMeasureSpec = getRootMeasureSpec(mWidth, lp.width);
 int childHeightMeasureSpec = getRootMeasureSpec(mHeight, lp.height);

  // Ask host how big it wants to be
  //执行测量操作
  performMeasure(childWidthMeasureSpec, childHeightMeasureSpec);

........................
//执行布局操作
 performLayout(lp, desiredWindowWidth, desiredWindowHeight);

.......................
//执行绘制操作
performDraw();

}
上述代码中就是一个完成的绘制流程,对应上了第一节中提到的三个步骤:
- performMeasure():从根节点向下遍历View树,完成所有ViewGroup和View的测量工作,计算出所有ViewGroup和View显示出来需要的高度和宽度;
- performLayout():从根节点向下遍历View树,完成所有ViewGroup和View的布局计算工作,根据测量出来的宽高及自身属性,计算出所有ViewGroup和View显示在屏幕上的区域;
- performDraw():从根节点向下遍历View树,完成所有ViewGroup和View的绘制工作,根据布局过程计算出的显示区域,将所有View的当前需显示的内容画到屏幕上。
咱们后续就是通过对这三个方法来展开研究整个绘制过程。
3.4 measure过程分析
这三个绘制流程中,measure是最复杂的,这里会花较长的篇幅来分析它。本节会先介绍整个流程中很重要的两个类MeasureSpec和ViewGroup.LayoutParams类,然后介绍ViewRootImpl、View及ViewGroup中测量流程涉及到的重要方法,最后简单梳理DecorView测量的整个流程并链接一个测量实例分析整个测量过程。
3.4.1 MeasureSpec和ViewGroup.LayoutParams**类
MeasureSpec :
  public static class MeasureSpec {


29         private static final int MODE_SHIFT = 30;
30         private static final int MODE_MASK  = 0x3 << MODE_SHIFT;
31         ......
32         /**
33          * Measure specification mode: The parent has not imposed any constraint
34          * on the child. It can be whatever size it wants.
35          */
36         public static final int UNSPECIFIED = 0 << MODE_SHIFT;
37
38         /**
39          * Measure specification mode: The parent has determined an exact size
40          * for the child. The child is going to be given those bounds regardless
41          * of how big it wants to be.
42          */
43         public static final int EXACTLY     = 1 << MODE_SHIFT;
44
45         /**
46          * Measure specification mode: The child can be as large as it wants up
47          * to the specified size.
48          */
49         public static final int AT_MOST     = 2 << MODE_SHIFT;
50         ......
51        /**
52          * Creates a measure specification based on the supplied size and mode.
53          *......
54          *@return the measure specification based on size and mode
55          */
56         public static int makeMeasureSpec(@IntRange(from = 0, to = (1 << MeasureSpec.MODE_SHIFT) - 1) int size,
57                                           @MeasureSpecMode int mode) {


58             if (sUseBrokenMakeMeasureSpec) {


59                 return size + mode;
60             } else {


61                 return (size & ~MODE_MASK) | (mode & MODE_MASK);
62             }
63             ......
64
65         }
66         ......
67         /**
68          * Extracts the mode from the supplied measure specification.
69          *......
70          */
71         @MeasureSpecMode
72         public static int getMode(int measureSpec) {


73             //noinspection ResourceType
74             return (measureSpec & MODE_MASK);
75         }
76
77         /**
78          * Extracts the size from the supplied measure specification.
79          *......
80          * @return the size in pixels defined in the supplied measure specification
81          */
82         public static int getSize(int measureSpec) {


83             return (measureSpec & ~MODE_MASK);
84         }
85         ......
86 }
-
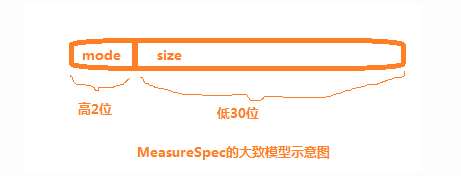
MeasureSpec概括了从父布局传递给子view布局要求。每一个MeasureSpec代表了宽度或者高度要求,它由size(尺寸)和mode(模式)组成。
-
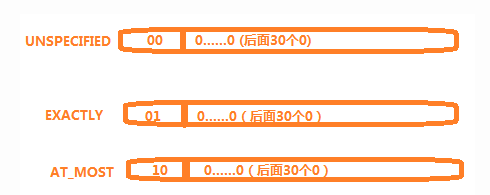
有三种可能的mode:UNSPECIFIED、EXACTLY、AT_MOST
-
UNSPECIFIED:未指定尺寸模式。父布局没有对子view强加任何限制。它可以是任意想要的尺寸。(笔者注:这个在工作中极少碰到,据说一般在系统中才会用到,后续会讲得很少)
-
EXACTLY:精确值模式。父布局决定了子view的准确尺寸。子view无论想设置多大的值,都将限定在那个边界内。(笔者注:也就是layout_width属性和layout_height属性为具体的数值,如50dp,或者设置为match_parent,设置为match_parent时也就明确为和父布局有同样的尺寸,所以这里不要以为笔者搞错了。当明确为精确的尺寸后,其也就被给定了一个精确的边界)
-
AT_MOST:最大值模式。子view可以一直大到指定的值。(笔者注:也就是其宽高属性设置为wrap_content,那么它的最大值也不会超过父布局给定的值,所以称为最大值模式)
-
MeasureSpec被实现为int型来减少对象分配。该类用于将size和mode元组装包和拆包到int中。(笔者注:也就是将size和mode组合或者拆分为int型数据)
-
分析代码可知,一个MeasureSpec的模式如下所示,int长度为32位置,高2位表示mode,后30位用于表示size
-
UNSPECIFIED、EXACTLY、AT_MOST这三个mode的示意图如下所示:
-
makeMeasureSpec(int mode,int size)用于将mode和size打包成一个int型的MeasureSpec。
-
getSize(int measureSpec)方法用于从指定的measureSpec值中获取其size。
-
getMode(int measureSpec)方法用户从指定的measureSpec值中获取其mode。
ViewGroup.LayoutParams
23     public static class LayoutParams {


24         ......
25
26         /**
27          * Special value for the height or width requested by a View.
28          * MATCH_PARENT means that the view wants to be as big as its parent,
29          * minus the parent's padding, if any. Introduced in API Level 8.
30          */
31         public static final int MATCH_PARENT = -1;
32
33         /**
34          * Special value for the height or width requested by a View.
35          * WRAP_CONTENT means that the view wants to be just large enough to fit
36          * its own internal content, taking its own padding into account.
37          */
38         public static final int WRAP_CONTENT = -2;
39
40         /**
41          * Information about how wide the view wants to be. Can be one of the
42          * constants FILL_PARENT (replaced by MATCH_PARENT
43          * in API Level 8) or WRAP_CONTENT, or an exact size.
44          */
45         public int width;
46
47         /**
48          * Information about how tall the view wants to be. Can be one of the
49          * constants FILL_PARENT (replaced by MATCH_PARENT
50          * in API Level 8) or WRAP_CONTENT, or an exact size.
51          */
52         public int height;
53         ......
54 }
这对其中重要的信息做一些翻译和整理:
- LayoutParams被view用于告诉它们的父布局它们想要怎样被布局。(笔者注:字面意思就是布局参数)
- 该LayoutParams基类仅仅描述了view希望宽高有多大。对于每一个宽或者高,可以指定为以下三种值中的一个:MATCH_PARENT,WRAP_CONTENT,an
exact
number。(笔者注:FILL_PARENT从API8开始已经被MATCH_PARENT取代了,所以下文就只提MATCH_PARENT) - MATCH_PARENT:意味着该view希望和父布局尺寸一样大,如果父布局有padding,则要减去该padding值。
- WRAP_CONTENT:意味着该view希望其大小为仅仅足够包裹住其内容即可,如果自己有padding,则要加上该padding值。
- 对ViewGroup不同的子类,也有相应的LayoutParams子类。
- 其width和height属性对应着layout_width和layout_height属性。
3.4.2 View测量的基本流程及重要方法分析
(1)getRootMeasureSpec()
Ok,我们继续回到源码中来
从performTraversals方法我们可以看到,在执行performMeasure测量之前要通过getRootMeasureSpec方法获得顶层视图DecorView的测量规格,跟踪代码进入getRootMeasureSpec()方法:
 private static int getRootMeasureSpec(int windowSize, int rootDimension) {


        int measureSpec;
        switch (rootDimension) {


        //匹配父容器时,测量模式为MeasureSpec.EXACTLY,测量大小直接为屏幕的大小,也就是充满真个屏幕
        case ViewGroup.LayoutParams.MATCH_PARENT:
            // Window can't resize. Force root view to be windowSize.
            measureSpec = MeasureSpec.makeMeasureSpec(windowSize, MeasureSpec.EXACTLY);
            break;
        //包裹内容时,测量模式为MeasureSpec.AT_MOST,测量大小直接为屏幕大小,也就是充满真个屏幕
        case ViewGroup.LayoutParams.WRAP_CONTENT:
            // Window can resize. Set max size for root view.
            measureSpec = MeasureSpec.makeMeasureSpec(windowSize, MeasureSpec.AT_MOST);
            break;
        //其他情况时,测量模式为MeasureSpec.EXACTLY,测量大小为DecorView顶层视图布局设置的大小。
        default:
            // Window wants to be an exact size. Force root view to be that size.
            measureSpec = MeasureSpec.makeMeasureSpec(rootDimension, MeasureSpec.EXACTLY);
            break;
        }
        return measureSpec;
    }
分析:该方法主要作用是在整个窗口的基础上计算出root view(顶层视图DecorView)的测量规格,该方法的两个参数分别表示:
windowSize:当前手机窗口的有效宽和高,一般都是除了通知栏的屏幕宽和高
rootDimension 根布局DecorView请求的宽和高,由前面的博客我们知道是MATCH_PARENT
由 《从setContentView方法分析Android加载布局流程》可知,我们的DecorView根布局宽和高都是MATCH_PARENT,
因此DecorView根布局的测量模式就是MeasureSpec.EXACTLY,测量大小一般都是整个屏幕大小,所以一般我们的Activity
窗口都是全屏的。因此上面代码走第一个分支,通过调用MeasureSpec.makeMeasureSpec方法将
DecorView的测量模式和测量大小封装成DecorView的测量规格。
(2)mView.measure():
我们重点来分析performMeasure()中的这段代码:
1 //=============ViewRootImpl.java==============
2 private void performMeasure(int childWidthMeasureSpec, int childHeightMeasureSpec) {


3        ......
4        mView.measure(childWidthMeasureSpec, childHeightMeasureSpec);
5        ......
6 }
看到这里,是不是有些似曾相识呢?在第二节的绘制流程中提到过,这里setView的参数view和attrs是ActivityThread类中addView方法传递过来的,所以咱们这里可以确定mView指的是DecorView了。上述performMeasure()中,其实就是DecorView在执行measure()操作。如果您这存在“mView不是View类型的吗,怎么会指代DecorView作为整个View体系的根view呢”这样的疑惑,那这里就啰嗦一下DecorView extends FrameLayout extends ViewGroup extends View,通过这个继承链可以看到,DecorView是一个容器,但ViewGroup也是View的子类,View是所有控件的基类,所以这里View类型的mView指代DecorView是没毛病的。
尽管mView就是DecorView,但是由于measure()方法是final型的,View子类都不能重写该方法,所以这里追踪measure()的时候就直接进入到View类中了,这里贴出关键流程代码:
Class View {


 1 //===========================View.java===============================
 2 /**
 3      * <p>
 4      * This is called to find out how big a view should be. The parent
 5      * supplies constraint information in the width and height parameters.
 6      * </p>
 7      *
 8      * <p>
 9      * The actual measurement work of a view is performed in
10      * {@link #onMeasure(int, int)}, called by this method. Therefore, only
11      * {@link #onMeasure(int, int)} can and must be overridden by subclasses.
12      * </p>
13      *
14      *
15      * @param widthMeasureSpec Horizontal space requirements as imposed by the
16      *        parent
17      * @param heightMeasureSpec Vertical space requirements as imposed by the
18      *        parent
19      *
20      * @see #onMeasure(int, int)
21      */
22 public final void measure(int widthMeasureSpec, int heightMeasureSpec) {


23       ......
24       // measure ourselves, this should set the measured dimension flag back
25       onMeasure(widthMeasureSpec, heightMeasureSpec);
26       ......
27 }
 }
这里面注释提供了很多信息,这简单翻译并整理一下:
- 该方法被调用,用于找出view应该多大。父布局在witdh和height参数中提供了限制信息;
- 一个view的实际测量工作是在被本方法所调用的onMeasure(int,int)方法中实现的。所以,只有onMeasure(int,int)可以并且必须被子类重写(笔者注:这里应该指的是,ViewGroup的子类必须重写该方法,才能绘制该容器内的子view。如果是自定义一个子控件,extends
View,那么并不是必须重写该方法); - 参数widthMeasureSpec:父布局加入的水平空间要求;
- 参数heightMeasureSpec:父布局加入的垂直空间要求。
系统将其定义为一个final方法,可见系统不希望整个测量流程框架被修改。
(3) onMeasure(widthMeasureSpec, heightMeasureSpec):
在上述方法体内看到onMeasure(int,int)方法时,是否有一丝慰藉呢?终于看到咱们最熟悉的身影了,很亲切吧!咱们编写自定义View时,基本上都会重写的方法!咱们看看其源码:
 1 //===========================View.java===============================
 2 /**
 3      * <p>
 4      * Measure the view and its content to determine the measured width and the
 5      * measured height. This method is invoked by {@link #measure(int, int)} and
 6      * should be overridden by subclasses to provide accurate and efficient
 7      * measurement of their contents.
 8      * </p>
 9      *
10      * <p>
11      * <strong>CONTRACT:</strong> When overriding this method, you
12      * <em>must</em> call {@link #setMeasuredDimension(int, int)} to store the
13      * measured width and height of this view. Failure to do so will trigger an
14      * <code>IllegalStateException</code>, thrown by
15      * {@link #measure(int, int)}. Calling the superclass'
16      * {@link #onMeasure(int, int)} is a valid use.
17      * </p>
18      *
19      * <p>
20      * The base class implementation of measure defaults to the background size,
21      * unless a larger size is allowed by the MeasureSpec. Subclasses should
22      * override {@link #onMeasure(int, int)} to provide better measurements of
23      * their content.
24      * </p>
25      *
26      * <p>
27      * If this method is overridden, it is the subclass's responsibility to make
28      * sure the measured height and width are at least the view's minimum height
29      * and width ({@link #getSuggestedMinimumHeight()} and
30      * {@link #getSuggestedMinimumWidth()}).
31      * </p>
32      *
33      * @param widthMeasureSpec horizontal space requirements as imposed by the parent.
34      *                         The requirements are encoded with
35      *                         {@link android.view.View.MeasureSpec}.
36      * @param heightMeasureSpec vertical space requirements as imposed by the parent.
37      *                         The requirements are encoded with
38      *                         {@link android.view.View.MeasureSpec}.
39      *
40      * @see #getMeasuredWidth()
41      * @see #getMeasuredHeight()
42      * @see #setMeasuredDimension(int, int)
43      * @see #getSuggestedMinimumHeight()
44      * @see #getSuggestedMinimumWidth()
45      * @see android.view.View.MeasureSpec#getMode(int)
46      * @see android.view.View.MeasureSpec#getSize(int)
47      */
48     protected void onMeasure(int widthMeasureSpec, int heightMeasureSpec) {


49         setMeasuredDimension(getDefaultSize(getSuggestedMinimumWidth(), widthMeasureSpec),
50                 getDefaultSize(getSuggestedMinimumHeight(), heightMeasureSpec));
51     }
函数体内也就一句代码而已,注释却写了这么一大堆,可见这个方法的重要性了。这里翻译和整理一下这些注释:
-
测量该view以及它的内容来决定测量的宽度和高度。该方法被measure(int,int)(笔者注:就是前面提到过的那个方法)调用,并且应该被子类重写来提供准确而且有效的对它们的内容的测量。
-
当重写该方法时,您必须调用setMeasuredDimension(int,int)来存储该view测量出的宽和高。如果不这样做将会触发IllegalStateException,由measure(int,int)抛出。调用基类的onMeasure(int,int)方法是一个有效的方法。
-
测量的基类实现默认为背景的尺寸,除非更大的尺寸被MeasureSpec所允许。子类应该重写onMeasure(int,int)方法来提供对内容更好的测量。
-
如果该方法被重写,子类负责确保测量的高和宽至少是该view的mininum高度和mininum宽度值(链接getSuggestedMininumHeight()和getSuggestedMininumWidth());
-
widthMeasureSpec:父布局加入的水平空间要求。该要求被编码到android.view.View.MeasureSpec中。
-
heightMeasureSpec:父布局加入的垂直空间要求。该要求被编码到android.view.View.MeasureSpec中。
注释中最后提到了7个方法,这些方法后面会再分析。注释中花了不少的篇幅对该方法进行说明,但读者恐怕对其中的一些信息表示有些懵吧,比如MeasureSpec是什么,mininum高度和mininum宽度值是怎么回事等,MeasureSpec在本节的开头介绍过,可以回头再看看,其它的后面会作进一步的阐述,到时候咱们再回头来看看这些注释。
注意:容器类控件都是ViewGroup的子类,如FrameLayout、LinearLayout等,都会重写onMeasure方法,根据自己的特性来进行测量;如果是叶子节点view,即最里层的控件,如TextView等,也可能会重写onMeasure方法,所以当流程走到onMeasure(…)时,流程可能就会切到那些重写的onMeasure()方法中去。最后通过从根View到叶子节点的遍历和递归,最终还是会在叶子view中调用setMeasuredDimension(…)来实现最终的测量。
(4)7个方法
/**
     * <p>This method must be called by {@link #onMeasure(int, int)} to store the
     * measured width and measured height. Failing to do so will trigger an
     * exception at measurement time.</p>
     *
     * @param measuredWidth The measured width of this view.  May be a complex
     * bit mask as defined by {@link #MEASURED_SIZE_MASK} and
     * {@link #MEASURED_STATE_TOO_SMALL}.
     * @param measuredHeight The measured height of this view.  May be a complex
     * bit mask as defined by {@link #MEASURED_SIZE_MASK} and
     * {@link #MEASURED_STATE_TOO_SMALL}.
     */

 setMeasuredDimension(
 		getDefaultSize(getSuggestedMinimumWidth(), widthMeasureSpec),
 		getDefaultSize(getSuggestedMinimumHeight(), heightMeasureSpec)
 );

    protected final void setMeasuredDimension(int measuredWidth, int measuredHeight) {


        ......
        setMeasuredDimensionRaw(measuredWidth, measuredHeight);
    }
   protected int getSuggestedMinimumWidth() {


      return (mBackground == null) ?
       mMinWidth:
      max(mMinWidth,mBackground.getMinimumWidth());
    }

 public static int getDefaultSize(int size, int measureSpec) {


         int result = size;
         int specMode = MeasureSpec.getMode(measureSpec);
         int specSize = MeasureSpec.getSize(measureSpec);

         switch (specMode) {


         case MeasureSpec.UNSPECIFIED:
             result = size;
            break;
         case MeasureSpec.AT_MOST:
         case MeasureSpec.EXACTLY:
            result = specSize;
           break;
         }
        return result;
        }
我们先来分析一下传入的两个参数:
measuredWidth:该view被测量出宽度值。
measuredHeight:该view被测量出的高度值。
到这个时候才正式明确提到宽度和高度,通过getDefaultSize(getSuggestedMinimumWidth(), widthMeasureSpec),参数由widthMeasureSpec变成了measuredWidth,即由“父布局加入的水平空间要求”转变为了view的宽度,measuredHeigh也是一样。咱们先继续追踪源码分析width的值:
getSuggestedMinimumWidth():
这个方法是干嘛用的呢?
- 返回建议该view应该使用的最小宽度值。该方法返回了view的最小宽度值和背景的最小宽度值(链接android.graphics.drawable.Drawable#getMinimumWidth())之间的最大值。
- 当在onMeasure(int,int)使用时,调用者应该仍然确保返回的宽度值在父布局的要求之内。
- 返回值:view的建议最小宽度值。
这其中提到的"mininum width“指的是在xml布局文件中该view的“android:minWidth"属性值,“background’s minimum width”值是指“android:background”的宽度。该方法的返回值就是两者之间较大的那一个值,用来作为该view的最小宽度值,现在应该很容易理解了吧,当一个view在layout文件中同时设置了这两个属性时,为了两个条件都满足,自然要选择值大一点的那个了。
getDefaultSize(int size, int measureSpec):
通过本节开头的介绍,您应该对MeasureSpec有了一个比较明确的认识了,再看看getDefaultSize(int size,int measureSpec)方法,就很容易理解了。正如其注释中所说,如果父布局没有施加任何限制,即MeasureSpec的mode为UNSPECIFIED,那么返回值为参数中提供的size值。如果父布局施加了限制,则返回的默认尺寸为保存在参数measureSpec中的specSize值。所以到目前为止,需要绘制的宽和高值就被确定下来了。只是,我们还需要明确这两个值最初是从哪里传过来的,后面我们还会顺藤摸瓜,找到这两个尺寸的出处。
setMeasuredDimensionRaw():
既然宽度值measuredWidth和高度值measuredHeight已经确定下来,我们继续追踪之前的setMeasuredDimension方法,其内部调用了setMeasuredDimensionRaw()方法:
 private void setMeasuredDimensionRaw(int measuredWidth, int measuredHeight) {


    mMeasuredWidth = measuredWidth;
     mMeasuredHeight = measuredHeight;
     ......
 }
到目前为止,View中的成员变量mMeasureWidth和mMeasureHeight就被赋值了,这也就意味着,View的测量就结束了。前面讲onMeasure()方法时介绍过,View子类(包括ViewGroup子类)通常会重写onMeasure(),当阅读FrameLayout、LinearLayout、TextView等重写的onMeasure()方法时,会发现它们最终都会调用setMeasuredDimension() 方法,从而完成测量。
(5) ViewGroup中辅助重写onMeasure的几个重要方法介绍
前面我们介绍的很多方法都是View类中提供的,ViewGroup中也提供了一些方法用于辅助ViewGroup子类容器的测量。这里重点介绍三个方法:measureChild(…)和measureChildWithMargins(…)方法。
measureChild()方法和measureChildWithMargins()方法
 protected void measureChild(View child, int parentWidthMeasureSpec,
             int parentHeightMeasureSpec) {


         final LayoutParams lp = child.getLayoutParams();

         final int childWidthMeasureSpec = getChildMeasureSpec(parentWidthMeasureSpec,
                 mPaddingLeft + mPaddingRight, lp.width);
         final int childHeightMeasureSpec = getChildMeasureSpec(parentHeightMeasureSpec,
                 mPaddingTop + mPaddingBottom, lp.height);

         child.measure(childWidthMeasureSpec, childHeightMeasureSpec);
     }

protected void measureChildWithMargins(View child,
             int parentWidthMeasureSpec, int widthUsed,
             int parentHeightMeasureSpec, int heightUsed) {


         final MarginLayoutParams lp = (MarginLayoutParams) child.getLayoutParams();

        final int childWidthMeasureSpec = getChildMeasureSpec(parentWidthMeasureSpec,
                mPaddingLeft + mPaddingRight + lp.leftMargin + lp.rightMargin
                       + widthUsed, lp.width);
        final int childHeightMeasureSpec = getChildMeasureSpec(parentHeightMeasureSpec,
               mPaddingTop + mPaddingBottom + lp.topMargin + lp.bottomMargin
                        + heightUsed, lp.height);

         child.measure(childWidthMeasureSpec, childHeightMeasureSpec);
     }
对比这两个方法可以发现,它们非常相似,从注释上来看,后者在前者的基础上增加了已经使用的宽高和margin值。其实它们的功能都是一样的,最后都是生成子View的MeasureSpec,并传递给子View继续测量,即最后一句代码child.measure(childWidthMeasureSpec, childHeightMeasureSpec)。
一般根据容器自身的需要来选择其中一个,比如,在FrameLayout和LinearLayout中重写的onMeasure方法中调用的就是后者,而AbsoluteLayout中就是间接地调用的前者。而RelativeLayout中,两者都没有调用,而是自己写了一套方法,不过该方法和后者方法仅略有差别,但基本功能还是一样,读者可以自己去看看它们的源码,这里就不贴出来了。
getChildMeasureSpec()方法:
 1 //==================ViewGroup.java====================
 2  /**
 3      * Does the hard part of measureChildren: figuring out the MeasureSpec to
 4      * pass to a particular child. This method figures out the right MeasureSpec
 5      * for one dimension (height or width) of one child view.
 6      *
 7      * The goal is to combine information from our MeasureSpec with the
 8      * LayoutParams of the child to get the best possible results. For example,
 9      * if the this view knows its size (because its MeasureSpec has a mode of
10      * EXACTLY), and the child has indicated in its LayoutParams that it wants
11      * to be the same size as the parent, the parent should ask the child to
12      * layout given an exact size.
13      *
14      * @param spec The requirements for this view
15      * @param padding The padding of this view for the current dimension and
16      *        margins, if applicable
17      * @param childDimension How big the child wants to be in the current
18      *        dimension
19      * @return a MeasureSpec integer for the child
20      */
21     public static int getChildMeasureSpec(int spec, int padding, int childDimension) {


22         int specMode = MeasureSpec.getMode(spec);
23         int specSize = MeasureSpec.getSize(spec);
24
25         int size = Math.max(0, specSize - padding);
26
27         int resultSize = 0;
28         int resultMode = 0;
29
30         switch (specMode) {


31         // Parent has imposed an exact size on us
32         case MeasureSpec.EXACTLY:
33             if (childDimension >= 0) {


34                 resultSize = childDimension;
35                 resultMode = MeasureSpec.EXACTLY;
36             } else if (childDimension == LayoutParams.MATCH_PARENT) {


37                 // Child wants to be our size. So be it.
38                 resultSize = size;
39                 resultMode = MeasureSpec.EXACTLY;
40             } else if (childDimension == LayoutParams.WRAP_CONTENT) {


41                 // Child wants to determine its own size. It can't be
42                 // bigger than us.
43                 resultSize = size;
44                 resultMode = MeasureSpec.AT_MOST;
45             }
46             break;
47
48         // Parent has imposed a maximum size on us
49         case MeasureSpec.AT_MOST:
50             if (childDimension >= 0) {


51                 // Child wants a specific size... so be it
52                 resultSize = childDimension;
53                 resultMode = MeasureSpec.EXACTLY;
54             } else if (childDimension == LayoutParams.MATCH_PARENT) {


55                 // Child wants to be our size, but our size is not fixed.
56                 // Constrain child to not be bigger than us.
57                 resultSize = size;
58                 resultMode = MeasureSpec.AT_MOST;
59             } else if (childDimension == LayoutParams.WRAP_CONTENT) {


60                 // Child wants to determine its own size. It can't be
61                 // bigger than us.
62                 resultSize = size;
63                 resultMode = MeasureSpec.AT_MOST;
64             }
65             break;
66
67         // Parent asked to see how big we want to be
68         case MeasureSpec.UNSPECIFIED:
69             if (childDimension >= 0) {


70                 // Child wants a specific size... let him have it
71                 resultSize = childDimension;
72                 resultMode = MeasureSpec.EXACTLY;
73             } else if (childDimension == LayoutParams.MATCH_PARENT) {


74                 // Child wants to be our size... find out how big it should
75                 // be
76                 resultSize = View.sUseZeroUnspecifiedMeasureSpec ? 0 : size;
77                 resultMode = MeasureSpec.UNSPECIFIED;
78             } else if (childDimension == LayoutParams.WRAP_CONTENT) {


79                 // Child wants to determine its own size.... find out how
80                 // big it should be
81                 resultSize = View.sUseZeroUnspecifiedMeasureSpec ? 0 : size;
82                 resultMode = MeasureSpec.UNSPECIFIED;
83             }
84             break;
85         }
86         //noinspection ResourceType
87         return MeasureSpec.makeMeasureSpec(resultSize, resultMode);
88     }
们依然先翻译和整理一下开头的注释:
-
处理measureChildren的困难部分:计算出Measure传递给指定的child。该方法计算出一个子view的宽或高的正确MeasureSpec。
-
其目的是组合来自我们MeasureSpec的信息和child的LayoutParams来得到最有可能的结果。比如:如果该view知道它的尺寸(因为它的MeasureSpec的mode为EXACTLY),并且它的child在它的LayoutParams中表示它想和父布局有一样大,那么父布局应该要求该child按照精确的尺寸进行布局。
-
参数spec:对该view的要求(笔者注:父布局对当前child的MeasureSpec要求)
-
参数padding:该view宽/高的padding和margins值,如果可应用的话。
-
参数childDimension:该child在宽/高上希望多大。
-
返回:返回该child的MeasureSpec整数。
如果明白了前文中对MeasureSpec的介绍后,这一部分的代码应该就容易理解了,specMode的三种值,LayoutParams的width和height的三种值,以及和layout_width、layout_height之间的关对应关系,在文章的开头已经介绍过了,不明白的可以再回头复习一下。specMode和specSize分别是父布局传下来的要求,size的值是父布局尺寸要求减去其padding值,最小不会小于0。代码最后就是将重新得到的mode和size组合生成一个新的MeasureSpec,传递给子View,一直递归下去,该方法也在前面讲过。本段代码重难点就是这里新mode和新size值的确定,specMode和childDimension各有3种值,所以最后会有9种组合。如果对这段代码看不明白的,可以看看笔者对这段代码的解释(width和height同理,这里以width为例):
代码解析:
如果specMode的值为MeasureSpec.EXACTLY,即父布局对子view的尺寸要求是一个精确值,这有两种情况,父布局中layout_width属性值被设置为具体值,或者match_parent,它们都被定义为精确值。针对childDimension的值
i)childDimension也为精确值时。它是LayoutParams中width属性,是一个具体值,不包括match_parent情况,这个一定要和MeasureSpec中的精确值EXACTLY区别开来。此时resultSize为childDimension的精确值,resultMode理所当然为MeasureSpec.EXACTLY。这里不知道读者会不会又疑问,如果子View的layout_width值比父布局的大,那这个结论还成立吗?按照我们的经验,似乎不太能理解,因为子view的宽度再怎么样也不会比父布局大。事实上,我们平时经验看到的,是最后布局后绘制出来的结果,而当前步骤为测量值,是有差别的。读者可以自定义一个View,将父布局layout_width设置为100px,该自定义的子view则设置为200px,然后在子view中重写的onMeasure方法中打印出getMeasuredWidth()值看看,其值一定是200。甚至如果子view设置的值超过屏幕尺寸,其打印值也是设置的值。
ii)childDimension值为LayoutParams.MATCH_PARENT时。这个容易理解,它的尺寸和父布局一样,也是个精确值,所以resultSize为前面求出的size值,由父布局决定,resultMode为MeasureSpec.EXACTLY。
iii)childDimension值为LayoutParams.WRAP_CONTENT时。当子view的layout_width被设置为wrap_content时,即使最后我们肉眼看到屏幕上真正显示出来的控件很小,但在测量时和父布局一样的大小。这一点仍然可以通过打印getMeasuredWidth值来理解。所以一定不要被“经验”所误。所以resultSize值为size大小,resultMode为MeasureSpec.AT_MOST。
如果specMode值为MeasureSpec.AT_MOST。其对应于layout_width为wrap_content,此时,我们可以想象到,子View对结果的决定性很大。
i)childDimension为精确值时。很容易明确specSize为自身的精确值,specMode为MeasureSpec.EXACTLY。
ii)childDimension为LayoutParams.MATCH_PARENT时。specSize由父布局决定,为size;specMode为MeasureSpec.AT_MOST。
iii)childDimension为LayoutParams.WRAP_CONTENT时。specSize由父布局决定,为size;specMode为MeasureSpec.AT_MOST。
如果specMode值为MeasureSpec.UNSPECIFIED。前面说过,平时很少用,一般用在系统中,不过这里还是简单说明一下。这一段有个变量View.sUseZeroUnspecifiedMeasureSpec,它是用于表示当前的目标api是否低于23(对应系统版本为Android M)的,低于23则为true,否则为false。现在系统版本基本上都是Android M及以上的,所以这里该值我们当成false来处理。
i)childDimension为精确值时。很容易明确specSize为自身的精确值,specMode为MeasureSpec.EXACTLY。
ii)childDimension为LayoutParams.MATCH_PARENT时。specSize由父布局决定,为size;specMode和父布局一样,为MeasureSpec.UNSPECIFIED。
iii)childDimension为LayoutParams.WRAP_CONTENT时。specSize由父布局决定,为size;specMode和父布局一样,为MeasureSpec.UNSPECIFIED。
这个方法对理解测量时MeasureSpec的传递过程非常重要,并且需要记忆和理解的内容也不少,所以这里花的篇幅比较多。
通过这一节,我们介绍了ViewGroup在测量过程中要用到的方法。通过这些方法,我们更加深入理解了测量过程中ViewGroup是如何测量子View的了。
(6)DecorView测量的大致流程
前面我们提到过DecorView的继承链:DecorView extends FrameLayout extends ViewGroup extends View。所以在这个继承过程中一定会有子类重写onMeasure方法,当DecorView第一次调用到measure()方法后,流程就开始切换到重写的onMeasure()中了。我们按照这个继承顺序看看measure流程的相关源码:
1 //=============DecorView.java=============
 2 @Override
 3 protected void onMeasure(int widthMeasureSpec, int heightMeasureSpec) {


 4        ......
 5     super.onMeasure(widthMeasureSpec, heightMeasureSpec);
 6        ......
 7 }
 8
 9 //=============FrameLayout.java=============
10 @Override
11 protected void onMeasure(int widthMeasureSpec, int heightMeasureSpec) {


12   int count = getChildCount();
13   for (int i = 0; i < count; i++) {


14        final View child = getChildAt(i);
15        ......
16        measureChildWithMargins(child, widthMeasureSpec, 0, heightMeasureSpec, 0);
17        ......
18    }
19    ......
20    setMeasuredDimension(......)
21    ...... }
第16行中measureChildWithMargins()方法是ViewGroup提供的方法,前面我们介绍过了。从上述FrameLayout中重写的onMeasure方法中可以看到,是先把子view测量完成后,最后才去调用setMeasuredDimension(…)来测量自己的。事实上,整个测量过程就是从子view开始测量,然后一层层往上再测量父布局,直到DecorView为止的。
可能到这里有些读者会有个疑问,DecorView中onMeasure方法的参数值是从哪里传过来的呢?呵呵,前面花了很大的篇幅,就在不断地讲它俩,这里再强调啰嗦一次:
1 //=====================ViewRootImpl.java=================
2 private void performTraversals() {


3    ......
4    int childWidthMeasureSpec = getRootMeasureSpec(mWidth, lp.width);
5    int childHeightMeasureSpec = getRootMeasureSpec(mHeight, lp.height);
6    ......
7 }
(7)DecorView视图树的简易measure流程图
到目前为止,DecorView的整个测量流程就接上了,从ViewRootImpl类的performTraversals()开始,经过递归遍历,最后到叶子view测量结束,DecorView视图树的测量就完成了。这里再用一个流程图简单描述一下整个流程:

在这一节的最后,推荐一篇博文,这里面有个非常详细的案例分析,如何一步一步从DecorView开始遍历,到整个View树测量完成,以及如何测量出每个view的宽高值:【Android View的绘制流程】Measure过程的第4点。认真分析完该实例,一定会对测量过程有个更深刻的认识。
3.5 layout过程分析
当measure过程完成后,接下来就会进行layout阶段,即布局阶段。在前面measure的作用是测量每个view的尺寸,而layout的作用是根据前面测量的尺寸以及设置的其它属性值,共同来确定View的位置。
3.5.1 performLayout方法引出DecorView的布局流程
测量完成后,会在ViewRootImpl类的performTraverserals()方法中,开始调用performLayout方法:
private void performTraversals() {


  // Ask host how big it wants to be
  	//执行测量操作
  	performMeasure(childWidthMeasureSpec, childHeightMeasureSpec);
........................
	//执行布局操作
	 performLayout(lp, desiredWindowWidth, desiredWindowHeight);

.......................
	//执行绘制操作
	performDraw();

}
传入该方法的参数我们在上一节中已经分析过了,lp中width和height均为LayoutParams.MATCH_PARENT,mWidth和mHeight分别为屏幕的宽高。
1 //=====================ViewRootImpl.java===================
2 private void performLayout(WindowManager.LayoutParams lp, int desiredWindowWidth,
3             int desiredWindowHeight) {


4    ......
5    final View host = mView;
6    ......
7    host.layout(0, 0, host.getMeasuredWidth(), host.getMeasuredHeight());
8    ......
9 }
mView的值上一节也讲过,就是DecorView,布局流程也是从DecorView开始遍历和递归。
3.5.2 layout方法正式启动布局流程
由于DecorView是一个容器,是ViewGroup子类,所以跟踪代码的时候,实际上是先进入到ViewGroup类中的layout方法中。
复制代码
 1 //==================ViewGroup.java================
 2     @Override
 3     public final void layout(int l, int t, int r, int b) {


 4         if (!mSuppressLayout && (mTransition == null || !mTransition.isChangingLayout())) {


 5             if (mTransition != null) {


 6                 mTransition.layoutChange(this);
 7             }
 8             super.layout(l, t, r, b);
 9         } else {


10             // record the fact that we noop'd it; request layout when transition finishes
11             mLayoutCalledWhileSuppressed = true;
12         }
13     }
这是一个final类型的方法,所以自定义 的ViewGroup子类无法重写该方法,可见系统不希望自定义的ViewGroup子类破坏layout流程。继续追踪super.layout方法,又跳转到了View中的layout方法。
//=================View.java================
 2  /**
 3      * Assign a size and position to a view and all of its
 4      * descendants
 5      *
 6      * <p>This is the second phase of the layout mechanism.
 7      * (The first is measuring). In this phase, each parent calls
 8      * layout on all of its children to position them.
 9      * This is typically done using the child measurements
10      * that were stored in the measure pass().</p>
11      *
12      * <p>Derived classes should not override this method.
13      * Derived classes with children should override
14      * onLayout. In that method, they should
15      * call layout on each of their children.</p>
16      *
17      * @param l Left position, relative to parent
18      * @param t Top position, relative to parent
19      * @param r Right position, relative to parent
20      * @param b Bottom position, relative to parent
21      */
22     @SuppressWarnings({

    "unchecked"})
23     public void layout(int l, int t, int r, int b) {


24         ......
25         boolean changed = isLayoutModeOptical(mParent) ?
26                 setOpticalFrame(l, t, r, b) : setFrame(l, t, r, b);
27         if (changed || (mPrivateFlags & PFLAG_LAYOUT_REQUIRED) == PFLAG_LAYOUT_REQUIRED) {


28             onLayout(changed, l, t, r, b);
29             ......
30          }
31          ......
32 }
先翻译一下注释中对该方法的描述:
- 给view和它的所有后代分配尺寸和位置。
- 这是布局机制的第二个阶段(第一个阶段是测量)。在这一阶段中,每一个父布局都会对它的子view进行布局来放置它们。一般来说,该过程会使用在测量阶段存储的child测量值。
- 派生类不应该重写该方法。有子view的派生类(笔者注:也就是容器类,父布局)应该重写onLayout方法。在重写的onLayout方法中,它们应该为每一子view调用layout方法进行布局。
- 参数依次为:Left、Top、Right、Bottom四个点相对父布局的位置。
3.5.3 setFrame方法真正执行布局任务
在上面的方法体中,我们先重点看看setFrame方法。至于setOpticalFrame方法,其中也是调用的setFrame方法。
1 //=================View.java================
 2 /**
 3      * Assign a size and position to this view.
 4      *
 5      * This is called from layout.
 6      *
 7      * @param left Left position, relative to parent
 8      * @param top Top position, relative to parent
 9      * @param right Right position, relative to parent
10      * @param bottom Bottom position, relative to parent
11      * @return true if the new size and position are different than the
12      *         previous ones
13      * {@hide}
14      */
15     protected boolean setFrame(int left, int top, int right, int bottom) {


16         boolean changed = false;
17         ......
18         if (mLeft != left || mRight != right || mTop != top || mBottom != bottom) {


19             changed = true;
20             ......
21             int oldWidth = mRight - mLeft;
22             int oldHeight = mBottom - mTop;
23             int newWidth = right - left;
24             int newHeight = bottom - top;
25             boolean sizeChanged = (newWidth != oldWidth) || (newHeight != oldHeight);
26
27             // Invalidate our old position
28             invalidate(sizeChanged);
29
30             mLeft = left;
31             mTop = top;
32             mRight = right;
33             mBottom = bottom;
34             ......
35         }
36         return changed;
37  }
注释中重要的信息有:
- 该方法用于给该view分配尺寸和位置。(笔者注:也就是实际的布局工作是在这里完成的)
- 返回值:如果新的尺寸和位置和之前的不同,返回true。(笔者注:也就是该view的位置或大小发生了变化)
- 在方法体中,从第27行开始,对view的四个属性值进行了赋值,即mLeft、mTop、mRight、mBottom四条边界坐标被确定,表明这里完成了对该View的布局。
3.5.4 onLayout方法让父布局调用对子view的布局
再返回到layout方法中,会看到如果view发生了改变(就是根据setFrame的返回值),接下来会调用onLayout方法,这和measure调用onMeasure方法类似。
1 //============View.java============
 2 /**
 3      * Called from layout when this view should
 4      * assign a size and position to each of its children.
 5      *
 6      * Derived classes with children should override
 7      * this method and call layout on each of
 8      * their children.
 9      * @param changed This is a new size or position for this view
10      * @param left Left position, relative to parent
11      * @param top Top position, relative to parent
12      * @param right Right position, relative to parent
13      * @param bottom Bottom position, relative to parent
14      */
15     protected void onLayout(boolean changed, int left, int top, int right, int bottom) {


16     }
先翻译一下关键注释:
- 当该view要分配尺寸和位置给它的每一个子view时,该方法会从layout方法中被调用。
- 有子view的派生类(笔者注:也就是容器,父布局)应该重写该方法并且为每一个子view调用layout。
我们发现这是一个空方法,因为layout过程是父布局容器布局子view的过程,onLayout方法叶子view没有意义,只有ViewGroup才有用。所以,如果当前View是一个容器,那么流程会切到被重写的onLayout方法中。我们先看ViewGroup类中的重写:
 //=============ViewGroup.java===========
   @Override
    protected abstract void onLayout(boolean changed,
            int l, int t, int r, int b);
进入到ViewGroup类中发现,该方法被定义为了abstract方法,所以以后凡是直接继承自ViewGroup类的容器,就必须要重写onLayout方法。 事实上,layout流程是绘制流程中必需的过程,而前面讲过的measure流程,其实可以不要,这一点等会再说。
咱们先直接进入到DecorView中查看重写的onLayout方法。
1 //==============DecorView.java================
2  @Override
3  protected void onLayout(boolean changed, int left, int top, int right, int bottom) {


4      super.onLayout(changed, left, top, right, bottom);
5      ......
6 }
DecerView继承自FrameLayout,咱们继续到FrameLayout类中重写的onLayout方法看看。
 1 //================FrameLayout.java==============
 2     @Override
 3     protected void onLayout(boolean changed, int left, int top, int right, int bottom) {


 4         layoutChildren(left, top, right, bottom, false /* no force left gravity */);
 5     }
 6
 7     void layoutChildren(int left, int top, int right, int bottom, boolean forceLeftGravity) {


 8         final int count = getChildCount();
 9         ......
10         for (int i = 0; i < count; i++) {


11              final View child = getChildAt(i);
12              if (child.getVisibility() != GONE) {


13                  final LayoutParams lp = (LayoutParams) child.getLayoutParams();
14
15                  final int width = child.getMeasuredWidth();
16                  final int height = child.getMeasuredHeight();
17                  ......
18                  child.layout(childLeft, childTop, childLeft + width, childTop + height);
19             }
20     }
这里仅贴出关键流程的代码,咱们可以看到,这里面也是对每一个child调用layout方法的。如果该child仍然是父布局,会继续递归下去;如果是叶子view,则会走到view的onLayout空方法,该叶子view布局流程走完。另外,我们看到第15行和第16行中,width和height分别来源于measure阶段存储的测量值,如果这里通过其它渠道赋给width和height值,那么measure阶段就不需要了,这也就是我前面提到的,onLayout是必需要实现的(不仅会报错,更重要的是不对子view布局的话,这些view就不会显示了),而measure过程可以不要。当然,肯定是不建议这么做的。
3.5.5 DecorView视图树的简易布局流程图
如果是前面搞清楚了DecorView视图树的测量流程,那这一节的布局流程也就非常好理解了,咱们这里再简单梳理一下:

3.6 draw过程分析
当layout完成后,就进入到draw阶段了,在这个阶段,会根据layout中确定的各个view的位置将它们画出来。该过程的分析思路和前两个过程类似,如果前面读懂了,那这个流程也就很容易理解了。
3.6.1 从performDraw方法到draw方法
draw过程,自然也是从performTraversals()中的performDraw()方法开始的,咱们从该方法追踪,咱们这里仅贴出关键流程代码,至于其它的逻辑,不是本文的重点,这里就先略过,有兴趣的可以自行研究。
1 //==================ViewRootImpl.java=================
 2 private void performDraw() {


 3       ......
 4       boolean canUseAsync = draw(fullRedrawNeeded);
 5       ......
 6 }
 7
 8 private boolean draw(boolean fullRedrawNeeded) {


 9       ......
10       if (!drawSoftware(surface, mAttachInfo, xOffset, yOffset,
11                         scalingRequired, dirty, surfaceInsets)) {


12                     return false;
13                 }
14       ......
15 }
16
17 private boolean drawSoftware(......){


18       ......
19       mView.draw(canvas);
20       ......
21 }
前面我们讲过了,这mView就是DecorView,这样就开始了DecorView视图树的draw流程了。
3.6.2 DecorView树递归完成“画”流程
DecorView类中重写了draw()方法,追踪源码后进入到该部分。
```java
       1 //================DecorView.java==============
2 @Override
3 public void draw(Canvas canvas) {


4      super.draw(canvas);
5
6      if (mMenuBackground != null) {


7          mMenuBackground.draw(canvas);
8      }
9 }
从这段代码来看, 调用完super.draw后,还画了菜单背景,当然super.draw是咱们关注的重点,这里还做了啥咱们不用太关心。由于FrameLayout和ViewGroup都没有重写该方法,所以就直接进入都了View类中的draw方法了。
`
 1 //====================View.java=====================
 2  /**
 3      * Manually render this view (and all of its children) to the given Canvas.
 4      * The view must have already done a full layout before this function is
 5      * called.  When implementing a view, implement
 6      * {@link #onDraw(android.graphics.Canvas)} instead of overriding this method.
 7      * If you do need to override this method, call the superclass version.
 8      *
 9      * @param canvas The Canvas to which the View is rendered.
10      */
11     @CallSuper
12     public void draw(Canvas canvas) {


13        ......
14         /*
15          * Draw traversal performs several drawing steps which must be executed
16          * in the appropriate order:
17          *
18          *      1. Draw the background
19          *      2. If necessary, save the canvas' layers to prepare for fading
20          *      3. Draw view's content
21          *      4. Draw children
22          *      5. If necessary, draw the fading edges and restore layers
23          *      6. Draw decorations (scrollbars for instance)
24          */
25
26         // Step 1, draw the background, if needed
27         int saveCount;
28
29         if (!dirtyOpaque) {


30             drawBackground(canvas);
31         }
32
33         // skip step 2 & 5 if possible (common case)
34         ......
35         // Step 3, draw the content
36         if (!dirtyOpaque) onDraw(canvas);
37
38         // Step 4, draw the children
39         dispatchDraw(canvas);
40         ......
41         // Step 6, draw decorations (foreground, scrollbars)
42         onDrawForeground(canvas);45         ......
43     }``
这段代码描述了draw阶段完成的7个主要步骤,这里咱们先翻译一下其注释:
-
手动渲染该view(以及它的所有子view)到给定的画布上。
-
在该方法调用之前,该view必须已经完成了全面的布局。当正在实现一个view是,实现onDraw(android.graphics.Cavas)而不是本方法。如果您确实需要重写该方法,调用超类版本。
-
参数canvas:将view渲染到的画布。
从代码上看,这里做了很多工作,咱们简单说明一下,有助于理解这个“画”工作。
-
第一步:画背景。对应我我们在xml布局文件中设置的“android:background”属性,这是整个“画”过程的第一步,这一步是不重点,知道这里干了什么就行。
-
第二步:画内容(第2步和第5步只有有需要的时候才用到,这里就跳过)。比如TextView的文字等,这是重点,onDraw方法,后面详细介绍。
-
第三步:画子view。dispatchDraw方法用于帮助ViewGroup来递归画它的子view。这也是重点,后面也要详细讲到。
-
第四步:画装饰。这里指画滚动条和前景。其实平时的每一个view都有滚动条,只是没有显示而已。同样这也不是重点,知道做了这些事就行。
咱们进入onDraw方法看看
复制代码
1 //=================View.java===============
2 /**
3      * Implement this to do your drawing.
4      *
5      * @param canvas the canvas on which the background will be drawn
6      */
7     protected void onDraw(Canvas canvas) {


8     }
注释中说:实现该方法来做“画”工作。也就是说,具体的view需要重写该方法,来画自己想展示的东西,如文字,线条等。DecorView中重写了该方法,所以流程会走到DecorView中重写的onDraw方法。
 1 //===============DocerView.java==============
2 @Override
3     public void onDraw(Canvas c) {


4         super.onDraw(c);
5       mBackgroundFallback.draw(this, mContentRoot, c, mWindow.mContentParent,
6         mStatusColorViewState.view, mNavigationColorViewState.view);
7  }
这里调用了onDraw的父类方法,同时第4行还画了自己特定的东西。由于FrameLayout和ViewGroup也没有重写该方法,且View中onDraw为空方法,所以super.onDraw方法其实是啥都没干的。DocerView画完自己的东西,紧接着流程就又走到dispatchDraw方法了。
复制代码
 1 //================View.java===============
 2 /**
 3      * Called by draw to draw the child views. This may be overridden
 4      * by derived classes to gain control just before its children are drawn
 5      * (but after its own view has been drawn).
 6      * @param canvas the canvas on which to draw the view
 7      */
 8     protected void dispatchDraw(Canvas canvas) {


 9
10     }
先看看注释:被draw方法调用来画子View。该方法可能会被派生类重写来获取控制,这个过程正好在该view的子view被画之前(但在它自己被画完成后)。
也就是说当本view被画完之后,就开始要画它的子view了。这个方法也是一个空方法,实际上对于叶子view来说,该方法没有什么意义,因为它没有子view需要画了,而对于ViewGroup来说,就需要重写该方法来画它的子view。
在源码中发现,像平时常用的LinearLayout、FrameLayout、RelativeLayout等常用的布局控件,都没有再重写该方法,DecorView中也一样,而是只在ViewGroup中实现了dispatchDraw方法的重写。所以当DecorView执行完onDraw方法后,流程就会切到ViewGroup中的dispatchDraw方法了。
 1 //=============ViewGroup.java============
 2  @Override
 3  protected void dispatchDraw(Canvas canvas) {


 4         final int childrenCount = mChildrenCount;
 5         final View[] children = mChildren;
 6         ......
 7         for (int i = 0; i < childrenCount; i++) {


 8             more |= drawChild(canvas, child, drawingTime);
 9             ......
10         }
11         ......
12  }
从上述源码片段可以发现,这里其实就是对每一个child执行drawChild操作。
 1 /**
 2      * Draw one child of this View Group. This method is responsible for getting
 3      * the canvas in the right state. This includes clipping, translating so
 4      * that the child's scrolled origin is at 0, 0, and applying any animation
 5      * transformations.
 6      *
 7      * @param canvas The canvas on which to draw the child
 8      * @param child Who to draw
 9      * @param drawingTime The time at which draw is occurring
10      * @return True if an invalidate() was issued
11      */
12     protected boolean drawChild(Canvas canvas, View child, long drawingTime) {


13         return child.draw(canvas, this, drawingTime);
14     }
先翻译注释的内容:
- 画当前ViewGroup中的某一个子view。该方法负责在正确的状态下获取画布。这包括了裁剪,移动,以便子view的滚动原点为0、0,以及提供任何动画转换。
- 参数drawingTime:“画”动作发生的时间点。
继续追踪源码,进入到如下流程。
 1 //============View.java===========
 2 /**
 3      * This method is called by ViewGroup.drawChild() to have each child view draw itself.
 4      *
 5      * This is where the View specializes rendering behavior based on layer type,
 6      * and hardware acceleration.
 7      */
 8     boolean draw(Canvas canvas, ViewGroup parent, long drawingTime) {


 9       ......
10       draw(canvas);
11       ......
12 }
注释中说:该方法被ViewGroup.drawChild()方法调用,来让每一个子view画它自己。
该方法中,又回到了draw(canvas)方法中了,然后再开始画其子view,这样不断递归下去,直到画完整棵DecorView树。
3.6.3 DecorView视图树的简易draw流程图
针对上述的代码追踪流程,这里梳理了DecorView整个view树的draw过程的关键流程,其中节点比较多,需要耐心分析。

到目前为止,View的绘制流程就介绍完了。根节点是DecorView,整个View体系就是一棵以DecorView为根的View树,依次通过遍历来完成measure、layout和draw过程。而如果要自定义view,一般都是通过重写onMeasure(),onLayout(),onDraw()来完成要自定义的部分,整个绘制流程也基本上是围绕着这几个核心的地方来展开的。