View的加载流程得从activity的setcontentView()开始查看View是如何加载的。
 /**
     * Set the activity content from a layout resource.  The resource will be
     * inflated, adding all top-level views to the activity.
     *
     * @param layoutResID Resource ID to be inflated.
     *
     * @see #setContentView(android.view.View)
     * @see #setContentView(android.view.View, android.view.ViewGroup.LayoutParams)
     */
    public void setContentView(@LayoutRes int layoutResID) {
        getWindow().setContentView(layoutResID);
        initWindowDecorActionBar();
    }
在activity的setContentView()中调用了getWindow().setContentView(layoutResID)。
 /**
     * Retrieve the current {@link android.view.Window} for the activity.
     * This can be used to directly access parts of the Window API that
     * are not available through Activity/Screen.
     *
     * @return Window The current window, or null if the activity is not
     *         visual.
     */
    public Window getWindow() {
        return mWindow;
    }
返回的是个window,发现window是个抽象类。
我们在activity源码中继续去找mwindow是再那赋值的。
    final void attach(Context context, ActivityThread aThread,
            Instrumentation instr, IBinder token, int ident,
            Application application, Intent intent, ActivityInfo info,
            CharSequence title, Activity parent, String id,
            NonConfigurationInstances lastNonConfigurationInstances,
            Configuration config, String referrer, IVoiceInteractor voiceInteractor) {
        attachBaseContext(context);

        mFragments.attachHost(null /*parent*/);

        mWindow = new PhoneWindow(this);
        mWindow.setCallback(this);
        mWindow.setOnWindowDismissedCallback(this);
        mWindow.getLayoutInflater().setPrivateFactory(this);
        if (info.softInputMode != WindowManager.LayoutParams.SOFT_INPUT_STATE_UNSPECIFIED) {
            mWindow.setSoftInputMode(info.softInputMode);
        }
        if (info.uiOptions != 0) {
            mWindow.setUiOptions(info.uiOptions);
        }
        mUiThread = Thread.currentThread();
发现这个window是PhoneWindow,那就去看PhoneWindow中的setcontentView()方法
@Override
    public void setContentView(int layoutResID) {
        // Note: FEATURE_CONTENT_TRANSITIONS may be set in the process of installing the window
        // decor, when theme attributes and the like are crystalized. Do not check the feature
        // before this happens.
        if (mContentParent == null) {
            installDecor();
        } else if (!hasFeature(FEATURE_CONTENT_TRANSITIONS)) {
            mContentParent.removeAllViews();
        }

        if (hasFeature(FEATURE_CONTENT_TRANSITIONS)) {
            final Scene newScene = Scene.getSceneForLayout(mContentParent, layoutResID,
                    getContext());
            transitionTo(newScene);
        } else {
            mLayoutInflater.inflate(layoutResID, mContentParent);
        }
        mContentParent.requestApplyInsets();
        final Callback cb = getCallback();
        if (cb != null && !isDestroyed()) {
            cb.onContentChanged();
        }
    }

    @Override
    public void setContentView(View view) {
        setContentView(view, new ViewGroup.LayoutParams(MATCH_PARENT, MATCH_PARENT));
    }

    @Override
    public void setContentView(View view, ViewGroup.LayoutParams params) {
        // Note: FEATURE_CONTENT_TRANSITIONS may be set in the process of installing the window
        // decor, when theme attributes and the like are crystalized. Do not check the feature
        // before this happens.
        if (mContentParent == null) {
            installDecor();
        } else if (!hasFeature(FEATURE_CONTENT_TRANSITIONS)) {
            mContentParent.removeAllViews();
        }

        if (hasFeature(FEATURE_CONTENT_TRANSITIONS)) {
            view.setLayoutParams(params);
            final Scene newScene = new Scene(mContentParent, view);
            transitionTo(newScene);
        } else {
            mContentParent.addView(view, params);
        }
        mContentParent.requestApplyInsets();
        final Callback cb = getCallback();
        if (cb != null && !isDestroyed()) {
            cb.onContentChanged();
        }
    }
虽然phoneWindow有三个setContentView()方法,不过三个方法最后的逻辑基本是一样的。继续向下
if (mContentParent == null) {
installDecor();
}
这里有个判断,我们来看看mContentParent是什么
// This is the view in which the window contents are placed. It is either
// mDecor itself, or a child of mDecor where the contents go.
private ViewGroup mContentParent;
意思就是我们activity的布局.xml的顶级ViewGroup,等会下面就能验证。这里 installDecor();
private void installDecor() {
        if (mDecor == null) {
            mDecor = generateDecor();
            mDecor.setDescendantFocusability(ViewGroup.FOCUS_AFTER_DESCENDANTS);
            mDecor.setIsRootNamespace(true);
            if (!mInvalidatePanelMenuPosted && mInvalidatePanelMenuFeatures != 0) {
                mDecor.postOnAnimation(mInvalidatePanelMenuRunnable);
            }
        }
        if (mContentParent == null) {
            mContentParent = generateLayout(mDecor);

            // Set up decor part of UI to ignore fitsSystemWindows if appropriate.
            mDecor.makeOptionalFitsSystemWindows();

            。。。。。。
mDecor = generateDecor();
    protected DecorView generateDecor() {
        return new DecorView(getContext(), -1);
    }
这里意思是创建了DecorView
 // This is the top-level view of the window, containing the window decor.
    private DecorView mDecor;
这里说DecorView是窗口的顶层视图,包含窗口装饰。DecorView是啥呢
 private final class DecorView extends FrameLayout implements RootViewSurfaceTaker {

        /* package */int mDefaultOpacity = PixelFormat.OPAQUE;

        /** The feature ID of the panel, or -1 if this is the application's DecorView */
        private final int mFeatureId;

        private final Rect mDrawingBounds = new Rect();
DecorView是PhoneWindow的内部类,集成的是FrameLayout。所以总结来说DecorView是窗口最顶层的视图,是一个FrameLayout。
继续看installDecor()中
if (mContentParent == null) {
mContentParent = generateLayout(mDecor);

来看看generateLayout()方法都干了啥
    protected ViewGroup generateLayout(DecorView decor) {
        // Apply data from current theme.

        TypedArray a = getWindowStyle();

        if (false) {
            System.out.println("From style:");
            String s = "Attrs:";
            for (int i = 0; i < R.styleable.Window.length; i++) {
                s = s + " " + Integer.toHexString(R.styleable.Window[i]) + "="
                        + a.getString(i);
            }
            System.out.println(s);
        }

        mIsFloating = a.getBoolean(R.styleable.Window_windowIsFloating, false);
        int flagsToUpdate = (FLAG_LAYOUT_IN_SCREEN|FLAG_LAYOUT_INSET_DECOR)
                & (~getForcedWindowFlags());
        if (mIsFloating) {
            setLayout(WRAP_CONTENT, WRAP_CONTENT);
            setFlags(0, flagsToUpdate);
        } else {
            setFlags(FLAG_LAYOUT_IN_SCREEN|FLAG_LAYOUT_INSET_DECOR, flagsToUpdate);
        }

        if (a.getBoolean(R.styleable.Window_windowNoTitle, false)) {
            requestFeature(FEATURE_NO_TITLE);
        } else if (a.getBoolean(R.styleable.Window_windowActionBar, false))
        。。。。。。
这个方法特别长,该方法做了相当多的工作的,首先根据设置的主题样式来设置DecorView的风格,设置titlebar,接着为DecorView添加子View,而这里的子View则是上面提到的mContentParent,设置了FEATURE_NO_ACTIONBAR,那么DecorView就只有mContentParent一个子View,这也解释了上面的疑问:mContentParent是DecorView本身或者是DecorView的一个子元素。DecorView包含两个元素:titlebar和mContentParent。
总结:
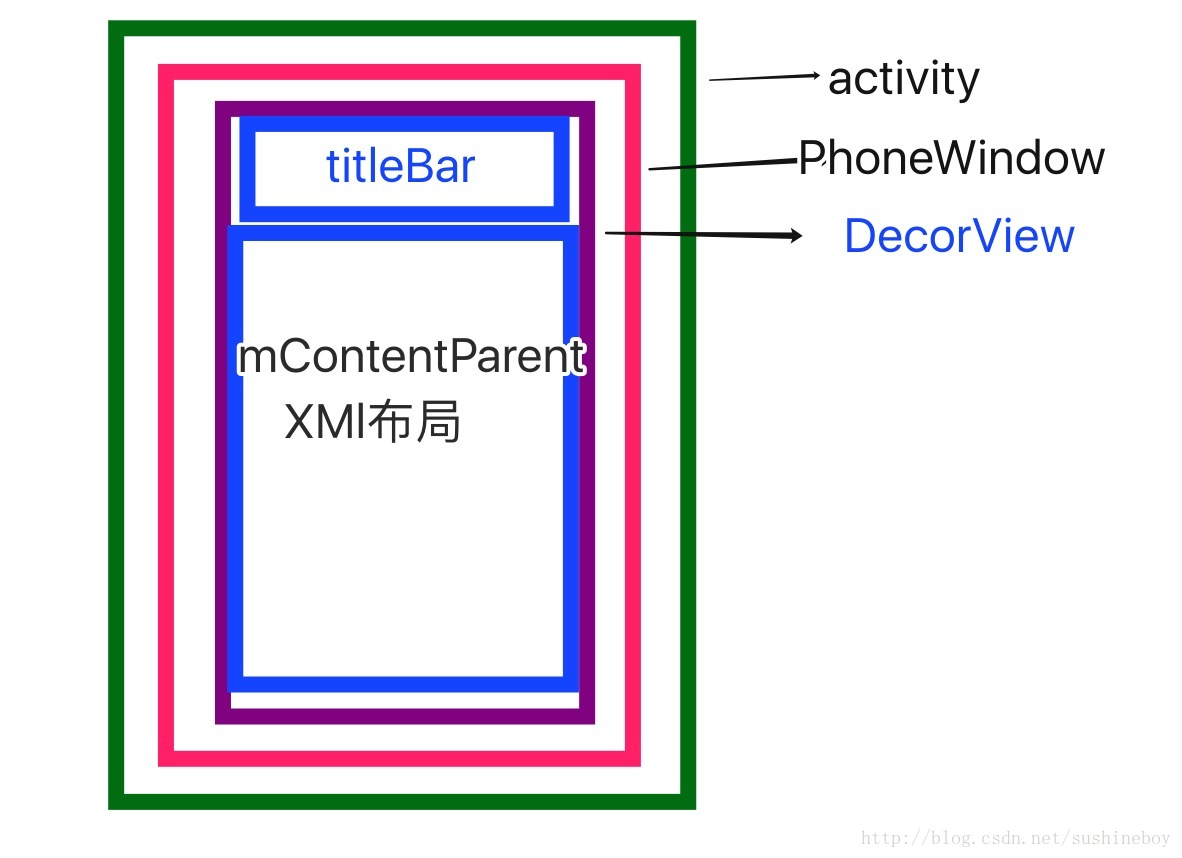
每个activity都对应一个Window,也就是PhoneWindow,DecorView是PhoneWindow的顶级布局,DecorView是FrameLayout,DecorView包含两部分titlebar和mContentParent,这个mContentParent对应就是activity的布局文件。
加载的时候从activity的oncreate里面的setContentView(),再调用的phonewindow的
setContentView()。在setContentView中创建DecorView和mContentParent,mContentParent是个Viewgroup,mContentParent中加载activity布局xml文件中的内容及应用的样式。mContentParent添加到DecorView中,DecorView创建成功后将DecorView加载到activity的Window中,于是界面就会加载完成了。
